
1. บทนำ
The Sunshine DT-17N Digital Multimeter is a versatile and reliable tool designed for accurate electrical measurements. It is particularly suitable for phone repair technicians and general electronics work, capable of measuring various electrical parameters including voltage, current, resistance, capacitance, and temperature. Its compact design and user-friendly features make it an essential tool for diagnosing and repairing electronic devices.

Figure 1: The Sunshine DT-17N Digital Multimeter, demonstrating its compact size for portability.
2. ข้อมูลด้านความปลอดภัย
To ensure safe operation and prevent damage to the meter, please read and follow all safety instructions carefully. This multimeter features double insulation protection for enhanced user safety.
- Always ensure the test leads are in good condition and properly connected before taking measurements.
- ไม่ต้องสมัครวอลุ่มtage or current that exceeds the maximum rated values for each range.
- Never use the multimeter if it appears damaged or if the test leads are frayed.
- ควรใช้ความระมัดระวังเมื่อทำงานกับ voltagแรงดันไฟฟ้าที่สูงกว่า 30V AC RMS, 42V peak หรือ 60V DC นั้นเป็นอันตรายจากไฟฟ้าช็อตได้
- ถอดปลั๊กไฟออกจากวงจรและปล่อยประจุไฟฟ้าแรงสูงออกทุกครั้งtagตรวจสอบตัวเก็บประจุก่อนทำการวัดความต้านทาน ความต่อเนื่อง หรือไดโอด
- ควรเปลี่ยนแบตเตอรี่ทันทีเมื่อไฟแสดงสถานะแบตเตอรี่ต่ำปรากฏขึ้น เพื่อให้ได้ค่าการวัดที่แม่นยำ
3. สินค้าหมดview
3.1. ส่วนประกอบของมัลติมิเตอร์

รูปที่ 2 : ด้านหน้า view of the DT-17N Multimeter, highlighting its main display and controls.
3.2. คุณสมบัติการแสดงผล
The DT-17N features a large LCD display with a backlight, ensuring clear readability in various lighting conditions.

Figure 3: The multimeter's LCD display with its backlight feature, improving visibility in low-light environments.
- จอ LCD ขนาดใหญ่: Provides clear numerical readings.
- แสงไฟด้านหลัง: Improves visibility in dark or low-light conditions. Activated by pressing and holding the HOLD button.
- หน่วยวัด: Displays the appropriate unit (e.g., V, A, Ω, °C/°F).
- สถานะแบตเตอรี่: ระบุระดับแบตเตอรี่ปัจจุบัน
- Automatic Polarity Display: Shows positive or negative polarity automatically.
3.3. Controls and Input Ports
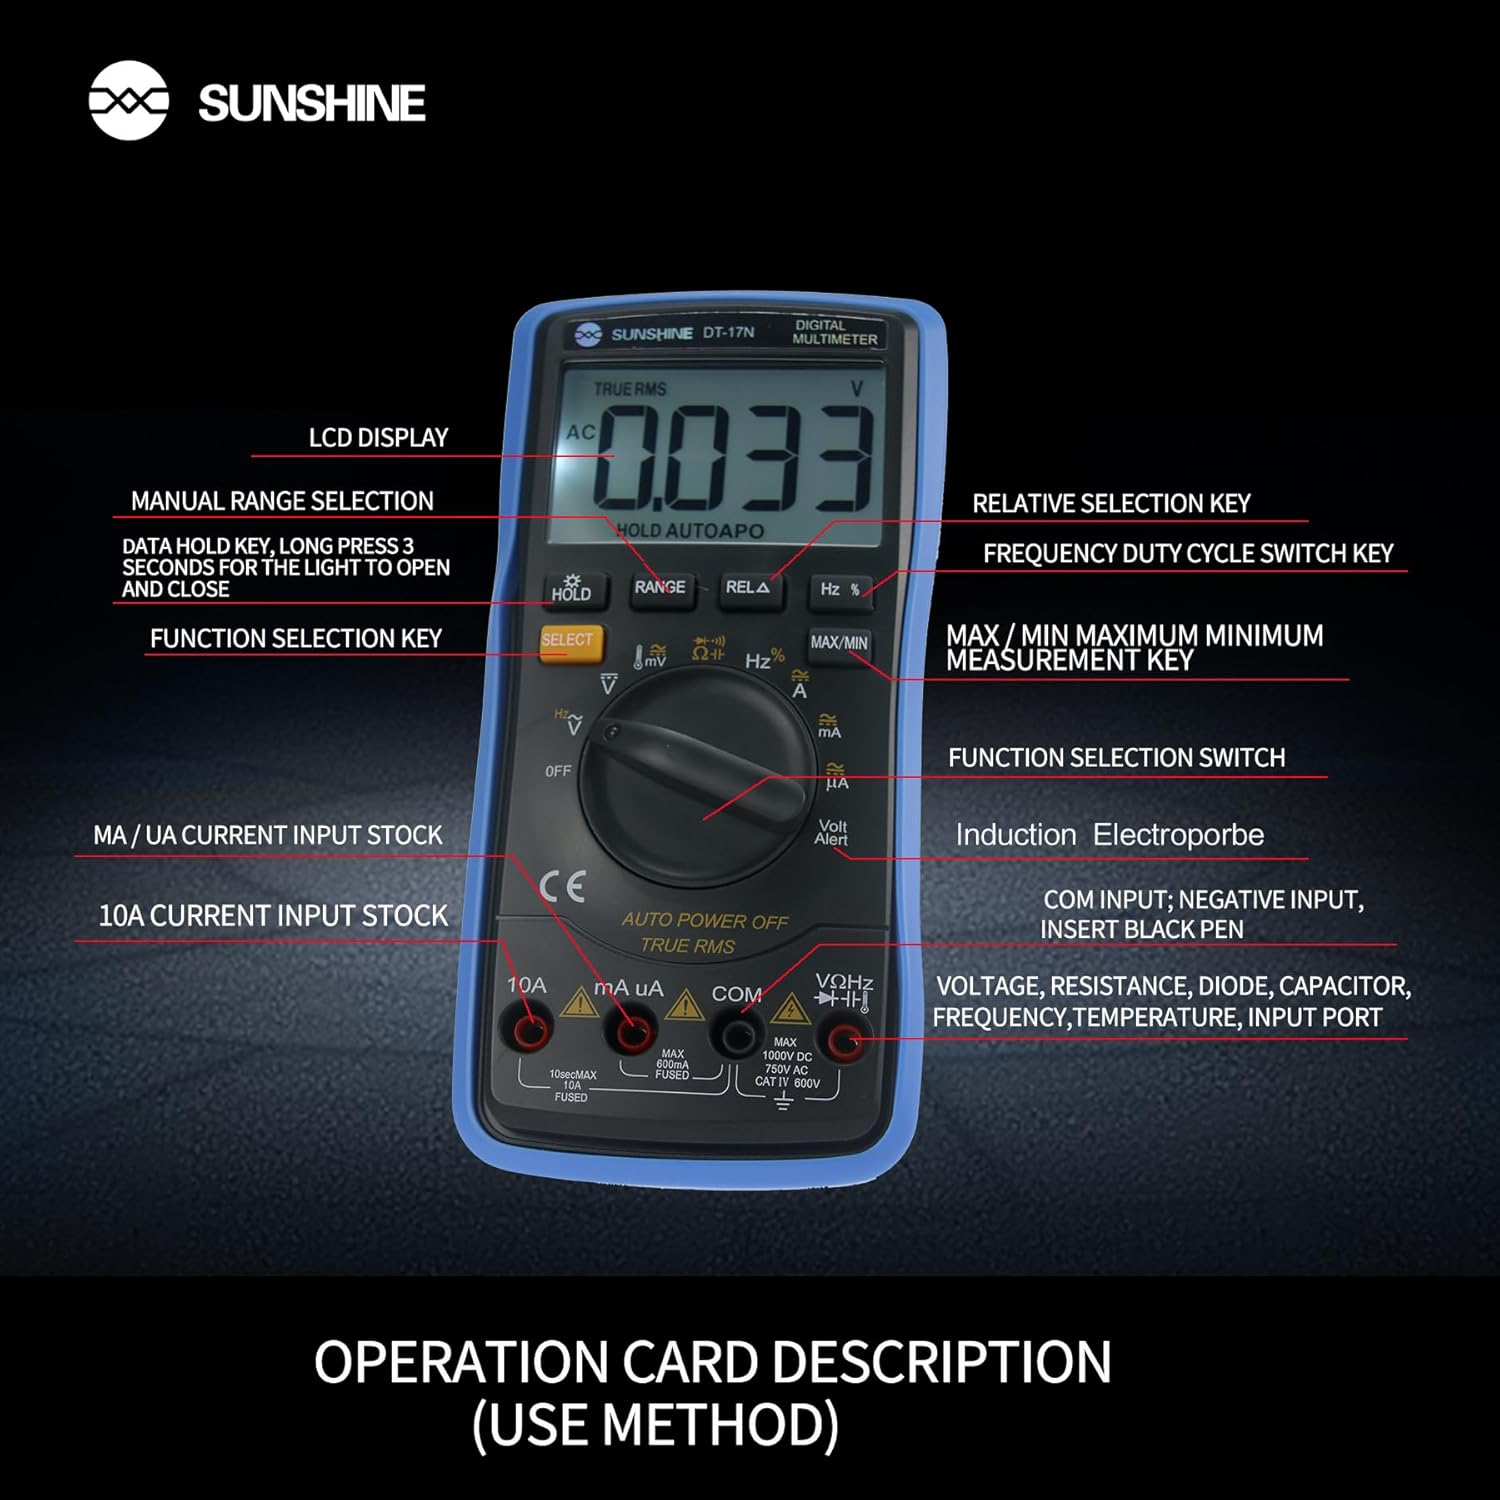
รูปที่ 4: รายละเอียด view of the multimeter's controls and input ports with their respective functions.
- สวิตช์หมุนควบคุมการทำงาน: ใช้สำหรับเลือกฟังก์ชันการวัดที่ต้องการ (เช่น ปริมาตร)tag(เช่น กระแสไฟฟ้า ความต้านทาน อุณหภูมิ)
- ปุ่มเลือก: Toggles between different measurement modes within a single rotary switch position (e.g., AC/DC voltage, ไดโอด/ความต่อเนื่อง)
- ปุ่มถือ: Freezes the current reading on the display. Press and hold to activate/deactivate the backlight.
- ปุ่มช่วง: Allows manual selection of measurement ranges, overriding the automatic ranging feature.
- RELA Button (Relative Selection Key): วัดความแตกต่างระหว่างค่าอ้างอิงที่บันทึกไว้กับค่าที่อ่านได้ในปัจจุบัน
- Hz % Button (Frequency Duty Cycle Switch Key): Toggles between frequency and duty cycle measurements.
- ปุ่มสูงสุด/นาที: แสดงค่าสูงสุดหรือต่ำสุดที่วัดได้ระหว่างรอบการวัด
- VΩHz Input Port: Connect the red test lead for voltage, resistance, frequency, capacitance, diode, and temperature measurements.
- พอร์ตอินพุต COM: Connect the black test lead (common ground) for all measurements.
- mA/uA Input Port: Connect the red test lead for measuring small currents (milliamperes and microampเอเรส)
- 10A Input Port: Connect the red test lead for measuring large currents (up to 10 Ampเอเรส)
- Volt Alert (NCV): แบบไม่สัมผัส Voltagคุณสมบัติการตรวจจับ
4. การตั้งค่า
4.1. การติดตั้งแบตเตอรี่
The DT-17N is battery-powered. To install or replace the battery:
- ตรวจสอบให้แน่ใจว่ามัลติมิเตอร์ปิดอยู่
- ค้นหาฝาครอบช่องใส่แบตเตอรี่ที่ด้านหลังของเครื่อง
- คลายสกรูยึดออก แล้วถอดฝาครอบออก
- Insert the new battery, observing correct polarity (+ and -).
- ปิดฝาช่องใส่แบตเตอรี่และขันสกรูให้แน่น
4.2. การเชื่อมต่อสายทดสอบ
Always connect the black test lead to the COM input jack. Connect the red test lead to the appropriate input jack based on the measurement you intend to perform:
- สำหรับฉบับที่tage, Resistance, Capacitance, Frequency, Diode, and Temperature measurements: Connect the red test lead to the VΩเฮิร์ตซ์ แจ็ค.
- For Current measurements (mA/uA): Connect the red test lead to the mA/uA แจ็ค.
- For High Current measurements (10A): Connect the red test lead to the 10เอ แจ็ค.
5. คู่มือการใช้งาน
The Sunshine DT-17N features automatic identification for most ranges, simplifying operation. Use the rotary switch to select the primary function and the SELECT button to toggle sub-functions.
5.1 การวัดปริมาตรtagอี (เอซี/ดีซี)
- หมุนสวิตช์โรตารี่ไปที่ V ตำแหน่ง.
- หากจำเป็นให้กดปุ่ม เลือก button to toggle between AC (~) and DC (—) voltage.
- เชื่อมต่อสายทดสอบสีดำเข้ากับ คอม แจ็คและการทดสอบสีแดงนำไปสู่ VΩเฮิร์ตซ์ แจ็ค.
- เชื่อมต่อหัววัดทดสอบแบบขนานกับวงจรหรือส่วนประกอบที่คุณต้องการวัด
- อ่านเล่มที่tagค่า e บนจอแสดงผล

Figure 5: The multimeter showing a DC millivolt measurement on its display.
5.2 การวัดกระแสไฟฟ้า (AC/DC)
คำเตือน: Never connect the multimeter in parallel when measuring current, as this can damage the meter and the circuit. Always connect in series.
- หมุนสวิตช์โรตารี่ไปที่ mA/uA or 10เอ ตำแหน่งจะขึ้นอยู่กับกระแสไฟฟ้าที่คาดการณ์ไว้
- หากจำเป็นให้กดปุ่ม เลือก button to toggle between AC (~) and DC (—) current.
- เชื่อมต่อสายทดสอบสีดำเข้ากับ คอม แจ็ค ต่อสายทดสอบสีแดงเข้ากับ mA/uA or 10เอ jack accordingly.
- เปิดวงจรและต่อโพรบทดสอบแบบอนุกรมเข้ากับโหลด
- อ่านค่าปัจจุบันบนจอแสดงผล
5.3. การวัดความต้านทาน
- หมุนสวิตช์โรตารี่ไปที่ Ω ตำแหน่ง.
- เชื่อมต่อสายทดสอบสีดำเข้ากับ คอม แจ็คและการทดสอบสีแดงนำไปสู่ VΩเฮิร์ตซ์ แจ็ค.
- ตรวจสอบให้แน่ใจว่าวงจรไม่มีพลังงานและตัวเก็บประจุทั้งหมดถูกปล่อยประจุแล้ว
- เชื่อมต่อโพรบวัดค่าต่างๆ เข้ากับชิ้นส่วนเพื่อวัดค่าความต้านทาน
- อ่านค่าความต้านทานบนจอแสดงผล
5.4. การวัดความจุ
- หมุนสวิตช์โรตารี่ไปที่ ความจุ symbol (often shared with diode/continuity).
- กดปุ่ม เลือก button until the capacitance mode is active.
- เชื่อมต่อสายทดสอบสีดำเข้ากับ คอม แจ็คและการทดสอบสีแดงนำไปสู่ VΩเฮิร์ตซ์ แจ็ค.
- ตรวจสอบให้แน่ใจว่าตัวเก็บประจุถูกปล่อยประจุจนหมดก่อนที่จะเชื่อมต่อโพรบทดสอบ
- เชื่อมต่อโพรบทดสอบข้ามตัวเก็บประจุ
- อ่านค่าความจุบนจอแสดงผล
5.5. Measuring Frequency / Duty Cycle
- หมุนสวิตช์โรตารี่ไปที่ เฮิร์ตซ์% ตำแหน่ง.
- กดปุ่ม เฮิร์ตซ์% ปุ่มสำหรับสลับระหว่างความถี่ (เฮิร์ตซ์) และรอบการทำงาน (%)
- เชื่อมต่อสายทดสอบสีดำเข้ากับ คอม แจ็คและการทดสอบสีแดงนำไปสู่ VΩเฮิร์ตซ์ แจ็ค.
- เชื่อมต่อหัววัดทดสอบแบบขนานกับแหล่งสัญญาณ
- อ่านค่าความถี่หรือรอบหน้าที่บนจอแสดงผล
5.6. การวัดอุณหภูมิ
The DT-17N can measure temperature using a K-type thermocouple (not always included, check package contents).

รูปที่ 6: อดีตample of temperature measurement using the DT-17N Multimeter with a thermocouple.
- หมุนสวิตช์โรตารี่ไปที่ ° C / ° F ตำแหน่ง.
- หากจำเป็นให้กดปุ่ม เลือก button to choose between Celsius or Fahrenheit.
- Connect the K-type thermocouple to the VΩเฮิร์ตซ์ และ คอม แจ็คสังเกตขั้ว
- Place the thermocouple tip on or in the object whose temperature you wish to measure.
- อ่านค่าอุณหภูมิบนจอแสดงผล
5.7. การทดสอบไดโอดและการตรวจสอบความต่อเนื่อง
- หมุนสวิตช์โรตารี่ไปที่ ไดโอด/ความต่อเนื่อง เครื่องหมาย.
- กดปุ่ม เลือก ปุ่มสำหรับสลับระหว่างการทดสอบไดโอดและการทดสอบความต่อเนื่อง
- เชื่อมต่อสายทดสอบสีดำเข้ากับ คอม แจ็คและการทดสอบสีแดงนำไปสู่ VΩเฮิร์ตซ์ แจ็ค.
- For Diode Test: Connect the probes across the diode. The display will show the forward voltage drop. สลับขั้วโพรบเพื่อตรวจสอบวงจรเปิด
- For Continuity Test: Connect the probes across the circuit or component. A beep indicates continuity (low resistance).
5.8. ไม่สัมผัส Voltagการตรวจจับ e (NCV)
ฟังก์ชัน NCV ช่วยให้สามารถตรวจจับแรงดันไฟฟ้ากระแสสลับได้tagโดยไม่สัมผัสกับตัวนำโดยตรง
- หมุนสวิตช์โรตารี่ไปที่ เอ็นซีวี position (often indicated by a Volt Alert symbol).
- Move the top part of the multimeter near the conductor.
- The meter will beep and/or flash an indicator light if AC voltagอีถูกตรวจพบ
5.9. การล็อกข้อมูลและไฟแบ็คไลท์
- การเก็บข้อมูล: กดปุ่ม ถือ กดปุ่มสั้นๆ เพื่อหยุดการแสดงค่าปัจจุบันบนหน้าจอ กดอีกครั้งเพื่อปล่อย
- แสงไฟด้านหลัง: กดปุ่มค้างไว้ ถือ button for approximately 3 seconds to turn the display backlight ON or OFF.
5.10. การวัดค่าสูงสุด/ต่ำสุด
This function records the maximum and minimum values measured during a session.
- เลือกฟังก์ชันการวัดที่ต้องการ (เช่น ปริมาตร)tagจ).
- กดปุ่ม สูงสุด/ต่ำสุด button. The display will show 'MAX' and the maximum value recorded.
- กด สูงสุด/ต่ำสุด again to cycle to 'MIN' and view the minimum value.
- กดค้างไว้ สูงสุด/ต่ำสุด เพื่อออกจากโหมดนี้
6. การบำรุงรักษา
การบำรุงรักษาอย่างถูกวิธีจะช่วยให้มัลติมิเตอร์ของคุณมีอายุการใช้งานยาวนานและแม่นยำ
6.1. การทำความสะอาด
เช็ดเคสด้วยโฆษณาamp ผ้าและผงซักฟอกอ่อนๆ ห้ามใช้สารกัดกร่อนหรือตัวทำละลาย ตรวจสอบให้แน่ใจว่ามิเตอร์แห้งสนิทก่อนใช้งาน
6.2. การเปลี่ยนแบตเตอรี่
Refer to Section 4.1 for battery replacement instructions. Always use the specified battery type.
6.3. Holster Care
The multimeter is protected by a thick rubber shockproof holster, designed for durability and a non-slip grip. Keep the holster clean and free from debris.

Figure 7: The durable rubber holster provides protection and a comfortable grip for the multimeter.
7 การแก้ไขปัญหา
If you encounter issues with your DT-17N multimeter, refer to the table below for common problems and solutions.
| ปัญหา | สาเหตุที่เป็นไปได้ | สารละลาย |
|---|---|---|
| ไม่มีจอแสดงผลหรือจอแสดงผลมืด | Low or dead battery; Poor battery contact | Replace battery; Check battery contacts |
| การอ่านไม่ถูกต้อง | Wrong function selected; Improper test lead connection; Damaged test leads; Out of range | Select correct function; Ensure leads are in correct jacks; Replace leads; Select higher range or check specifications |
| ไม่มีเสียงบี๊บแสดงความต่อเนื่อง | Circuit resistance too high; Continuity mode not selected | Ensure resistance is below threshold; Press SELECT to enter continuity mode |
| Fuse blown (for current measurements) | Overcurrent applied | Replace fuse with specified type and rating; Ensure correct current measurement procedure |
8. ข้อมูลจำเพาะ
Technical specifications for the Sunshine DT-17N Digital Multimeter.
| คุณสมบัติ | ข้อมูลจำเพาะ |
|---|---|
| แบบอย่าง | DT-17N |
| ประเภทการวัด | มัลติมิเตอร์ |
| แสดง | 5999 (5 5/6) counts, Automatic Polarity Display, Backlit LCD |
| Sampลิงอัตรา | ประมาณ 3 ครั้งต่อวินาที |
| แหล่งพลังงาน | ใช้พลังงานจากแบตเตอรี่ |
| ปริมาณการใช้งานขั้นต่ำtage | 3 โวลต์ (กระแสตรง) |
| ช่วงการวัดอุณหภูมิ | 0°C ถึง 1000°C (32°F ถึง 1832°F) |
| Induction Electroprobe Function | Yes (NCV) |
| การแปลง A/D แบบอินทิกรัลสองเท่า | ใช่ |
| ขนาดรายการ | 5.51 x 2.76 x 1.18 นิ้ว |
| น้ำหนักสินค้า | 0.55 กิโลกรัม |
| สี | สีฟ้า |
9. การรับประกันและการสนับสนุน
9.1. ข้อมูลการรับประกัน
This product comes with a warranty of 3 เดือนนับจากวันที่ซื้อ. Please retain your proof of purchase for warranty claims. The warranty covers manufacturing defects under normal use.
9.2. การสนับสนุนลูกค้า
For technical assistance or inquiries regarding your Sunshine DT-17N Digital Multimeter, please contact your retailer or the manufacturer's customer service department. Refer to your purchase documentation for specific contact details.