1. บทนำ
This manual provides comprehensive instructions for the installation, operation, and maintenance of your OAE 60A MPPT Solar Charge Controller. This device is designed to efficiently manage power flow from your solar panels to various battery types, including Lithium, Sealed, Gel, and Flooded batteries, ensuring optimal charging and system longevity.
2. ข้อมูลด้านความปลอดภัย
โปรดอ่านคำแนะนำด้านความปลอดภัยทั้งหมดอย่างละเอียดก่อนการติดตั้งและการใช้งาน การไม่ปฏิบัติตามคำแนะนำเหล่านี้อาจส่งผลให้เกิดไฟฟ้าช็อต ไฟไหม้ หรือการบาดเจ็บร้ายแรงได้
- Ensure all power sources are disconnected before installing or servicing the controller.
- Use appropriate personal protective equipment (PPE) such as insulated gloves and eye protection.
- Verify correct polarity for all connections (solar panel, battery, load) to prevent damage.
- ติดตั้งตัวควบคุมในบริเวณที่มีอากาศถ่ายเทสะดวก ห่างจากวัสดุไวไฟและแสงแดดโดยตรง
- Do not disassemble or attempt to repair the controller yourself. Refer to qualified personnel.
- ตรวจสอบให้แน่ใจว่าระบบต่อสายดินอย่างถูกต้อง
3. คุณสมบัติของผลิตภัณฑ์
The OAE 60A MPPT Solar Charge Controller offers advanced features for efficient solar power management:
- Auto 12/24/36/48V Battery System: Automatically detects and adapts to your battery voltage.
- ความเข้ากันได้กับแบตเตอรี่หลากหลายประเภท: Supports 4 charging options: Sealed, Gel, Flooded, and User-defined, compatible with lithium batteries.
- เทคโนโลยี MPPT ประสิทธิภาพสูง: Creative maximum power point tracking technology significantly increases energy utilization rate (up to 97% transfer efficiency). Quickly scans the entire I-V curve to track the maximum power point within seconds.
- จอแสดงผล LCD ที่ให้ข้อมูล: Clear display of operating data and working conditions. Features real-time energy statistics, Chinese and English language options, and a multi-function LCD screen with operation menu. Displays daily power generation and current curves, and fault records for timely troubleshooting.
- ฟังก์ชั่นการป้องกันที่ครอบคลุม: Built-in protections ensure system safety and longevity.
- การสื่อสาร RS485: Capable of Wi-Fi remote monitoring (additional purchase required) for real-time wireless monitoring via APP (Android & iOS compatible). Simple and convenient to set, with one-key factory settings restore.
4. เนื้อหาบรรจุภัณฑ์
เมื่อเปิดบรรจุภัณฑ์ ตรวจสอบว่ามีสินค้าทั้งหมดอยู่ครบถ้วนและไม่ได้รับความเสียหาย:
- OAE 60A MPPT Solar Charge Controller (Blue)
- ตัวยึด
- คู่มือการใช้งาน
- สายเซ็นเซอร์อุณหภูมิ
- สกรูสำหรับติดตั้ง

Figure 1: OAE 60A MPPT Solar Charge Controller (Blue model).
5. การตั้งค่าและการติดตั้ง
Follow these steps for proper installation of your MPPT solar charge controller. For a visual guide, please refer to the installation video below.
Video 1: OAE 60A MPPT Solar Charge Controller Installation Guide. This video demonstrates the unboxing, physical setup, and wiring connections for the solar charge controller.
5.1 การติดตั้งทางกายภาพ
- การแกะกล่องและการตรวจสอบ: Carefully remove the controller from its packaging. Inspect for any visible damage. The package typically includes the controller, mounting bracket, and user manual.

Figure 2: The OAE MPPT Solar Charge Controller as packaged in its box.
- การติดตั้งคอนโทรลเลอร์: Loosen the four screws on the bottom of the MPPT controller to detach the mounting bracket. Secure the bracket to a stable, vertical surface in a well-ventilated area, then reattach the controller to the bracket using the screws.

รูปที่ 3: ด้านข้าง view of the controller showing dimensions and mounting points.
5.2 การเชื่อมต่อสายไฟ
Before making any connections, ensure all power sources are OFF. Connect the wires in the following order:
- การเชื่อมต่อแบตเตอรี่: Connect the battery wires to the "BATTERY" terminals on the controller. Ensure correct polarity (positive to positive, negative to negative). Loosen the terminal screws, insert the wires, and tighten securely.

Figure 4: Connection diagram illustrating solar panel, battery, and DC load connections.
- การเชื่อมต่อแผงโซลาร์เซลล์: Connect the solar panel wires to the "SOLAR PANEL" terminals. Observe correct polarity. The controller supports a maximum PV input of 150V.

Figure 5: Close-up of the controller's terminal block, showing connections for solar panel, battery, and DC load.
- DC Load Connection (Optional): If using a DC load directly from the controller, connect the load wires to the "DC LOAD" terminals, ensuring correct polarity.
- การเชื่อมต่อเซ็นเซอร์อุณหภูมิ: Connect the temperature sensor cable to the designated "TEMPERATURE INTERFACE" port. This ensures accurate battery temperature compensation for optimal charging.
6. คู่มือการใช้งาน
Once all connections are secure, the controller will boot up automatically. The LCD display provides real-time system information and allows for configuration.
6.1 จอแสดงผล LCD เกินview
The multi-function LCD screen displays various parameters and allows access to settings. Use the MENU, DOWN, UP, and ENTER buttons to navigate and adjust settings.
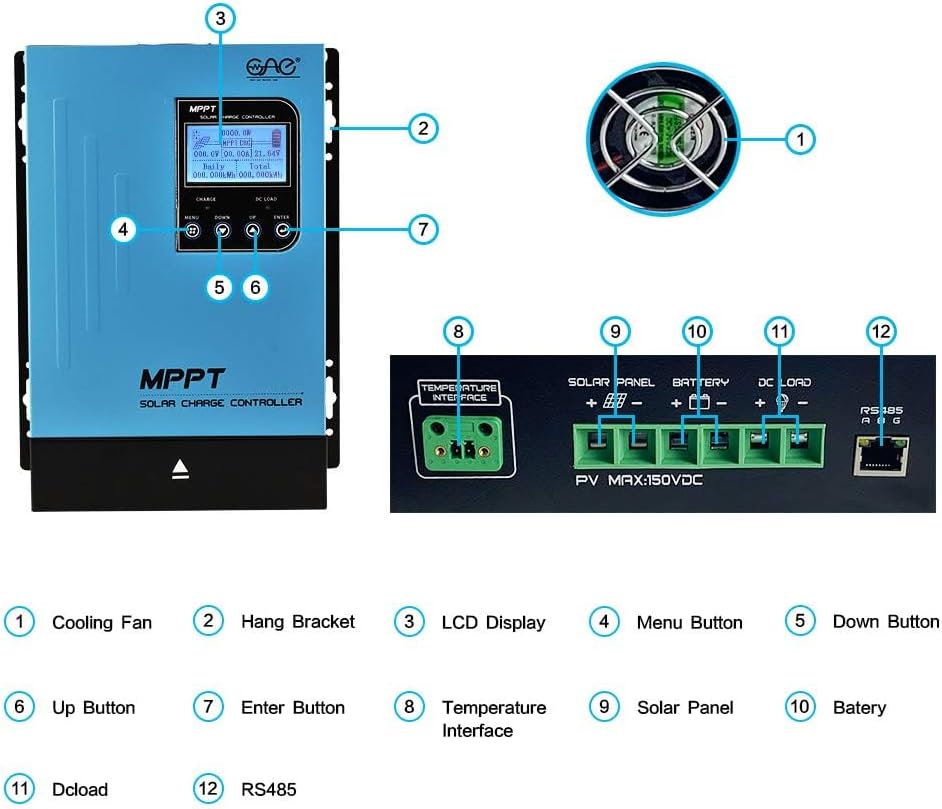
Figure 6: Detailed description of the main interface and display parameters.
6.2 การทำงานพื้นฐาน
- เปิดเครื่อง: After connecting the battery, the controller will automatically power on. The display will show "Boot up, please wait..."
- การติดตาม: The main interface displays PV module voltage, daily power generation, charging power, charging current, battery capacity indication, battery voltage, total power generation, date, time, charging state (MPPT tracking, floating charge, stop charge), external temperature, and internal temperature.
- เมนูการนำทาง: Use the "MENU" button to cycle through different display screens and settings options. Use "UP" and "DOWN" to change values or navigate within a menu. Press "ENTER" to confirm selections.
- DC Load Control: The DC load output can be configured for automatic operation (e.g., time control) or manual ON/OFF. This is accessed via the "DC Output Setting" menu.
7. การบำรุงรักษา
การบำรุงรักษาอย่างสม่ำเสมอจะช่วยให้ตัวควบคุมการชาร์จพลังงานแสงอาทิตย์ของคุณมีอายุการใช้งานยาวนานและทำงานได้อย่างมีประสิทธิภาพสูงสุด:
- ความสะอาด : รักษาตัวควบคุมให้สะอาด ปราศจากฝุ่นและเศษขยะ ใช้ผ้าแห้งเช็ดทำความสะอาด
- การระบายอากาศ : Ensure the cooling fan and ventilation holes are not obstructed. Periodically check for dust buildup in the fan.


Figure 7: Cooling fan and ventilation holes for proper airflow.
- การเชื่อมต่อ: ตรวจสอบความแน่นหนาและการกัดกร่อนของการเชื่อมต่อสายไฟทั้งหมดเป็นระยะ การเชื่อมต่อที่หลวมอาจทำให้เกิดความร้อนสูงเกินไปและประสิทธิภาพการทำงานลดลง
- สุขภาพแบตเตอรี่: ตรวจสอบปริมาณแบตเตอรี่tage and health regularly. Ensure the battery type setting on the controller matches your battery.
8 การแก้ไขปัญหา
ส่วนนี้จะกล่าวถึงปัญหาทั่วไปที่คุณอาจพบเจอเกี่ยวกับตัวควบคุมการชาร์จพลังงานแสงอาทิตย์ของคุณ
| ปัญหา | สาเหตุที่เป็นไปได้ | สารละลาย |
|---|---|---|
| ตัวควบคุมไม่เปิดเครื่อง | ไม่มีแบตเตอรี่เชื่อมต่อหรือไม่มีแรงดันไฟฟ้าของแบตเตอรี่tagอีต่ำเกินไป | Ensure battery is connected with correct polarity and has sufficient voltage (above minimum operating voltagจ). |
| No charging current from solar panels. | Solar panels not connected, insufficient sunlight, or incorrect panel voltage. | Check solar panel connections and polarity. Ensure adequate sunlight. Verify panel voltage อยู่ภายในช่วงอินพุตของตัวควบคุม |
| DC load not working. | Load output disabled, overloaded, or incorrect wiring. | Check DC output settings on the LCD. Reduce load if overloaded. Verify load wiring and polarity. |
| Unusual noise from controller (e.g., fan). | Normal operation (fan activates under load) or obstructed fan. | Ensure proper ventilation. Clean fan if obstructed. If noise is excessive or unusual, contact support. |
9. ข้อมูลจำเพาะ
Key technical specifications for the OAE 60A MPPT Solar Charge Controller:
- หมายเลขรุ่น: MP-60A
- ยี่ห้อ: OAE
- คะแนนปัจจุบัน: 60เอ
- ระบบแบตเตอรี่Voltage: Auto 12V/24V/36V/48V
- อินพุต PV สูงสุด Voltage: 150โวลต์
- ประเภทจอภาพ: นำ
- วัสดุ: โลหะ
- ขนาดสินค้า : 7.9 x 3.5 x 12.4 นิ้ว
- น้ำหนักสินค้า: 7.96 ปอนด์ (3.62 กิโลกรัม)
- ประเภทแบตเตอรี่ที่เข้ากันได้: Sealed, Gel, Flooded, Lithium, and User-defined
10. การรับประกันและการสนับสนุน
For warranty information, technical support, or to purchase additional accessories, please visit the official OAE store or contact their customer service.
มีแผนคุ้มครองเพิ่มเติมให้เลือก:
- แผนคุ้มครอง 3 ปี
- แผนคุ้มครอง 4 ปี
- Complete Protect (แผนรายเดือนที่ครอบคลุมการซื้อที่เข้าเงื่อนไข)
สำหรับรายละเอียดเพิ่มเติมกรุณาเยี่ยมชม OAE Store on Amazon.