
1. บทนำ
This manual provides comprehensive instructions for the safe and efficient use of your LIVINGbasics Multifunctional Baby Bottle Sterilizer, Warmer, and Dryer. This appliance is designed to sterilize baby bottles, pacifiers, and breast pump parts using high-temperature steam, dry items with hot air, warm milk, and heat baby food. Please read this manual thoroughly before first use and retain it for future reference.

Figure 1: LIVINGbasics Baby Bottle Sterilizer, Warmer, and Dryer in operation. The unit is made from 100% food-grade, BPA-free material, designed for safety and to keep items dry for up to 24 hours.
2. สินค้าหมดview
Familiarize yourself with the components of your sterilizer, warmer, and dryer unit.

รูปที่ 2: ระเบิด view of the product parts. From top to bottom: Lid, Accessory Rack, Bottle Tray, Sterilizer Container, Heating Plate, Machine Base, and Panel Setting.
ส่วนประกอบ:
- ฝา: Covers the sterilizer container, retaining steam and heat.
- ชั้นวางอุปกรณ์เสริม: Holds smaller items like pacifiers, bottle caps, and breast pump parts.
- Bottle Tray: Supports baby bottles during sterilization and drying.
- Sterilizer Container: The main chamber where items are sterilized and dried.
- แผ่นทำความร้อน: Located in the machine base, it heats water to produce steam.
- ฐานเครื่องจักร: ประกอบด้วยตัวทำความร้อนและแผงควบคุม
- การตั้งค่าแผง: The control interface for selecting functions and adjusting settings.
3. การตั้งค่า
- การแกะกล่อง: นำส่วนประกอบทั้งหมดออกจากบรรจุภัณฑ์อย่างระมัดระวัง เก็บบรรจุภัณฑ์ไว้สำหรับการจัดเก็บหรือการขนส่งในอนาคต
- การทำความสะอาดเบื้องต้น: Before first use, wash all removable parts (lid, accessory rack, bottle tray, sterilizer container) with warm soapy water and rinse thoroughly. Wipe the machine base and heating plate with a damp ผ้า.
- การเตรียมการใช้งานครั้งแรก: It is recommended to boil water several times in the unit without any items inside to clean the heating plate and remove any manufacturing residues.
- การประกอบ: Place the sterilizer container onto the machine base. Insert the bottle tray, followed by the accessory rack. Place the lid on top.
- การจัดวาง: Position the unit on a stable, flat, heat-resistant surface, away from direct sunlight and heat sources. Ensure adequate ventilation around the unit.
- การเชื่อมต่อไฟฟ้า: เสียบสายไฟเข้ากับเต้ารับไฟฟ้าที่เหมาะสม
4. คู่มือการใช้งาน
The unit features a touch control panel for various functions. Ensure the unit is properly assembled and plugged in before operation.

Figure 3: Control Panel. Use the 'MODE' button to cycle through functions, and '+' / '-' buttons to adjust time or temperature. 'START/CANCEL' initiates or stops the operation.
4.1. Sterilize & Dry Function
This function sterilizes items with high-temperature steam and then dries them with hot air.
- เตรียมรายการ: Wash all bottles, pacifiers, and breast pump parts thoroughly before placing them in the sterilizer.
- เติมน้ำ: Pour 140ml of distilled water onto the heating plate in the machine base.
- โหลดรายการ: Place the sterilizer container on the machine base. Arrange washed bottles upside down on the bottle tray (maximum 6 wide-neck bottles or 12 standard bottles). Place smaller items like pacifiers and bottle caps on the accessory rack.
- เลือกฟังก์ชัน: Plug in the power cable. Press the "MODE" button once to select "Sterilize & Dry". The indicator light for "Sterilize & Dry" will illuminate.
- Adjust Drying Time (Optional): The default drying time is 30 minutes. To adjust, press the "+" or "-" buttons. The drying time can be set from 1 to 120 minutes.
- เริ่มดำเนินการ: Press the "START" button to begin. The display will show a rotating line, indicating the machine is in operation.
- กระบวนการ: The sterilization process runs for 14 minutes, followed by the drying process.
- เสร็จสิ้น: When the drying cycle is complete, the machine will beep once, and the display will show "END".
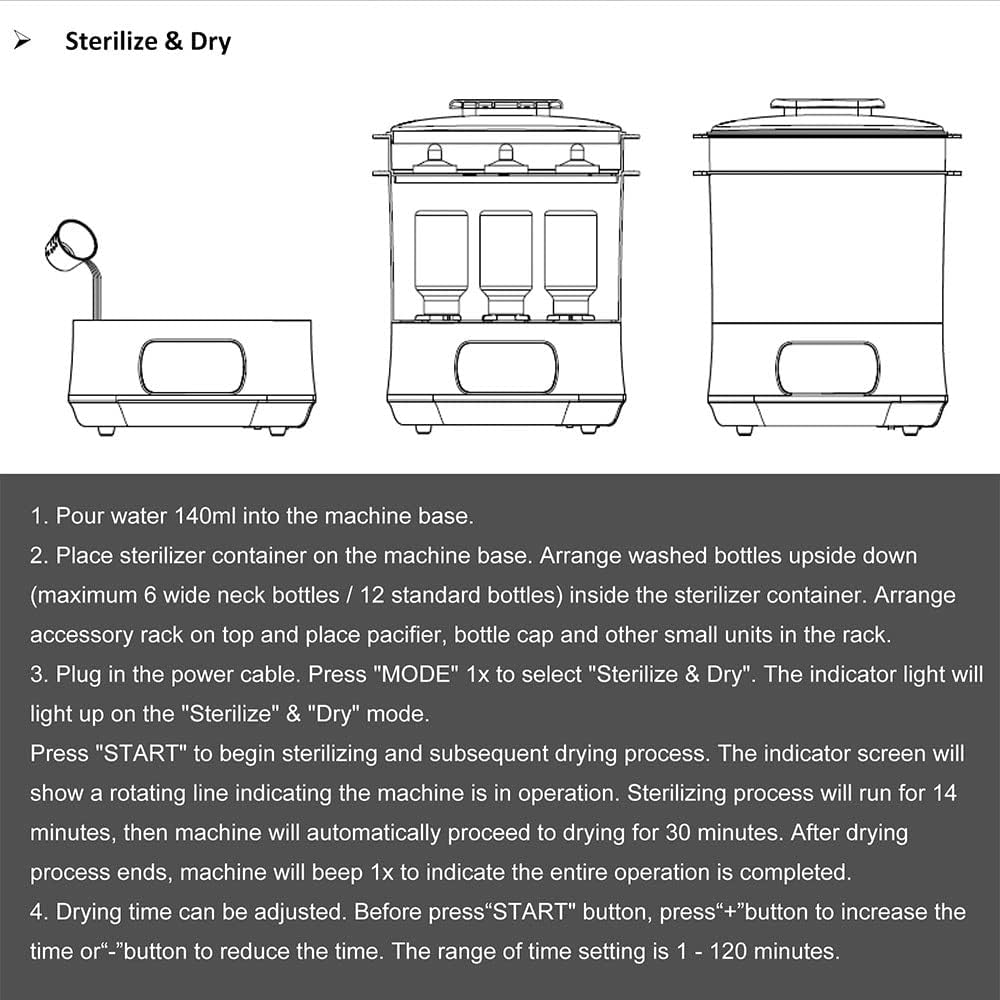
Figure 4: Step-by-step guide for the Sterilize & Dry function, illustrating water addition, item placement, and control panel interaction.
4.2. Sterilize/Egg Boil Function
This function provides steam sterilization or can be used for boiling eggs.
- เตรียมรายการ: For sterilization, wash items as described above. For egg boiling, place eggs in the accessory rack.
- เติมน้ำ: Pour 140ml of distilled water onto the heating plate.
- โหลดรายการ: Place items in the sterilizer container.
- เลือกฟังก์ชัน: Press the "MODE" button twice to select "Sterilize/Egg Boil".
- เริ่มดำเนินการ: Press "START".
- เสร็จสิ้น: The machine will beep upon completion.
4.3. Dry Function
This function provides hot air drying for items that have already been sterilized or washed.
- โหลดรายการ: Place clean, wet items into the sterilizer container.
- เลือกฟังก์ชัน: Press the "MODE" button three times to select "Dry".
- Adjust Drying Time: Use the "+" or "-" buttons to set the desired drying time (1-120 minutes).
- เริ่มดำเนินการ: Press "START".
- เสร็จสิ้น: The machine will beep upon completion.
4.4. Warm Milk Function
This function gently warms milk to a suitable temperature.
- เติมน้ำ: Pour a small amount of water (e.g., 50-100ml) into the machine base, ensuring it covers the heating plate.
- วางขวด: Place the bottle containing milk into the sterilizer container.
- เลือกฟังก์ชัน: Press the "MODE" button four times to select "Warm Milk".
- ปรับอุณหภูมิ/เวลา: Use the "+" or "-" buttons to set the desired warming temperature or time.
- เริ่มดำเนินการ: Press "START".
- เสร็จสิ้น: The machine will beep upon completion. Always check milk temperature before feeding.
4.5. Warm Food Function
This function warms baby food.
- เติมน้ำ: Pour a small amount of water (e.g., 50-100ml) into the machine base.
- Place Food Container: Place the container with baby food into the sterilizer container.
- เลือกฟังก์ชัน: Press the "MODE" button five times to select "Warm Food".
- ปรับอุณหภูมิ/เวลา: Use the "+" or "-" buttons to set the desired warming temperature or time.
- เริ่มดำเนินการ: Press "START".
- เสร็จสิ้น: The machine will beep upon completion. Always check food temperature before feeding.
4.6. General Operation Notes
- To cancel any operation, press the "CANCEL" button.
- Always use distilled water to prevent mineral buildup on the heating plate.
- Ensure the lid is properly seated during operation.
5. การบำรุงรักษาและการทำความสะอาด
การทำความสะอาดอย่างสม่ำเสมอจะช่วยให้เครื่องใช้ไฟฟ้าทำงานได้อย่างมีประสิทธิภาพสูงสุดและยืดอายุการใช้งาน
- ถอดปลั๊กก่อนทำความสะอาด: ควรถอดปลั๊กเครื่องออกจากเต้ารับไฟฟ้าทุกครั้ง และปล่อยให้เย็นลงสนิทก่อนทำความสะอาด
- ซักชิ้นส่วนที่สามารถถอดออกได้: The lid, accessory rack, bottle tray, and sterilizer container are dishwasher safe or can be washed by hand with warm soapy water. Rinse thoroughly and allow to air dry.
- ทำความสะอาดแผ่นทำความร้อน: Over time, mineral deposits (limescale) may build up on the heating plate.
- To remove limescale, mix 50ml of white vinegar with 100ml of water.
- Pour the solution onto the heating plate and let it soak for 30 minutes to an hour, or until the deposits loosen.
- Scrub gently with a soft brush or sponge. Do not use abrasive cleaners or metal scouring pads.
- Rinse the heating plate by wiping it with a damp cloth several times.
- ทำความสะอาดฐานเครื่อง: Wipe the exterior of the machine base with a damp cloth. Do not immerse the machine base in water.
- พื้นที่จัดเก็บ: Store the clean and dry unit in a cool, dry place away from direct sunlight.
6 การแก้ไขปัญหา
หากคุณพบปัญหาเกี่ยวกับเครื่องใช้ของคุณ โปรดดูปัญหาทั่วไปและวิธีแก้ไขต่อไปนี้:
| ปัญหา | สาเหตุที่เป็นไปได้ | สารละลาย |
|---|---|---|
| เครื่องไม่เปิด | ไม่ได้เสียบปลั๊ก; ปัญหาเต้ารับไฟฟ้า; เครื่องทำงานผิดปกติ | Ensure power cable is securely plugged in. Test the outlet with another appliance. If still not working, contact customer support. |
| Sterilization/Drying cycle does not start. | No water added; lid not properly closed; function not selected. | Add 140ml of water to the heating plate. Ensure the lid is securely placed. Select the desired function using the "MODE" button and press "START". |
| Items are not completely dry after cycle. | Drying time too short; excessive water on items; mineral buildup on heating plate. | Increase drying time using the "+" button (up to 120 minutes). Shake off excess water from items before placing them in the unit. Clean the heating plate to remove limescale. |
| คราบสีขาวบนแผ่นทำความร้อน | คราบแร่ธาตุจากน้ำประปา | Clean the heating plate as described in the Maintenance section. Use distilled water for future operations. |
| Milk/Food warming takes too long. | Insufficient water; incorrect temperature/time setting; starting from cold. | Ensure adequate water is added for warming. Adjust temperature/time settings. Warming from refrigerated temperatures will naturally take longer. |
7. ข้อมูลจำเพาะ
Key technical specifications for the LIVINGbasics Baby Bottle Sterilizer, Warmer, and Dryer.
| คุณสมบัติ | รายละเอียด |
|---|---|
| ขนาดสินค้า | 27 x 17 x 39 ซม. (10.6 x 6.7 x 15.35 นิ้ว) |
| น้ำหนักสินค้า | 2.27 กก. (5 ปอนด์) |
| ประเภทวัสดุ | BPA Free, Food-Grade Material |
| Capacity (Bottles) | Up to 6 wide-neck bottles / 12 standard bottles |
| ฟังก์ชั่น | Sterilize, Dry, Sterilize/Egg Boil, Warm Milk, Warm Food |
| ประเภทการควบคุม | Smart Touch Keys, LED Display |
| อะไหล่เครื่องล้างจานปลอดภัย | Lid, Accessory Rack, Bottle Tray, Sterilizer Container |
| ประเทศต้นกำเนิด | จีน |
| ยูพีซี | 888620159755 |
| ASIN | B09R9VP8L5 |

Figure 5: Product dimensions in various configurations (sterilizer, dryer, bottle warmer).
8. การรับประกันและการสนับสนุน
LIVINGbasics is committed to providing high-quality products. For warranty information, technical support, or any questions regarding your product, please contact LIVINGbasics customer service through the retailer where the product was purchased or visit the official LIVINGbasics webเว็บไซต์.
กรุณาระบุหมายเลขรุ่นของคุณ (ASIN: B09R9VP8L5) and purchase date available when contacting support.
9. วิดีโอสาธิตผลิตภัณฑ์
Watch this video for a visual guide on the features and operation of the LIVINGbasics Baby Bottle Sterilizer, Warmer, and Dryer.
Video: A demonstration of the LIVINGbasics Baby Bottle Sterilizer, Warmer, and Dryer, showcasing its various functions and ease of use.