
1. บทนำ
Thank you for choosing the Kurzweil KA130 Digital Piano. This instrument is designed to provide an authentic piano playing experience with advanced digital features. This manual provides essential information for the proper setup, operation, and maintenance of your digital piano. Please read it thoroughly before using the instrument to ensure optimal performance and longevity.
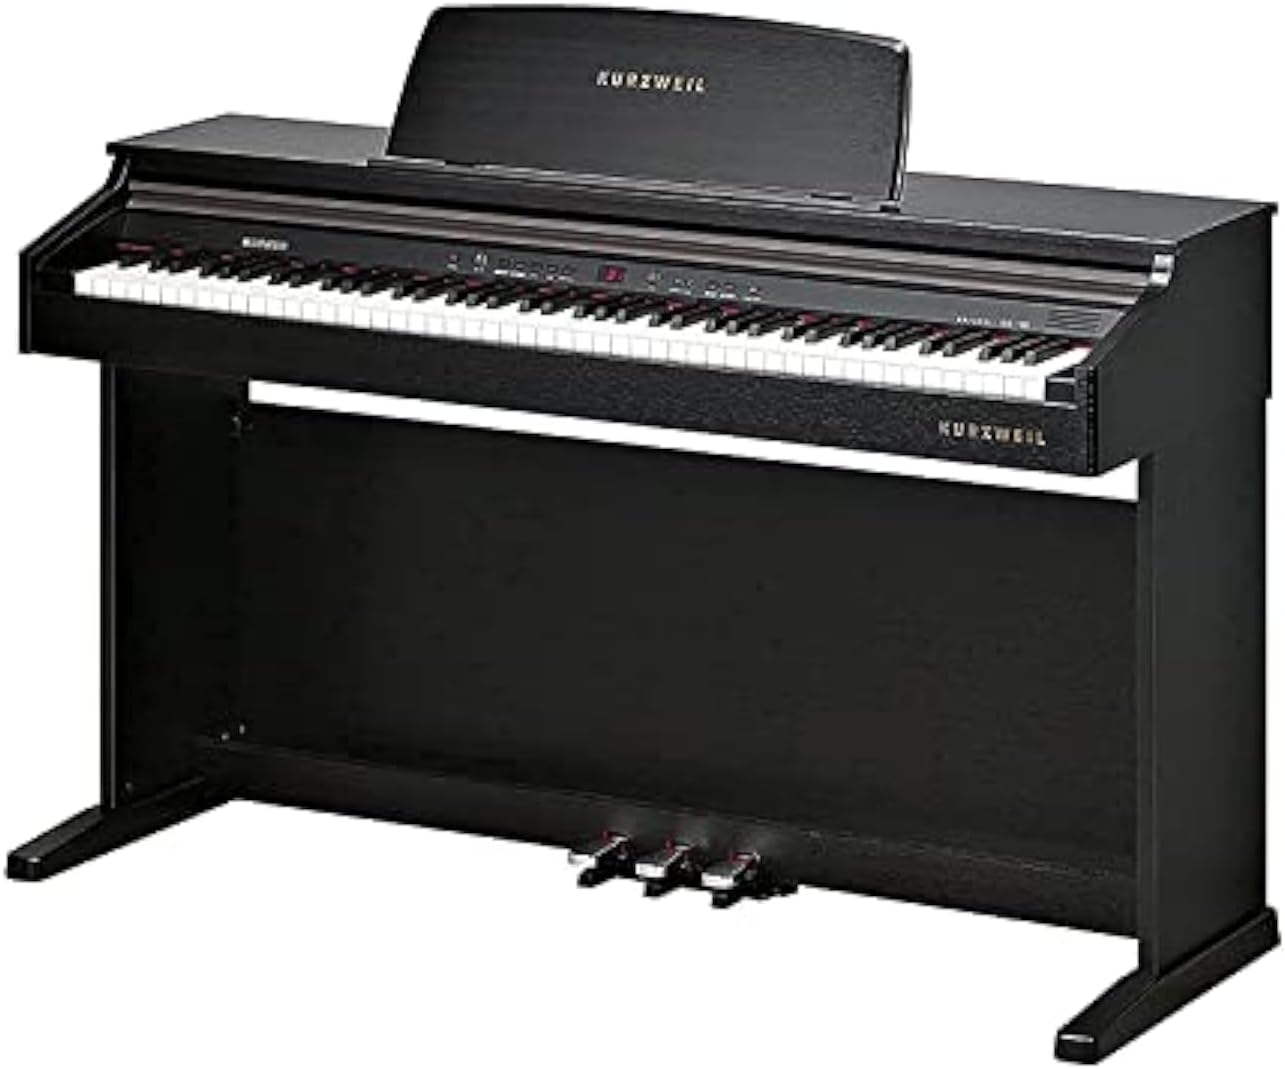
Figure 1: The Kurzweil KA130 Digital Piano. This image displays the full instrument, highlighting its black finish, 88-note keyboard, integrated music rest, and the three foot pedals (sustain, sostenuto, soft) located at the base.
2. ข้อมูลด้านความปลอดภัยที่สำคัญ
- แหล่งจ่ายไฟ: ใช้เฉพาะอะแดปเตอร์ไฟฟ้าที่ระบุเท่านั้น ตรวจสอบให้แน่ใจว่าระดับเสียงtage matches the requirements of your region. Disconnect the power cord during lightning storms or when unused for extended periods.
- ที่ตั้ง: Place the instrument on a stable, level surface. Avoid locations exposed to direct sunlight, extreme temperatures, high humidity, dust, or strong vibrations. Keep away from heat sources like radiators.
- น้ำและความชื้น: Do not expose the instrument to water or moisture. Do not place containers with liquids on the piano.
- การระบายอากาศ : อย่าปิดกั้นช่องระบายอากาศ ตรวจสอบให้แน่ใจว่าอากาศไหลเวียนรอบเครื่องมือได้เพียงพอ
- วัตถุจากต่างประเทศ: ห้ามสอดสิ่งแปลกปลอมเข้าไปในช่องเปิดใดๆ ของเครื่องมือ
- การทำความสะอาด: Clean only with a dry, soft cloth. Avoid using chemical cleaners or solvents.
- การบริการ: อย่าพยายามซ่อมแซมเครื่องมือด้วยตนเอง โปรดส่งต่อเครื่องมือให้กับช่างผู้ชำนาญการเท่านั้น
3. การติดตั้งและการประกอบ
3.1 เนื้อหาบรรจุภัณฑ์
ก่อนประกอบ โปรดตรวจสอบว่ามีชิ้นส่วนครบทุกชิ้น:
- Kurzweil KA130 Digital Piano Unit
- ม้านั่งที่เข้าชุดกัน
- เพลงพักผ่อน
- อะแดปเตอร์แปลงไฟ
- คู่มือการใช้งาน (เอกสารนี้)
- Assembly Hardware (screws, tools if required)
3.2 คำแนะนำในการประกอบ
The Kurzweil KA130 is a console-style digital piano that requires some assembly. It is recommended that two adults perform the assembly to prevent injury or damage to the instrument.
- แกะส่วนประกอบ: นำชิ้นส่วนทั้งหมดออกจากบรรจุภัณฑ์อย่างระมัดระวัง และวางเรียงบนพื้นผิวที่นุ่มและสะอาดเพื่อป้องกันรอยขีดข่วน
- ติดแผงด้านข้าง: Secure the left and right side panels to the main keyboard unit using the provided screws. Ensure they are oriented correctly.
- Install Pedal Unit: Connect the pedal unit to the base of the piano, ensuring the pedal cable is properly routed and connected to the main unit.
- แผงด้านหลังที่ปลอดภัย: Attach the back panel to stabilize the structure.
- Place Music Rest: Insert the music rest into the designated slot on the top panel of the piano.
- ประกอบม้านั่ง: Follow the separate instructions provided with the matching bench for its assembly.
3.3 การเชื่อมต่อ
- พลัง: Connect the power adapter to the DC IN jack on the piano and then to a suitable wall outlet.
- หูฟัง: Two 1/4" stereo headphone jacks are provided for private practice. Connect standard stereo headphones to either jack.
- เสียงออก: Stereo left/right RCA line outs are available for connecting the piano to external amplification systems (e.g., an amplifier, mixer, or powered speakers).
- เสียงเข้า: Stereo left/right RCA line ins allow connection of external sound sources (e.g., an MP3 player, smartphone) to play through the piano's speakers.
- ยูเอสบี: The USB port provides Plug and Play MIDI over USB functionality. Connect a standard USB cable to a computer for MIDI communication without requiring additional drivers.
4. คู่มือการใช้งาน
4.1 เปิด/ปิดเครื่อง
กดปุ่ม พลัง กดปุ่มเพื่อเปิดเครื่อง กดปุ่มค้างไว้ พลัง กดปุ่มค้างไว้สองสามวินาทีเพื่อปิดเครื่อง
4.2 Keyboard and Touch Sensitivity
The KA130 features an 88-note, fully weighted, hammer action keyboard (88RGTA) designed to replicate the feel of an acoustic piano. You can adjust the keyboard's touch sensitivity with 6 selectable response levels to match your playing style.
4.3 Display and Voice Selection
The 7-segment 3-digit LED display shows current settings. The piano offers a Stereo PCM voice type with 32-voice polyphony. Select from 16 primary preset programs, with an additional 116 programs available for General MIDI (GM) compatibility.
4.4 โหมดการเล่น
- Splits: Divides the keyboard into two sections, allowing different voices to be played by each hand.
- ชั้น: Combines two voices to be played simultaneously when a key is pressed.
- คู่: A specific mode that might combine elements of splits and layers, or offer a predefined layered sound. Refer to the on-screen menu for specific Dual mode options.
4.5 Demo Songs and Learning Mode
The instrument includes 50 demo songs and 221 learning songs. The Education Mode supports Bayer, Czerny 100, 30, 40, and Sonatine exercises, featuring a 'Score Lesson' mode to assist with practice.
4.6 Recorder/Sequencer
Record your performances with the built-in sequencer, which has a capacity for 5 songs. Consult the detailed operational guide for recording and playback procedures.
4.7 ฟังก์ชั่นทั่วไป
- General MIDI (GM): The KA130 is GM compatible, allowing it to play back MIDI files with standard instrument assignments.
- การเปลี่ยนตำแหน่ง: ปรับระดับเสียงของแป้นพิมพ์ทั้งหมดขึ้นหรือลงทีละครึ่งเสียง
- ทำนอง: Fine-tune the overall pitch of the instrument.
- เครื่องเมตรอนอม: Use the built-in metronome for rhythm practice. Adjust tempo and beat as needed.
4.8 คันเหยียบ
The KA130 includes three built-in pedals:
- แป้นเหยียบซัสเทน (ด้านขวา): Sustains notes, similar to an acoustic piano. Features half-damper effect for nuanced control.
- แป้นเหยียบ Sostenuto (กลาง): รักษาเสียงไว้เฉพาะโน้ตที่กดค้างไว้ในขณะที่เหยียบแป้น
- แป้นเหยียบนุ่ม (ซ้าย): ช่วยลดทอนเสียงของโน้ตที่เล่นลง
5. การบำรุงรักษาและการดูแล
- การทำความสะอาด: เช็ดพื้นผิวของเครื่องดนตรีด้วยผ้าแห้งนุ่มๆ สำหรับคราบสกปรกที่ติดแน่น ให้ใช้ผ้าชุบน้ำหมาดๆ เช็ดเบาๆampชุบผ้าด้วยน้ำและผงซักฟอกอ่อนๆ แล้วเช็ดให้แห้งทันที หลีกเลี่ยงน้ำยาทำความสะอาดที่มีฤทธิ์กัดกร่อน แว็กซ์ หรือตัวทำละลาย
- การดูแลรักษาคีย์บอร์ด: รักษากุญแจให้สะอาด หากกุญแจสกปรก ให้เช็ดด้วยผ้านุ่มๆampชุบด้วยน้ำและสบู่ชนิดอ่อนเพียงเล็กน้อย
- พื้นที่จัดเก็บ: When not in use for extended periods, cover the piano with a dust cover to protect it from dust and debris.
- สภาพแวดล้อม : Maintain a stable room temperature and humidity. Extreme fluctuations can affect the instrument's components.
6 การแก้ไขปัญหา
| ปัญหา | สาเหตุที่เป็นไปได้ | สารละลาย |
|---|---|---|
| ไม่มีเสียง |
|
|
| ปุ่มไม่ตอบสนองหรือสัมผัสไม่สม่ำเสมอ |
|
|
| เสียงเพี้ยน |
|
|
| แป้นเหยียบใช้งานไม่ได้ |
|
|
If the problem persists after attempting these solutions, please contact Kurzweil customer support or a qualified service technician.
7. ข้อมูลจำเพาะทางเทคนิค
| คุณสมบัติ | รายละเอียด |
|---|---|
| แป้นพิมพ์ | 88-Note, fully weighted, hammer action (88RGTA) |
| ความไวของแป้นพิมพ์ | 6 selectable response levels |
| แสดง | 7-segment 3-digit LED |
| ประเภทเสียง | สเตอริโอ PCM |
| โพลีโฟนี | 32 เสียง |
| โปรแกรมที่ตั้งไว้ล่วงหน้า | 16 Primary (+116 for GM) |
| โหมดการเล่น | Splits, Layers, Dual |
| เพลงสาธิต | 50 demo + 221 learning songs |
| Recorder/Sequencer | 5 Song capacity |
| MIDI ทั่วไป | ใช่ |
| ทรานสโพส | ใช่ |
| ปรับแต่งเสียง | ใช่ |
| เครื่องวัดจังหวะ | ใช่ |
| Education Mode | Bayer, Czerny 100,30,40, Sonatine with 'Score Lesson' mode |
| เสร็จ | Simulated Rosewood (Black) |
| พลังเสียง | 30 วัตต์ (15W + 15W) |
| ลำโพง | 6" x 2 |
| เอาต์พุตเสียง | Stereo left/right RCA line outs |
| อินพุตเสียง | Stereo left/right RCA line ins |
| แจ็คหูฟัง | (2) 1/4" stereo headphone outs |
| พอร์ต USB | (1) port; Plug and Play MIDI over USB |
| แป้นเหยียบ | (3) built-in sustain, sostenuto, soft (with half damper effect) |
| อุปกรณ์เสริมที่รวมอยู่ด้วย | Matching bench |
| ขนาด (สูง x กว้าง x ลึก) | 86 x 136 x 44 ซม. |
| น้ำหนัก | 45 กก. |
| แหล่งพลังงาน | AC Power Adapter (Note: Product data listed "Battery Powered" which is typically incorrect for this type of instrument; AC adapter is standard.) |
| ประเภทวัสดุ | ไม้ |
8. การรับประกันและการสนับสนุนลูกค้า
For warranty information, please refer to the warranty card included with your product or visit the official Kurzweil website. For technical support, service, or inquiries, please contact Kurzweil customer support through their official channels. Keep your purchase receipt as proof of purchase for warranty claims.