
1. บทนำ
Thank you for choosing the IROAD TR7 Dash Camera. This manual provides essential information for the proper installation, operation, and maintenance of your device. Please read this manual thoroughly before using the product to ensure optimal performance and safety.
2. เนื้อหาบรรจุภัณฑ์
โปรดตรวจสอบให้แน่ใจว่าสินค้าทุกรายการที่ระบุไว้ด้านล่างนั้นอยู่ในบรรจุภัณฑ์ของคุณ หากมีสินค้าใดขาดหายหรือเสียหาย โปรดติดต่อผู้ค้าปลีกของคุณ
- หน่วยหลัก (กล้องหน้า)
- กล้องหลัง
- Main Unit Bracket
- Genuine Micro SD Card (16GB)
- Wi-Fi Dongle
- Quick Manual (Japanese)
- สายไฟคงที่
- สายกล้องด้านหลัง
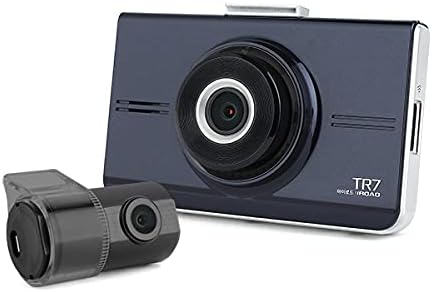
Image 2.1: IROAD TR7 Dash Camera main unit and rear camera, showing the compact design of both components.
3. การตั้งค่าและการติดตั้ง
3.1 การใส่การ์ด MicroSD
- โปรดตรวจสอบให้แน่ใจว่ากล้องติดรถยนต์ปิดอยู่
- ค้นหาช่องเสียบการ์ด MicroSD ที่ด้านข้างของตัวเครื่องหลัก
- Insert the provided MicroSD card into the slot until it clicks into place.
- To remove, gently push the card in, and it will spring out.

Image 3.1: The IROAD TR7 main unit with the MicroSD card and Wi-Fi dongle inserted into their respective slots on the side.
3.2 การติดตั้งยูนิตหลัก
- Clean the windshield area where the dash camera will be mounted.
- Attach the main unit bracket to the dash camera.
- Remove the protective film from the adhesive pad on the bracket.
- Firmly press the dash camera onto the windshield, ensuring a clear view ของถนน

Image 3.2: The IROAD TR7 main unit shown with its adjustable mounting bracket, ready for windshield attachment.
3.3 การติดตั้งกล้องหลัง
- Clean the rear window area where the rear camera will be mounted.
- Attach the rear camera to the rear window using its adhesive.
- Connect the rear camera to the main unit using the provided rear camera cable. Route the cable neatly along the vehicle's interior trim.

Image 3.3: The compact IROAD TR7 rear camera, designed for discreet installation on the rear window.
3.4 การเชื่อมต่อสายไฟ
Connect the constant power cable to the vehicle's power source according to the installation guide provided with the cable. Ensure proper wiring to enable parking surveillance features.
3.5 Wi-Fi Dongle Connection
Insert the Wi-Fi dongle into the designated USB port on the main unit. This enables connection to your smartphone via the IROAD mobile application for live view, settings adjustment, and video playback.
3.6 เสาอากาศ GPS (อุปกรณ์เสริม)
An external GPS antenna (sold separately) can be connected to enable ADAS functions and record location and speed data, which can be viewed on Google Maps via the PC viewเอ่อ.
4. คู่มือการใช้งาน
4.1 Basic Recording Modes
The IROAD TR7 supports several recording modes:
- การบันทึกต่อเนื่อง: Automatically starts recording when the vehicle's ignition is turned on. Footage is saved in short segments and overwritten when the MicroSD card is full (Loop Recording).
- การบันทึกเหตุการณ์ (ผลกระทบ): Activated by the built-in 3-axis G-sensor upon detecting a significant impact or sudden braking/acceleration. These files are saved in a separate folder to prevent overwriting.
- Parking (Motion Detection) Recording: When the vehicle is parked and the ignition is off, the camera enters parking mode. It records when motion is detected in its field of view or an impact is sensed. Requires a constant power connection.
4.2 ADAS (Advanced Driver-Assistance System) Functions
The IROAD TR7 includes ADAS features to enhance driving safety. These functions are available only when an external GPS antenna is connected:
- ระบบเตือนออกนอกเลน (LDWS): Alerts the driver if the vehicle deviates from its lane without signaling.
- ระบบเตือนการชนด้านหน้า (FCWS): Warns the driver of a potential collision with a vehicle ahead.
- ระบบเตือนการออกตัวของรถคันหน้า (FVDW): Notifies the driver when the vehicle in front starts moving after a stop.
4.3 การบันทึกเสียง
The dash camera records audio by default. This feature can be toggled on or off via the mobile application or PC viewเอ่อการตั้งค่า
4.4 การใช้งานแผงสัมผัส
The IROAD TR7 features a touch panel screen for intuitive control. Users can access live view, playback recorded videos, and adjust settings directly on the device. Refer to the on-screen menu for specific options.

ภาพที่ 4.1: ด้านหลัง view of the IROAD TR7 main unit, showcasing its touch panel display for user interaction.
5. การบำรุงรักษา
5.1 การจัดการการ์ด MicroSD
Regularly format the MicroSD card (at least once a month) to maintain optimal recording performance and prevent data corruption. Use a Class 10 or higher MicroSD card for reliable operation. The camera supports capacities from 16GB to 256GB.
5.2 การทำความสะอาด
Use a soft, dry cloth to clean the camera lenses and the touch screen. Avoid using abrasive cleaners or solvents that could damage the device.
6 การแก้ไขปัญหา
- กล้องไม่เปิด: Check the power cable connection and ensure the vehicle's ignition is on (for continuous recording) or the constant power cable is correctly installed (for parking surveillance).
- ปัญหาการบันทึก: Ensure the MicroSD card is inserted correctly and has sufficient free space. Format the MicroSD card if issues persist.
- ปัญหาการเชื่อมต่อ Wi-Fi: Verify the Wi-Fi dongle is securely inserted. Restart the camera and your smartphone's Wi-Fi.
- ADAS functions not working: Confirm that an external GPS antenna is connected and receiving a signal. ADAS features require GPS data.
- หน้าจอสัมผัสไม่ตอบสนอง: รีสตาร์ทอุปกรณ์ หากปัญหายังคงอยู่ โปรดติดต่อฝ่ายบริการลูกค้า
7. ข้อมูลจำเพาะ
| คุณสมบัติ | ข้อมูลจำเพาะ |
|---|---|
| Front Camera Resolution/Frame Rate/Angle | Full HD 1920×1080, 30fps, 142° |
| Rear Camera Resolution/Frame Rate/Angle | HD 1280×720, 30fps, 135° |
| ฟังก์ชั่น ADAS | LDWS, FCWS, FVDW (GPS connection required) |
| เซ็นเซอร์ | 3-axis G-sensor (for impact recording) |
| เสาอากาศ GPS ภายนอก | อุปกรณ์เสริม (แยกจำหน่าย) |
| สื่อบันทึกข้อมูล | MicroSD card 16GB~256GB supported (Class 10 recommended) |
| โหมดการบันทึก | Continuous, Event (Impact), Parking (Motion Detection), Audio Recording |
| การบีบอัดวิดีโอ / เสียง | H.264/PCM |
| อุณหภูมิในการทำงาน | -20℃ ถึง 60℃ |
| PC Viewเอ้อ ความเข้ากันได้ | Windows 7, 8, 10 (32Bit/64Bit) |
| ประเภทจอภาพ | จอสัมผัส LCD |
| วิธีการติดตั้ง | ชนิดของกาว |
8. การรับประกันและการสนับสนุน
For warranty information, please refer to the warranty card included with your product or contact your point of purchase. For technical support or inquiries, please visit the official IROAD webเว็บไซต์หรือติดต่อฝ่ายบริการลูกค้าของพวกเขา


