
D-Link DSL-224
D-Link N300 VDSL2 Router DSL-224 User Manual
Model: DSL-224
1. บทนำ
This manual provides detailed instructions for the installation, configuration, and operation of your D-Link N300 VDSL2 Router, model DSL-224. This device combines a VDSL2/ADSL2+ modem and a high-speed wireless router, offering a complete solution for internet connectivity in your home or small office.
Please read this manual thoroughly before attempting to install or use the device to ensure proper setup and optimal performance.
2. เนื้อหาบรรจุภัณฑ์
ตรวจสอบว่าแพ็คเกจของคุณมีรายการต่อไปนี้:
- D-Link N300 VDSL2 Router (DSL-224)
- อะแดปเตอร์แปลงไฟ
- สายอีเธอร์เน็ต (RJ-45)
- สายโทรศัพท์ (RJ-11)
- คู่มือการติดตั้งแบบด่วน
If any items are missing or damaged, please contact your local D-Link reseller for assistance.
3. ทางกายภาพมากกว่าview
3.1 แผงด้านหน้า
The front panel of the DSL-224 router features LED indicators that provide real-time status information about the device's operation.

ภาพที่ 3.1: ด้านหน้า view of the D-Link DSL-224 Router, showing the status indicator lights. From left to right, these typically include Power, DSL, Internet, Wi-Fi, and LAN activity indicators.
- กำลังไฟ LED: แสดงว่าเราเตอร์เปิดใช้งานอยู่หรือไม่
- DSL LED: Indicates the status of the VDSL/ADSL connection. A solid light means a stable connection.
- ไฟ LED อินเทอร์เน็ต: Indicates internet connectivity. A solid light means the router has an active internet connection.
- ไฟ LED แบบไร้สาย: Indicates wireless network activity. Blinks when data is being transmitted wirelessly.
- ไฟ LED แสดงสถานะ LAN (1-4): Indicate activity on the corresponding Ethernet ports.
3.2 แผงด้านหลัง
The rear panel contains all the physical connection ports for power, DSL line, and Ethernet devices.
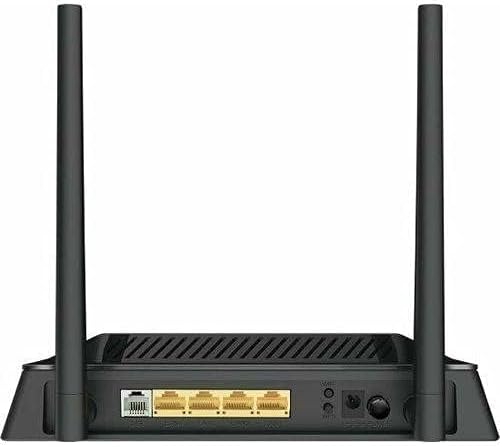
ภาพที่ 3.2: หลัง view of the D-Link DSL-224 Router, displaying the various ports. These include the DSL port, four LAN Ethernet ports, the power input, and a reset button.
- DSL Port (RJ-11): Connects to your VDSL/ADSL line from the wall jack.
- LAN Ports (1-4, RJ-45): Connects to wired devices such as computers, gaming consoles, or network printers.
- พอร์ตไฟ: เชื่อมต่อกับอะแดปเตอร์ไฟฟ้าที่ให้มา
- ปุ่มรีเซ็ต: Used to restore the router to factory default settings. Press and hold for 5-10 seconds while the device is powered on.
- ปุ่ม WPS: For easy and secure wireless connection setup.
- ปุ่มเปิด/ปิด: เพื่อเปิดหรือปิดอุปกรณ์
4. การตั้งค่า
4.1 การติดตั้งฮาร์ดแวร์
- ตำแหน่งเราเตอร์: Place the router in a central location to maximize wireless coverage. Avoid placing it near obstructions or devices that emit radio frequency interference.
- เชื่อมต่อสาย DSL: Connect one end of the phone cable (RJ-11) to the DSL port on the router and the other end to your wall's VDSL/ADSL jack. If you have a splitter, connect it to the splitter's modem port.
- Connect to a Computer (Optional): For initial setup, you may connect a computer directly to one of the LAN ports on the router using an Ethernet cable (RJ-45).
- เชื่อมต่อพลังงาน: Connect the power adapter to the router's power port and then plug the adapter into a power outlet. Press the Power On/Off button if available.
- ตรวจสอบไฟ LED: Wait for the Power, DSL, and Internet LEDs to become solid green. The DSL LED may blink for a few minutes before becoming solid.
4.2 การกำหนดค่าเริ่มต้น (Web อินเตอร์เฟซ)
- เข้าถึง Web อินเทอร์เฟซ: เปิด web browser on a connected computer (wired or wireless). In the address bar, type the router's default IP address (commonly http://192.168.1.1 or http://192.168.0.1) และกด Enter
- เข้าสู่ระบบ: Enter the default username and password. These are usually printed on a sticker on the bottom of the router (e.g., Username: แอดมิน, รหัสผ่าน: แอดมิน or blank).
- เรียกใช้ตัวช่วยการตั้งค่า: Follow the on-screen setup wizard to configure your internet connection (VDSL/ADSL settings provided by your Internet Service Provider) and wireless network (SSID and password).
- เปลี่ยนรหัสผ่านเริ่มต้น: For security, it is highly recommended to change the default administrator password for the router's web อินเทอร์เฟซ
5. การใช้งานเราเตอร์
5.1 Connecting Devices Wirelessly
- ค้นหาเครือข่าย: บนอุปกรณ์ไร้สายของคุณ (แล็ปท็อป สมาร์ทโฟน แท็บเล็ต) ค้นหาเครือข่าย Wi-Fi ที่ใช้งานได้
- เลือก SSID: เลือกชื่อเครือข่าย Wi-Fi (SSID) ที่คุณกำหนดค่าไว้ระหว่างการตั้งค่า
- กรอกรหัสผ่าน: Enter the Wi-Fi password (WPA/WPA2 key) you set.
- Connect using WPS: Alternatively, press the WPS button on the router and then activate WPS on your wireless device within two minutes to establish a connection without entering a password.
5.2 การเชื่อมต่ออุปกรณ์ผ่านสายอีเธอร์เน็ต
Connect an Ethernet cable from the LAN port of your computer or other wired device to any of the available LAN ports (1-4) on the rear of the DSL-224 router.
6. การบำรุงรักษา
การอัปเดตเฟิร์มแวร์ 6.1 รายการ
Periodically check the D-Link support website for firmware updates for your DSL-224 router. Firmware updates can improve performance, add new features, and fix security vulnerabilities. Follow the instructions provided with the firmware update carefully.
6.2 รีเซ็ตเป็นค่าโรงงาน
If you encounter persistent issues or forget your login credentials, you can perform a factory reset:
- With the router powered on, use a paperclip or a thin object to press and hold the Reset button on the rear panel for 5-10 seconds.
- Release the button when the Power LED blinks or all LEDs briefly turn off and then on.
- The router will restart with factory default settings. You will need to reconfigure your internet and wireless settings.
7 การแก้ไขปัญหา
This section addresses common issues you might encounter with your D-Link DSL-224 router.
7.1 ไม่มีการเชื่อมต่ออินเทอร์เน็ต
- ตรวจสอบสายเคเบิล: Ensure all cables (DSL, Ethernet) are securely connected.
- ตรวจสอบไฟ LED: Verify that the Power, DSL, and Internet LEDs are solid green. If the DSL LED is blinking, there might be an issue with your phone line or ISP connection. If the Internet LED is off, check your ISP settings in the router's web อินเทอร์เฟซ
- รีสตาร์ทเราเตอร์: ปิดเราเตอร์ รอ 30 วินาที แล้วเปิดใหม่อีกครั้ง
- การตั้งค่า ISP: Confirm that your VDSL/ADSL settings (VPI/VCI, connection type, username, password) are correctly entered in the router's configuration. Contact your ISP if unsure.
7.2 ไม่สามารถเชื่อมต่อกับ Wi-Fi ได้
- Check WLAN LED: Ensure the WLAN LED on the front panel is lit or blinking.
- รหัสผ่านที่ถูกต้อง: Double-check that you are entering the correct Wi-Fi password (WPA/WPA2 key).
- ความแรงของสัญญาณ: ขยับเข้าไปใกล้เราเตอร์มากขึ้นเพื่อปรับปรุงความแรงของสัญญาณ
- รีสตาร์ทอุปกรณ์: Restart your wireless device and try connecting again.
- รีสตาร์ทเราเตอร์: Restart the router as described above.
7.3 ความเร็วอินเทอร์เน็ตช้า
- แบบมีสาย vs. แบบไร้สาย: Test speed with a wired connection to determine if the issue is with the wireless network or the internet connection itself.
- การรบกวน: Reduce interference by moving the router away from other electronic devices (cordless phones, microwaves).
- การเพิ่มประสิทธิภาพช่องทาง: ในเราเตอร์ web interface, try changing the wireless channel to a less congested one.
- แบนด์วิดท์ของ ISP: Contact your ISP to verify your subscribed speed and check for any network issues on their end.
8. ข้อมูลจำเพาะ
Below are the technical specifications for the D-Link N300 VDSL2 Router DSL-224:
| คุณสมบัติ | คำอธิบาย |
|---|---|
| ยี่ห้อ | ดีลิงค์ |
| ชื่อรุ่น | เดเอสแอล-224 |
| เทคโนโลยีการเชื่อมต่อ | ไร้สาย |
| ประเภทไร้สาย | 802.11n |
| มาตรฐานการสื่อสารไร้สาย | 802.11n |
| ระดับย่านความถี่ | ดูอัลแบนด์ |
| จำนวนพอร์ต | 4 (LAN) |
| ประเภทเสาอากาศ | ที่ตายตัว |
| ส่วนประกอบที่รวมอยู่ | เราเตอร์ |
| อุปกรณ์ที่รองรับ | เครื่องคอมพิวเตอร์ส่วนบุคคล |
| น้ำหนักสินค้า | 510 กรัม |
| ขนาดแพ็คเกจ | 22.2 x 17.4 x 7.8 ซม. |
9. การรับประกันและการสนับสนุน
For warranty information and technical support, please refer to the warranty card included with your product or visit the official D-Link support website. You can typically find drivers, firmware updates, and additional support resources there.
การสนับสนุน D-Link Webเว็บไซต์: www.dlink.com/support (Please note: This is a generic example URL. Refer to your product's specific documentation for the correct regional support link.)
Ask a question about this manual
Ask about setup, troubleshooting, compatibility, parts, safety, or missing instructions. Manuals+ will review the question and use this page’s manual context to help answer it.