
1. บทนำ
This manual provides essential information for the safe and efficient operation of your GIGABYTE AORUS FO48U 48" 4K OLED Gaming Monitor. Please read this manual thoroughly before using the product and retain it for future reference. The AORUS FO48U is designed to deliver a high-performance visual experience with its 4K OLED display, fast refresh rate, and advanced features.
2. ข้อมูลด้านความปลอดภัย
ปฏิบัติตามข้อควรระวังด้านความปลอดภัยต่อไปนี้เพื่อป้องกันความเสียหายต่อจอภาพและเพื่อความปลอดภัยของผู้ใช้:
- ห้ามให้จอภาพโดนฝนหรือความชื้น เพื่อหลีกเลี่ยงอันตรายจากไฟไหม้หรือไฟฟ้าช็อต
- อย่าเปิดจอภาพcasinก. ไม่มีชิ้นส่วนใดที่ผู้ใช้สามารถซ่อมบำรุงเองได้ภายใน แนะนำให้ช่างผู้ชำนาญการซ่อมบำรุงเป็นผู้รับผิดชอบ
- วางจอภาพบนพื้นผิวที่มั่นคงและเรียบเพื่อป้องกันไม่ให้ตก
- ตรวจสอบให้แน่ใจว่ามีการระบายอากาศที่เหมาะสมรอบ ๆ จอภาพ อย่าปิดกั้นช่องระบายอากาศ
- ใช้เฉพาะอะแดปเตอร์แปลงไฟและสายเคเบิลที่ผู้ผลิตจัดมาให้หรือระบุไว้เท่านั้น
- ถอดปลั๊กจอภาพออกจากเต้าเสียบไฟฟ้าในระหว่างที่มีพายุฝนฟ้าคะนองหรือเมื่อไม่ได้ใช้งานเป็นเวลานาน
- หลีกเลี่ยงการสัมผัสหน้าจอด้วยวัตถุมีคมเพื่อป้องกันความเสียหาย
3. เนื้อหาบรรจุภัณฑ์
ตรวจสอบว่ารายการทั้งหมดที่ระบุไว้ด้านล่างนี้รวมอยู่ในแพ็คเกจของคุณ:
- GIGABYTE AORUS FO48U 48" 4K OLED Gaming Monitor
- สายไฟ
- สาย HDMI 2.1
- สายเคเบิล DP 1.4
- USB 3.0 B to A cable
- คู่มือการเริ่มต้นฉบับย่อ (QSG)
- บัตรรับประกัน
- AORUS Remote Control
4. การตั้งค่า
4.1 การตั้งค่าทางกายภาพ
The monitor can be set up using its included stand or a VESA-compatible wall mount.
การประกอบขาตั้ง:
Follow the instructions in the Quick Start Guide to securely attach the stand to the monitor base. Ensure all screws are tightened.
การติดตั้งแบบติดผนัง VESA:
The AORUS FO48U supports VESA wall mounts with a 300 x 300mm pattern. Remove the stand if already attached. Use appropriate screws and a VESA-compatible bracket (not included) to mount the monitor. Refer to your wall mount's instructions for specific installation steps.

ภาพ: ด้านหลัง view of the AORUS FO48U monitor, highlighting the VESA 300x300mm mounting points for wall installation.
4.2 สายเชื่อมต่อ
Connect the necessary cables to the monitor's I/O ports. Ensure the monitor is powered off before connecting or disconnecting cables.

ภาพ: รายละเอียดด้านข้าง view of the monitor's I/O ports, including USB 3.0, USB Upstream, USB Type-C (KVM), DisplayPort 1.4, HDMI 2.1, Headphone Jack, and Audio Line-Out.
- การเชื่อมต่อไฟฟ้า: เชื่อมต่อสายไฟเข้ากับแหล่งจ่ายไฟของจอภาพ จากนั้นจึงเชื่อมต่อกับเต้ารับไฟฟ้า
- อินพุตวิดีโอ: Connect your PC or gaming console using either the provided HDMI 2.1 cable or DisplayPort 1.4 cable. The monitor features two HDMI 2.1 ports and one DisplayPort 1.4.
- การเชื่อมต่อ USB: Connect the USB 3.0 B to A cable from your PC to the monitor's USB Upstream port to enable the monitor's USB 3.0 ports and KVM functionality.
- USB Type-C (KVM): For KVM functionality, connect a USB Type-C cable (10Gbps Type-C cable required, not always included) from your device to the monitor's USB Type-C port. This allows control of multiple devices with a single keyboard and mouse connected to the monitor.
- เอาต์พุตเสียง: Use the Headphone Jack or Audio Line-Out for external audio devices.
4.3 การเปิดเครื่องครั้งแรก
After connecting all necessary cables, press the power button on the monitor to turn it on. The monitor will automatically detect the active input source. If no signal is detected, ensure your source device is powered on and correctly connected.
5. คู่มือการใช้งาน
5.1 การนำทางบนหน้าจอ (OSD)
The monitor's settings can be adjusted using the OSD menu, typically accessed via a joystick or buttons on the monitor's rear or bottom edge, or with the included AORUS Remote Control.
- Use the joystick/buttons or remote to navigate through menu options.
- Press to select an option or enter a sub-menu.
- Move left/right or up/down to adjust values or select different settings.
- Press the back button or move the joystick in a specific direction (as indicated on-screen) to exit menus.
5.2 คุณสมบัติหลัก
The AORUS FO48U offers several features for an enhanced viewประสบการณ์การเล่นเกมและการเล่นเกม:
- ความละเอียด 4K UHD (3840x2160): Provides crisp, detailed visuals.
- อัตราการรีเฟรช 120Hz: Ensures smooth motion for gaming and fast-paced content.
- เวลาตอบสนอง 1 มิลลิวินาที (GTG): ช่วยลดปัญหาภาพซ้อนและภาพเบลอจากการเคลื่อนไหว
- FreeSync Premium Support: ซิงโครไนซ์อัตราการรีเฟรชของจอภาพกับ GPU ของคุณ เพื่อการเล่นเกมที่ไร้ภาพฉีกขาด
- 10-bit Color / 98% DCI-P3 / 130% sRGB: Delivers accurate and vibrant color reproduction.

Image: Visual comparison demonstrating the difference between 1ms response time at 120Hz refresh rate and 5ms response time at 60Hz, illustrating smoother motion with higher specifications.
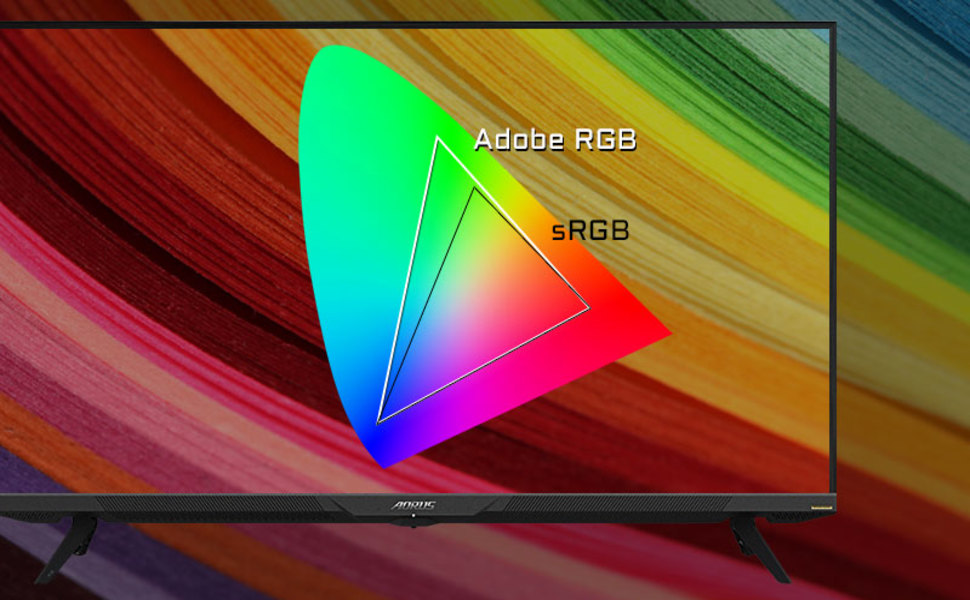
Image: A visual representation of color gamut, comparing Adobe RGB and sRGB color spaces, indicating the monitor's wide color coverage.
5.3 คุณสมบัติพิเศษ
The monitor includes several advanced features accessible via the OSD or OSD Sidekick software:
- OSD Sidekick: A software utility that allows you to control OSD settings directly from your desktop.
- ภาพซ้อนภาพ (PiP) / ภาพต่อภาพ (PbP): Display content from multiple sources simultaneously on the screen.
- แดชบอร์ด: Real-time hardware information display (e.g., CPU/GPU temperature, fan speed).
- อีควอไลเซอร์สีดำ: Enhances visibility in dark areas without overexposing bright areas.
- ผู้ช่วยเกม: Provides in-game enhancements like crosshairs, timers, and refresh rate counters.
- Space Audio: Offers 5 modes of audio experiences for immersive sound.
- KVM Feature: Allows you to control multiple devices (e.g., two PCs) connected to the monitor using a single keyboard and mouse. Connect devices via USB Type-C and USB 3.0 Upstream ports.

Image: A diagram showing how the Type-C KVM feature allows switching between a desktop PC and a laptop connected to the monitor using one keyboard and mouse.
6. การบำรุงรักษา
6.1 การทำความสะอาดจอภาพ
To clean the monitor, first unplug the power cord. Use a soft, lint-free cloth lightly dampened with water or a mild, non-abrasive screen cleaner. Do not spray cleaner directly onto the screen. Avoid using alcohol, ammonia, or abrasive cleaners, as they can damage the screen surface.
6.2 การดูแลรักษา OLED และการป้องกันการเบิร์นอิน
OLED displays are susceptible to image retention (burn-in) if static images are displayed for extended periods. To prolong the life of your OLED panel:
- Avoid displaying static images (e.g., desktop icons, taskbars, logos) for long durations.
- Utilize screen savers or dynamic wallpapers.
- Enable the monitor's built-in OLED care features (e.g., pixel shift, pixel refresh, logo luminance adjustment) through the OSD menu.
- Reduce screen brightness when not needed.
- Power off the monitor when not in use.
7 การแก้ไขปัญหา
หากคุณพบปัญหาเกี่ยวกับจอภาพของคุณ โปรดดูปัญหาทั่วไปและวิธีแก้ไขต่อไปนี้:
| ปัญหา | สาเหตุที่เป็นไปได้ | สารละลาย |
|---|---|---|
| ไม่มีภาพบนหน้าจอ | Power cable disconnected; Video cable disconnected or loose; Incorrect input source selected; Source device off. | Check power and video cable connections; Ensure source device is on; Select correct input source via OSD. |
| ภาพเบลอหรือบิดเบี้ยว | Incorrect resolution; Video cable quality; Graphics card driver issues. | Set display resolution to 3840x2160; Use high-quality HDMI 2.1 or DP 1.4 cables; Update graphics drivers. |
| Screen randomly turns off/on | Loose video cable; Power supply issue; Monitor firmware issue; Source device instability. | Ensure video cables are securely connected; Try a different power outlet; Check for and install the latest monitor firmware updates from GIGABYTE's website; Test with a different source device. |
| ไม่มีเสียง | Volume too low or muted; Incorrect audio output selected; Audio cable disconnected. | Adjust monitor volume; Select correct audio output in PC settings; Ensure external speakers/headphones are connected. |
| KVM feature not working | Incorrect USB cable; USB Upstream cable not connected; Devices not properly configured. | Ensure a 10Gbps USB Type-C cable is used for Type-C connection; Connect the USB 3.0 B to A cable to your primary PC; Refer to the OSD Sidekick software for KVM setup. |
8. ข้อมูลจำเพาะ
Key technical specifications for the GIGABYTE AORUS FO48U monitor:
| คุณสมบัติ | รายละเอียด |
|---|---|
| ขนาดหน้าจอ | 48 นิ้ว |
| ประเภทแผง | โอแอลอีดี |
| ปณิธาน | 3840 x 2160 (4K UHD) |
| อัตราการรีเฟรช | 120เฮิรตซ์ |
| เวลาตอบสนอง | 1ms (GTG) |
| ช่วงสี | 98% DCI-P3 / 130% sRGB |
| ความลึกของสี | 10 บิต |
| Viewอิงแองเกิล | 178°(สูง)/178°(ต่ำ) |
| การเชื่อมต่อ | 2x HDMI 2.1, 1x DisplayPort 1.4, 1x USB Type-C (KVM), 2x USB 3.0, 1x USB 3.0 Upstream, Earphone Jack, Audio Line-Out |
| ลำโพง | 2x 15W, 1x 20W (Space Audio) |
| แท่นยึด VESA | 300 x 300มม. |
| ขนาด (กxสxล) | 26.58 x 42.07 x 9.89 นิ้ว (พร้อมขาตั้ง) |
| น้ำหนัก | 39.8 ปอนด์ (พร้อมขาตั้ง) |
9. การรับประกันและการสนับสนุน
For detailed warranty information, please refer to the warranty card included in your product package or visit the official GIGABYTE website. For technical support, driver downloads, and further assistance, please visit the GIGABYTE support page or contact their customer service.
GIGABYTE อย่างเป็นทางการ Webเว็บไซต์: www.gigabyte.com