
การแนะนำ
This manual provides detailed instructions for the installation, operation, and maintenance of your Biostar TB360-BTC PRO 2.0 motherboard. Designed for cryptocurrency mining, this motherboard supports Intel 8th and 9th Generation Core processors and up to 12 GPUs. Please read this manual thoroughly before proceeding with installation and setup.
สินค้าเกินview
The Biostar TB360-BTC PRO 2.0 is a specialized motherboard built for high-performance cryptocurrency mining. It features an Intel B360 single-chip architecture and supports DDR4 memory.

รูปที่ 1: จากบนลงล่าง view of the Biostar TB360-BTC PRO 2.0 motherboard, showing the LGA 1151 CPU socket, two DDR4 DIMM slots, and multiple PCIe slots.

Figure 2: Angled perspective of the motherboard, illustrating the arrangement of components and extensive connectivity for GPUs.
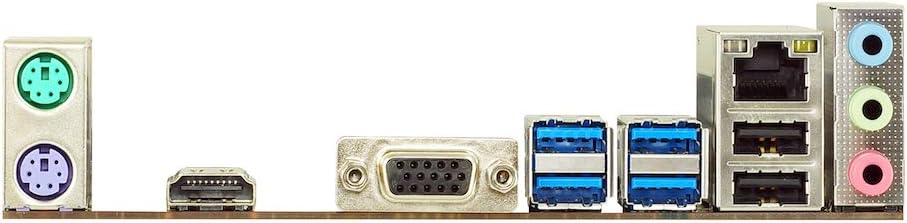
Figure 3: The rear input/output panel provides connectivity for peripherals, network, and display.
คุณสมบัติหลัก
- Supports 9th & 8th Generation Intel Core Processor
- Intel B360 single chip architecture
- Support M.2 SATA III (6Gb/s) Connector
- Support 2-DIMM DDR4-1866/2133/2400/2666 up to 32G maximum capacity
- Support 12 x PCIe 3.0 slots
- Only 8th and 9th gen LGA 1151 CPUs with Integrated graphics are compatible
คู่มือการติดตั้ง
1. CPU and RAM Installation
Install your compatible 8th or 9th Generation Intel LGA1151 CPU (with integrated graphics) and DDR4 RAM into the motherboard. Ensure proper seating and secure retention.
2. การต่อสายไฟ
Connect the 24-pin ATX power connector to the motherboard.
หมายเหตุสำคัญ: The 24-pin connector only supplies power to the motherboard. It does not provide additional power to the 8-pin EPS or the 6-pin AUX ports at the bottom of the motherboard. The 6-pin AUX ports on the bottom are output ports designed for attaching a PCIe cable to a riser or GPU. They are not designed to be plugged into a power supply.
3. การติดตั้ง GPU
Install your graphics cards into the PCIe 3.0 slots. Use powered risers for stability and optimal performance.
4. การเชื่อมต่อจอภาพ
Plug the HDMI cable into the onboard HDMI port to connect to a display. The onboard HDMI is the primary video output.
5. เปิดเครื่องครั้งแรก
Power on your system using the power switch.
6. การตั้งค่า BIOS
Access the BIOS setup utility during boot (usually by pressing DEL or F2). Configure the following settings:
- นำทางไปที่ Advanced > PCI Subsystem Settings.
- ชุด ถอดรหัส 4G ขึ้นไป ถึง เปิดใช้งานแล้ว.
- นำทางไปที่ Chipset > PCH-IO Configuration.
- ชุด PCI Express Configuration > PCIe Speed ถึง Gen2 or Gen1 (for all slots).
- ชุด การสนับสนุน CSM ถึง พิการ.
- นำทางไปที่ Chipset > System Agent (SA) Configuration > PCI Express Configuration.
- ชุด PCIe x16 Speed ถึง Gen2 or Gen1.
- ทำให้มั่นใจ โหมดการขุด is เปิดใช้งานแล้ว.
บันทึก: BIOS settings must be adjusted to support 12 GPUs.
Video: This video demonstrates the setup and operation of a mining rig using a similar motherboard, providing visual guidance for component installation and initial boot.
คำแนะนำการใช้งาน
ระบบปฏิบัติการ
This motherboard is compatible with Windows 10. Ensure your operating system is installed in UEFI mode for proper functionality, especially when using M.2 drives.
Mining Software
Install your preferred cryptocurrency mining software. Configure it according to the software's instructions and your specific GPU setup.
การซ่อมบำรุง
- Regularly clean dust from the motherboard, GPUs, and fans to prevent overheating.
- Periodically check all cable connections (power, data, PCIe risers) to ensure they are secure.
- Monitor GPU temperatures and system stability to ensure optimal performance.
- Keep your BIOS and GPU drivers updated to the latest stable versions.
การแก้ไขปัญหา
No Video When Booting
- Check that your CPU has internal graphics. CPUs ending with 'F' in the model number will NOT work.
- Ensure your CPU is an 8th or 9th Gen Intel LGA 1151. Other generations will NOT work.
- Try removing and replacing the CMOS battery.
บันทึก: The video titled "Didn't work." shows a system failing to boot, which could be related to these issues.
Motherboard Won't Boot or Recognize SSD/M.2 Drive
- If using an M.2 drive, ensure it's a SATA III drive. NVMe M.2 drives are NOT supported as they use PCIe lanes.
- Make sure the OS is installed on the drive in UEFI mode.
บันทึก: The video titled "Works great!" shows a functional mining rig, implying successful boot and drive recognition.
Motherboard Won't Boot After 4, 5, or 6 GPUs are Added
- Check all BIOS settings as outlined in the "Setup Guide" section.
- Ensure the OS is installed in UEFI mode.
- Risers are a common source of issues; check them if the above suggestions don't resolve the problem.
บันทึก: The video titled "Next generation superior mining board!! (Video proof!)" demonstrates a successful multi-GPU setup.
For further assistance, please contact support@deepinthemine.com.
ข้อมูลจำเพาะ
| คุณสมบัติ | รายละเอียด |
|---|---|
| ขนาดสินค้า | 10 x 13 x 3 นิ้ว |
| น้ำหนักสินค้า | 2.16 ปอนด์ |
| ผู้ผลิต | ไบโอสตาร์ |
| ASIN | B0985LF8XT |
| หมายเลขรุ่นสินค้า | TB360-BTC PRO 2.0 |
| วันที่พร้อมใช้งานครั้งแรก | วันที่ 28 มิถุนายน 2021 |
| ยี่ห้อ | ไบโอสตาร์ |
| ซ็อคเก็ตซีพียู | แอลจีเอ 1151 |
| อุปกรณ์ที่รองรับ | เครื่องคอมพิวเตอร์ส่วนบุคคล |
| เทคโนโลยีหน่วยความจำ RAM | DDR4 |
| โปรเซสเซอร์ที่เข้ากันได้ | โปรเซสเซอร์ Intel Core รุ่นที่ 8 |
| ประเภทชิปเซ็ต | อินเทล B360 |
| ความเร็วสัญญาณนาฬิกาหน่วยความจำ | 2666 เมกะเฮิรตซ์ |
| แพลตฟอร์ม | วินโดวส์ 10 |
| ชื่อรุ่น | TB360-BTC PRO 2.0 |
| รุ่นซีพียู | คอร์ ไอ 7 |
การรับประกันและการสนับสนุน
For warranty information, please refer to the documentation provided with your purchase or contact your retailer.
For technical support and troubleshooting, please contact Biostar customer service or email support@deepinthemine.com.