
1. บทนำ
Thank you for choosing the KETOTEK Digital Thermostat Plug KT3100. This device is designed to precisely control temperature for various heating and cooling applications, offering both temperature regulation and timing functions. Please read this manual carefully before operation to ensure safe and efficient use.
2. ข้อมูลด้านความปลอดภัย
- ตรวจสอบให้แน่ใจเสมอว่าอุปกรณ์ต่อสายดินอย่างถูกต้อง
- ห้ามใช้เกินกำลังรับโหลดสูงสุด 16A / 3680W
- Keep the device and sensor away from water or excessive moisture, unless specified for waterproof use.
- ห้ามถอดประกอบหรือพยายามซ่อมแซมอุปกรณ์ด้วยตนเอง โปรดติดต่อช่างผู้ชำนาญการเพื่อขอรับบริการ
- Ensure the power supply matches the device's requirements (230V AC).
- เก็บให้พ้นจากมือเด็ก
3. สินค้าหมดview
The KETOTEK KT3100 Digital Thermostat Plug features a clear digital display and intuitive buttons for easy operation. It includes a remote temperature sensor for accurate readings.

รูปที่ 3.1 : ด้านหน้า view of the KETOTEK KT3100 Digital Thermostat Plug with key components labeled. This includes the display showing measured, start, and stop temperatures, heating/refrigeration mode indicators, output work indicator, and control buttons (MODE, SET, UP, DOWN, Reset).
คุณสมบัติหลัก:
- ฟังก์ชันควบคุมอุณหภูมิ: Range -40°C to 120°C, with 0.1°C resolution.
- ฟังก์ชันการตั้งเวลา (F01-F04): Cycle timer, countdown ON, countdown OFF, and combined countdown ON/OFF modes.
- การสอบเทียบอุณหภูมิ: Adjust readings from -9.9°C to 9.9°C.
- ฟังก์ชั่นหน่วยความจำ: คงการตั้งค่าไว้แม้ไฟดับ
- ฟังก์ชั่นรีเซ็ต: Restores factory default settings.

Figure 3.2: Visual representation of the main functions of the KT3100: Heating/Refrigeration, Timing, Temperature Calibration, Memory, and Reset.
4. ข้อมูลจำเพาะ
| พารามิเตอร์ | ค่า |
|---|---|
| แบบอย่าง | KT3100 |
| แหล่งพลังงาน | ไฟฟ้ากระแสสลับ 230 โวลต์ |
| โหลดเอาต์พุตสูงสุด | 16A/3680W |
| ช่วงการควบคุมอุณหภูมิ | -40°C ถึง 120°C |
| ความละเอียดของอุณหภูมิ | 0.1 องศาเซลเซียส |
| ความแม่นยำในการควบคุม | ±1% |
| ประเภทเซนเซอร์ | NTC10K/B3950 Waterproof Sensor |
| ความยาวสายเคเบิลเซนเซอร์ | 1.7 เมตร (170 เซนติเมตร) |
| ช่วงเวลา | 0-99 ชม. 59 นาที |
| ช่วงการสอบเทียบอุณหภูมิ | -9.9°C ถึง 9.9°C |
| ขนาดสินค้า (กว้าง x ยาว x สูง) | 12 ซม. x 5.8 ซม. x 3.2 ซม. |
| ประเภทจอภาพ | ดิจิตอล |
| สี | สีขาว |

Figure 4.1: Dimensions of the KT3100 thermostat plug and its 1.7-meter temperature sensor cable.
5. การตั้งค่า
- แกะ: Carefully remove the thermostat plug and sensor from its packaging.
- เชื่อมต่อเซ็นเซอร์: Plug the NTC10K/B3950 temperature sensor into the designated port on the thermostat plug.
- เซ็นเซอร์ตำแหน่ง: Place the sensor in the area where you want to measure and control the temperature. Ensure it is not directly exposed to heating or cooling elements, which could lead to inaccurate readings.
- เสียบปลั๊ก: Insert the KETOTEK KT3100 into a standard 230V AC power outlet.
- เชื่อมต่ออุปกรณ์: Plug your heating or cooling appliance (e.g., heater, fan, refrigerator) into the outlet on the KETOTEK KT3100.
- Initial Reset (Recommended): If the device does not immediately display temperature or seems stuck in a timing mode, press the small 'Reset' button (usually located near the 'UP' and 'DOWN' buttons) with a pointed object (e.g., a pen tip) to restore default settings and enter temperature control mode.
6. คู่มือการใช้งาน
โหมดควบคุมอุณหภูมิ 6.1 โหมด
This mode allows you to set a desired temperature range for your connected appliance.
- ตั้งค่าอุณหภูมิเริ่มต้น: กดปุ่ม ชุด button once. The 'Start Temperature' value will flash. Use the UP และ ลง buttons to adjust the desired temperature at which the appliance should turn ON. Press ชุด เพื่อยืนยันอีกครั้ง
- ตั้งอุณหภูมิหยุด: After setting the start temperature, press the ชุด button again. The 'Stop Temperature' value will flash. Use the UP และ ลง buttons to adjust the desired temperature at which the appliance should turn OFF. Press ชุด a third time to confirm and exit setting mode.
- Heating vs. Cooling:
- โหมดการให้ความร้อน: If the Start Temperature is set ต่ำกว่า than the Stop Temperature (e.g., Start 20°C, Stop 25°C), the device operates in heating mode. The appliance will turn ON when the measured temperature drops to 20°C and turn OFF when it reaches 25°C.
- โหมดทำความเย็น: If the Start Temperature is set สูงกว่า than the Stop Temperature (e.g., Start 25°C, Stop 20°C), the device operates in cooling mode. The appliance will turn ON when the measured temperature rises to 25°C and turn OFF when it drops to 20°C.

รูปที่ 6.1: อดีตamples of the LCD display in Temperature Control Mode and different Timing Modes (F01, F02, F03, F04).
6.2 Timing Functions (F01-F04)
กดปุ่ม โหมด button repeatedly to cycle through the different timing modes (F01, F02, F03, F04). Once in a timing mode, press ชุด to adjust the time parameters using UP และ ลง buttons. The time range is 0-99 hours and 59 minutes.
- F01 - โหมดตั้งเวลาแบบวนรอบ: The output will turn ON for a set duration (ON time) and then turn OFF for another set duration (OFF time), repeating the cycle.
- F02 - โหมดนับถอยหลังเปิด: The output will remain OFF for a set countdown period, and then turn ON and stay ON indefinitely.
- F03 - โหมดปิดการนับถอยหลัง: The output will remain ON for a set countdown period, and then turn OFF and stay OFF indefinitely.
- F04 - โหมดเปิด/ปิดการนับถอยหลัง: The output will turn ON for a set duration (CD ON time) and then turn OFF for another set duration (CD OFF time), completing a single cycle.
6.3 การปรับเทียบอุณหภูมิ
If you find the measured temperature to be inaccurate compared to a known reference thermometer, you can calibrate the device:
- With the device in normal operating mode (displaying measured temperature), press and hold the ชุด button for approximately 3 seconds until the display changes to show 'CAL' or a calibration value.
- ใช้ UP และ ลง buttons to adjust the calibration value (from -9.9°C to 9.9°C). A positive value increases the displayed temperature, a negative value decreases it.
- กด ชุด again to save the calibration and exit.
6.4 รีเซ็ตฟังก์ชัน
To restore the device to its factory default settings, locate the small 'Reset' button (often a small pinhole) and press it with a pointed object. This will clear all custom settings and return the device to its initial state.
7. การบำรุงรักษา
- การทำความสะอาด: เช็ดอุปกรณ์ด้วยผ้าแห้งเนื้อนุ่ม ห้ามใช้สารทำความสะอาดที่มีฤทธิ์กัดกร่อน หรือแช่อุปกรณ์ในน้ำ
- การดูแลเซ็นเซอร์: ตรวจสอบให้แน่ใจว่าเซ็นเซอร์วัดอุณหภูมิสะอาดและปราศจากสิ่งสกปรก หลีกเลี่ยงการงอหรือทำให้สายเคเบิลของเซ็นเซอร์เสียหาย
- พื้นที่จัดเก็บ: เมื่อไม่ได้ใช้งานเป็นเวลานาน ควรเก็บอุปกรณ์ไว้ในที่แห้งและเย็น หลีกเลี่ยงแสงแดดโดยตรง
8 การแก้ไขปัญหา
| ปัญหา | สาเหตุที่เป็นไปได้ | สารละลาย |
|---|---|---|
| อุปกรณ์ไม่เปิดเครื่อง | No power from outlet; device faulty. | Check power outlet with another appliance. Ensure the device is properly plugged in. If still no power, contact support. |
| การวัดอุณหภูมิไม่แม่นยำ | Sensor placement; calibration needed. | Relocate sensor away from direct heat/cold sources. Perform temperature calibration as described in Section 6.3. |
| Appliance not turning ON/OFF at set temperatures. | Incorrect start/stop temperature settings; heating/cooling mode misconfigured. | Review and adjust start/stop temperatures (Section 6.1). Ensure the logic (Start < Stop for heating, Start > Stop for cooling) matches your intended operation. |
| Device stuck in timer mode or unresponsive. | Software glitch; incorrect mode selection. | Press the small 'Reset' button with a pointed object to return to default temperature control mode. Cycle through modes using the MODE button. |
| Output indicator not lighting up when appliance should be active. | Appliance not plugged in correctly; device fault. | Ensure the appliance is securely plugged into the thermostat. Check if the appliance itself is working by plugging it directly into a wall outlet. |
9. การสมัคร
The KETOTEK KT3100 Digital Thermostat Plug is versatile and can be used in a variety of settings:
- บ้าน: For controlling room heaters, fans, or small refrigerators.
- ตู้ฟักไข่: Maintaining precise temperatures for hatching eggs.
- เรือนกระจก: Regulating temperature for optimal plant growth.
- กรงเลี้ยงสัตว์เลื้อยคลาน: Ensuring stable temperatures for pets.
- การเพาะเลี้ยงสัตว์น้ำ: Controlling water temperature for aquatic life.
- การให้ความร้อนแก่ผลึกคาร์บอน: Managing heating panels.
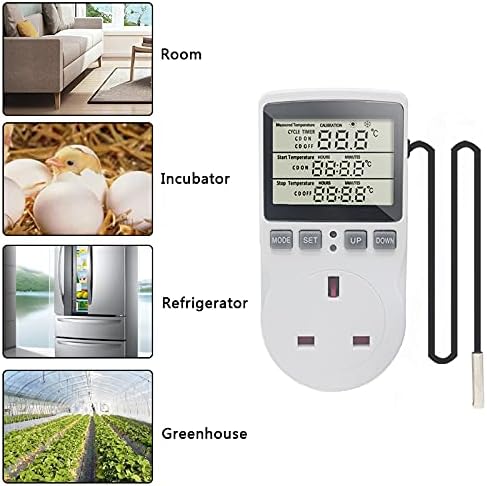
รูปที่ 9.1: อดีตamples of common applications for the KT3100 thermostat, including home heating, incubators, refrigeration, and greenhouses.
10. การรับประกันและการสนับสนุน
KETOTEK products are designed for reliability and performance. This product comes with a standard manufacturer's warranty against defects in materials and workmanship. For warranty claims, technical support, or any questions regarding the operation of your KT3100 Digital Thermostat Plug, please refer to the contact information provided with your purchase or visit the official KETOTEK webเว็บไซต์.