
1. สินค้าหมดview
The Biostar Racing B550M-Silver is a micro-ATX motherboard designed for AMD AM4 socket processors, including AMD 3rd Gen Ryzen (Matisse) and future Ryzen 4th Gen series. It features the AMD B550 chipset, offering support for PCIe 4.0, DDR4 memory, and high-speed M.2 storage. This motherboard is built for reliable performance in various computing applications.

ภาพที่ 1.1: จากบนลงล่าง view of the Biostar Racing B550M-Silver motherboard, showing the CPU socket, RAM slots, PCIe slots, and heatsinks.
คุณสมบัติหลัก:
- Supports AMD 3rd Gen Ryzen (Matisse) and future Ryzen 4th Gen series processors.
- Micro ATX Form Factor for compact builds.
- Supports 4-DIMM DDR4 memory up to 128GB maximum capacity, with speeds up to 4933+(OC) MHz.
- Features PCIe M.2 4.0 (64Gb/s) for high-speed NVMe SSDs.
- Includes USB 3.2 Gen2 ports for fast data transfer.
- Equipped with HDMI 2.1 supporting 4K resolution.
- Built with 2.5Guard for enhanced network protection.
2. ข้อควรระวังเพื่อความปลอดภัย
Observe the following safety guidelines during installation and operation to prevent damage to the motherboard or injury to yourself.
- การป้องกันไฟฟ้าสถิต (ESD): Always wear an anti-static wrist strap or frequently touch a grounded metal object before handling the motherboard and its components.
- การตัดการเชื่อมต่อไฟฟ้า: โปรดตรวจสอบให้แน่ใจว่าได้ถอดปลั๊กไฟออกจากเต้ารับที่ผนังแล้วก่อนทำการติดตั้งหรือถอดชิ้นส่วนใดๆ
- ความเข้ากันได้ของส่วนประกอบ: Verify that all components (CPU, RAM, GPU, PSU) are compatible with the Biostar Racing B550M-Silver motherboard. Refer to the specifications section.
- การจัดการที่เหมาะสม: Hold the motherboard by its edges. Avoid touching sensitive components or circuits.
- การระบายอากาศ : ตรวจสอบให้แน่ใจว่ามีการระบายอากาศที่เพียงพอภายในเคสคอมพิวเตอร์เพื่อป้องกันความร้อนสูงเกินไป
- การใช้เครื่องมือ: Use appropriate tools and avoid excessive force when installing components.
3. เนื้อหาบรรจุภัณฑ์
Verify that all items are present in the package before proceeding with installation. If any item is missing or damaged, contact your retailer.
- Biostar Racing B550M-Silver Motherboard
- I / O Shield
- สายข้อมูล SATA
- แพ็คเกจสกรู M.2
- ไดร์เวอร์ซีดี/USB (อาจแตกต่างกันไปตามภูมิภาค)
- คู่มือการติดตั้งแบบด่วน
4. เค้าโครงเมนบอร์ด
ทำความคุ้นเคยกับส่วนประกอบและขั้วต่อต่างๆ บนเมนบอร์ดก่อนการติดตั้ง
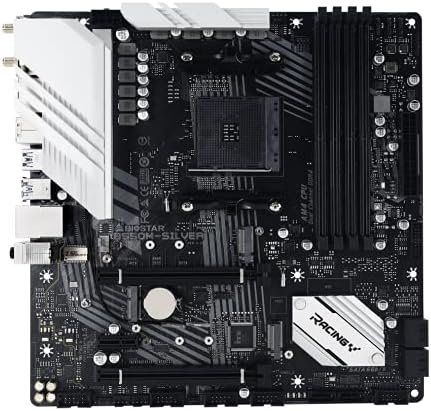
ภาพที่ 4.1: มุม view of the Biostar Racing B550M-Silver motherboard, highlighting the CPU socket, DIMM slots, and various headers.
ส่วนประกอบหลัก:
- ซ็อกเก็ต CPU (AM4): Located centrally, designed for AMD Ryzen processors.
- ช่องเสียบ DIMM (DDR4): Four slots for installing DDR4 memory modules.
- สล็อต PCIe: Includes PCIe 4.0 x16 slot for graphics cards and additional PCIe x1 slots for expansion cards.
- สล็อต M.2: High-speed slots for NVMe SSDs.
- พอร์ต SATA 6Gb/s: Connectors for traditional SATA storage devices.
- ส่วนหัวแผงด้านหน้า: Connectors for case buttons, LEDs, and front USB/audio ports.
- ขั้วต่อสายไฟ: 24-pin ATX power connector and 8-pin CPU power connector.
แผง I/O ด้านหลัง:

Image 4.2: Rear I/O panel of the Biostar Racing B550M-Silver motherboard, showing various connectivity ports.
- พอร์ต USB: Various USB 2.0, USB 3.2 Gen1, and USB 3.2 Gen2 ports.
- เอาต์พุตวิดีโอ: HDMI 2.1 for display connectivity (requires compatible APU).
- พอร์ต LAN: Ethernet port for network connection.
- แจ็คเสียง: สำหรับลำโพง หูฟัง และไมโครโฟน
- พอร์ต PS/2: สำหรับคีย์บอร์ดหรือเมาส์รุ่นเก่า
- ขั้วต่อเสาอากาศ Wi-Fi: For optional Wi-Fi module.
5. การติดตั้งฮาร์ดแวร์
Follow these steps carefully to install your components onto the motherboard.
5.1. การติดตั้งซีพียู
- เปิดคันโยกซ็อกเก็ต CPU
- จัดตำแหน่งเครื่องหมายรูปสามเหลี่ยมบนซีพียูให้ตรงกับเครื่องหมายบนซ็อกเก็ต
- วาง CPU ลงในซ็อกเก็ตอย่างเบามือโดยไม่ต้องออกแรง
- ปิดก้านซ็อกเก็ตเพื่อยึดซีพียู
5.2. การติดตั้งตัวระบายความร้อน CPU
ติดตั้งพัดลมระบายความร้อน CPU ตามคำแนะนำของผู้ผลิต ตรวจสอบให้แน่ใจว่าได้ทาซิลิโคนระบายความร้อนอย่างถูกต้องและติดตั้งอย่างแน่นหนา
5.3. การติดตั้งหน่วยความจำ (RAM)
- คลายคลิปที่ปลายทั้งสองด้านของช่องเสียบ DIMM
- จัดตำแหน่งรอยบากบนโมดูลหน่วยความจำ DDR4 ให้ตรงกับคีย์ในช่อง DIMM
- กดปลายทั้งสองข้างของโมดูลหน่วยความจำให้แน่นจนกระทั่งคลิปล็อคเข้าที่
- For dual-channel configuration, refer to the motherboard manual for recommended slot pairing.
5.4. การติดตั้งอุปกรณ์จัดเก็บข้อมูล
การติดตั้ง M.2 SSD:
- Locate the M.2 slot and remove the standoff screw.
- ใส่ M.2 SSD เข้าไปในช่องโดยทำมุม 30 องศา
- กด SSD ลงไปและยึดให้แน่นด้วยสกรูยึด
การติดตั้งไดรฟ์ SATA:
- ต่อปลายด้านหนึ่งของสายเคเบิลข้อมูล SATA เข้ากับพอร์ต SATA บนเมนบอร์ด
- Connect the other end to your SATA hard drive or SSD.
- เชื่อมต่อสายไฟ SATA จากแหล่งจ่ายไฟเข้ากับฮาร์ดไดรฟ์
5.5. การติดตั้งการ์ดขยาย (PCIe)
- จัดวางการ์ดกราฟิกหรือการ์ดขยาย PCIe อื่นๆ ให้ตรงกับช่อง PCIe ที่เหมาะสม
- กดลงไปให้แน่นจนกว่าการ์ดจะเข้าที่ในช่องเสียบอย่างสมบูรณ์
- ยึดการ์ดเข้ากับเคสคอมพิวเตอร์ด้วยสกรู
- Connect any required PCIe power cables from the power supply to the graphics card.
5.6. การเชื่อมต่อพาวเวอร์ซัพพลาย
- Connect the 24-pin ATX power cable from the power supply to the main power connector on the motherboard.
- Connect the 8-pin CPU power cable (EPS 12V) from the power supply to the CPU power connector near the CPU socket.
5.7. Case Mounting and Front Panel Connections
- ติดตั้งแผ่นปิดพอร์ต I/O เข้ากับช่องเปิดด้านหลังของเคสคอมพิวเตอร์ของคุณ
- วางเมนบอร์ดลงในเคสอย่างระมัดระวัง โดยจัดตำแหน่งรูสกรูให้ตรงกับตัวรองรับ
- ยึดเมนบอร์ดด้วยสกรู
- Connect the front panel cables (Power SW, Reset SW, HDD LED, Power LED) to their respective headers on the motherboard. Refer to the motherboard manual for exact pin assignments.
- Connect front USB and audio cables to their corresponding headers.
6. Initial System Setup and BIOS
After hardware installation, proceed with the initial system setup.
6.1. การบูตครั้งแรก
Connect a monitor, keyboard, and mouse. Power on the system. The system should display the BIOS/UEFI splash screen.
6.2 การเข้าถึง BIOS/UEFI
ระหว่างกระบวนการบูต ให้กดปุ่มซ้ำๆ เดล key (or sometimes F2) เพื่อเข้าสู่ยูทิลิตี้การตั้งค่า BIOS/UEFI
6.3. BIOS/UEFI Navigation
Use the keyboard (arrow keys, Enter, Esc) or mouse to navigate the BIOS/UEFI interface. Important settings to check include boot order, date/time, and fan controls.
6.4. การติดตั้งไดร์เวอร์
After installing your operating system, install the necessary drivers for the motherboard chipset, LAN, audio, and any other integrated components. These can typically be found on the included driver CD/USB or downloaded from the Biostar official webเว็บไซต์.
7. การติดตั้งระบบปฏิบัติการ
To install an operating system (e.g., Windows, Linux), you will need an installation medium (USB drive or DVD) and a valid product key.
- Insert the OS installation medium.
- Access the BIOS/UEFI and set the boot order to prioritize the installation medium.
- Save changes and exit BIOS/UEFI. The system will boot from the installation medium.
- Follow the on-screen prompts to complete the operating system installation.
8. การบำรุงรักษา
การบำรุงรักษาอย่างสม่ำเสมอจะช่วยให้เมนบอร์ดของคุณมีอายุการใช้งานยาวนานและทำงานได้อย่างเสถียร
8.1. การทำความสะอาด
- Periodically clean dust from inside the computer case, especially around fans, heatsinks, and vents.
- Use compressed air to remove dust. Avoid using a vacuum cleaner as it can generate static electricity.
- โปรดตรวจสอบให้แน่ใจว่าระบบปิดเครื่องและถอดปลั๊กออกก่อนทำความสะอาด
8.2. การอัปเดต BIOS/UEFI
BIOS/UEFI updates can provide improved compatibility, stability, and new features. Only update the BIOS/UEFI if necessary and follow the instructions provided by Biostar precisely. Incorrect updates can render the motherboard inoperable.
9. การแก้ไขปัญหาทั่วไป
ส่วนนี้จะนำเสนอวิธีแก้ปัญหาทั่วไปที่คุณอาจพบเจอ
- ไม่มีไฟฟ้า:
- Check if the power supply is connected to the wall outlet and switched on.
- ตรวจสอบให้แน่ใจว่าสายไฟ ATX 24 พินและสายไฟ CPU 8 พินเชื่อมต่อกับเมนบอร์ดอย่างแน่นหนาแล้ว
- ตรวจสอบให้แน่ใจว่าสายเคเบิลของสวิตช์เปิดปิดแผงด้านหน้าเชื่อมต่อกับหัวต่อบนเมนบอร์ดอย่างถูกต้อง
- ไม่มีจอแสดงผล:
- Confirm the monitor is connected to the correct video output (graphics card or motherboard if using an APU).
- ติดตั้งการ์ดจอและโมดูลหน่วยความจำใหม่
- If using an APU, ensure your CPU supports integrated graphics.
- System Not Booting / POST Errors:
- Listen for beep codes (if a speaker is connected) or check the Debug LED on the motherboard for error codes. Refer to the motherboard manual for code meanings.
- Reseat all installed components (CPU, RAM, GPU, M.2 SSDs).
- Try booting with only essential components (CPU, one RAM stick, GPU if no APU).
- Clear CMOS by removing the CMOS battery for a few minutes or using the CLR_CMOS jumper.
- Operating System Not Loading:
- Check the boot order in BIOS/UEFI to ensure the correct drive is selected.
- Verify that the storage drive containing the OS is properly connected and detected.
10. ข้อมูลจำเพาะทางเทคนิค
Below are the detailed technical specifications for the Biostar Racing B550M-Silver motherboard.
| คุณสมบัติ | ข้อมูลจำเพาะ |
|---|---|
| ยี่ห้อ | ไบโอสตาร์ |
| หมายเลขรุ่น | B550M-Silver |
| ซ็อคเก็ตซีพียู | ซ็อคเก็ต AM4 |
| ประเภทชิปเซ็ต | เอเอ็มดี B550 |
| โปรเซสเซอร์ที่เข้ากันได้ | AMD 3rd Generation Ryzen, future Ryzen 4th Gen series |
| เทคโนโลยีหน่วยความจำ RAM | DDR4 |
| มีช่องหน่วยความจำให้เลือก | 4 |
| ขนาดสูงสุดของหน่วยความจำ RAM | 128GB |
| ความเร็วสัญญาณนาฬิกาหน่วยความจำ | Up to 4933+(OC) MHz |
| อินเทอร์เฟซการ์ดกราฟิก | PCI เอ็กซ์เพรส 4.0 |
| Total PCIe Ports | 3 (1x PCIe 4.0 x16, 2x PCIe 3.0 x1) |
| สล็อต M.2 | PCIe M.2 4.0 (64Gb/s) |
| พอร์ต SATA ทั้งหมด | 6 |
| พอร์ต USB รวม | 8 (various USB 2.0, 3.2 Gen1, 3.2 Gen2) |
| จำนวนพอร์ต HDMI ทั้งหมด | 1 (HDMI 2.1) |
| จำนวนพอร์ตอีเธอร์เน็ต | 1 |
| ฟอร์มแฟกเตอร์ | ไมโคร ATX |
11. การรับประกันและการสนับสนุน
11.1. ข้อมูลการรับประกัน
The Biostar Racing B550M-Silver motherboard comes with a 4-year BIOSTAR VIP Care Warranty. This warranty covers defects in materials and workmanship under normal use during the specified period. Please retain your proof of purchase for warranty claims.
11.2. ติดต่อฝ่ายสนับสนุน
For technical assistance, driver downloads, or warranty inquiries, please visit the official Biostar website or contact their customer support directly. Provide your product model number (B550M-Silver) and a detailed description of your issue when seeking support.
Official Biostar Webเว็บไซต์: www.biostar.com.tw