1. บทนำ
This manual provides detailed instructions for the setup, operation, maintenance, and troubleshooting of your UF-TOOLS 7-Inch LCD Digital Microscope. Please read this manual thoroughly before using the device to ensure proper functionality and to maximize its lifespan.
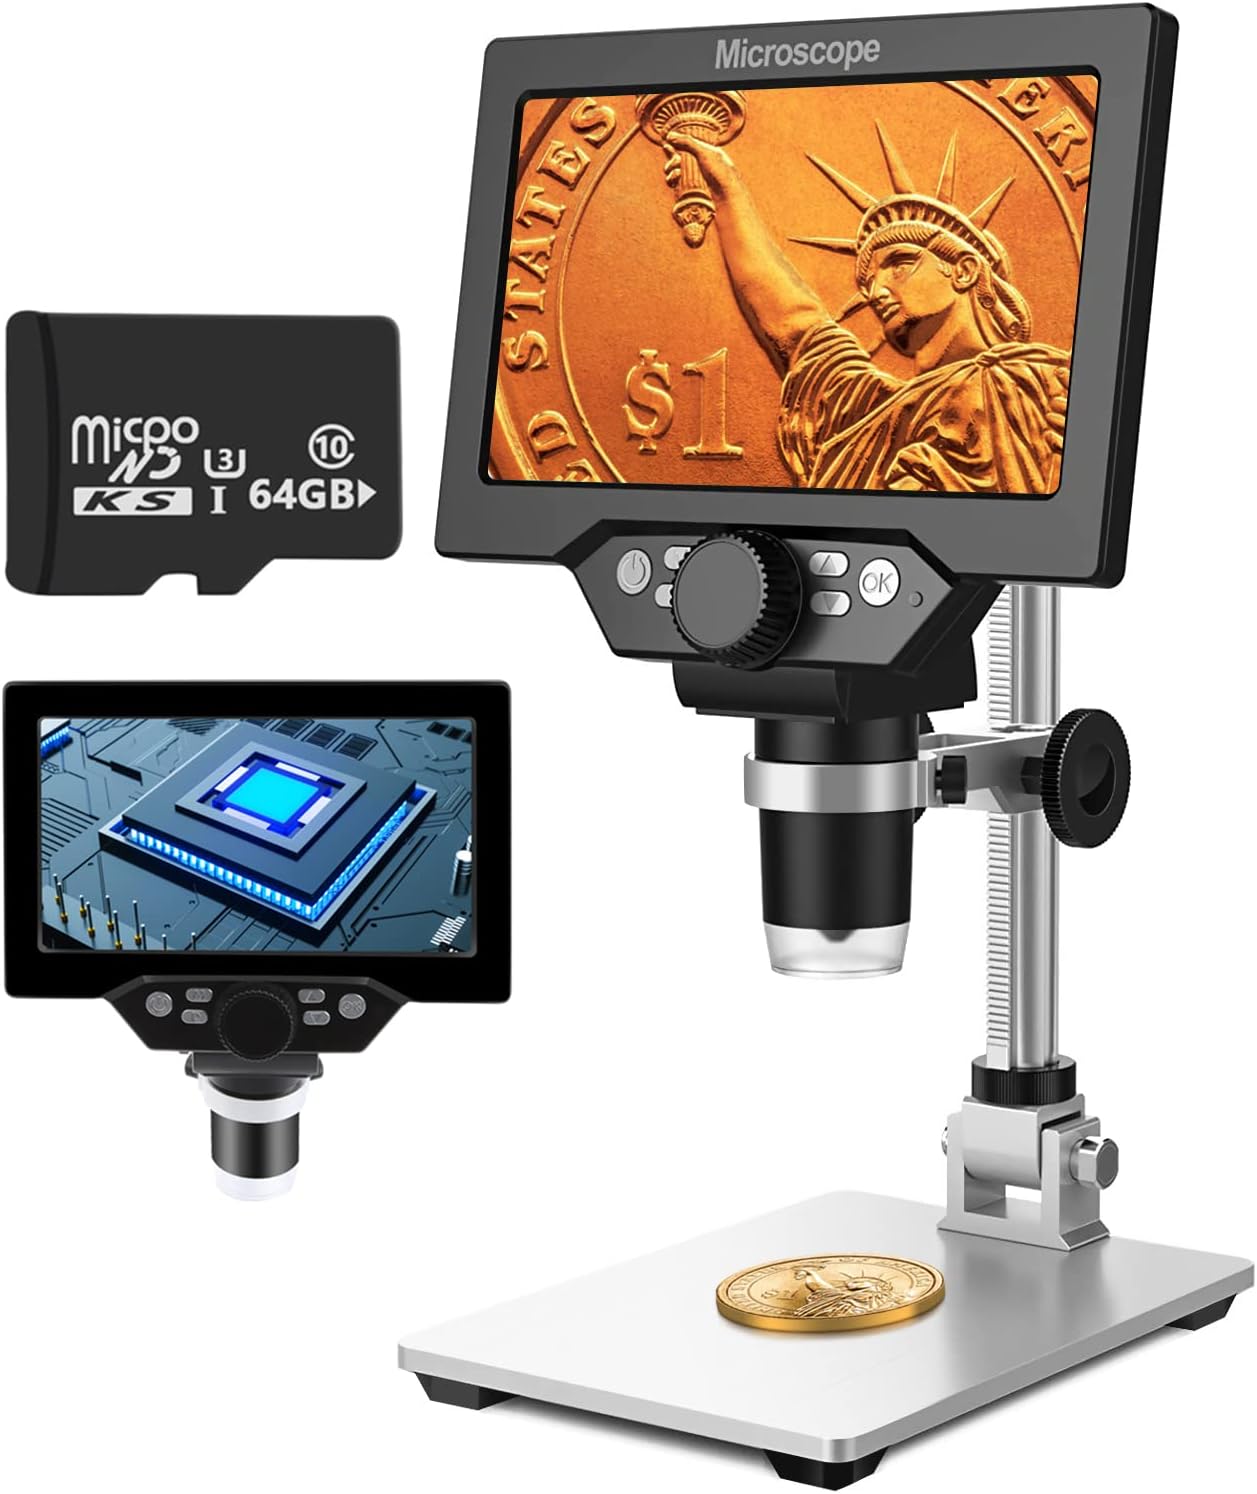
Image 1.1: UF-TOOLS 7-Inch LCD Digital Microscope with included 64GB TF card, showing the main unit and stand.
1.1 คุณสมบัติหลัก
- หน้าจอ LCD ขนาด 7 นิ้ว: Provides a clear, high-definition display for direct viewing without a computer.
- กำลังขยาย 10-1200 เท่า: Continuous zoom capability for observing various objects.
- กล้อง 12MP: Captures high-resolution images and 1080P video.
- การ์ด TF ขนาด 64GB: Included for direct storage of photos and videos. Supports up to 128GB.
- ไฟ LED ปรับได้ 8 ดวง: Ensures optimal illumination for detailed observation.
- Flexible Aluminum Alloy Stand: Allows for 90° angle adjustment and 2-10cm focus distance adjustment.
- แบตเตอรี่ในตัว 3000mAh: Offers portability with up to 6 hours of operation on a full charge.
- การเชื่อมต่อพีซี: Compatible with Windows 7/8/10 for larger display and data transfer.
2. เนื้อหาบรรจุภัณฑ์
ตรวจสอบว่ามีสินค้าทั้งหมดที่ระบุไว้ด้านล่างอยู่ในแพ็คเกจของคุณ:
- UF-TOOLS 7-Inch LCD Digital Microscope Unit
- Adjustable Aluminum Alloy Stand
- 64GB TF Card
- สาย USB
- อะแดปเตอร์ไฟฟ้า (ถ้ามี)
- คู่มือการใช้งาน (เอกสารนี้)

Image 2.1: The microscope package includes a 64GB TF card for storage.
3. คู่มือการติดตั้ง
3.1 Assembling the Microscope
- แกะส่วนประกอบทั้งหมดออกจากกล่องอย่างระมัดระวัง
- Attach the microscope unit to the adjustable aluminum alloy stand. Ensure it is securely fastened using the provided screws or locking mechanisms.
- Insert the 64GB TF card into the designated slot on the microscope unit.
- Place the assembled microscope on a stable, flat surface.

Image 3.1: Product dimensions and adjustable stand features, including 270° rotation and height adjustment.
3.2 การชาร์จแบตเตอรี่
The microscope has a built-in 3000mAh rechargeable battery. Before first use, fully charge the device.
- Connect the USB cable to the microscope's charge port and the other end to a power adapter or a computer's USB port.
- ไฟแสดงสถานะการชาร์จจะแสดงสถานะการชาร์จ
- A full charge typically provides up to 6 hours of continuous use.

Image 3.2: The microscope features a long-lasting rechargeable battery, charged via USB.
4. คู่มือการใช้งาน
4.1 อุปกรณ์เกินview และการควบคุม

ภาพที่ 4.1: จบแล้วview of the microscope's controls and ports, including charge port, MicroSD slot, light regulation, fixed knob, lifting adjusting bracket knob, and various function buttons.
- เปิด/ปิดเครื่อง: กดปุ่มเปิด/ปิดค้างไว้เพื่อเปิดหรือปิดอุปกรณ์
- Video/Camera Playback: Use dedicated buttons to switch between video recording, photo capture, and playback modes.
- System Key Programming: Access menu settings for various configurations.
- Object Distance Adjustment: Adjust the distance between the lens and the object.
- เลื่อนหน้าขึ้น/ลง: Navigate through menus or captured media.
- Confirm Key/Camera Button: Select options or capture photos/videos.
- Light Regulation: Adjust the brightness of the 8 LED lights.
- ลูกบิดคงที่: Secures the microscope unit to the stand.
- Lifting Adjusting Bracket Knob: Adjusts the height of the microscope unit on the stand.
4.2 การปรับกำลังขยายและโฟกัส
- วางวัตถุที่คุณต้องการสังเกตลงบนฐานรอง
- Adjust the height of the microscope unit using the Lifting Adjusting Bracket Knob to get a rough focus.
- Use the focus wheel on the microscope lens to fine-tune the focus until the image on the 7-inch LCD screen is clear.
- The magnification range is 10X to 1200X. Adjust the distance between the lens and the object, along with the focus wheel, to achieve the desired magnification.

Image 4.2: The microscope features an adjustable screen, free length adjustment, and precise focus control.

Image 4.3: Digital magnification from 10X to 1200X, demonstrating the zoom capability on small objects.
4.3 การใช้ไฟ LED
The microscope is equipped with 8 adjustable LED lights to illuminate your subject. Use the Light Regulation control to increase or decrease brightness as needed for optimal viewการไอเอ็นจี

Image 4.4: The 8 LED lights provide adequate illumination for observing objects in various lighting conditions.
4.4 การถ่ายภาพและวิดีโอ
With the included 64GB TF card, you can directly save images and videos.
- In photo mode, press the Confirm/Camera button to capture an image.
- In video mode, press the Confirm/Camera button to start recording, and press again to stop.
- Captured media can be reviewed using the playback function.
4.5 การเชื่อมต่อพีซี
ถึง view observations on a larger screen or transfer files, connect the microscope to a Windows PC (Windows 7/8/10) using the provided USB cable.
- Connect the microscope to your PC via the USB cable.
- The microscope should be recognized as a storage device or a webcam, depending on the mode selected on the microscope.
- You can then access the stored images/videos or use the microscope as a live camera feed.

Image 4.5: Connect the microscope to a PC for a larger viewing experience and data management.
5. การบำรุงรักษา
5.1 การทำความสะอาด
- เลนส์: Use a soft, lint-free cloth specifically designed for optical lenses. For stubborn smudges, a small amount of lens cleaning solution can be applied to the cloth, not directly to the lens.
- หน้าจอ: Wipe the LCD screen gently with a microfiber cloth. Avoid harsh chemicals.
- ร่างกาย: Clean the microscope body and stand with a soft, dry cloth. Do not use abrasive cleaners or solvents.
5.2 พื้นที่จัดเก็บ
- เก็บกล้องจุลทรรศน์ไว้ในที่แห้งและเย็น หลีกเลี่ยงแสงแดดโดยตรงและอุณหภูมิที่สูงหรือต่ำเกินไป
- หากเก็บรักษาเป็นเวลานาน ควรตรวจสอบให้แน่ใจว่าแบตเตอรี่มีประจุอยู่บ้าง (ประมาณ 50%) เพื่อยืดอายุการใช้งาน
- Keep the lens covered to prevent dust accumulation.
5.3 การดูแลแบตเตอรี่
- หลีกเลี่ยงการปล่อยแบตเตอรี่จนหมดบ่อยครั้ง
- ควรชาร์จแบตเตอรี่เป็นประจำแม้จะไม่ได้ใช้งานเพื่อรักษาสภาพแบตเตอรี่
- อย่าให้แบตเตอรี่ถูกอุณหภูมิสูง
6 การแก้ไขปัญหา
- ไม่มีไฟฟ้า:
- Ensure the battery is charged. Connect the microscope to a power source and try again.
- ตรวจสอบการเชื่อมต่อสายไฟ
- ภาพเบลอ:
- Adjust the focus wheel carefully.
- Adjust the height of the microscope unit on the stand.
- Ensure the object is properly illuminated by adjusting the LED lights.
- Clean the lens if smudges or dust are present.
- Cannot Capture Photos/Videos:
- ตรวจสอบให้แน่ใจว่าได้เสียบการ์ด TF และฟอร์แมตอย่างถูกต้องแล้ว
- Check if the TF card has sufficient storage space.
- Verify the device is in the correct photo or video capture mode.
- พีซีไม่รู้จักอุปกรณ์:
- Ensure the USB cable is securely connected to both the microscope and the PC.
- ลองใช้พอร์ต USB อื่นบนคอมพิวเตอร์ของคุณ
- Restart both the microscope and the PC.
- Ensure your PC is running Windows 7/8/10.
7. ข้อมูลจำเพาะ
| คุณสมบัติ | รายละเอียด |
|---|---|
| ชื่อรุ่น | SUGON-Digital Microscope |
| ขนาดหน้าจอ | จอ LCD ขนาด 7 นิ้ว |
| การขยายภาพ | 10X-1200X |
| ความละเอียดของกล้อง | 12MP |
| ความละเอียดวิดีโอ | 1080พ |
| พื้นที่จัดเก็บ | 64GB TF Card (Max 128GB supported) |
| การส่องสว่าง | ไฟ LED 8 ดวง |
| ความจุของแบตเตอรี่ | 3000mAh ลิเธียมโพลิเมอร์ |
| อายุการใช้งานแบตเตอรี่ | สูงสุด 6 ชั่วโมง (โดยประมาณ) |
| ความเข้ากันได้ของพีซี | วินโดวส์ 7/8/10 |
| วัสดุ | โลหะ, พลาสติก |
| น้ำหนักสินค้า | 2.44 ปอนด์ (1.11 กก.) |
| ขนาดแพ็คเกจ | 9.8 x 8.19 x 3.35 นิ้ว |
8. การรับประกันและการสนับสนุน
UF-TOOLS provides the following warranty and support for this product:
- ระยะเวลาการคืนสินค้า: 45 days limited product return period.
- นโยบายการแลกเปลี่ยน: 18 months exchange for product defects.
For technical support or warranty claims, please contact UF-TOOLS customer service through the retailer where the product was purchased or visit the official UF-TOOLS webเว็บไซต์สำหรับข้อมูลการติดต่อ
Note: Warranty terms may vary based on region and retailer. Please retain your proof of purchase.