1. บทนำ
Thank you for choosing the Beacon Pet Fully Automatic Digital Egg Incubator. This device is designed to provide a stable and controlled environment for hatching various types of poultry eggs, including chicken, duck, quail, and more. With its automatic temperature control, egg turning, and LED candling features, this incubator simplifies the hatching process, making it suitable for both beginners and experienced breeders. Please read this manual thoroughly before operation to ensure proper use and optimal hatching results.
2. คำแนะนำด้านความปลอดภัย
- ควรต่อเครื่องฟักไข่เข้ากับปลั๊กไฟที่มีสายดินเสมอ
- Do not immerse the incubator or its power cord in water or other liquids.
- Unplug the incubator from the power source before cleaning or performing any maintenance.
- ควรวางตู้ฟักไข่ให้ห่างจากแสงแดดโดยตรง ลมโกรก และการเปลี่ยนแปลงอุณหภูมิอย่างรวดเร็ว
- Ensure proper ventilation around the incubator.
- Do not allow children to operate the incubator without adult supervision.
- Handle eggs with clean hands to prevent contamination.
3. เนื้อหาบรรจุภัณฑ์
ตรวจสอบว่ามีรายการทั้งหมดอยู่ในแพ็คเกจ:
- 1x Beacon Pet Egg Incubator Unit
- สายไฟ 1x
- 1x Blister Tray (Egg Holder)
4. คุณสมบัติของผลิตภัณฑ์
- ความจุ: Accommodates 9 standard-sized eggs or 4 quail eggs.
- การควบคุมอุณหภูมิแบบดิจิตอล: Clear digital display for monitoring and adjusting internal temperature.
- Automatic Egg Turning: Integrated mechanism for regular egg rotation to ensure even heating and development.
- LED Candler: ไฟ LED ในตัว lamps under egg holders for easy observation of embryo development without disturbing the hatching process.
- Constant Heating: Ceramic heater maintains a stable internal temperature.
- การกระจายความร้อนสม่ำเสมอ: Turbo fan ensures uniform heat transfer with low noise operation.
- Humidification Sponge: Included sponge for maintaining appropriate humidity levels.
- ฝาปิดโปร่งใส: Allows for easy observation of the hatching process.
- โครงสร้างทนทาน: ผลิตจากวัสดุ ABS เพื่อความทนทาน
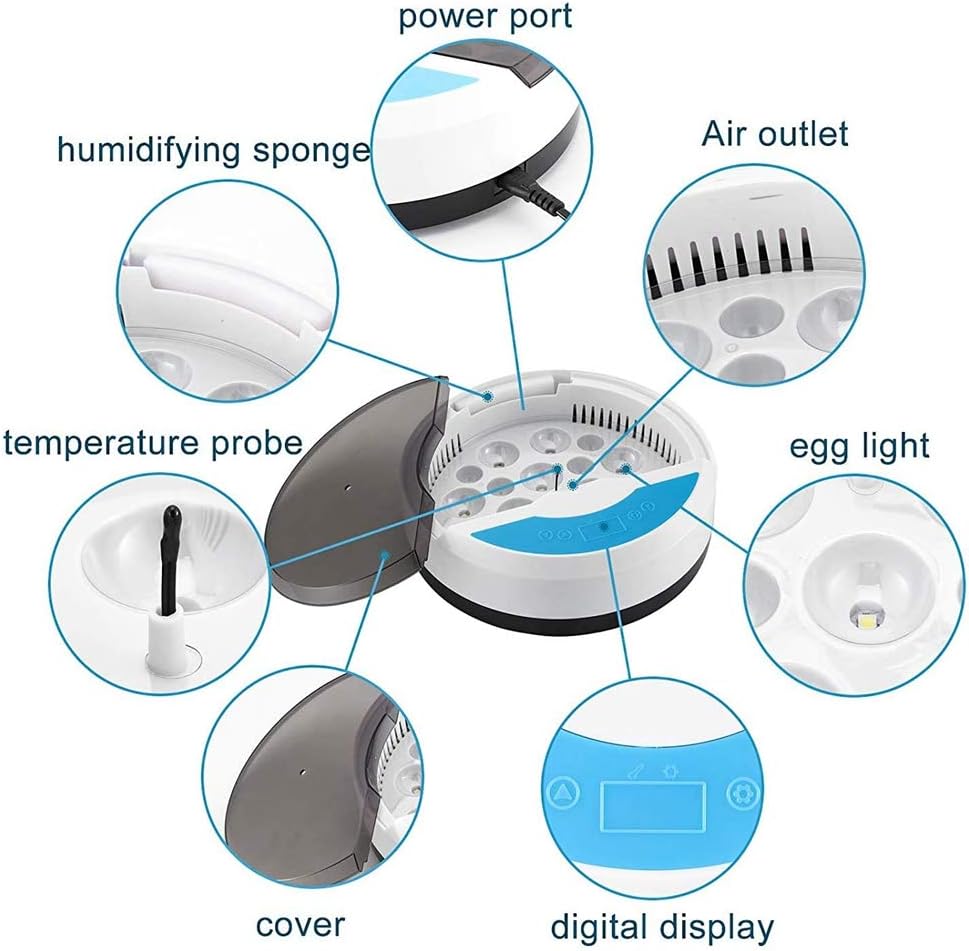
Figure 1: Key components of the Beacon Pet Egg Incubator, including the power port, humidifying sponge, temperature probe, cover, digital display, air outlet, and egg light.
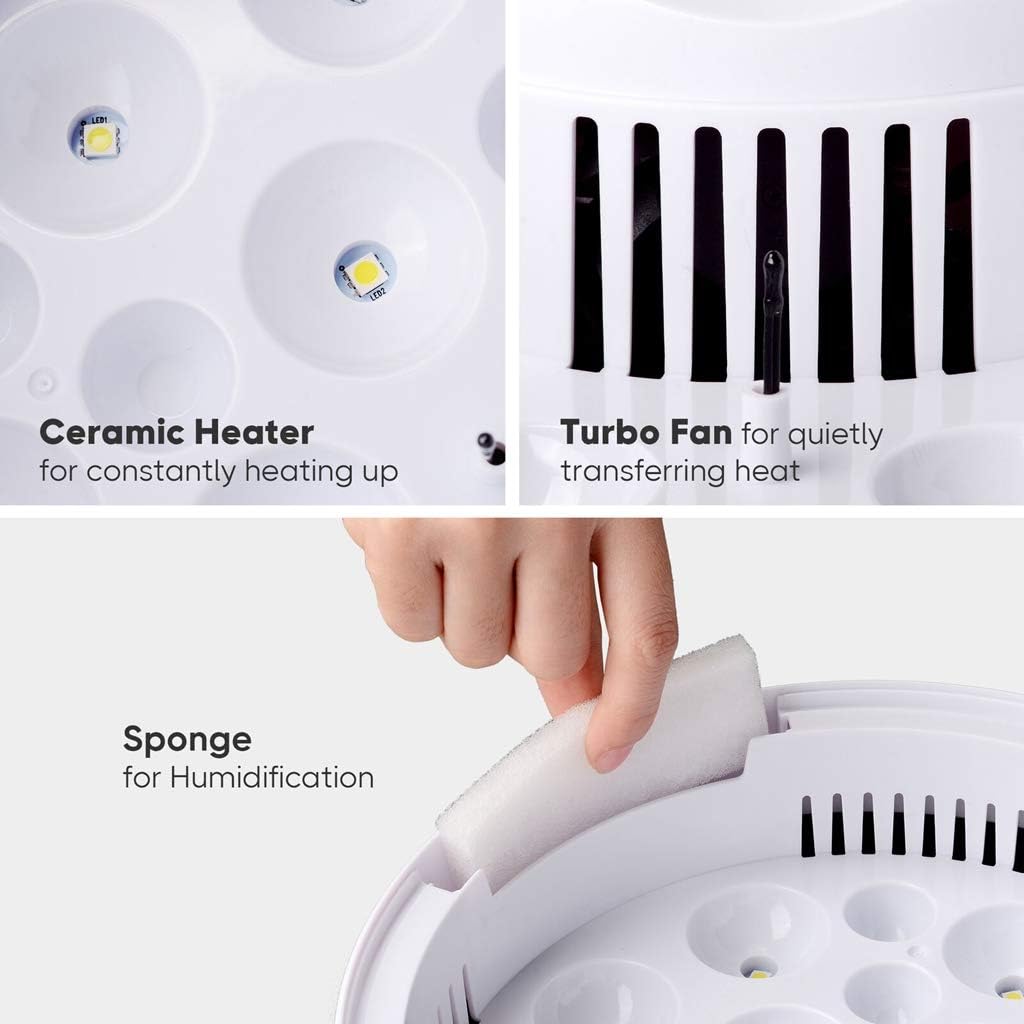
รูปที่ 2: รายละเอียด view of the ceramic heater for constant warmth, the turbo fan for quiet heat distribution, and the sponge for humidification.
5. การตั้งค่า
- แกะ: นำส่วนประกอบทั้งหมดออกจากบรรจุภัณฑ์อย่างระมัดระวัง
- การจัดวาง: Place the incubator on a stable, level surface in a room with a consistent ambient temperature (ideally between 20-25°C / 68-77°F) and away from direct sunlight or drafts.
- เติมน้ำ: Locate the humidifying sponge. Moisten the sponge with clean, distilled water and place it in its designated slot within the incubator. Ensure water does not spill onto electronic components.
- เชื่อมต่อพลังงาน: Plug the power cord into the incubator's power port, then into a suitable electrical outlet. The digital display should illuminate.
- การอุ่นเครื่องล่วงหน้า: Allow the incubator to pre-heat for at least 2-3 hours to stabilize the internal temperature before placing eggs inside.

Figure 3: The Beacon Pet Egg Incubator ready for operation, showing the digital temperature display and egg placement.
6. คู่มือการใช้งาน
6.1. การตั้งค่าอุณหภูมิ
- หน้าจอแสดงผลดิจิทัลจะแสดงอุณหภูมิภายในปัจจุบัน
- Press the 'Set' button (often represented by a gear icon) to enter temperature adjustment mode.
- Use the '+' and '-' buttons to increase or decrease the target temperature. Refer to specific egg type requirements for optimal hatching temperatures (e.g., chicken eggs typically require 37.5°C / 99.5°F).
- Press 'Set' again to confirm the new temperature. The incubator will automatically adjust to the set temperature.
6.2. Placing Eggs
- Ensure eggs are clean and fertile.
- Carefully place eggs into the designated slots on the blister tray. Ensure they are positioned correctly for automatic turning.
- ปิดฝาใสให้แน่น
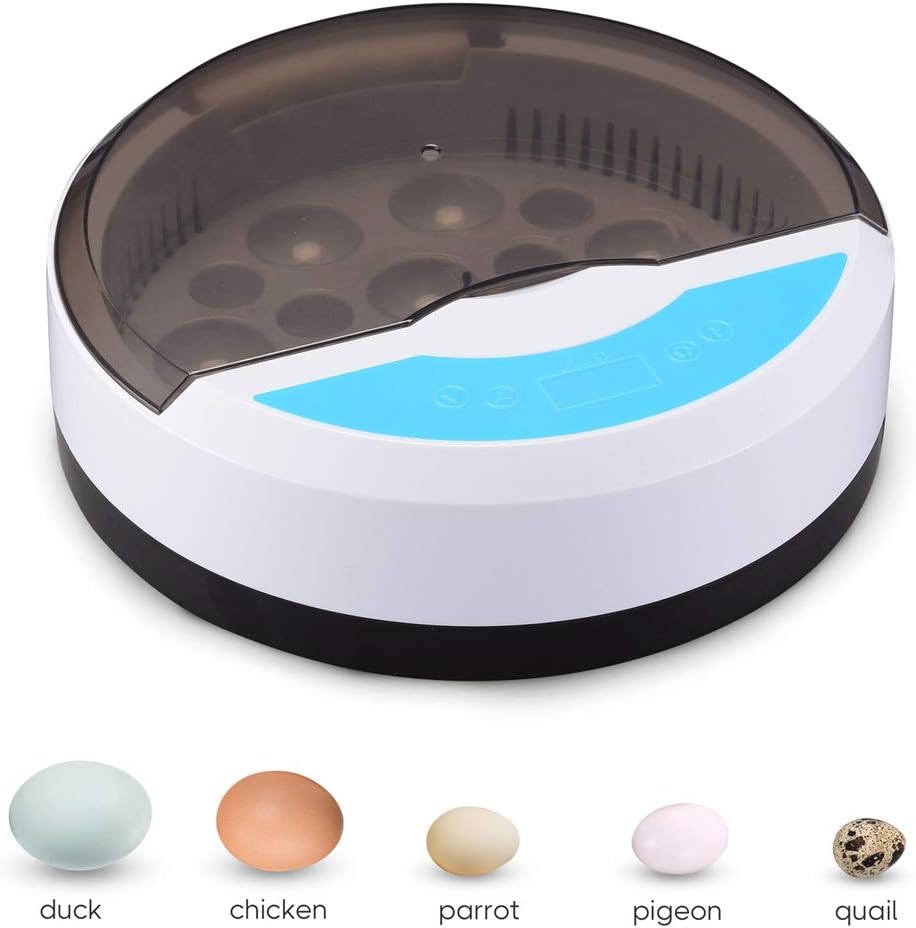
Figure 4: The incubator is compatible with various egg sizes, including duck, chicken, parrot, pigeon, and quail eggs.
6.3. Automatic Egg Turning
- The incubator is equipped with an automatic egg turning mechanism. This feature typically operates every 2 hours.
- Do not manually turn the eggs once the automatic turning is active, as this may interfere with the mechanism.
- Stop automatic turning 3 days before the expected hatch date to allow chicks to position themselves for hatching.
6.4. Candling Eggs
- The built-in LED candler allows you to observe the embryo development.
- To use, gently lift an egg and place it over one of the LED lights.
- Observe for signs of development, such as blood vessels or a visible embryo. Remove infertile or non-developing eggs to prevent contamination.
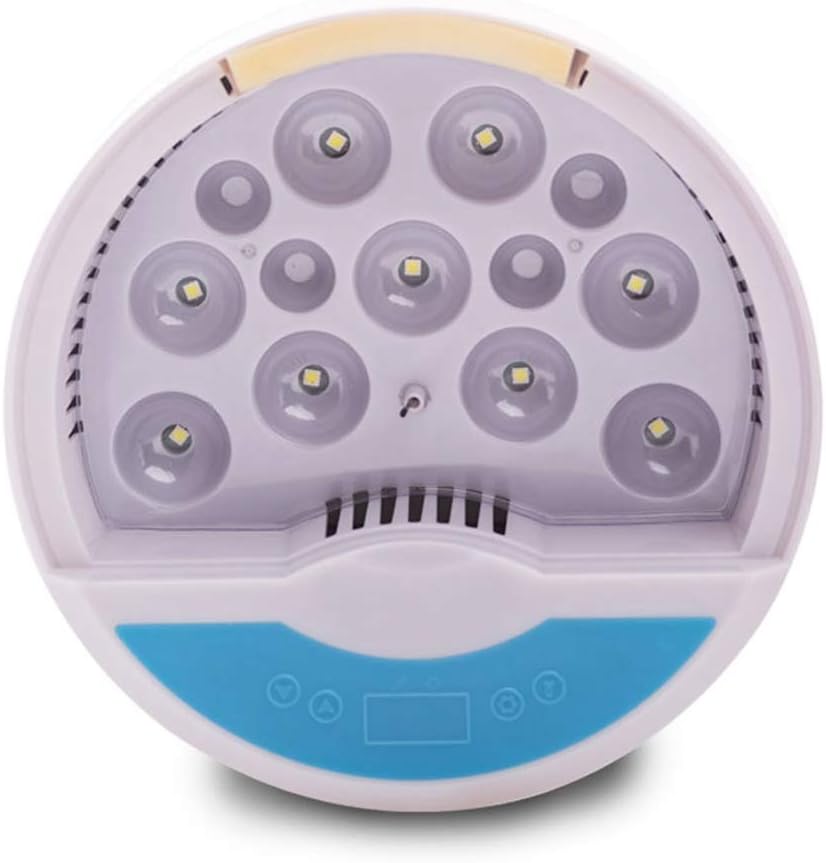
Figure 5: The internal LED lights used for candling eggs, allowing observation of embryo development.
7. การบำรุงรักษา
7.1. การทำความสะอาด
- After each hatch, unplug the incubator and allow it to cool completely.
- Remove the blister tray and clean it with mild soap and water. Rinse thoroughly and dry completely.
- Wipe the interior and exterior surfaces of the incubator with a damp cloth. For stubborn stains, use a mild disinfectant.
- Ensure all parts are completely dry before reassembling or storing the incubator.
7.2. เติมน้ำ
- Regularly check the humidifying sponge and replenish water as needed to maintain desired humidity levels.
- ใช้น้ำกลั่นเพื่อป้องกันการสะสมของแร่ธาตุ
8 การแก้ไขปัญหา
| ปัญหา | สาเหตุที่เป็นไปได้ | สารละลาย |
|---|---|---|
| Incubator not powering on | สายไฟไม่ได้เชื่อมต่อ; ปัญหาเต้ารับไฟฟ้า | ตรวจสอบการเชื่อมต่อสายไฟ ลองใช้เต้ารับอื่น |
| อุณหภูมิไม่เสถียร | Lid not closed properly; Room temperature fluctuations; Faulty sensor | Ensure lid is sealed; Move incubator to a stable environment; Contact support if issue persists. |
| ไข่ไม่พลิก | Automatic turning disabled; Obstruction; Motor issue | Verify automatic turning is active; Check for obstructions; Contact support. |
| ความชื้นต่ำ | Insufficient water in sponge; Sponge dry | Add more water to the humidifying sponge; Ensure sponge is moist. |
| Poor hatch rate | Incorrect temperature/humidity; Infertile eggs; Improper egg handling | Review temperature/humidity settings; Use fresh, fertile eggs; Follow proper handling procedures. |
9. ข้อมูลจำเพาะ
- ขนาดโดยรวม (ยาว x กว้าง x สูง): 9 9/16" x 9 9/16" x 3 1/8" (24.3 x 24.3 x 8 cm)
- เล่มที่tage: 95 ถึง 125V
- ความถี่: 50/60เฮิรตซ์
- พลัง: 20วัตต์
- น้ำหนักสุทธิ: 1.34 ปอนด์ (0.61 กก.)
- วัสดุ: เอบีเอส
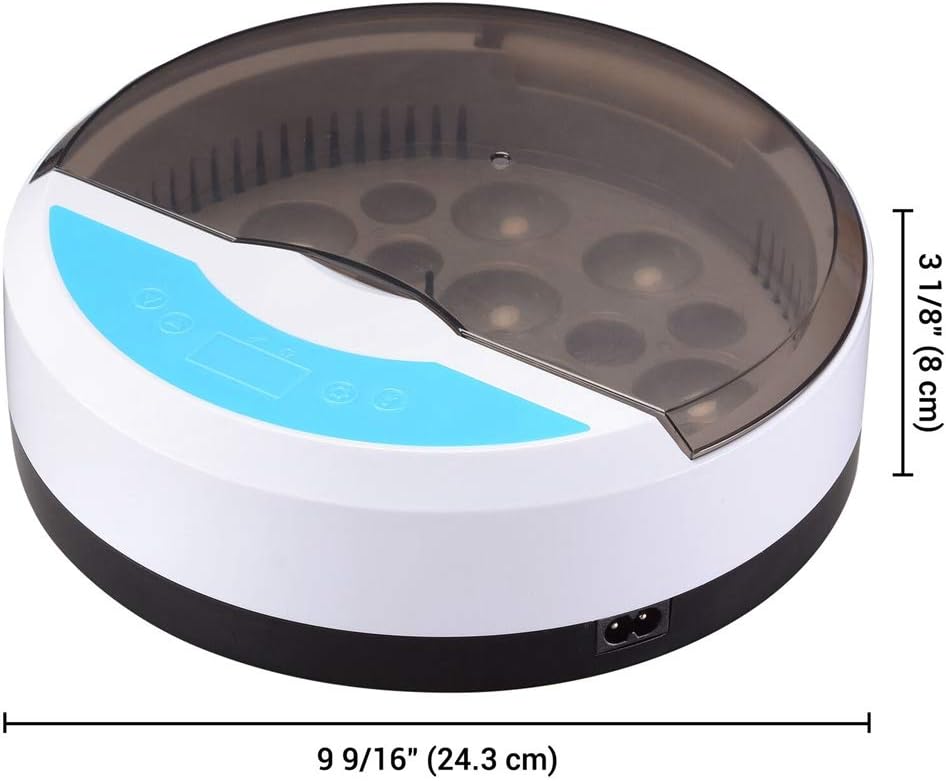
Figure 6: Dimensions of the Beacon Pet Egg Incubator.
10. การรับประกันและการสนับสนุน
For warranty information or technical support, please refer to the contact details provided with your purchase or visit the official Beacon Pet website. Please have your model number (B08ZXQYC8G) and purchase date ready when contacting support.