
1. บทนำ
The D-Link AC1750 WiFi Range Extender (DAP-1720) is designed to expand the coverage of your existing wireless network, providing a stronger and more reliable Wi-Fi signal throughout your home or office. This device supports dual-band connectivity (2.4 GHz and 5 GHz) with combined speeds up to 1750 Mbps, making it ideal for high-bandwidth activities like 4K streaming and online gaming across multiple devices. Its smart signal indicator assists in finding the optimal placement for maximum coverage.
2. สินค้าหมดview
The DAP-1720 features a compact, plug-in design with external antennas for enhanced signal strength. It includes a Gigabit Ethernet port for wired connections and a smart signal indicator for easy setup.
2.1 คุณสมบัติหลัก
- Extends Wi-Fi coverage and eliminates dead spots with Dual Band connectivity.
- Supports both 2.4 GHz and 5 GHz bands for combined speeds up to 1750 Mbps.
- Smart Signal Indicator helps identify the best location for optimal Wi-Fi coverage.
- Features a 3x3 antenna configuration for improved data rates and reliability.
- Includes a 10/100/1000 Gigabit Ethernet Port for wired device connectivity.
2.2 เค้าโครงอุปกรณ์

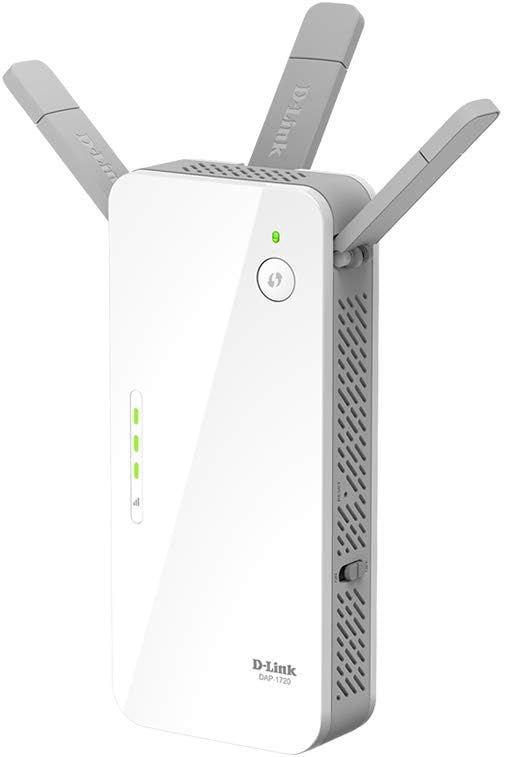
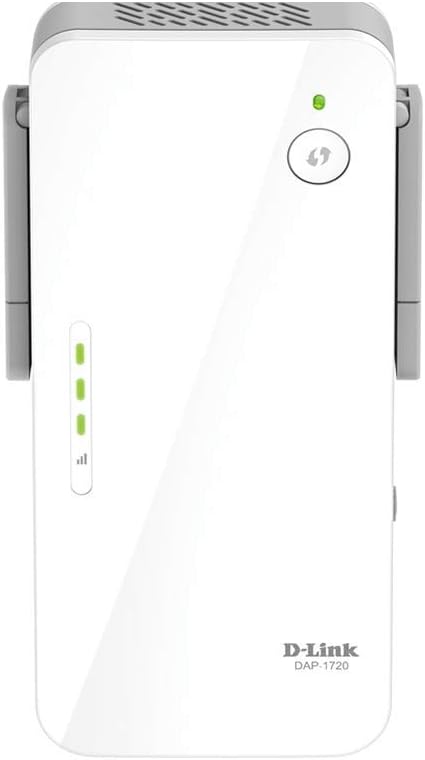

3. คำแนะนำในการตั้งค่า
There are two primary methods to set up your D-Link DAP-1720 Range Extender: using Wi-Fi Protected Setup (WPS) or manual configuration via a web เบราว์เซอร์
3.1 WPS Setup (Recommended)
- เปิดเครื่อง: Plug the DAP-1720 into a power outlet near your existing wireless router. Wait for the power LED to turn solid green.
- เปิดใช้งาน WPS บนเราเตอร์: Press the WPS button on your wireless router. Refer to your router's manual for the exact location of this button.
- เปิดใช้งาน WPS บน Extender: Within two minutes, press the WPS button on the DAP-1720 (often indicated by a circular arrow icon).
- ตรวจสอบสถานะ: The signal indicator LEDs on the DAP-1720 will flash during the connection process. Once connected, the LEDs will turn solid green, indicating a successful connection.
- ตำแหน่งที่เหมาะสมที่สุด: Unplug the DAP-1720 and move it to a location halfway between your router and the Wi-Fi dead zone. Plug it into a power outlet. The Smart Signal Indicator LEDs will help you find the best spot. Aim for at least two solid green bars for good signal strength.
Note: If the signal indicator shows red or only one bar, move the extender closer to your router.
3.2 Manual Setup (Web เบราว์เซอร์)
- เปิดเครื่อง: Plug the DAP-1720 into a power outlet near your existing wireless router.
- เชื่อมต่อกับ Extender: On your computer or mobile device, connect to the D-Link extender's default Wi-Fi network (e.g., "dlink-XXXX"). The default Wi-Fi name and password are usually found on a label on the device or in the Quick Installation Guide (QIG).
- เข้าถึงตัวช่วยตั้งค่า: เปิด web เบราว์เซอร์และประเภท http://dlinkap.local หรือที่อยู่ IP เริ่มต้น (เช่น 192.168.0.50) ลงในแถบที่อยู่
- ปฏิบัติตามคำแนะนำบนหน้าจอ: The setup wizard will guide you through selecting your existing Wi-Fi network(s) and configuring the extender's settings, including its new Wi-Fi name and password.
- ตำแหน่งที่เหมาะสมที่สุด: After configuration, unplug the DAP-1720 and move it to a suitable location as described in step 5 of the WPS setup.
4. Operating Your Range Extender
4.1 การเชื่อมต่ออุปกรณ์
- อุปกรณ์ไร้สาย: Once the extender is set up, search for the new extended Wi-Fi network name (SSID) on your devices (e.g., "YourNetworkName_EXT" or "YourNetworkName_5G_EXT") and connect using the password you configured.
- อุปกรณ์แบบมีสาย: For devices like smart TVs, gaming consoles, or desktop computers that benefit from a stable wired connection, use an Ethernet cable to connect them to the Gigabit Ethernet port on the DAP-1720.
4.2 ฟังก์ชันการทำงานแบบดูอัลแบนด์
The DAP-1720 operates on both 2.4 GHz and 5 GHz frequency bands. The 2.4 GHz band offers wider coverage and better penetration through walls, while the 5 GHz band provides faster speeds over shorter distances with less interference. Your devices will automatically connect to the optimal band, or you can manually select the preferred band if separate SSIDs were configured during setup.
5. การบำรุงรักษา
- อัพเดตเฟิร์มแวร์: Periodically check the D-Link support website for firmware updates. Keeping your device's firmware up-to-date ensures optimal performance, security, and access to new features.
- การทำความสะอาด: Ensure the device's ventilation slots are clear of dust to prevent overheating. Use a soft, dry cloth for cleaning. Do not use liquid cleaners.
- การรีเซ็ตอุปกรณ์: If you encounter persistent issues or wish to reconfigure the extender from scratch, you can perform a factory reset. Locate the reset button (usually a small pinhole) on the device, and while the device is powered on, press and hold it for about 10 seconds using a paperclip until the LEDs flash.
6 การแก้ไขปัญหา
6.1 No Internet Access After Connecting to Extender
- ตรวจสอบการเชื่อมต่อเราเตอร์: ตรวจสอบให้แน่ใจว่าเราเตอร์หลักของคุณทำงานได้อย่างถูกต้องและสามารถเชื่อมต่ออินเทอร์เน็ตได้
- ตำแหน่งการติดตั้งตัวขยายสัญญาณ: Verify the DAP-1720 is placed within range of your main router. The Smart Signal Indicator should show at least two green bars. Relocate if necessary.
- Re-run Setup: Try re-running the WPS or manual setup process to ensure the extender is properly connected to your main Wi-Fi network.
- ความขัดแย้งของที่อยู่ IP: If you manually configured the extender, ensure its IP address does not conflict with other devices on your network.
6.2 สัญญาณอ่อนหรือความเร็วช้า
- ย้ายตำแหน่งส่วนขยาย: Move the extender closer to your main router. The ideal location is halfway between the router and the area needing coverage.
- ลดการรบกวน: Keep the extender away from large metal objects, concrete walls, and devices that emit radio frequency interference (e.g., microwaves, cordless phones).
- Check Router Performance: Ensure your main router is providing adequate signal strength and speed.
- อัพเดตเฟิร์มแวร์: Ensure the extender's firmware is up-to-date.
6.3 ไม่สามารถเข้าถึงได้ Webหน้าการตั้งค่าพื้นฐาน
- ตรวจสอบการเชื่อมต่อ: Ensure your device is connected to the extender's Wi-Fi network (e.g., "dlink-XXXX") or directly via Ethernet.
- ที่อยู่ที่ถูกต้อง: Double-check that you are typing http://dlinkap.local or the correct IP address into your browser's address bar.
- ล้างแคชเบราว์เซอร์: ลองล้างแคชและคุกกี้ของเบราว์เซอร์ของคุณหรือใช้เบราว์เซอร์อื่น
- Temporarily Disable Firewall/Antivirus: Your computer's security software might be blocking access.
- รีเซ็ตเป็นค่าเริ่มต้นจากโรงงาน: If all else fails, perform a factory reset and attempt the manual setup again.
7. ข้อมูลจำเพาะ
| คุณสมบัติ | รายละเอียด |
|---|---|
| หมายเลขรุ่น | DAP-1720/RE |
| ไร้มาตรฐาน | 802.11ac, 802.11n |
| อัตราการถ่ายโอนข้อมูล | สูงสุด 1750 Mbps (450 Mbps บน 2.4GHz, 1300 Mbps บน 5GHz) |
| ระดับย่านความถี่ | ดูอัลแบนด์ |
| พอร์ตอีเทอร์เน็ต | 1 x 10/100/1000 Gigabit Ethernet Port |
| การกำหนดค่าเสาอากาศ | 3x3 Internal Antennas |
| ขนาดสินค้า | 6.5 x 2.5 x 1.5 นิ้ว |
| น้ำหนักสินค้า | 8 ออนซ์ |
| ส่วนประกอบที่รวมอยู่ | DAP-1720 device, Quick Installation Guide (QIG) |
8. การรับประกันและการสนับสนุน
For detailed warranty information, technical support, and additional resources, please visit the official D-Link support website. You can find FAQs, updated drivers, and contact information for customer service.
การสนับสนุน D-Link Webเว็บไซต์: www.dlink.com/support