Sorand AC 230V Floor Heating Thermostat
Sorand AC 230V Digital Programmable Floor Heating Thermostat User Manual
Model: AC 230V Floor Heating Thermostat
การแนะนำ
This manual provides comprehensive instructions for the installation, operation, and maintenance of your Sorand AC 230V Digital Programmable Floor Heating Thermostat. Please read this manual carefully before installation and use to ensure proper function and safety.
The thermostat is designed for electronic floor heating systems and other electrical heating elements. It features a large LCD with backlight, programmable temperature settings, and internal/external temperature sensing capabilities.
ข้อมูลด้านความปลอดภัย
- การติดตั้งจะต้องดำเนินการโดยช่างไฟฟ้าที่มีคุณสมบัติ
- ตรวจสอบให้แน่ใจว่าได้ตัดกระแสไฟฟ้าออกก่อนการติดตั้งหรือการบำรุงรักษา
- อย่าให้เทอร์โมสตัทโดนน้ำหรือความชื้นมากเกินไป
- ทำงานภายในปริมาตรที่กำหนดtage และขีดจำกัดปัจจุบัน
เนื้อหาแพ็คเกจ
ตรวจสอบว่ามีรายการทั้งหมดอยู่ในแพ็คเกจ:
- 1 x Sorand AC 230V Digital Programmable Floor Heating Thermostat
- 1 x External Temperature Sensor Cable (approx. 3 meters)
- สกรูยึด 2 ตัว
- 1 x คู่มือผู้ใช้ (เอกสารนี้)

Image: Contents of the Sorand thermostat package, showing the main unit, external sensor cable, mounting screws, and the instruction manual.
การติดตั้งและการตั้งค่า
สำคัญ: Installation should only be carried out by a qualified electrician. Ensure the main power supply is turned off before commencing any wiring work.
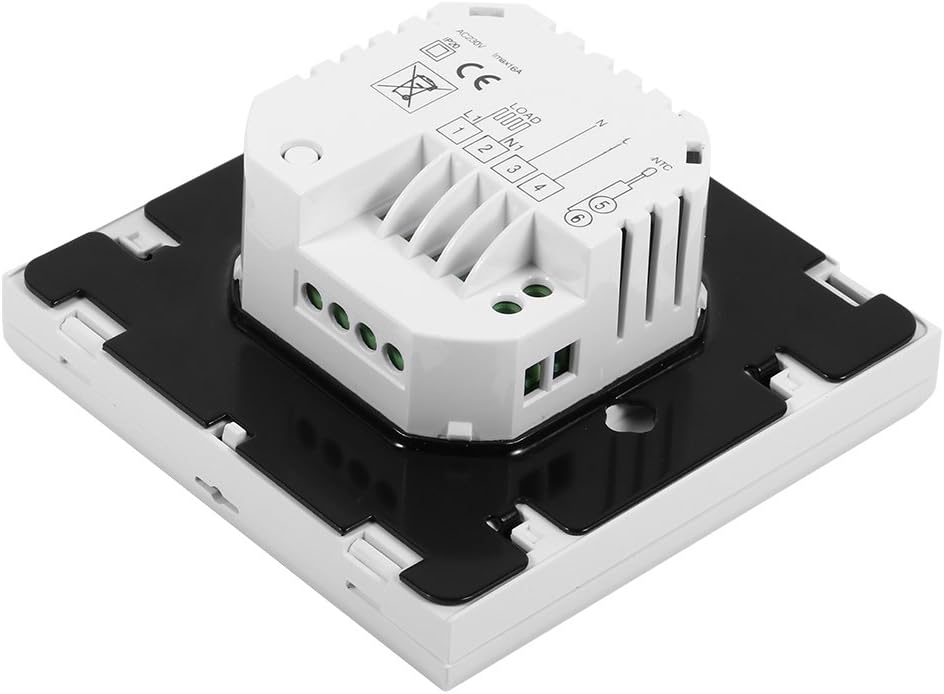
แผนผังการเดินสายไฟ
Refer to the wiring diagram on the back of the thermostat unit for correct connections. The terminals are typically labeled as follows:
- L1, N1: Power input (AC 230V)
- LOAD (1, 2): Connection to the heating element
- กทช. (5, 6): Connection for the external floor temperature sensor

ภาพ: ด้านหลัง view of the Sorand thermostat, displaying the wiring terminals and a simplified diagram for electrical connections.
ภาพ: ด้านข้าง view of the Sorand thermostat, illustrating the internal components and ports for wiring connections.
การติดตั้ง
- Prepare a standard electrical wall box (86x86mm recommended).
- Connect the power supply, heating load, and external sensor wires according to the wiring diagram.
- Carefully push the wired thermostat into the wall box.
- ยึดเทอร์โมสตัทเข้ากับกล่องที่ผนังโดยใช้สกรูที่ให้มา
- ติดตั้งแผงด้านหน้าของเทอร์โมสตัท
คำแนะนำการใช้งาน
The thermostat features a large LCD and touch-sensitive buttons for easy operation.
ปุ่มฟังก์ชั่น
- ⏻ (พลัง): เปิด/ปิดเทอร์โมสตัท
- ↻ (Mode/Cycle): Switches between manual mode and programmable mode.
- ⏱ (Clock/Time): Sets the time and enters programming mode.
- ▲ (Up Arrow): Increases temperature setting or adjusts values.
- ▼ (Down Arrow): Decreases temperature setting or adjusts values.

ภาพ: ด้านหน้า view of the Sorand thermostat, highlighting the LCD screen and the five touch-sensitive control buttons below it.
การตั้งเวลาและวัน
- กดปุ่มค้างไว้ ⏱ กดปุ่มค้างไว้ 3 วินาทีเพื่อเข้าสู่โหมดตั้งเวลา
- ใช้ ▲ และ ▼ กดปุ่มเพื่อปรับเวลา จากนั้นกด ⏱ to confirm and move to minutes, then day of the week.
- กด ⏱ again to exit, or wait for 10 seconds for automatic exit.
การใช้งานโหมดแมนนวล
In manual mode, the thermostat maintains a constant temperature set by the user.
- กดปุ่ม ↻ button to switch to manual mode (indicated by a hand icon or similar on the display).
- ใช้ ▲ และ ▼ ปุ่มเพื่อตั้งอุณหภูมิที่คุณต้องการ
- ขณะนี้เทอร์โมสตัทจะรักษาอุณหภูมินี้ไว้
Programmable Mode Operation (6 Periods)
The thermostat allows for 6 programmable periods per day, enabling different temperature settings at different times.
- กดปุ่ม ↻ button to switch to programmable mode (indicated by a clock icon or similar).
- กดปุ่มค้างไว้ ⏱ กดปุ่มค้างไว้ 3 วินาทีเพื่อเข้าสู่โหมดการตั้งโปรแกรม
- The display will show the first period (e.g., "Period 1"). Use ▲ และ ▼ to set the start time and desired temperature for this period.
- กด ⏱ to move to the next period and repeat the process for all 6 periods.
- After setting all periods, press ⏱ again or wait for automatic exit to save settings.
เทอร์โมสตัทจะทำงานตามตารางเวลาที่ตั้งโปรแกรมไว้โดยอัตโนมัติ
Sensor Selection (Internal/External)
The thermostat can use its internal sensor or the external floor sensor. The selection method is typically found in advanced settings or by a specific button combination. Refer to the on-screen indicators for the active sensor.
การซ่อมบำรุง
- ทำความสะอาดหน้าจอแสดงผลของเทอร์โมสตัทและ...asinเช็ดด้วยผ้านุ่มและแห้ง ห้ามใช้น้ำยาทำความสะอาดที่มีฤทธิ์กัดกร่อนหรือตัวทำละลาย
- Ensure the thermostat is free from dust and debris to maintain optimal performance.
- ไม่มีชิ้นส่วนใดที่ผู้ใช้สามารถซ่อมแซมได้เอง ห้ามพยายามเปิดหรือซ่อมแซมตัวเครื่อง
การแก้ไขปัญหา
| ปัญหา | สาเหตุที่เป็นไปได้ | สารละลาย |
|---|---|---|
| เทอร์โมสตัทไม่เปิดเครื่อง | ไม่มีแหล่งจ่ายไฟ, เดินสายไม่ถูกต้อง | Check circuit breaker. Verify wiring connections (consult a qualified electrician). |
| เครื่องทำความร้อนไม่สามารถเปิด/ปิดได้ | Incorrect temperature setting; thermostat in OFF mode; wiring issue. | Adjust set temperature. Ensure thermostat is ON. Check heating element wiring. |
| การอ่านอุณหภูมิไม่แม่นยำ | Sensor malfunction; incorrect sensor selected. | Verify sensor connection. Check if internal or external sensor is active. |
| หน้าจอว่างเปล่าหรือกะพริบ | ไฟฟ้าผันผวน; ความผิดพลาดภายใน | Reset power to the thermostat. If issue persists, contact support. |
ข้อมูลจำเพาะ
| คุณสมบัติ | รายละเอียด |
|---|---|
| ยี่ห้อ | Sorand |
| แบบอย่าง | AC 230V Floor Heating Thermostat |
| ฉบับทำงานtage | ไฟฟ้ากระแสสลับ 230 โวลต์, 50/60 เฮิรตซ์ |
| กระแสโหลด | 12/16A (Electric Heating) |
| ความแม่นยำ | ±0.5℃ |
| Set-point Temperature Range | 5℃ - 35℃ |
| ช่วงอุณหภูมิที่จำกัด | 5℃ - 99℃ |
| การใช้พลังงาน | <0.3วัตต์ |
| เซ็นเซอร์วัดอุณหภูมิ | NTC (Internal and External) |
| ขนาดพื้นผิว | ขนาดประมาณ 86 x 86 x 40 มม. (3.4 x 3.4 x 1.6 นิ้ว) |
| ความยาวสายเคเบิลเซ็นเซอร์ภายนอก | ประมาณ 3 เมตร (9.8 ฟุต) |
| วัสดุ | พีซี+เอบีเอส |
| ประเภทจอภาพ | จอ LCD ดิจิทัลพร้อมไฟแบ็คไลท์ |
| วิธีการควบคุม | การควบคุมทัชแพด |
การรับประกันและการสนับสนุน
This product is covered by the manufacturer's standard warranty. Please refer to the product packaging or your point of purchase for specific warranty terms and conditions.
For technical support, troubleshooting assistance, or warranty claims, please contact your retailer or the manufacturer directly. Keep your purchase receipt as proof of purchase.
Ask a question about this manual
Ask about setup, troubleshooting, compatibility, parts, safety, or missing instructions. Manuals+ will review the question and use this page’s manual context to help answer it.