1. บทนำ
The i-tec USB-C Quattro Docking Station is designed to expand the connectivity of your USB-C enabled laptop or tablet, allowing for connection of up to four external displays, multiple USB peripherals, Gigabit Ethernet, and audio devices. It also provides up to 85W Power Delivery to charge your host device. This manual provides detailed instructions for setting up, operating, and maintaining your docking station.
2. เนื้อหาบรรจุภัณฑ์
โปรดตรวจสอบว่าสินค้าทั้งหมดที่ระบุไว้ด้านล่างนี้มีอยู่ในแพ็คเกจของคุณ:
- i-tec USB-C Quattro Docking Station
- อะแดปเตอร์แปลงไฟ
- สายไฟ
- สาย USB-C ถึง USB-C
- คู่มือเริ่มต้นอย่างรวดเร็ว

รูปที่ 2.1: Package Contents. The image displays the docking station, its power adapter, a power cable, and a quick setup guide.
3. สินค้าหมดview
Familiarize yourself with the ports and indicators on your i-tec USB-C Quattro Docking Station.
3.1 แผงด้านหน้า

รูปที่ 3.1: Front Panel. This image shows the front of the docking station with a power button, microphone input jack, headphone output jack, one USB-C data port, and one USB 3.0 port.
- ปุ่มเปิด/ปิด: เพื่อเปิด/ปิดแท่นวาง
- Microphone Jack (3.5mm): เชื่อมต่อไมโครโฟน
- แจ็คหูฟัง (3.5 มม.): เชื่อมต่อหูฟังหรือลำโพง
- พอร์ตข้อมูล USB-C: สำหรับเชื่อมต่ออุปกรณ์ต่อพ่วง USB-C
- พอร์ต USB 3.0: For connecting USB 3.0/2.0 peripherals.
3.2 แผงด้านหลัง

รูปที่ 3.2: Rear Panel. This image displays the rear of the docking station, featuring the DC 20V power input, USB-C PD host connection, two DisplayPort outputs, two HDMI outputs, a Gigabit Ethernet (LAN) port, and four additional USB 3.0 ports.
- กำลังไฟเข้า DC 20V: เชื่อมต่ออะแดปเตอร์ไฟฟ้าที่ให้มาด้วย
- USB-C PD Host Port: Connect to your laptop/tablet for data, video, and power delivery.
- 2x DisplayPort: เชื่อมต่อจอภาพภายนอกผ่านสาย DisplayPort
- 2x HDMI: Connect external monitors via HDMI cables.
- GLAN (RJ-45) Port: เชื่อมต่อกับเครือข่ายแบบมีสาย
- พอร์ต USB 3.0 จำนวน 4 ช่อง: Connect USB 3.0/2.0 peripherals.
4. คำแนะนำในการตั้งค่า
Follow these steps to set up your i-tec USB-C Quattro Docking Station:
- เชื่อมต่อพลังงาน: Connect the power adapter to the DC 20V input on the rear of the docking station, then plug the power cable into a wall outlet.
- เชื่อมต่อกับอุปกรณ์โฮสต์: Use the provided USB-C to USB-C cable to connect the docking station's USB-C PD Host Port to your laptop's USB-C port. Ensure your laptop's USB-C port supports DisplayPort Alternate Mode and Power Delivery for full functionality.
- เชื่อมต่อจอแสดงผลภายนอก: Connect your monitors to the DisplayPort and/or HDMI ports on the rear of the docking station. You can connect up to four displays simultaneously.
- เชื่อมต่ออุปกรณ์ต่อพ่วง: Plug your USB devices (keyboard, mouse, external drives) into the available USB 3.0 or USB-C data ports. Connect an Ethernet cable to the GLAN port for wired network access. Connect headphones/speakers and a microphone to the respective audio jacks on the front panel.
- เปิดเครื่อง: Press the power button on the front of the docking station. Your operating system should automatically detect the connected devices.
- การติดตั้งไดรเวอร์ (ถ้าจำเป็น): For optimal performance or specific features, visit www.i-tec.cz/setup to download and install any required drivers for your operating system.
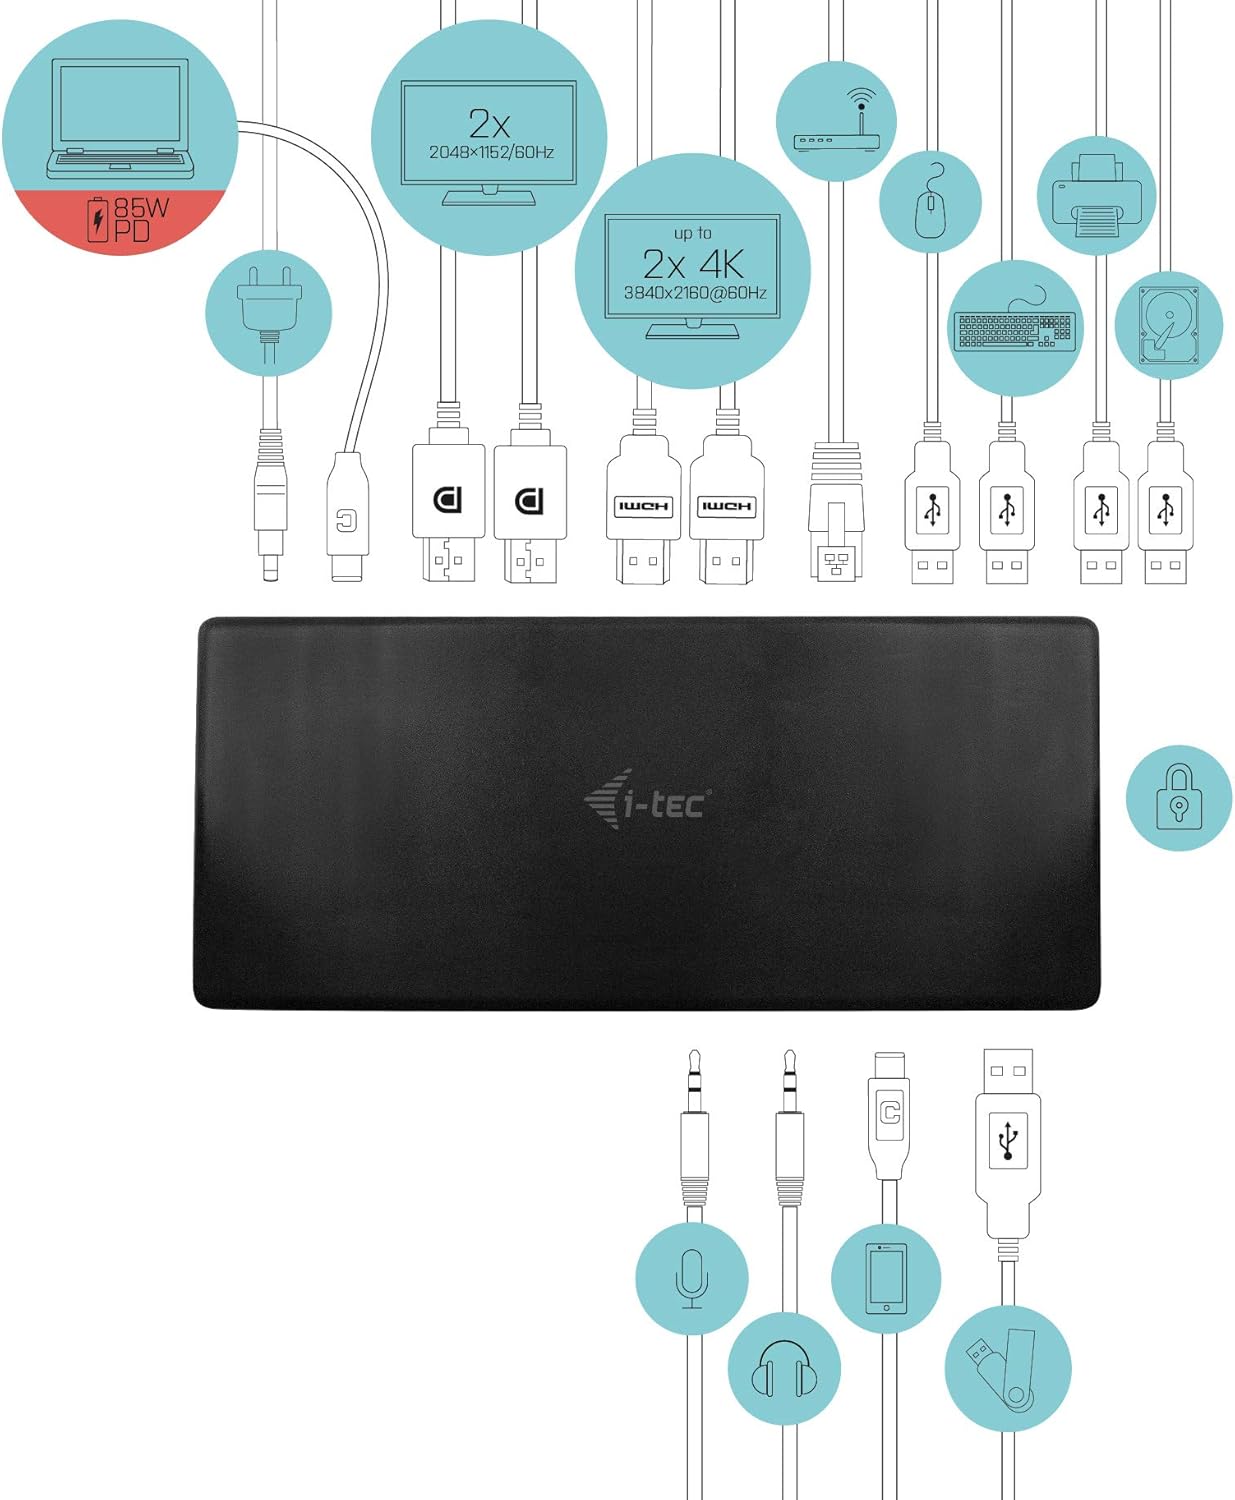
รูปที่ 4.1: Connection Diagram. This diagram shows the various connections to the docking station, including power, host laptop, multiple monitors (DisplayPort and HDMI), Ethernet, and USB peripherals like a mouse, keyboard, and external storage.
5. คู่มือการใช้งาน
Once set up, your docking station provides enhanced functionality for your workspace.
5.1 การกำหนดค่าจอแสดงผลหลายจอ
The docking station supports up to four external displays. You can configure these displays in various modes (extended, mirrored) through your operating system's display settings.
- มติ: Supports up to 2x 2048x1152@60Hz and 2x 4K/60Hz, depending on your host device's capabilities and display connections.
- หน้าต่าง: Right-click on the desktop, select 'Display settings' to arrange and configure your monitors.
- MacOS: Go to 'System Preferences' > 'Displays' to adjust settings.

รูปที่ 5.1: Four-Display Setup Example. This image illustrates a workstation with a laptop connected to the docking station, driving four external monitors simultaneously, showcasing a multi-tasking environment.
5.2 การจ่ายพลังงาน
The USB-C PD Host Port provides up to 85W of power to charge your connected laptop or tablet, eliminating the need for a separate power adapter for your host device.
การเชื่อมต่อ USB 5.3
Utilize the 5x USB 3.0 ports and 1x USB-C data port for connecting various peripherals such as external hard drives, USB flash drives, keyboards, mice, and printers. USB 3.0 ports offer high-speed data transfer.
5.4 กิกะบิตอีเทอร์เน็ต
The GLAN RJ-45 port provides a stable and high-speed wired internet connection (10/100/1000 Mbps), which is often more reliable than Wi-Fi.
5.5 ฟังก์ชันเสียง
Connect your headphones, speakers, or microphone to the 3.5mm audio jacks on the front panel for integrated audio input and output.

รูปที่ 5.2: Productivity Setup. This image shows a professional desk environment where the docking station facilitates a multi-monitor setup for enhanced productivity, displaying various applications and data across four screens.
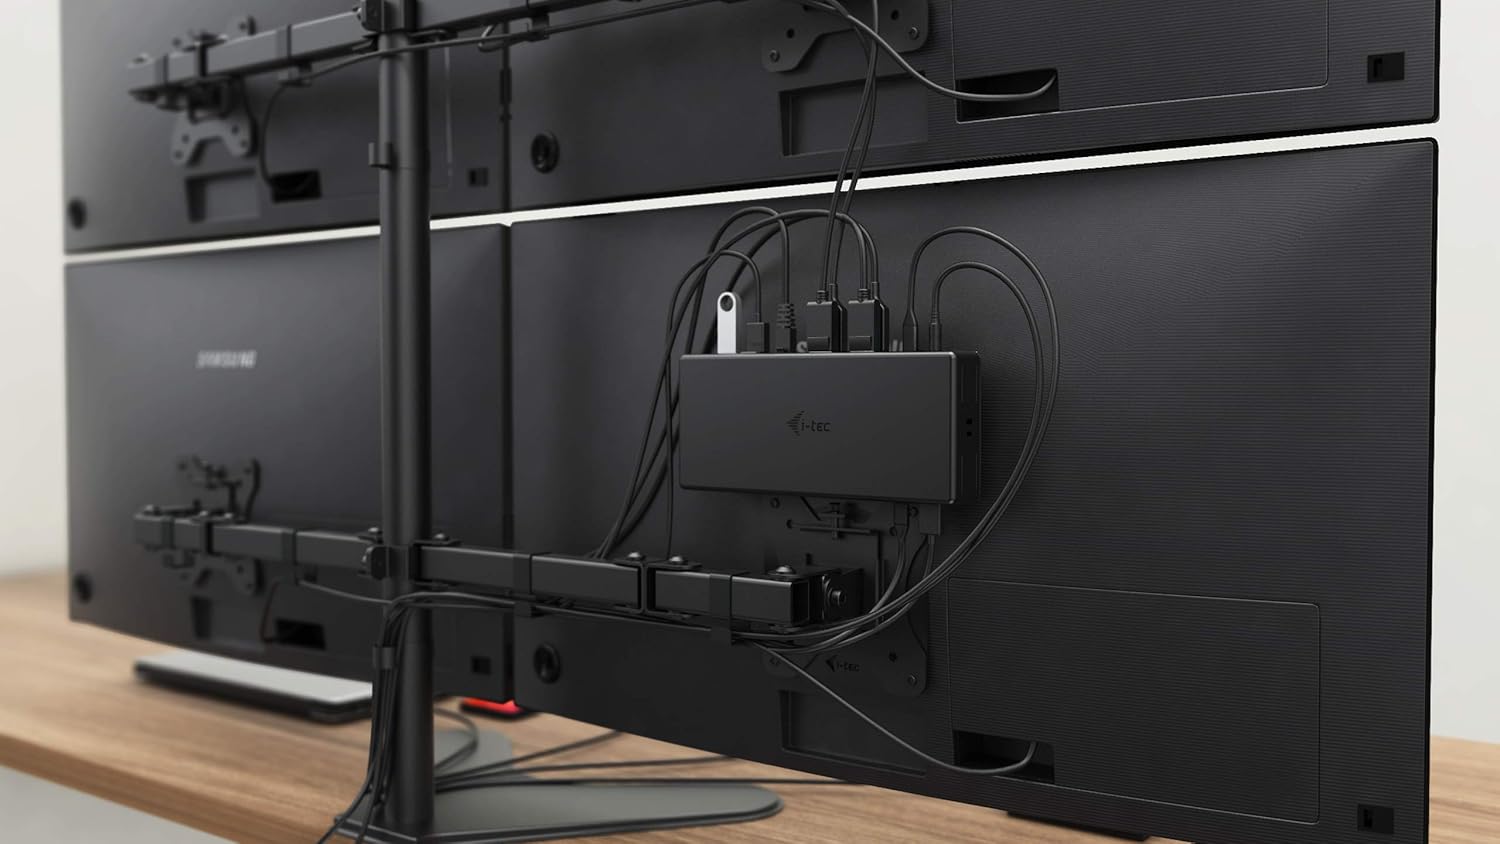
รูปที่ 5.3: VESA Mounting. The docking station is shown mounted vertically on the back of a VESA-compatible monitor, demonstrating its space-saving installation capability and organized cable routing.

รูปที่ 5.4: Connected Workstation. This image provides a close-up of the docking station on a desk, connected to a laptop via USB-C, and featuring various peripherals plugged into its front ports, including a USB drive and audio devices.
6. การบำรุงรักษา
เพื่อให้มั่นใจได้ว่าแท่นวางอุปกรณ์ของคุณจะมีอายุการใช้งานยาวนานและทำงานได้อย่างมีประสิทธิภาพสูงสุด โปรดปฏิบัติตามคำแนะนำในการบำรุงรักษาเหล่านี้:
- การทำความสะอาด: ใช้ผ้าแห้งนุ่มเช็ดทำความสะอาดภายนอกของแท่นวาง ห้ามใช้น้ำยาทำความสะอาดหรือสเปรย์กระป๋อง
- การระบายอากาศ : ควรวางแท่นวางในบริเวณที่มีอากาศถ่ายเทสะดวกเพื่อป้องกันความร้อนสูงเกินไป อย่าปิดกั้นช่องระบายอากาศใดๆ
- การจัดการ: ควรหลีกเลี่ยงการทำแท่นชาร์จตกหรือกระแทกอย่างแรง
- สิ่งแวดล้อม: เก็บอุปกรณ์ให้ห่างจากอุณหภูมิ ความชื้น และแสงแดดโดยตรง
- การจัดการสายเคเบิล: Ensure cables are not excessively bent or strained to prevent damage to ports and cables.
7 การแก้ไขปัญหา
หากคุณพบปัญหาเกี่ยวกับแท่นวาง โปรดดูปัญหาทั่วไปและวิธีแก้ไขต่อไปนี้:
7.1 ไม่มีการแสดงผล
- ตรวจสอบการเชื่อมต่อ: ตรวจสอบให้แน่ใจว่าสายเคเบิลแสดงผล (HDMI/DisplayPort) ทั้งหมดเชื่อมต่อกับแท่นวางและจอภาพอย่างแน่นหนาแล้ว
- การเชื่อมต่อโฮสต์: Verify the USB-C cable from the docking station is firmly connected to your laptop's USB-C port.
- พลัง: Confirm the docking station is powered on and receiving power from the adapter.
- ความเข้ากันได้ของแล็ปท็อป: ตรวจสอบให้แน่ใจว่าพอร์ต USB-C ของแล็ปท็อปของคุณรองรับ DisplayPort Alternate Mode
- ไดรเวอร์: Install the latest drivers from www.i-tec.cz/setup.
- การตั้งค่าการแสดงผล: Adjust your operating system's display settings to detect and extend/mirror displays.
7.2 อุปกรณ์ USB ใช้งานไม่ได้
- เชื่อมต่อใหม่: Disconnect and reconnect the USB device to a different port on the docking station.
- พลัง: ตรวจสอบให้แน่ใจว่าแท่นวางเปิดอยู่
- การเชื่อมต่อโฮสต์: Verify the USB-C connection to your laptop.
- การใช้พลังงาน: If connecting high-power USB devices, ensure the docking station's power adapter is correctly connected and providing sufficient power.
7.3 No Network Connection (GLAN)
- ตรวจสอบสายเคเบิล: ตรวจสอบให้แน่ใจว่าสายเคเบิลอีเทอร์เน็ตเชื่อมต่อกับสถานีเชื่อมต่อและเราเตอร์/โมเด็มของคุณอย่างแน่นหนา
- เราเตอร์/โมเด็ม: ตรวจสอบว่าเราเตอร์/โมเด็มของคุณทำงานถูกต้อง
- ไดรเวอร์: Ensure the latest network drivers are installed for the docking station.
7.4 Laptop Not Charging (Power Delivery)
- อะแดปเตอร์ไฟฟ้า: Confirm the docking station's power adapter is correctly connected and functioning.
- สาย USB-C: Ensure the USB-C cable connecting the dock to your laptop supports Power Delivery.
- ความเข้ากันได้ของแล็ปท็อป: Verify your laptop's USB-C port supports Power Delivery input.
8. ข้อมูลจำเพาะ
| คุณสมบัติ | รายละเอียด |
|---|---|
| หมายเลขรุ่น | C31QUATTRODOCKPDUK |
| ยี่ห้อ | ไอ-เทค |
| ขนาดสินค้า | 10 x 2 x 2.7 นิ้ว (25.4 x 5.08 x 6.86 ซม.) |
| น้ำหนักสินค้า | 10.2 ออนซ์ (0.29 กก.) |
| ฮาร์ดแวร์อินเตอร์เฟซ | DisplayPort, Ethernet, HDMI, USB, USB 3.0, USB Type C |
| อุปกรณ์ที่รองรับ | Laptop, Monitor, Tablet with USB-C (DisplayPort Alt Mode & Power Delivery support recommended) |
| พอร์ต USB รวม | 6 (5x USB 3.0, 1x USB-C Data) |
| พอร์ต HDMI ทั้งหมด | 2 |
| พอร์ตแสดงผลทั้งหมด | 2 |
| อีเธอร์เน็ต | Gigabit Ethernet (RJ-45) |
| แจ็คเสียง | 1x Microphone (3.5mm), 1x Headphone (3.5mm) |
| การส่งกำลัง | Up to 85W to host device |
| สี | สีดำ |
| ระบบปฏิบัติการ | Windows 10, macOS, Android, Linux |
9. ข้อมูลการรับประกัน
The i-tec USB-C Quattro Docking Station is covered by a manufacturer's warranty. Please refer to the warranty card included in your package or visit the official i-tec webดูรายละเอียดข้อกำหนดและเงื่อนไขการรับประกันได้ที่เว็บไซต์ เก็บหลักฐานการซื้อไว้เพื่อใช้ในการเรียกร้องการรับประกัน
10. การสนับสนุนลูกค้า
For further assistance, technical support, or to download the latest drivers and firmware, please visit the official i-tec support webเว็บไซต์:
You may also find helpful resources and FAQs on the product's dedicated setup page: www.i-tec.cz/setup