
1. คำแนะนำด้านความปลอดภัยที่สำคัญ
Read all instructions carefully before operating the LawnMaster GV1314 Scarifier and Dethatcher. Failure to follow these instructions may result in electric shock, fire, and/or serious injury.
- ความปลอดภัยส่วนบุคคล: Always wear appropriate personal protective equipment, including safety glasses, gloves, and sturdy footwear. Do not operate the machine barefoot or in open-toed shoes.
- ความปลอดภัยทางไฟฟ้า: ตรวจสอบให้แน่ใจว่าเต้ารับไฟฟ้ามีแรงดันไฟฟ้าตรงกับเครื่องtage. Use only a heavy-duty outdoor extension cord of appropriate gauge for the length and amperage. For a 12.5AMP tool, a 12-gauge extension cord is recommended for lengths up to 100 feet to prevent overheating and motor damage. Keep the extension cord clear of the working area and cutting blades.
- พื้นที่ทำงาน : Keep children, bystanders, and pets away from the operating area. Clear the area of any objects that could be thrown by the blades, such as rocks, sticks, or debris.
- การดำเนินการ: Never operate the machine in wet conditions. Do not overreach or stand on unstable surfaces. Maintain proper footing and balance at all times. Always push the machine forward; do not pull it towards you.
- การซ่อมบำรุง: Disconnect the power supply before performing any adjustments, cleaning, or maintenance. Regularly inspect the machine for damage or wear. Replace worn or damaged parts with genuine LawnMaster replacements.
- ความปลอดภัยของใบมีด: The blades are sharp. Handle them with care. Always wear gloves when handling or changing the cylinders.
2. สินค้าหมดview และส่วนประกอบ
Familiarize yourself with the parts of your LawnMaster GV1314 Scarifier and Dethatcher before use.

รูปที่ 2.1: เกินview of the LawnMaster GV1314 components. Key parts include the Aerator Cylinder, Scarifier Cylinder, Start/Stop Bale Switch, Safety Switch Button, Foam Grip, Upper Handle, Cord Retainer, Power Cord, Wing Nut, Cable Clip, Safety Guard Flap, Motor Cover, Front Wheel, Collection Bag Handle, Lower Handle, Collection Bag, Height Adjustment Lever, and Rear Wheel.
- Aerator Cylinder: Equipped with tines for aerating the lawn.
- กระบอกขูด: Equipped with blades for scarifying and dethatching.
- Start/Stop Bale Switch: Engages and disengages power to the motor.
- Safety Switch Button: Must be pressed before the bale switch can be engaged.
- คันโยกปรับความสูง: Adjusts the working depth of the cylinders.
- กระเป๋าเก็บ: Gathers dethatched material.
- ตัวยึดสายไฟ: Secures the extension cord to prevent accidental disconnection.
3. คำแนะนำในการประกอบ
The LawnMaster GV1314 requires minimal assembly. Follow these steps to prepare your unit for use:
- จับประกอบ: Attach the lower handle to the main unit using the provided bolts and wing nuts. Secure the middle handle to the lower handle, and then the upper handle to the middle handle. Ensure all connections are tight.
- ตัวยึดสายไฟ: Install the cord retainer on the upper handle. This will be used to secure your extension cord.
- กระเป๋าเก็บ: Assemble the collection bag frame and attach the bag. Slide the assembled collection bag onto the designated hooks at the rear of the unit.
- การติดตั้งกระบอกสูบ: The scarifier cylinder is typically pre-installed. If you wish to use the aerator cylinder, refer to the "Cylinder Exchange" section below.
4. การตั้งค่าและการเตรียมการ
4.1 Cylinder Exchange
Your LawnMaster GV1314 comes with two interchangeable cylinders: a scarifier cylinder (pre-installed) and an aerator cylinder. Always disconnect the power before changing cylinders.

รูปที่ 4.1: The two easily exchangeable work cylinders (Scarifier and Aerator) and their mounting mechanism, including the mounting bolt and bearing cover.
- ตรวจสอบให้แน่ใจว่าได้ถอดปลั๊กเครื่องแล้ว
- Turn the machine on its side to access the underside.
- Locate the bearing cover and mounting bolt on the side of the cylinder.
- Loosen and remove the mounting bolt and bearing cover.
- Carefully slide the installed cylinder out of its housing.
- Insert the desired cylinder (aerator or scarifier), ensuring the square drive end aligns correctly with the motor shaft.
- Reattach the bearing cover and tighten the mounting bolt securely. Ensure the cylinder is properly seated and rotates freely.
4.2 การปรับความสูง
The working depth of the cylinders can be adjusted using the height adjustment lever located on the side of the unit. There are multiple settings:
- Transport Setting: For moving the machine without engaging the blades with the ground.
- การตั้งค่า 1-3: Progressively deeper working depths. Start with a higher setting (less aggressive) and adjust as needed based on your lawn's condition and the amount of thatch.
Always adjust the height before starting the machine and while it is unplugged.
4.3 Extension Cord Connection
Connect a suitable outdoor-rated extension cord to the power cord of the dethatcher. Secure the connection using the cord retainer to prevent accidental disconnection during operation. Refer to the safety section for recommended extension cord gauge.
5. คู่มือการใช้งาน
Follow these steps for safe and effective operation of your LawnMaster GV1314.
5.1 การสตาร์ทและหยุดเครื่อง
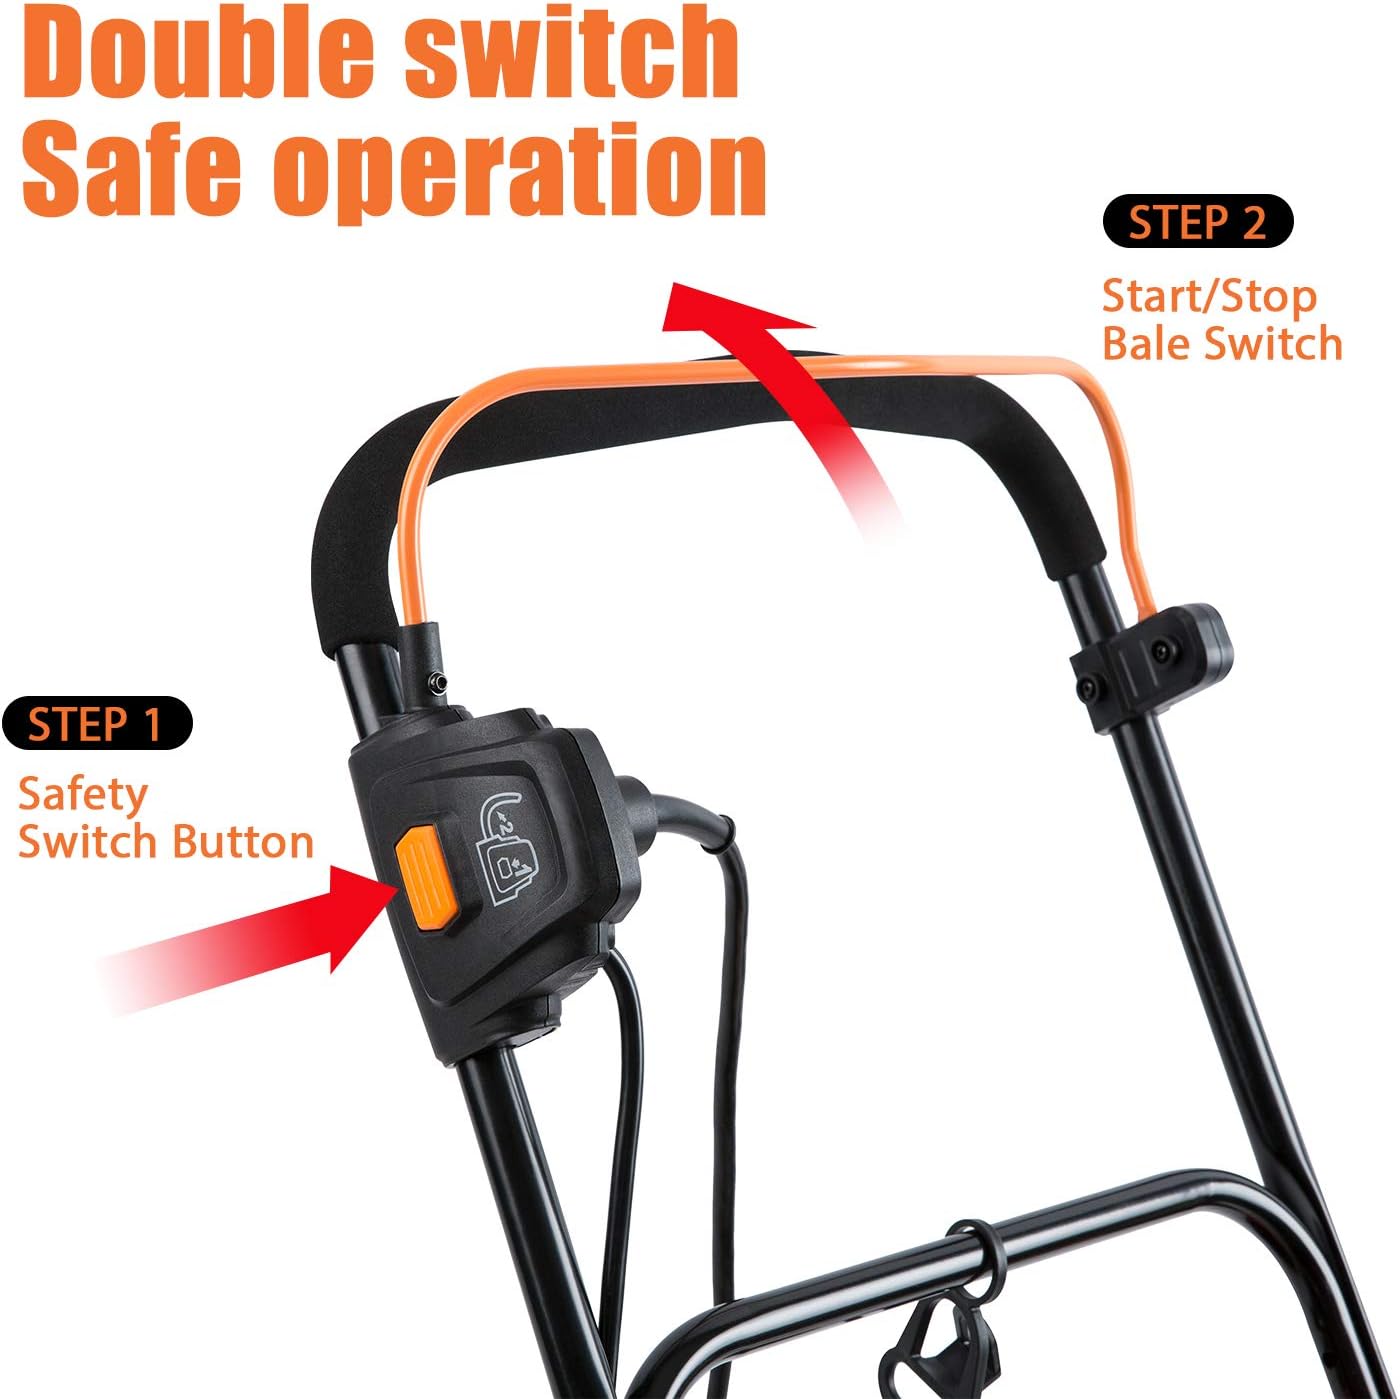
รูปที่ 5.1: The double switch system for safe operation, highlighting the Safety Switch Button (Step 1) and the Start/Stop Bale Switch (Step 2).
- Ensure the machine is on a level surface and the desired working depth is set.
- Plug the extension cord into a suitable outdoor power outlet.
- เริ่มต้นโดยการกดปุ่มค้างไว้ ปุ่มสวิตช์นิรภัย (Figure 5.1, Step 1).
- While holding the safety button, pull the สวิตช์สตาร์ท/หยุดก้อนเบล towards the handle (Figure 5.1, Step 2). The motor will start.
- Release the safety switch button once the motor is running.
- To stop, release the Start/Stop Bale Switch. The motor will shut off.
5.2 Operating Techniques

รูปที่ 5.2: The LawnMaster GV1314 in operation, showcasing its maneuverability on a lawn.
- ความคล่องตัว: The machine is designed for easy pushing. The front wheels are 6.7 inches and rear wheels are 3.15 inches, aiding in smooth movement across the lawn.
- Working Pattern: Work in straight, overlapping lines, similar to mowing. Avoid sudden turns or twisting the machine.
- กระเป๋าเก็บ: The collection bag will fill quickly, especially during heavy dethatching. Monitor its fill level and empty it frequently to maintain performance. For very thick thatch, it may be more efficient to remove the bag and rake up the debris manually after dethatching.
- หลีกเลี่ยงการโอเวอร์โหลด: Do not force the machine through dense areas. If the motor slows significantly, raise the working depth or reduce your pace.
- ช่องระบายความร้อน: Regularly check and clear the cooling vents on the motor cover to prevent overheating.
6. การบำรุงรักษา
Regular maintenance ensures the longevity and optimal performance of your LawnMaster GV1314. Always disconnect power before maintenance.
- การทำความสะอาด: After each use, clean the machine thoroughly. Remove any grass, dirt, or debris from the housing, wheels, and especially the cooling vents. A garden hose can be used, but avoid spraying water directly into the motor area.
- Cylinder Inspection: Inspect the scarifier and aerator cylinders for wear or damage. Replace dull or bent blades/tines to maintain effectiveness. Ensure the cylinder is securely mounted and the square drive connection is not worn.
- การหล่อลื่น: Periodically apply a light lubricant to moving parts, such as the height adjustment mechanism and cylinder mounting points, to ensure smooth operation.
- พื้นที่จัดเก็บ: Store the machine in a dry, protected area away from direct sunlight and moisture.
7 การแก้ไขปัญหา
If you encounter issues with your LawnMaster GV1314, refer to the following common problems and solutions:
| ปัญหา | สาเหตุที่เป็นไปได้ | สารละลาย |
|---|---|---|
| เครื่องไม่เริ่มทำงาน |
|
|
| Motor runs, but blades do not spin or spin weakly. |
|
|
| Machine overheats or shuts off. |
|
|
8. ข้อมูลจำเพาะผลิตภัณฑ์
| คุณสมบัติ | รายละเอียด |
|---|---|
| ยี่ห้อ | ลอว์นมาสเตอร์ |
| หมายเลขรุ่น | GV1314 |
| แหล่งพลังงาน | สายไฟ |
| Ampอีเรจ | 12.5 AMP |
| ความกว้างในการตัด | 15 นิ้ว |
| ความสูงในการตัดที่ปรับได้สูงสุด | 0.39 Inches (This likely refers to the maximum depth of scarification/dethatching, not height above ground) |
| วัสดุ | อะลูมิเนียม โลหะ พลาสติก |
| ขนาดสินค้า (ลึก x กว้าง x สูง) | ลึก 25 นิ้ว x กว้าง 17 นิ้ว x สูง 12 นิ้ว |
| จำเป็นต้องประกอบ | ใช่ |
9. การรับประกันและการสนับสนุนลูกค้า
For warranty information, replacement parts, or technical assistance, please contact LawnMaster customer support. Refer to your product packaging or the official LawnMaster webเว็บไซต์สำหรับรายละเอียดการติดต่อและเงื่อนไขการรับประกันล่าสุด
Webเว็บไซต์: Visit the LawnMaster Store on Amazon