
1. ข้อมูลด้านความปลอดภัย
โปรดอ่านและทำความเข้าใจคำเตือนด้านความปลอดภัยและคำแนะนำการใช้งานทั้งหมดก่อนใช้เครื่องมือนี้ การไม่ปฏิบัติตามคำแนะนำเหล่านี้อาจส่งผลให้เกิดไฟฟ้าช็อต ไฟไหม้ หรือการบาดเจ็บร้ายแรงได้
- Always ensure the multimeter is in good working condition before use. Inspect for any damage to the casing or test leads.
- ไม่ต้องสมัครวอลุ่มtage exceeding the maximum rated input (400V DC or AC effective value).
- ใช้ความระมัดระวังเมื่อทำงานกับ voltages สูงกว่า 30V AC RMS, 42V peak หรือ 60V DC ปริมาตรเหล่านี้tagอาจทำให้เกิดอันตรายจากการช็อตได้
- Ensure the test leads are properly connected to the correct input terminals for the measurement being performed.
- Do not use the multimeter if the battery cover is not securely closed.
- เปลี่ยนแบตเตอรี่ทันทีเมื่อไฟแสดงสถานะแบตเตอรี่อ่อนปรากฏขึ้นเพื่อให้แน่ใจว่าการอ่านค่าแม่นยำ
- ควรหลีกเลี่ยงการใช้งานอุปกรณ์ในสภาพแวดล้อมที่เปียกชื้นหรือขณะเกิดพายุฝนฟ้าคะนอง
- ควรตัดกระแสไฟออกจากวงจรทุกครั้งก่อนทำการวัดค่าความต้านทานหรือความต่อเนื่อง
2. สินค้าหมดview และบรรจุภัณฑ์
The Walfront Digital Multimeter is a compact, auto-ranging device designed for measuring AC/DC voltage, resistance, frequency, continuity, and non-contact voltage detection. It features an LCD display and an integrated flashlight for convenience.
2.1 เนื้อหาบรรจุภัณฑ์
- Walfront Digital Multimeter (ADMS1CL or ADMS1)
- สายทดสอบ (สีแดงและสีดำ)
- สายคล้องคอ
- คู่มือการใช้งาน
2.2 ส่วนประกอบของมัลติมิเตอร์

ภาพที่ 2.1: Labeled diagram of the Walfront Digital Multimeter, showing the non-contact sensor probe, LCD screen, power switch, mode/flashlight switch, voltage signal indicator, and input terminals.
- Non-contact sensor probe: ใช้สำหรับวัดปริมาตรแบบไม่สัมผัสtagการตรวจจับ e (NCV)
- หน้าจอ LCD: Displays measurement readings, units, and indicators.
- สวิตซ์ไฟ: เปิดหรือปิดอุปกรณ์
- Switch mode/Flashlight switch: Toggles between measurement modes and activates the LED flashlight.
- เล่มที่tage signal indicator: LED bar graph indicating detected voltagความแข็งแกร่ง
- Input Terminal (COM): Common negative input for test leads.
- Input Terminal (INPUT): ผลตอบรับเชิงบวกสำหรับสายทดสอบ
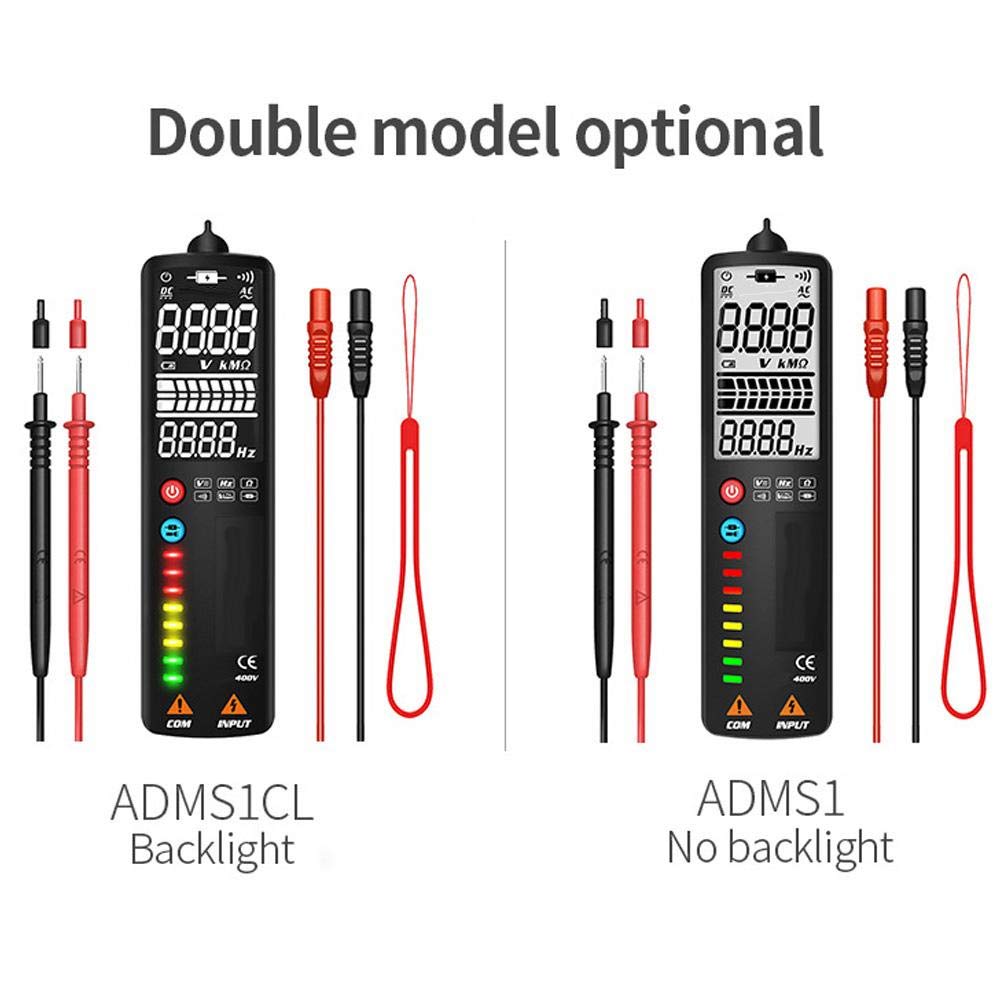
ภาพที่ 2.2: Comparison showing the ADMS1CL model with a backlit display and the ADMS1 model without a backlight.
3. การตั้งค่า
3.1 การติดตั้งแบตเตอรี่
The multimeter requires one 3V AAA battery (not included) for operation.
- ค้นหาช่องใส่แบตเตอรี่ที่ด้านหลังของมัลติมิเตอร์
- ใช้ไขควงเปิดฝาช่องใส่แบตเตอรี่
- Insert one 3V AAA battery, observing the correct polarity (+/-) as indicated inside the compartment.
- ปิดฝาช่องใส่แบตเตอรี่ให้แน่น
4. คู่มือการใช้งาน
4.1 เปิด/ปิดเครื่อง
- To power on the multimeter, press the สวิตซ์ไฟฟ้า ปุ่ม.
- ในการปิดเครื่องให้กดปุ่ม สวิตซ์ไฟฟ้า จนกระทั่งจอแสดงผลดับลง
- The device features an automatic shutdown function after approximately 2 minutes of inactivity to conserve battery life.
4.2 โหมดการวัดอัตโนมัติ
Upon powering on, the multimeter defaults to an intelligent automatic measurement mode. In this mode, the device automatically identifies and measures AC/DC voltage, ความต้านทาน และความต่อเนื่อง โดยไม่ต้องเลือกช่วงด้วยตนเอง

ภาพที่ 4.1: The multimeter being used to test electrical components on a circuit board, demonstrating its application in general electrical testing.
4.3 Manual Mode Selection
กดปุ่ม Mode/Flashlight Switch button to cycle through specific measurement functions:

ภาพที่ 4.2: Icons illustrating the multimeter's capabilities: AC Voltagอี DC Voltage, Resistance, Frequency, Continuity, Flashlight, V-Alert, and Live Wire detection.
- เล่มที่tage AC (V~): For measuring alternating current voltage. ต่อสายทดสอบเข้ากับวงจรแบบขนาน
- เล่มที่tage DC (V-): For measuring direct current voltage. Connect test leads to the circuit in parallel, observing polarity.
- ความต้านทาน (โอห์ม): For measuring electrical resistance. Ensure the circuit is de-energized before connecting test leads across the component.
- ความถี่ (Hz): For measuring the frequency of an AC signal.
- ความต่อเนื่อง (•))): For checking if a circuit is complete. The multimeter will beep if continuity is detected. Ensure the circuit is de-energized.
4.4 ไม่สัมผัส Voltagการตรวจจับ e (NCV)
The multimeter can detect AC voltagโดยไม่ต้องสัมผัสโดยตรง ช่วยเพิ่มความปลอดภัย
- ตรวจสอบให้แน่ใจว่ามัลติมิเตอร์เปิดใช้งานอยู่
- Place the non-contact sensor probe near the conductor or outlet.
- ฉบับที่tage signal indicator LEDs will illuminate, and an audible beep will sound, with intensity increasing เป็นปริมาตรtagความแข็งแกร่งเพิ่มขึ้น
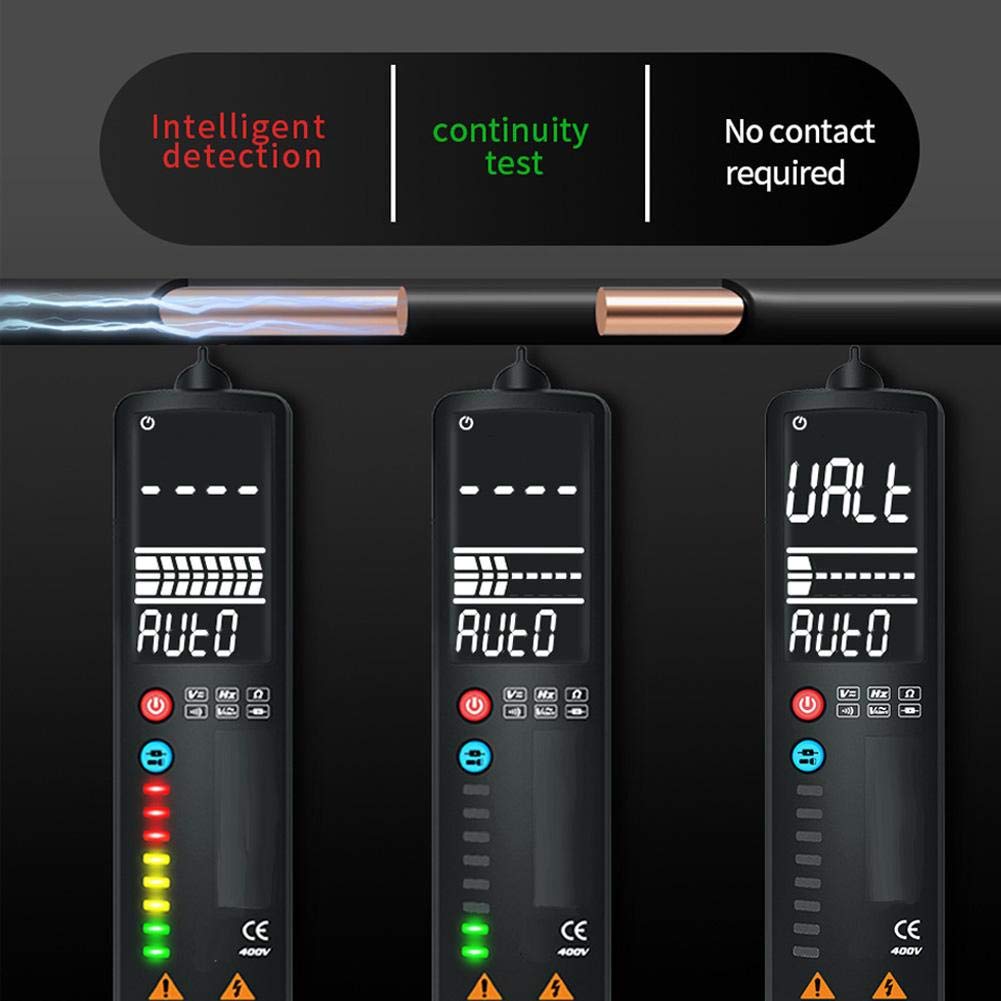
ภาพที่ 4.3: Demonstrates intelligent detection, continuity testing, and non-contact voltage detection capabilities of the multimeter.
4.5 การตรวจจับสายไฟที่มีกระแสไฟฟ้า
This function helps identify live wires in an AC circuit.
- ตรวจสอบให้แน่ใจว่ามัลติมิเตอร์เปิดใช้งานอยู่
- Place the non-contact sensor probe near the wire or into the slot of an outlet.
- The multimeter will indicate a live wire with a stronger signal (more LEDs illuminated) compared to a neutral wire.

ภาพที่ 4.4: Illustrates the difference in readings and LED indications when performing a Neutral Check versus a Live Check with the multimeter.
4.6 การใช้งานไฟฉาย LED
The integrated LED flashlight assists in working in dimly lit areas.
- To turn on the flashlight, press and hold the Mode/Flashlight Switch ปุ่ม.
- To turn off the flashlight, press and hold the Mode/Flashlight Switch ปุ่มอีกครั้ง

ภาพที่ 4.5: The multimeter's LED flashlight in operation, illuminating a work area for convenient testing in low-light conditions.
5. การบำรุงรักษา
5.1 การทำความสะอาด
ในการทำความสะอาดมัลติมิเตอร์ ให้เช็ด casinจีกับโฆษณาamp cloth and a mild detergent. Do not use abrasive cleaners or solvents. Ensure the device is powered off and disconnected from any circuits before cleaning.
5.2 การเปลี่ยนแบตเตอรี่
When the low battery indicator appears on the LCD, replace the battery promptly to ensure accurate measurements. Refer to Section 3.1 for battery installation instructions.
5.3 พื้นที่จัดเก็บ
If the multimeter will not be used for an extended period, remove the battery to prevent leakage and damage to the device. Store the multimeter in a cool, dry place, away from direct sunlight and extreme temperatures.
6 การแก้ไขปัญหา
- No display or weak display: Check battery installation. Replace with a fresh 3V AAA battery if necessary.
- การอ่านค่าที่ไม่ถูกต้อง: Ensure test leads are properly connected. Verify the correct measurement mode is selected (if not using auto mode). Replace battery if low battery indicator is present.
- ไม่มีเสียงบี๊บแสดงความต่อเนื่อง: Ensure the circuit is de-energized. Check if the component being tested is actually continuous.
- NCV ตรวจไม่พบปริมาตรtage: Ensure the probe is close enough to the conductor. Verify the voltage is within the detectable range.
7. ข้อมูลจำเพาะ
- ประเภทสินค้า: สมาร์ทมัลติมิเตอร์
- วัสดุ: เอบีเอส
- สี: สีดำ
- ขนาด: ขนาดโดยประมาณ 150x40x17 มม. / 5.9x1.6x0.7 นิ้ว
- น้ำหนัก: ประมาณ 120 กรัม / 4.2 ออนซ์
- แสดง: LCD, 2000 digits maximum display value
- Sampหลิงอัตรา: ประมาณ 3 ครั้ง/วินาที
- ช่วงอัตโนมัติ: ใช่
- Full Range Overload Protection: ใช่
- ปริมาณสูงสุดtage Allowed at Measuring Terminal: DC: 400V or AC: 400V (effective value)
- ความสูงในการทำงาน: 2000ม.
- เวลาปิดเครื่องอัตโนมัติ: ประมาณ 2 นาที
- แหล่งจ่ายไฟสำหรับใช้งาน: 1x 3V AAA battery (not included)
- DC ฉบับที่tagอี ช่วง: 400โวลต์
- DC ฉบับที่tage ความละเอียด: 0.01โวลต์
- DC ฉบับที่tage ความแม่นยำ: ± 0.8% reading + 3 words
- ความไว: Minimum 0.5V DC voltage
- ปริมาณอินพุตสูงสุดtage: 400V DC or AC effective value
8. การรับประกันและการสนับสนุน
For warranty information or technical support, please refer to the product packaging or contact Walfront customer service directly through their official channels. Keep your purchase receipt for warranty claims.