
1. บทนำ
This manual provides instructions for the installation, operation, and maintenance of the Walfront Y-Axis Belt Tensioner Kit. This kit is designed to enhance the performance of Ender-3 and Ender-3 PRO 3D printers by allowing precise adjustment of the Y-axis belt tension, which is crucial for print accuracy and quality.
2. เนื้อหาบรรจุภัณฑ์
ตรวจสอบว่ารายการทั้งหมดที่ระบุไว้ด้านล่างนี้รวมอยู่ในแพ็คเกจของคุณ:
- 1 x Y-Axis Belt Tensioner Kit
- 3 x Wrenches (typically hex keys and a spanner for assembly)

3. สินค้าหมดview
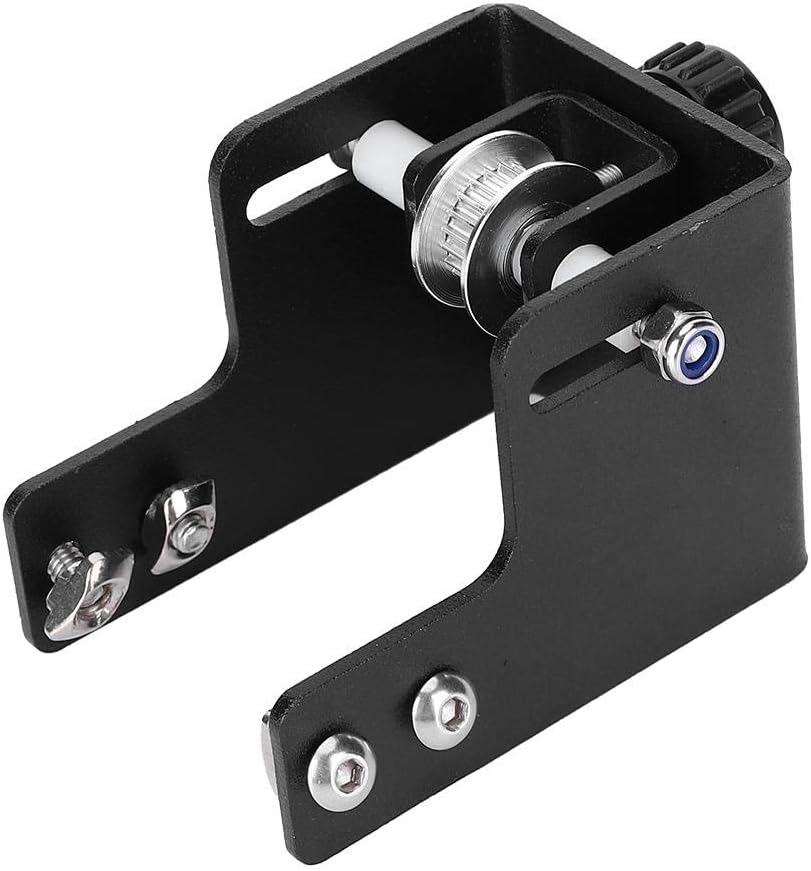
The Walfront Y-Axis Belt Tensioner Kit is constructed from durable 4040 aluminum alloy, featuring an anodized surface treatment for enhanced longevity and corrosion resistance. It integrates a pulley system and an adjustment mechanism to maintain optimal tension on the Y-axis timing belt of compatible 3D printers.


4. การตั้งค่าและการติดตั้ง
This section outlines the steps for installing the Y-Axis Belt Tensioner Kit on your 3D printer. Ensure the printer is powered off and disconnected from the power source before beginning installation.
- การตระเตรียม: Power off your 3D printer and unplug it from the electrical outlet.
- Locate Y-Axis Belt: Identify the existing Y-axis belt assembly on your printer.
- Remove Original Component: Carefully remove any existing Y-axis belt tensioning component or end cap, if present, following your printer's specific disassembly instructions.
- Mount Tensioner Kit: Position the Walfront Y-Axis Belt Tensioner Kit onto the Y-axis aluminum extrusion. Align the mounting holes with the corresponding slots on the printer frame.
- ยึดด้วยสกรู: Use the provided screws and wrenches to securely fasten the tensioner kit to the printer frame. Do not overtighten.
- Route Belt: Guide the Y-axis timing belt around the pulley of the newly installed tensioner. Ensure the belt is correctly seated in the pulley grooves.
- Initial Tension Adjustment: Loosely adjust the tensioner knob to take up any significant slack in the belt. Final adjustment will be performed during operation.
For detailed visual guidance, refer to online resources or your 3D printer's specific assembly diagrams.
5. Operation: Adjusting Belt Tension
Proper Y-axis belt tension is crucial for accurate 3D printing. Too loose, and prints may show ghosting or layer shifts; too tight, and it can cause excessive wear on motors and bearings.
- เปิดเครื่อง: Reconnect your 3D printer to power and turn it on.
- การเคลื่อนไหวด้วยมือ: Manually move the print bed (Y-axis) back and forth to observe the belt's movement.
- ปรับความตึง: Use the adjustment knob on the tensioner kit to gradually increase or decrease belt tension. Turn the knob clockwise to tighten and counter-clockwise to loosen.
- Optimal Tension: Aim for a tension where the belt is firm but can still be slightly flexed with moderate finger pressure. It should produce a low-pitched strumming sound when plucked, similar to a guitar string, without being overly tight or loose.
- ทดสอบพิมพ์: Perform a test print to verify print quality. Adjust tension further if issues like ghosting or layer shifts persist.
6. การบำรุงรักษา
Regular maintenance ensures the longevity and optimal performance of your Y-Axis Belt Tensioner Kit.
- การตรวจสอบปกติ: Periodically inspect the Y-axis belt and tensioner for any signs of wear, damage, or misalignment.
- ความสะอาด : Keep the pulley and belt free from dust, debris, and filament scraps, which can affect performance. Use a soft brush or compressed air for cleaning.
- การหล่อลื่น: The pulley bearings are typically sealed and do not require lubrication. Avoid applying lubricants directly to the belt itself.
- การตรวจสอบความตึง: Re-check belt tension periodically, especially after extended printing sessions or if print quality degrades.
7 การแก้ไขปัญหา
โปรดดูตารางด้านล่างเพื่อดูปัญหาทั่วไปและวิธีแก้ไข:
| ปัญหา | สาเหตุที่เป็นไปได้ | สารละลาย |
|---|---|---|
| Layer Shifting / Ghosting | Y-axis belt too loose | Increase Y-axis belt tension using the adjustment knob. |
| Excessive Noise from Y-axis | Y-axis belt too tight or misaligned | Slightly loosen Y-axis belt tension. Check for proper belt alignment on the pulley. |
| เข็มขัดลื่น | Belt worn or pulley dirty | Inspect belt for wear; replace if necessary. Clean pulley grooves. Increase tension if belt is not worn. |
If issues persist after troubleshooting, consult your 3D printer's manufacturer support or relevant online communities.
8. ข้อมูลจำเพาะ
- ประเภทสินค้า: Y-axis belt tensioner kit
- แบบอย่าง: Y-axis tensioner for Ender-3PRO
- ความเข้ากันได้: Ender-3, Ender-3 PRO 3D Printers
- วัสดุ: อะลูมิเนียมอัลลอย 4040
- การบำบัดพื้นผิว: การชุบอะโนไดซ์
- ขนาด (โดยประมาณ): 100มม. x 80มม. x 10มม.
- หมายเลขชิ้นส่วนของผู้ผลิต: Walfront2r6fgqp5gh
- น้ำหนัก: ประมาณ 4.4 ออนซ์ (125 กรัม)
9. ข้อมูลการรับประกัน
This Walfront product is covered by a standard manufacturer's warranty against defects in materials and workmanship. Please retain your proof of purchase for warranty claims. For specific warranty terms and conditions, refer to the Walfront official webไซต์หรือติดต่อฝ่ายสนับสนุนลูกค้า
10. การสนับสนุนลูกค้า
For technical assistance, troubleshooting, or inquiries regarding your Walfront Y-Axis Belt Tensioner Kit, please visit the official Walfront webเว็บไซต์หรือติดต่อฝ่ายบริการลูกค้าของพวกเขา