
1. บทนำ
The Massive Audio Primo Series P8 Monoblock Mega Amplifier is a high-performance Class D amplifier designed for car audio systems. This manual provides essential information for proper installation, operation, and maintenance of your P8 amplifier เพื่อให้แน่ใจว่าประสิทธิภาพสูงสุดและอายุการใช้งานที่ยาวนาน

ภาพที่ 1.1: ด้านบน view of the Massive Audio Primo Series P8 Monoblock Ampเครื่องแสดงasinด้วยการออกแบบที่เพรียวบางและรูปทรงที่กะทัดรัด
2. คำแนะนำด้านความปลอดภัย
Please read and understand all safety instructions before installing or operating this ampเครื่องขยายเสียง การไม่ปฏิบัติตามคำแนะนำเหล่านี้อาจส่งผลให้เกิดการบาดเจ็บหรือความเสียหายต่อผลิตภัณฑ์หรือยานพาหนะ
- ควรตัดการเชื่อมต่อขั้วลบของแบตเตอรี่รถยนต์ทุกครั้งก่อนทำการเชื่อมต่อทางไฟฟ้าใดๆ
- ตรวจสอบให้แน่ใจว่ามีการระบายอากาศที่เหมาะสมรอบ ๆ amplifier เพื่อป้องกันความร้อนสูงเกินไป
- ใช้สายไฟที่มีขนาดเหมาะสมสำหรับการเชื่อมต่อไฟเลี้ยง สายดิน และสายลำโพง ตามที่ระบุไว้ในคู่มือนี้
- ติดตั้ง ampติดตั้งอุปกรณ์ขยายสัญญาณให้แน่นหนาเพื่อป้องกันการเคลื่อนไหวขณะใช้งานยานพาหนะ
- หลีกเลี่ยงการติดตั้ง ampควรติดตั้งเครื่องขยายเสียงในบริเวณที่มีความชื้นหรือการสั่นสะเทือนมากเกินไป
- เพื่อความปลอดภัยและประสิทธิภาพสูงสุด แนะนำให้ติดตั้งโดยช่างผู้เชี่ยวชาญ
3. เนื้อหาบรรจุภัณฑ์
ตรวจสอบว่ามีสิ่งของทั้งหมดอยู่ครบเมื่อแกะกล่อง:
- One (1) Massive Audio Primo Series P8 Monoblock Mega Ampชีวิต
- คู่มือการใช้งาน (เอกสารนี้)
- ฮาร์ดแวร์สำหรับติดตั้ง (ถ้ามี)
4. คุณสมบัติหลัก
พี 8 amplifier incorporates advanced features for superior audio performance and reliability:
- Input Sensitivity Low Level: 400mVrms ~ 10Vrms
- Auto Hi-Level Input via RCA Input
- 12v Remote Output When Hi-level Signal is Used
- Parametric EQ with 0 - 12 dB Boost
- All Models Linkable with Single RCA for easy upgrade
- Short Circuit, Thermal, Reverse Voltage, and Over Voltagการป้องกันอี
- N-Channel Circuitry for High-Efficiency
- 24 dB Low Pass Crossovers with an adjustable range of 30Hz - 220Hz
- Heavy Duty Power Supply
- โลโก้เรืองแสง
- Heavy-Duty Aluminum Heat Sink
- ออกแบบและออกแบบในสหรัฐอเมริกา
- Proprietary "Bass Kompressor" Circuitry provides Low-Frequency Enhancement
- Extreme Power in a Small Footprint
- "Q Control" to fine-tune the curve on the bass boost
- "Clip Limit Switch" allows the amplifier to take up to 16.5 volts
- Adjustable Low Pass 18dB Sub Harmonic Filter with a range of 0Hz - 60Hz
- Adjustable center frequency range of 30-80 Hz
- Nickel-Plated Connectors
- High-Efficiency Class "D" Design
5. การตั้งค่าและการติดตั้ง
การติดตั้งที่ถูกต้องเป็นสิ่งสำคัญต่อประสิทธิภาพและความปลอดภัยของคุณ amplifier. Consult a professional installer if you are unsure about any steps.
5.1. ตำแหน่งการติดตั้ง
- Choose a dry, well-ventilated area away from direct sunlight or heat sources.
- ตรวจสอบให้แน่ใจว่าพื้นผิวที่ติดตั้งมีความแข็งแรงเพียงพอที่จะรองรับน้ำหนักได้ ampน้ำหนักของเครื่องเพิ่มน้ำหนัก
- เว้นพื้นที่รอบ ๆ ให้เพียงพอ ampเครื่องเพิ่มการไหลเวียนของอากาศ
5.2. การเชื่อมต่อสายไฟ
Refer to the diagram below for proper wiring of power, ground, remote, and speaker connections.

Image 5.1: Rear panel of the P8 ampเครื่องขยายเสียงแสดงขั้วต่อไฟ ขั้วต่อสายดิน ขั้วต่อรีโมท และขั้วต่อลำโพง
5.2.1. Power Connection (+12V)
Connect a heavy-gauge power cable (e.g., 4 AWG or larger) from the amplifier's +12V terminal to the positive terminal of the vehicle's battery. Install an appropriate fuse (not supplied) within 18 inches (45 cm) of the battery.
5.2.2. Ground Connection (GND)
Connect a heavy-gauge ground cable (e.g., 4 AWG or larger) from the amplifier's GND terminal to a clean, unpainted metal surface of the vehicle chassis. Ensure a solid, low-resistance connection.
5.2.3. Remote Turn-On (REM IN/OUT)
Connect a 18-gauge wire from your head unit's remote output to the amplifier's REM IN terminal. The REM OUT terminal can be used to daisy-chain the remote signal to other ampลิตเตอร์
5.2.4. Speaker Connection (SPEAKER)
Connect your subwoofer(s) to the SPEAKER terminals. Ensure the total impedance of the connected speakers is not below 0.5 Ohm. Observe correct polarity (+ to + and - to -).
5.2.5. Signal Input (LINE IN)
เชื่อมต่อสาย RCA จากชุดเครื่องเสียงหลักของคุณamp ส่งออกไปยัง amplifier's LINE IN RCA inputs. The amplifier also supports auto hi-level input via the RCA inputs.
6. การใช้งานและการปรับแต่ง
พี 8 amplifier features various controls to fine-tune your audio system. Familiarize yourself with these controls for optimal sound.
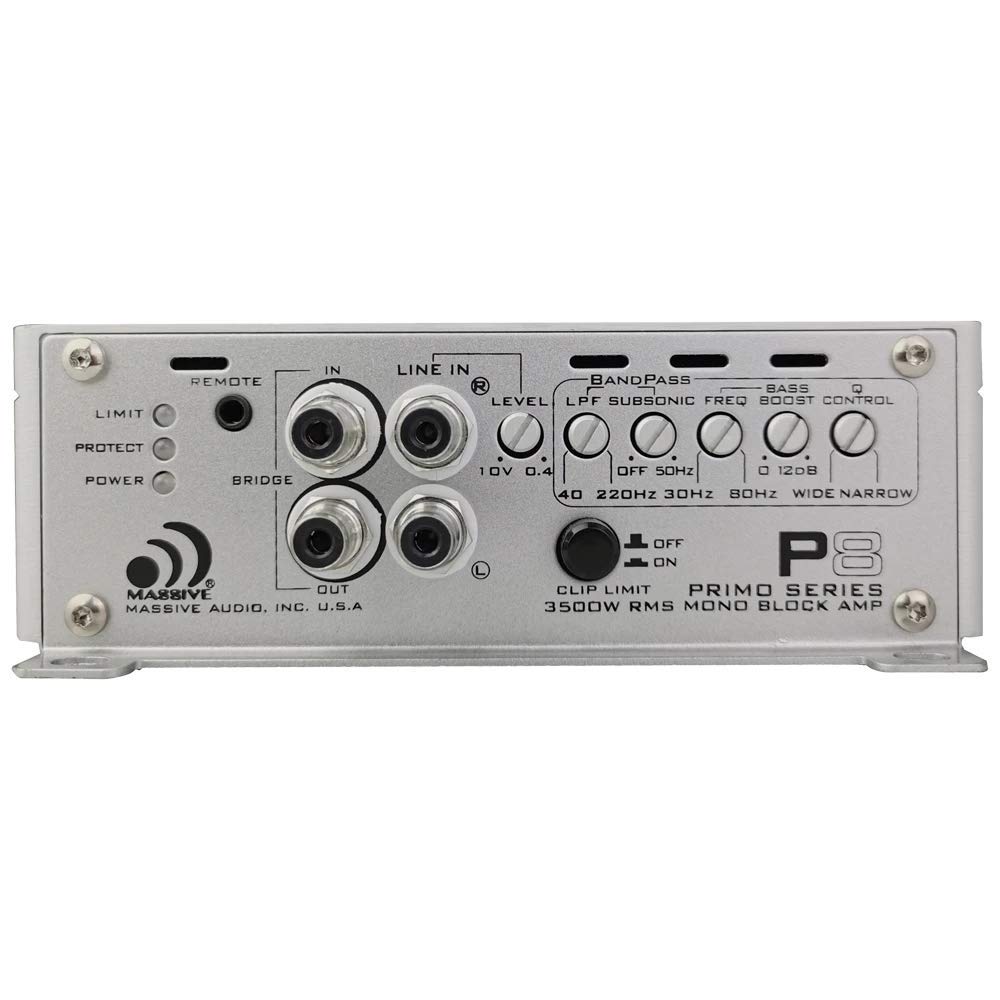
Image 6.1: Front panel of the P8 amplifier displaying the control layout for audio adjustments.
6.1. แผงควบคุมด้านบนview
- ระยะไกล: Input for optional remote bass control knob.
- LIMIT/PROTECT/POWER Indicators: ไฟ LED แสดงสถานะ ampสถานะตัวเร่งปฏิกิริยา
- เข้าแถว: RCA inputs for audio signal.
- LEVEL (Input Sensitivity): Adjusts the input gain to match the head unit's output. Range: 400mVrms - 10Vrms.
- LPF (ฟิลเตอร์ผ่านความถี่ต่ำ): Adjusts the upper frequency limit for the subwoofer. Range: 30Hz - 220Hz (24 dB/octave).
- SUBSONIC FREQ (High Pass Filter): Filters out ultra-low frequencies below the audible range to protect subwoofers. Range: 0Hz - 60Hz (18 dB/octave).
- เพิ่มเสียงเบส: Increases bass output at a specific frequency. Range: 0 - 12 dB.
- Q CONTROL: Fine-tunes the bandwidth of the bass boost.
- CLIP LIMIT SWITCH: ช่วยให้ amplifier to handle up to 16.5 volts, preventing clipping at high input levels.
6.2. การตั้งค่าและการปรับแต่งเบื้องต้น
- ตั้งค่าทั้งหมด amplifier controls (LEVEL, LPF, SUBSONIC, BASS BOOST) to their minimum or off positions.
- Turn your head unit volume to about 75% of its maximum.
- ค่อยๆเพิ่ม amplifier's LEVEL control until you hear slight distortion, then back off slightly.
- Adjust the LPF to suit your subwoofers and personal preference, typically between 60Hz and 100Hz for subwoofers.
- Set the SUBSONIC FREQ to protect your subwoofers from frequencies below their resonant frequency, usually around 20Hz to 30Hz.
- Use the BASS BOOST and Q CONTROL sparingly to enhance bass, avoiding excessive boost that can lead to distortion or speaker damage.
7. การบำรุงรักษา
การบำรุงรักษาอย่างสม่ำเสมอจะช่วยให้มั่นใจได้ถึงอายุการใช้งานและประสิทธิภาพการทำงานของอุปกรณ์ของคุณ ampชีวิต.
- เก็บรักษาไว้ ampทำความสะอาดเครื่องขยายเสียงให้ปราศจากฝุ่นและสิ่งสกปรก ใช้ผ้าแห้งนุ่มๆ ในการทำความสะอาด
- ตรวจสอบการเชื่อมต่อสายไฟทั้งหมดเป็นระยะๆ เพื่อดูความแน่นหนาและการกัดกร่อน
- ให้แน่ใจว่า ampครีบระบายความร้อนของเครื่องขยายเสียงไม่มีสิ่งกีดขวาง เพื่อรักษาการระบายความร้อนที่เหมาะสม
8. คำแนะนำการแก้ไขปัญหา
หากคุณประสบปัญหาเกี่ยวกับ ampเครื่องขยายสัญญาณ โปรดดูตารางด้านล่างเพื่อดูปัญหาทั่วไปและวิธีแก้ไข
| ปัญหา | สาเหตุที่เป็นไปได้ | สารละลาย |
|---|---|---|
| ไม่มีไฟ / ไฟ LED แสดงสถานะดับ | Blown fuse, poor power/ground connection, faulty remote wire. | Check inline fuse near battery. Verify +12V, GND, and REM connections. Ensure remote wire has +12V when head unit is on. |
| No Sound / Protect LED On | Speaker short circuit, impedance too low, overheating, faulty RCA cables. | Check speaker wiring for shorts. Verify speaker impedance is 0.5 Ohm or higher. Ensure adequate ventilation. Check RCA cable integrity. |
| เสียงผิดเพี้ยน | Gain set too high, improper LPF/Subsonic settings, poor signal quality, low voltage. | Reduce LEVEL (gain) control. Adjust LPF and Subsonic filters. Check RCA cables. Verify vehicle's electrical system. |
| Ampเครื่องทำความร้อนร้อนเกินไป | การระบายอากาศไม่เพียงพอ, ค่าความต้านทานต่ำเกินไป, การใช้งานกำลังไฟสูงเป็นเวลานาน | ย้ายที่อยู่ amplifier for better airflow. Check speaker impedance. Reduce listening volume or duration. |
9. ข้อมูลจำเพาะทางเทคนิค
| ข้อมูลจำเพาะ | ค่า |
|---|---|
| กำลัง RMS (1 โอห์ม) | 2300w x 1 |
| กำลังขับ RMS (2 โอห์ม) | 1400w x 1 |
| กำลัง RMS (0.5 โอห์ม) | 3500w x 1 |
| พลังสูงสุด | 7000w x 1 |
| อิมพีแดนซ์ขั้นต่ำ | 0.5 โอห์ม |
| Bass Boost ความถี่ | 30Hz - 120Hz |
| ความเพี้ยนฮาร์มอนิกรวม (THD) | น้อยกว่า 0.03% |
| อัตราส่วนสัญญาณต่อเสียงรบกวน (S/N) | มากกว่า 100dB |
| ตัวกรองความถี่ต่ำ (HPF) | 0-60เฮิรตซ์ |
| อาร์ซีเออินพุตVoltage | 400มิลลิโวลต์ - 10โวลต์ |
| การตอบสนองความถี่ | 10Hz - 220Hz |
| ขนาด (กว้าง x ยาว x สูง) | 19.9" x 6.5" x 2.1" |
| เล่มที่tage | 12 โวลต์ (กระแสตรง) |
| ปริมาณอุปทานสูงสุดtage | 12 โวลต์ |
| ประเภทการติดตั้ง | อิสระ |
| หมายเลขรุ่น | P8 |
| ผู้ผลิต | Massive Audio |
10. ข้อมูลการรับประกัน
Massive Audio products typically come with a limited manufacturer's warranty. Please refer to the official Massive Audio website or your purchase documentation for specific warranty terms and conditions, including coverage period and claim procedures. Keep your proof of purchase for warranty validation.
11. การสนับสนุนลูกค้า
For technical assistance, service, or further inquiries regarding your Massive Audio Primo Series P8 Monoblock Amplifier, please visit the official Massive Audio website or contact their customer support department. You can also visit the Massive Audio Store on Amazon for product information: