คำแนะนำด้านความปลอดภัยที่สำคัญ
Read all instructions before using this dehumidifier. Failure to follow these instructions may result in electric shock, fire, or personal injury. Keep this manual for future reference.
- Use only on a grounded 115V, 60Hz electrical outlet.
- Do not operate with a damaged power cord or plug. If the power cord is damaged, it must be replaced by the manufacturer or a qualified service agent.
- อย่าปิดกั้นช่องลมเข้าหรือช่องลมออก ตรวจสอบให้แน่ใจว่ามีพื้นที่ว่างรอบเครื่องเพียงพอเพื่อให้มีการไหลเวียนของอากาศอย่างเหมาะสม
- Keep the unit upright during operation and transport. Tilting the unit may cause water leakage or malfunction.
- Unplug the dehumidifier from the power outlet before cleaning, servicing, or moving the unit.
- Do not use the dehumidifier near water or in excessively wet environments, such as bathrooms without proper ventilation.
- เครื่องใช้ไฟฟ้าตัวนี้ไม่ได้มีวัตถุประสงค์เพื่อให้บุคคล (รวมทั้งเด็ก) ที่มีความบกพร่องทางร่างกาย ทางประสาทสัมผัส หรือทางจิตใจ หรือขาดประสบการณ์และความรู้ ใช้งาน เว้นแต่จะมีการดูแลหรือคำแนะนำเกี่ยวกับการใช้เครื่องใช้ไฟฟ้าโดยบุคคลที่รับผิดชอบด้านความปลอดภัยของบุคคลดังกล่าว
สินค้าเกินview
The AIRPLUS AP10-2011EE Dehumidifier is designed to efficiently remove excess moisture from the air, helping to create a more comfortable indoor environment and prevent issues related to high humidity, such as mold and mildew growth.
ส่วนประกอบ

คำอธิบายภาพ: A white, rectangular AIRPLUS dehumidifier with a black top panel and small wheels visible at the base. The AIRPLUS logo is prominently displayed on the front. This image provides a general view of the unit's exterior.
- แผงควบคุม: Located on the top of the unit for setting functions and monitoring status.
- อากาศไหลเข้า: Positioned at the rear of the unit, where humid air is drawn in.
- ช่องระบายอากาศ: Located at the top, releasing dry air back into the room.
- ถังเก็บน้ำ: A removable reservoir at the front for collecting condensed water.
- การเชื่อมต่อท่อระบายน้ำ: A port at the back for continuous drainage.
- ล้อ: Four universal wheels at the base for easy mobility.
- ตัวกรองล้างทำความสะอาดได้: A removable filter located at the air inlet to capture dust and particles.
การตั้งค่า
- การจัดวาง: Place the dehumidifier on a level, stable surface in the desired location. Ensure there is at least 8 inches (20 cm) of unobstructed space around the unit, especially near the air inlets and outlets, to allow for proper airflow and efficient operation. Avoid placing it against walls or furniture that could block ventilation.
- การเชื่อมต่อไฟฟ้า: Plug the power cord into a grounded 115V, 60Hz electrical outlet. Do not use extension cords or power strips.
- ตัวเลือกการระบายน้ำ: The unit offers two methods for water drainage.
การระบายน้ำด้วยตนเอง
The unit collects water in its internal 1.5-liter (50 OZ) water tank. When the tank is full, the dehumidifier will automatically shut off, and the "FULL" indicator light on the control panel will illuminate. To empty the tank, carefully pull it out from the front of the unit, discard the collected water, and then securely reinsert the tank until it clicks into place. The unit will resume operation once the tank is properly reinserted.

คำอธิบายภาพ: An illustration showing the water tank being pulled out from the front of the dehumidifier for manual emptying. Blue arrows indicate the direction of removal.
การระบายน้ำอย่างต่อเนื่อง
For continuous operation without the need to manually empty the water tank, attach the included drain hose to the drainage port located at the back of the unit. Ensure the hose is securely connected and sloped downwards to allow gravity to drain the water into a suitable floor drain or a larger container. Periodically check the hose for kinks or blockages to ensure uninterrupted drainage.

คำอธิบายภาพ: An illustration demonstrating the continuous drainage setup, with a hose connected to the back of the dehumidifier leading to an external drain. Blue arrows indicate water flow.
คำแนะนำการใช้งาน
แผงควบคุม
The control panel allows you to manage all functions of the dehumidifier. Familiarize yourself with the buttons and indicators:

คำอธิบายภาพ: A close-up of the dehumidifier's top-mounted control panel. It features touch-sensitive buttons for ON/OFF, MODE, HUMIDITY, and TIMER, along with LED indicators for STANDARD, RAINING, DRYING, SLEEP, IONIZER, FULL, and DEFROST. A digital display shows current humidity or timer settings.
- ปุ่มเปิด/ปิด: กดเพื่อเปิดหรือปิดเครื่อง
- ปุ่มโหมด: Press repeatedly to cycle through the available operating modes: Standard, Drying, Raining, and Sleep. The corresponding indicator light will illuminate.
- ปุ่มความชื้น: In Standard Mode, press to adjust the desired target humidity level. The setting can be adjusted in 5% increments from 40% to 80% Relative Humidity (RH).
- ปุ่มตั้งเวลา: Press to set the auto-start or auto-stop time. The timer can be set from 1 to 24 hours.
- IONIZER Indicator: Illuminates when the ionizer function is active, which helps to purify the air.
- FULL Indicator: Illuminates when the water tank is full and needs to be emptied. The unit will pause operation.
- DEFROST Indicator: Illuminates when the unit is undergoing an automatic defrost cycle. This is normal operation in cooler conditions.
โหมดการทำงาน
- โหมดมาตรฐาน: This is the default mode. You can manually set your desired humidity level using the HUMIDITY button. The unit will operate to maintain the set humidity.
- โหมดการอบแห้ง: Provides continuous operation for maximum moisture removal. This mode is suitable for drying clothes or in very damp environments where rapid dehumidification is needed.
- โหมดฝนตก: Automatically targets and maintains a comfortable humidity level of 45% RH.
- โหมดสลีป: Designed for quiet operation, typically below 45dB. In this mode, the unit targets a humidity level of 50% RH, and the display lights may dim for minimal disturbance.
ฟังก์ชั่นจับเวลา
The timer function allows you to program the unit to automatically turn on or off after a set period. Press the TIMER button to select the desired number of hours (1-24). If the unit is off, setting the timer will program it to auto-start. If the unit is on, setting the timer will program it to auto-stop.

คำอธิบายภาพ: An illustration showing the dehumidifier with a circular arrow indicating a 24-hour cycle, representing the auto-start/auto-stop timer function. A sun and moon icon suggest day and night operation.
การซ่อมบำรุง
การบำรุงรักษาตามปกติจะช่วยให้เครื่องลดความชื้นทำงานได้อย่างเหมาะสมที่สุดและยืดอายุการใช้งานของเครื่องลดความชื้นของคุณ
การทำความสะอาดตัวกรองอากาศ
A clean air filter is crucial for efficient operation and air quality. It is recommended to clean the filter every two weeks or more frequently depending on usage and air quality.
- ปิดเครื่องลดความชื้นและถอดปลั๊กออกจากเต้าเสียบไฟฟ้า
- Locate the air filter at the back of the unit.
- Gently pull out the filter from its slot.
- Wash the filter with warm, soapy water. Rinse thoroughly under running water.
- Allow the filter to air dry completely before reinserting it. Do not use a dishwasher or expose to direct sunlight.
- Reinsert the dry filter into the unit, ensuring it is securely in place.

คำอธิบายภาพ: An image showing the removable air filter being pulled out from the back of the dehumidifier for cleaning. A blue arrow indicates the direction of removal.
การทำความสะอาดถังเก็บน้ำ
Periodically clean the water tank to prevent the growth of mold, mildew, and bacteria.
- ถอดถังน้ำออกจากเครื่อง
- Wash the tank with warm water and a mild detergent. Use a soft brush if necessary to remove any residue.
- Rinse thoroughly to remove all soap residue and dry completely before placing it back into the dehumidifier.
การจัดเก็บเครื่องลดความชื้น
If the unit will not be used for an extended period, follow these steps for proper storage:
- ปิดเครื่องและถอดปลั๊กออก
- ล้างถังน้ำและทำความสะอาด
- ทำความสะอาดตัวกรองอากาศ
- Allow the unit to dry for at least 24 hours in a well-ventilated area to prevent internal moisture buildup.
- ควรวางเครื่องลดความชื้นในแนวตั้งในที่แห้งและเย็น หลีกเลี่ยงแสงแดดโดยตรงและอุณหภูมิที่สูงหรือต่ำเกินไป
การแก้ไขปัญหา
ก่อนติดต่อฝ่ายบริการลูกค้า โปรดดูตารางต่อไปนี้เพื่อดูปัญหาทั่วไปและวิธีแก้ไข
| ปัญหา | สาเหตุที่เป็นไปได้ | สารละลาย |
|---|---|---|
| เครื่องลดความชื้นไม่เปิด | No power; Water tank full or improperly inserted; Room temperature too low. | Check power connection and outlet; Empty and properly reinsert water tank; Ensure room temperature is above 41°F (5°C). |
| ไม่มีการรวบรวมน้ำหรือการลดความชื้นไม่เพียงพอ | Humidity setting too high; Air filter clogged; Room temperature too low; Unit size too small for space; Doors/windows open. | Lower target humidity; Clean air filter; Ensure room temperature is adequate; Close doors and windows; Consider if unit capacity matches room size. |
| หน่วยมีเสียงดัง | หน่วยไม่ได้อยู่บนพื้นผิวระดับ; ตัวกรองอากาศอุดตัน; พัดลมอุดตัน | Place on a flat, stable surface; Clean air filter; Check for any obstructions around the fan. |
| "FULL" indicator is on, but tank is not full. | สวิตช์ลูกลอยค้างหรือวางไม่ตรงตำแหน่ง | Remove and reinsert water tank, ensuring the float switch moves freely. Clean any debris around the float switch. |
| Defrost indicator is on. | Unit is automatically defrosting. | This is normal operation. The unit will automatically resume dehumidifying once the defrosting cycle is complete. Do not unplug the unit during defrosting. |
ข้อมูลจำเพาะ
Technical details for the AIRPLUS AP10-2011EE Dehumidifier.
| คุณสมบัติ | รายละเอียด |
|---|---|
| ชื่อรุ่น | AP10-2011อีอี |
| ลดความชื้นความจุ | 30 Pints per Day (at 80% RH, 86°F) |
| พื้นที่ให้บริการ | มากถึง 1,500 ตร.ว. ฟุต |
| ปริมาตรถังเก็บน้ำ | 1.5 Liters (50 OZ) |
| ขนาดสินค้า (ลึก x กว้าง x สูง) | 6.55" x 11.14" x 19.65" |
| น้ำหนักสินค้า | 22.6 ปอนด์ |
| วัดtage | 192 วัตต์ |
| โหมดการทำงาน | ต่อเนื่อง |
| คุณสมบัติพิเศษ | Continuous Draining, Defrost, Drying, Ionizer, Timer |
| สี | สีขาว |
| ผู้ผลิต | แอร์พลัส |
| วันที่พร้อมใช้งานครั้งแรก | 13 พฤษภาคม 2024 |
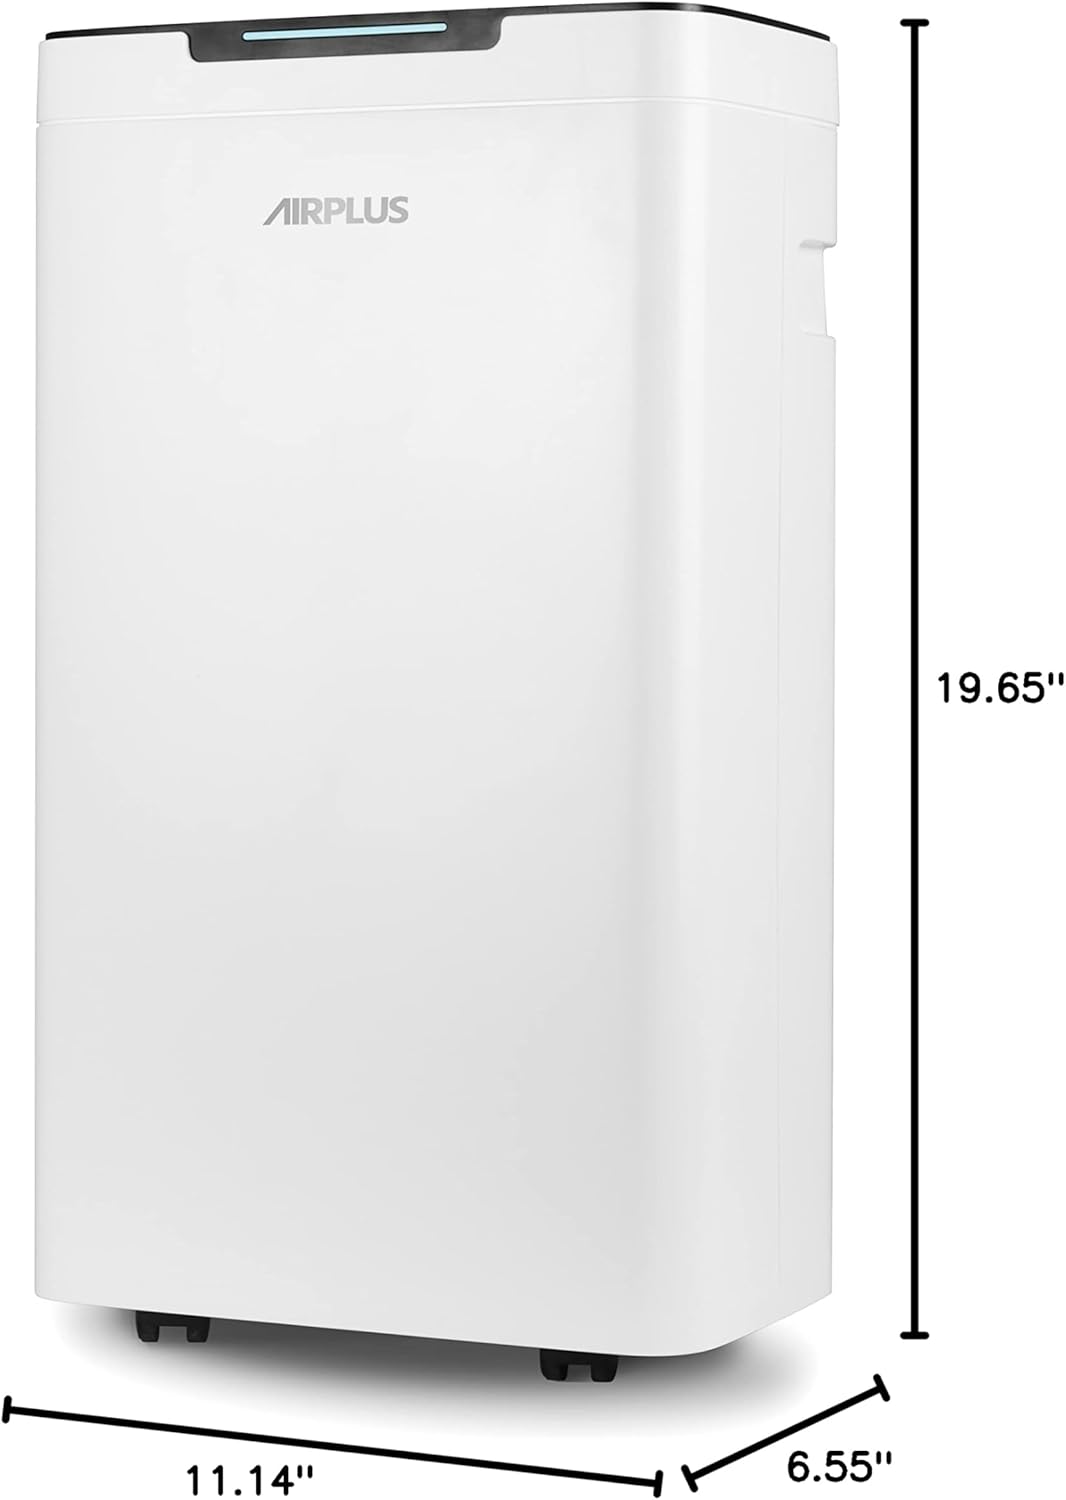
คำอธิบายภาพ: An image of the dehumidifier with its dimensions labeled: 19.65 inches height, 11.14 inches width, and 6.55 inches depth. This provides a clear visual reference for the unit's size.
การรับประกันและการสนับสนุน
For detailed warranty information, including coverage periods and terms, please refer to the warranty card provided with your AIRPLUS AP10-2011EE Dehumidifier. In case of technical issues, questions, or to request service, please contact AIRPLUS customer support through the contact information provided in your product packaging or on the official AIRPLUS webเว็บไซต์.
ผู้ผลิต: แอร์พลัส
วันที่เข้าใช้งานครั้งแรก: 13 พฤษภาคม 2024