
1. บทนำ
This manual provides essential instructions for the safe and efficient operation and maintenance of your VEVOR 4.8 CFM Single-Stage Vacuum Pump with Manifold Gauge Kit. Please read this manual thoroughly before operating the equipment and retain it for future reference. This kit is designed for evacuating air conditioning and refrigeration systems.
2. คำแนะนำด้านความปลอดภัยที่สำคัญ
To prevent personal injury or damage to the equipment, always observe the following safety precautions:
- Always wear appropriate personal protective equipment (PPE), including safety glasses and gloves, when operating or maintaining the pump.
- Ensure the work area is well-ventilated to prevent the accumulation of refrigerant vapors.
- ห้ามใช้งานปั๊มใกล้ของเหลวหรือก๊าซไวไฟ
- Disconnect the power supply before performing any maintenance, cleaning, or when the pump is not in use.
- Handle refrigerants with extreme care. Direct contact can cause frostbite or other injuries.
- Ensure all connections are secure and leak-free before starting the pump.
- ห้ามใช้ปั๊มเพื่อวัตถุประสงค์อื่นนอกเหนือจากที่ระบุไว้ในคู่มือนี้
- ห้ามเด็กและบุคคลที่ไม่ได้รับอนุญาตเข้าใกล้เครื่องมือที่กำลังทำงานอยู่
- ใช้เฉพาะชิ้นส่วนทดแทนและอุปกรณ์เสริมที่ได้รับการรับรองจาก VEVOR เท่านั้น
3. สินค้าหมดview
3.1 ส่วนประกอบ
The VEVOR 4.8 CFM Single-Stage Vacuum Pump kit includes the following main components:
- Vacuum Pump Unit: A 1/3 HP single-stage rotary vane pump designed for efficient evacuation.
- Manifold Gauge Set: Features high and low-pressure gauges for monitoring system pressures, with corresponding connections and an exhaust vent.
- Color-Coded Hoses: Three durable hoses (red, yellow, blue) for connecting the manifold gauge to the system and vacuum pump.
- กระเป๋าใส่อุปกรณ์: A robust case for convenient storage and transport of the manifold gauge, hoses, and accessories.

This image displays the complete VEVOR vacuum pump kit, including the pump unit, manifold gauge set, hoses, and a protective carrying case.
3.2 คุณสมบัติหลัก
- การก่อสร้างคุณภาพสูง: Features a robust die-cast aluminum housing and a shock-proof, wear-proof composite rubber base for durability and reduced vibration.
- มอเตอร์ที่มีประสิทธิภาพ: Equipped with an upgraded strong copper motor for stable and reliable operation.
- Oil Sight Window: Allows for easy monitoring of the oil level to prevent lubricant shortage.
- Enlarged Heat-sink Holes: Designed for rapid heat dissipation, ensuring prolonged pump life and stable performance.
- Precise Manifold Gauges: High-quality dual-pressure gauges provide accurate readings for effective system maintenance.

รายละเอียด view highlighting the internal copper motor for stable operation, the robust die-cast aluminum housing for durability, and the shock-proof, wear-proof composite rubber base for stability and noise reduction.
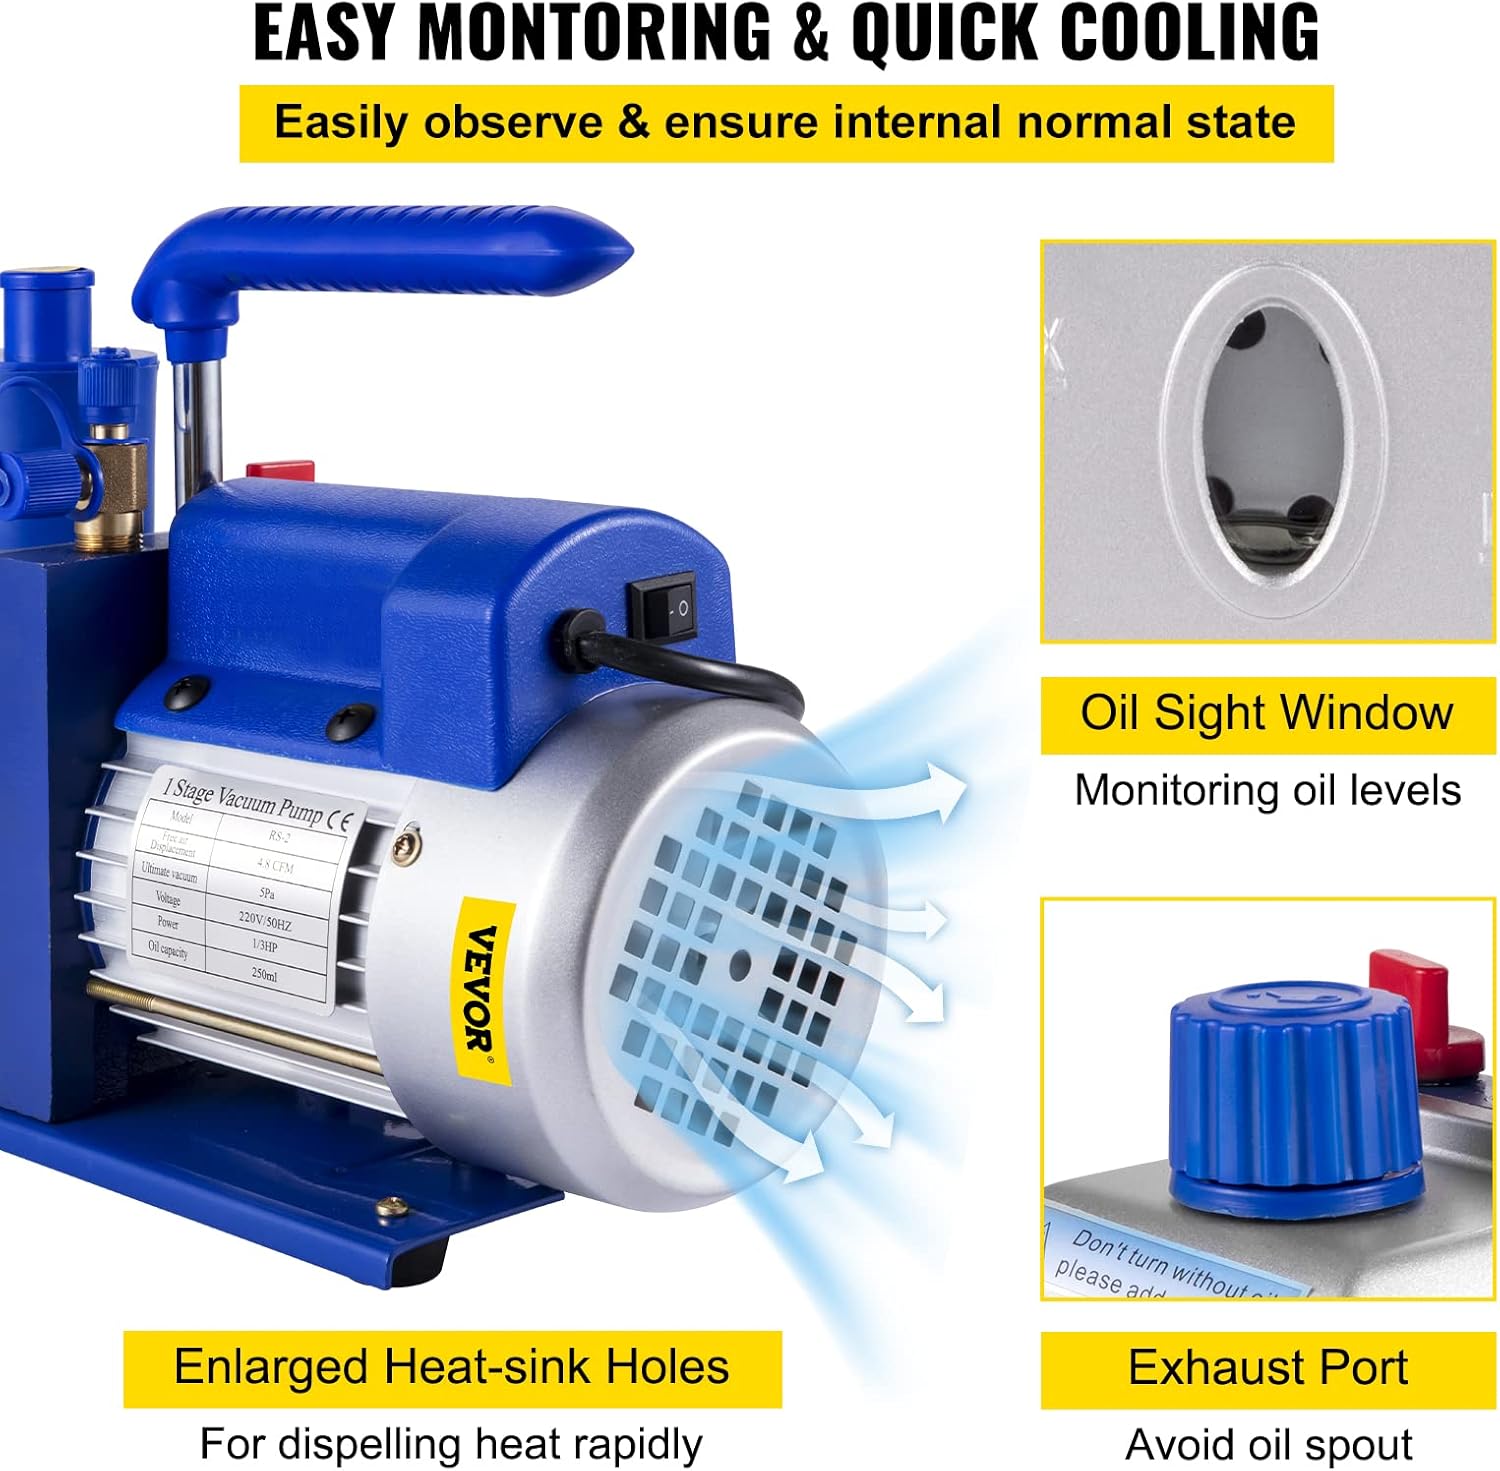
This image highlights the oil sight window for monitoring oil levels and the enlarged heat-sink holes designed for rapid heat dissipation, ensuring efficient and safe operation.

This image provides a close-up of the manifold gauge, showing the low pressure gauge, high pressure gauge, low pressure connection, high pressure connection, and exhaust vent. It also includes a diagram illustrating how to connect the manifold gauge to a vacuum pump and an automotive system.

This image displays the wear-proof, breakage-proof, flexible, and durable color-coded hoses (red, yellow, blue) and demonstrates their connection to the manifold gauge and an air conditioning unit.
4. ข้อมูลจำเพาะ
| ข้อมูลจำเพาะ | ค่า |
|---|---|
| แบบอย่าง | px55dv (RS-2 on label) |
| Free Air Displacement (FAD) | 4.8 ลูกบาศก์ฟุตต่อนาที (136 ลิตร/นาที) |
| Stages | 1-สtage |
| พลัง | 1 / 3 เอชพี |
| เครื่องดูดฝุ่นอัลติเมท | 5 ปา |
| เล่มที่tage | 220V/50Hz |
| ความจุน้ำมัน | 250 มล. |
| ขนาดสินค้า (กว้าง x ยาว x สูง) | 40.89 x 33.02 x 29.97 ซม. |
| น้ำหนักสินค้า | 9.98 กก. |

A close-up of the vacuum pump's side label, detailing important specifications such as Model (RS-2), Free Air Displacement (4.8 CFM), Ultimate Vacuum (5 Pa), Voltage (220V/50Hz), Power (1/3 HP), and Oil Capacity (250ml).
5. การตั้งค่า
5.1 การแกะกล่อง
- นำส่วนประกอบทั้งหมดออกจากบรรจุภัณฑ์อย่างระมัดระวัง
- Inspect the pump and accessories for any signs of damage during transit. If damage is found, do not operate the unit and contact customer support.
- ตรวจสอบให้แน่ใจว่ามีส่วนประกอบทั้งหมดที่ระบุไว้อยู่
5.2 การเติมน้ำมันปั๊มสุญญากาศ
The vacuum pump is shipped without oil. It is crucial to add vacuum pump oil before first use.
- Locate the oil fill port on the top of the pump (usually marked 'OIL FILL' or similar).
- ถอดฝาเติมน้ำมันออก
- Slowly pour appropriate vacuum pump oil into the fill port until the oil level is between the 'MIN' and 'MAX' marks on the oil sight window. Do not overfill. The oil capacity is approximately 250 ml.
- ปิดฝาเติมน้ำมันให้แน่น
5.3 Connecting the Manifold Gauge and Hoses
- Connect the yellow hose to the vacuum pump's inlet port.
- Connect the other end of the yellow hose to the service port (usually the center port) of the manifold gauge.
- Connect the blue hose to the low-pressure side of the manifold gauge.
- Connect the red hose to the high-pressure side of the manifold gauge.
- Ensure all connections are finger-tight, then use a wrench to slightly tighten them to prevent leaks.
6. คู่มือการใช้งาน
6.1. การดำเนินการทั่วไป
- Ensure the vacuum pump is placed on a stable, level surface.
- Verify the oil level is correct in the oil sight window.
- Connect the power cord to a suitable electrical outlet (220V/50Hz).
- Turn on the power switch. The pump should start running smoothly.
- Allow the pump to run for a few minutes to warm up and circulate the oil.
6.2 Evacuating an AC or Refrigeration System
This procedure outlines a typical evacuation process. Always refer to the specific service manual for the system you are working on.
- Connect the blue hose from the manifold gauge to the low-pressure service port of the AC/refrigeration system.
- Connect the red hose from the manifold gauge to the high-pressure service port of the AC/refrigeration system.
- Ensure the manifold gauge valves (high and low side) are closed.
- สตาร์ทเครื่องปั๊มสูญญากาศ
- Slowly open both the high and low-pressure valves on the manifold gauge.
- Monitor the vacuum gauge. Allow the pump to run until the desired vacuum level is reached (typically 500 microns or lower, depending on system requirements). This may take some time.
- Once the desired vacuum is achieved, close both the high and low-pressure valves on the manifold gauge.
- ปิดปั๊มสุญญากาศ
- Observe the vacuum gauge for a period (e.g., 15-30 minutes) to ensure the system holds the vacuum, indicating no leaks.
- After confirming no leaks, disconnect the hoses from the system and the vacuum pump.

This image illustrates the VEVOR vacuum pump and manifold gauge set connected to both an automotive air conditioning system and a residential AC unit, demonstrating its practical application.
7. การบำรุงรักษา
การบำรุงรักษาตามปกติจะช่วยให้ปั๊มสุญญากาศของคุณมีอายุการใช้งานยาวนานและมีประสิทธิภาพเหมาะสมที่สุด
7.1 การตรวจสอบระดับน้ำมันเครื่อง
Check the oil level before each use. The oil should be clear and between the 'MIN' and 'MAX' marks on the oil sight window. If the oil appears cloudy or discolored, it needs to be changed.
7.2 Changing Vacuum Pump Oil
Change the vacuum pump oil regularly, especially after evacuating systems with high moisture content or after prolonged use. Dirty oil reduces pump efficiency and can cause damage.
- Ensure the pump is turned off and disconnected from the power supply.
- Place a suitable container under the oil drain plug (located at the bottom of the oil reservoir).
- Remove the oil drain plug and the oil fill cap to allow the old oil to drain completely.
- ใส่ปลั๊กท่อระบายน้ำมันกลับเข้าที่อย่างแน่นหนา
- Add new, clean vacuum pump oil through the oil fill port until the level is between the 'MIN' and 'MAX' marks on the sight window.
- เปลี่ยนฝาเติมน้ำมัน
- กำจัดน้ำมันเครื่องที่ใช้แล้วอย่างถูกวิธีตามระเบียบข้อบังคับของท้องถิ่น
7.3 การทำความสะอาดและการเก็บรักษา
- เช็ดภายนอกปั๊มด้วยผ้าสะอาดamp ผ้า. อย่าใช้สารเคมีหรือตัวทำละลายที่รุนแรง
- Store the pump in a clean, dry environment, preferably in its original carrying case, to protect it from dust and damage.
- Ensure all hoses and gauges are clean and properly stored.
8 การแก้ไขปัญหา
โปรดดูตารางด้านล่างเพื่อดูปัญหาทั่วไปและวิธีแก้ไขที่เป็นไปได้
| ปัญหา | สาเหตุที่เป็นไปได้ | สารละลาย |
|---|---|---|
| ปั๊มไม่ทำงาน | ไม่มีแหล่งจ่ายไฟ สวิตช์ไฟชำรุด เปิดใช้งานการป้องกันการโอเวอร์โหลดของมอเตอร์ | ตรวจสอบการเชื่อมต่อสายไฟและเต้าเสียบ ติดต่อช่างเทคนิคผู้เชี่ยวชาญ รอให้ปั๊มเย็นลงก่อน แล้วจึงเริ่มใช้งานอีกครั้ง |
| Pump not reaching desired vacuum | ระบบรั่ว Dirty or low oil level น้ำมันที่ปนเปื้อน Hose connections loose | Check system for leaks Add oil or change oil เปลี่ยนถ่ายน้ำมันเครื่อง ขันข้อต่อท่อทั้งหมดให้แน่น |
| เสียงรบกวนหรือการสั่นสะเทือนมากเกินไป | ระดับน้ำมันต่ำ ปั๊มไม่ได้วางอยู่บนพื้นผิวที่มั่นคง ปัญหาทางกลภายใน | ตรวจสอบและเติมน้ำมัน Place pump on a firm, level surface ติดต่อช่างเทคนิคผู้เชี่ยวชาญ |
| Oil appears milky or cloudy | Moisture contamination in oil | Change oil immediately and ensure system is dry before next use |
9. การรับประกันและการสนับสนุน
For warranty information, technical support, or to inquire about replacement parts, please refer to the warranty card included with your product or contact VEVOR customer service directly. Keep your purchase receipt as proof of purchase.