1. บทนำ
Thank you for choosing the BEACON PET 505A Sewing Machine. This multifunction electric crafting and mending machine is designed for ease of use, making it ideal for beginners and sewing enthusiasts. With 12 built-in stitch patterns, double speed, and double thread capabilities, it provides versatility for various household sewing needs. Please read this manual thoroughly before operating the machine to ensure safe and efficient use.

รูปที่ 1.1 : ด้านหน้า view of the BEACON PET 505A Sewing Machine, showcasinด้วยดีไซน์ที่กะทัดรัดและแป้นหมุนเลือกตะเข็บ
2. คำแนะนำด้านความปลอดภัย
เพื่อให้มั่นใจถึงความปลอดภัยในการใช้งานและป้องกันการบาดเจ็บหรือความเสียหาย โปรดปฏิบัติตามข้อควรระวังด้านความปลอดภัยต่อไปนี้:
- Always unplug the machine from the power outlet when not in use, before cleaning, or when changing parts like needles or presser feet.
- ให้เก็บนิ้วให้ห่างจากชิ้นส่วนที่เคลื่อนไหวทั้งหมด โดยเฉพาะเข็ม ในระหว่างการใช้งาน
- ห้ามใช้งานเครื่องจักรหากช่องระบายอากาศใดๆ ถูกปิดกั้น ควรทำความสะอาดช่องระบายอากาศของจักรเย็บผ้าและแป้นเหยียบให้ปราศจากฝุ่นละออง เศษผ้า และสิ่งสกปรกอื่นๆ
- Do not allow children to operate the machine without supervision.
- Use only the specified power adapter (DC 6V 1200mA) or 4 "AA" batteries.
- Do not use the machine outdoors or in damp เงื่อนไข.
- If the power cord is damaged, it must be replaced by the manufacturer or a qualified service agent to avoid a hazard.
3. เนื้อหาบรรจุภัณฑ์
เมื่อแกะกล่อง โปรดตรวจสอบให้แน่ใจว่ามีสิ่งของทั้งหมดที่ระบุไว้ด้านล่างนี้อยู่ในพัสดุของคุณ:
- 1 x BEACON PET 505A Sewing Machine
- 1 x คู่มือการใช้งาน (เอกสารนี้)
- 1 x คันเหยียบ
- 1 x Power Adaptor (DC 6V 1200mA)
- 2 x เกลียวสิ่งของ
- 2 x กระสวย
- 1 x ตัวร้อยเข็ม
- 1 x Needle (#14)
4. คุณสมบัติของผลิตภัณฑ์
The BEACON PET 505A Sewing Machine is equipped with a range of features to enhance your sewing experience:
- รูปแบบตะเข็บในตัว 12 รูปแบบ: Offers a variety of basic and decorative stitches for different sewing projects.
- Two-thread Lockstitch: ให้ตะเข็บที่แข็งแรงและปลอดภัย
- High/Low Speed Selector: Allows adjustment of sewing speed for precision or efficiency.
- การเย็บไปข้างหน้าและถอยหลัง: Enables reinforcement of stitches at the beginning and end of seams.
- Automatic Thread Rewind: Simplifies bobbin winding.
- Sews Sleeves: Designed to handle cylindrical items like sleeves and pant hems.
- สามารถปรับความยาวตะเข็บได้: ปรับแต่งความหนาแน่นของตะเข็บให้เหมาะสมกับผ้าและชิ้นงานต่างๆ
- Drawer Included: Convenient storage for small accessories.
- All-purpose Presser Foot Replacement Holder: Allows for easy changing of presser feet.
- ตัวเลือกการควบคุมแบบคู่: Can be operated via hand switch or foot pedal.
- One-step Buttonhole: ช่วยให้ขั้นตอนการทำรังดุมง่ายขึ้น
- Four-step Buttonhole Sewing: Provides precise control for buttonhole creation.
- ไฟเย็บผ้าในตัว: ช่วยให้มองเห็นบริเวณเย็บผ้าได้ชัดเจนยิ่งขึ้น
- เครื่องตัดเกลียว: ตั้งอยู่ในตำแหน่งที่สะดวกสำหรับการตัดแต่งด้ายอย่างรวดเร็ว
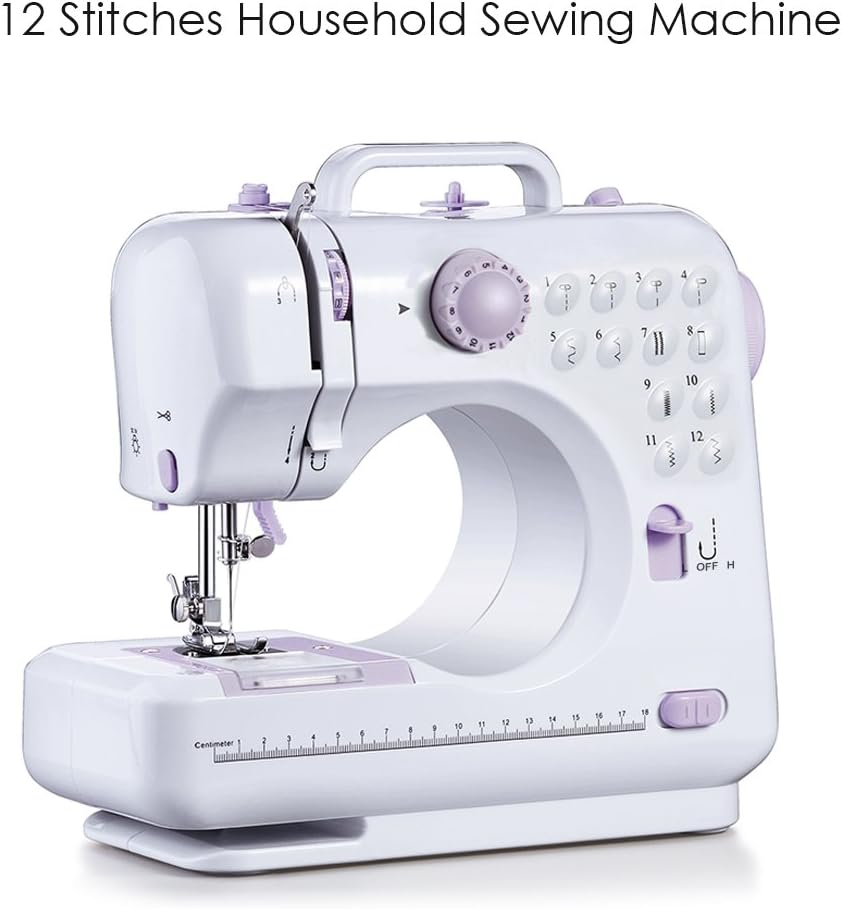
Figure 4.1: The sewing machine highlighting its 12 built-in stitch patterns, visible on the front panel.

รูปที่ 4.2: อดีตamples of various sewing applications possible with the machine, including mending, crafting, and home decor.
5. การตั้งค่า
Before you begin sewing, follow these steps to set up your machine:

Figure 5.1: Diagram showing key components of the BEACON PET 505A Sewing Machine, including the take-up lever, thread tension dial, handwheel, and presser foot lifter.
- การเชื่อมต่อไฟฟ้า:
- Connect the power adapter to the AC/DC input port on the back of the machine. Plug the adapter into a suitable electrical outlet.
- Alternatively, for battery operation, insert 4 "AA" batteries into the battery compartment (batteries not included). Ensure correct polarity.
- การเชื่อมต่อแป้นเหยียบ:
- Plug the foot pedal cable into the foot pedal port on the back of the machine.
- การพันด้ายกระสวย:
- Place an empty bobbin onto the bobbin winder pin.
- Guide the thread from a spool through the bobbin winder tension disk and around the bobbin.
- Push the bobbin winder pin to the right.
- Start the machine (using hand switch or foot pedal) to wind the thread evenly onto the bobbin. Stop when the bobbin is full.
- Cut the thread and push the bobbin winder pin back to the left.
- การใส่กระสวย:
- เปิดฝาครอบกระสวย
- ใส่กระสวยที่พันด้ายแล้วเข้าไปในกล่องกระสวย ตรวจสอบให้แน่ใจว่าด้ายคลายตัวในทิศทางที่ถูกต้อง (โดยปกติคือทวนเข็มนาฬิกา)
- Pull the thread through the tension spring and out through the small opening.
- ปิดฝาครอบกระสวย
- เกลียวด้านบน:
- ยกตีนผีขึ้น
- วางหลอดด้ายไว้บนแกนยึดหลอดด้าย
- สอดด้ายผ่านตัวนำด้ายด้านบน
- Follow the numbered threading path down through the tension dial, up to the take-up lever (ensure the take-up lever is at its highest position), and then down to the needle.
- Thread the needle from front to back using the needle threader or manually.
- ดึงด้ายผ่านรูเข็มประมาณ 6 นิ้ว
- การดึงด้ายกระสวยขึ้นมา:
- Hold the upper thread gently.
- Turn the handwheel towards you slowly, lowering the needle into the needle plate and then raising it. The upper thread will catch the bobbin thread, forming a loop.
- Pull the loop of bobbin thread up through the needle plate with the upper thread.
- Pull both threads (upper and bobbin) under the presser foot and towards the back of the machine, leaving about 4-6 inches of tail.
6. คู่มือการใช้งาน
Once your machine is set up and threaded, you are ready to sew:

Figure 6.1: A user demonstrating the operation of the BEACON PET 505A Sewing Machine, showing fabric placement and hand position.
- Select Stitch Pattern: Turn the pattern selection dial to choose one of the 12 built-in stitch patterns.
- ปรับความเร็ว: Use the "L OFF H" switch (Low, Off, High) to select your desired sewing speed. Beginners are advised to start with "L" (Low speed).
- Place Fabric: Lift the presser foot using the presser foot lifter. Place the fabric under the presser foot, aligning the edge with the desired seam allowance. Lower the presser foot.
- เริ่มเย็บผ้ากันเลย:
- Using Foot Pedal: Press down on the foot pedal to start sewing. Release to stop.
- Using Hand Switch: Slide the "L OFF H" switch to "L" or "H" to start sewing. Slide to "OFF" to stop.
- เย็บย้อนกลับ: To reinforce stitches at the beginning or end of a seam, press and hold the reverse button while sewing. Release to sew forward again.
- การเย็บเก็บขอบตะเข็บ: When you reach the end of your seam, sew a few reverse stitches to secure. Raise the needle to its highest position by turning the handwheel. Lift the presser foot. Pull the fabric towards the back of the machine.
- Cut Thread: Use the built-in thread cutter located on the side of the machine to trim the threads.
- Buttonhole Sewing: Refer to the detailed instructions in the included quick guide for one-step or four-step buttonhole creation, as this process requires specific steps for accurate results.
7. การบำรุงรักษา
Regular maintenance ensures the longevity and optimal performance of your sewing machine:
- การทำความสะอาด: Regularly clean lint and dust from the bobbin area and feed dogs using a small brush. Unplug the machine before cleaning.
- การเปลี่ยนเข็ม: Replace the needle frequently, especially if it becomes bent, dull, or if you notice skipped stitches. Use only appropriate sewing machine needles (#14 is included). To replace, loosen the needle clamp screw, remove the old needle, insert the new needle with the flat side facing the back, and tighten the screw.
- พื้นที่จัดเก็บ: When not in use, store the machine in a dry, dust-free environment.
8 การแก้ไขปัญหา
หากคุณพบปัญหาเกี่ยวกับจักรเย็บผ้า โปรดดูปัญหาและวิธีแก้ไขที่พบบ่อยต่อไปนี้:
| ปัญหา | สาเหตุที่เป็นไปได้ | สารละลาย |
|---|---|---|
| เครื่องสตาร์ทไม่ติด | Power not connected; Foot pedal not connected; Speed switch in "OFF" position. | Check power adapter/batteries; Ensure foot pedal is securely plugged in; Set speed switch to "L" or "H". |
| ข้ามตะเข็บ | Incorrect needle; Bent or dull needle; Incorrect threading. | Use correct needle type/size for fabric; Replace needle; Re-thread the machine carefully, ensuring all guides are followed. |
| กระทู้หยุดทำงาน | Incorrect tension; Poor quality thread; Improper threading; Bent needle. | Adjust upper thread tension; Use good quality thread; Re-thread machine; Replace needle. |
| ผ้าไม่ป้อน | Presser foot not lowered; Lint under feed dogs. | Lower the presser foot; Clean feed dogs. |
9. ข้อมูลจำเพาะ
Detailed specifications for the BEACON PET 505A Sewing Machine:
- หมายเลขรุ่น: FHSM-505A
- Dimensions (Product Size): 27.5 cm (L) × 12 cm (W) × 26 cm (H)
- น้ำหนัก (แพ็คเกจ): 2943กรัม
- แหล่งพลังงาน: DC 6V 1200mA power adapter or 4 "AA" batteries (not included)
- ตะเข็บในตัว: 12 รูปแบบ
- การตั้งค่าความเร็ว: สูง / ต่ำ
- ประเภทตะเข็บ: Two-thread lockstitch
- รังดุม: One-step / Four-step
- ผู้ผลิต: huijieus
- ASIN: B087LRG5JR

Figure 9.1: Diagram illustrating the dimensions of the BEACON PET 505A Sewing Machine.
10. การรับประกันและการสนับสนุน
Specific warranty details for the BEACON PET 505A Sewing Machine are not provided within this document. For information regarding warranty coverage, returns, or technical support, please contact the seller or manufacturer directly through your purchase platform or their official webเว็บไซต์.
โปรดเก็บหลักฐานการซื้อไว้เพื่อใช้ในกรณีเรียกร้องการรับประกัน