
1. บทนำ
The Walfront TM919BK is a versatile digital programmable timer switch designed for automated control of electrical devices. It offers precise 24-hour and 7-day programming capabilities, an intuitive LCD display, and up to 16 ON/OFF settings per day. This device is ideal for managing various electrical loads, including lighting systems, heating elements, ventilation fans, and other appliances, enhancing energy efficiency and operational convenience.
2. ข้อมูลด้านความปลอดภัย
คำเตือน: Risk of electric shock. Installation and servicing of this device must only be performed by qualified electrical personnel. Always disconnect power at the main circuit breaker before attempting any installation, wiring, or maintenance procedures.
- ตรวจสอบให้แน่ใจว่าสายไฟทั้งหมดเป็นไปตามมาตรฐานไฟฟ้าในท้องถิ่นและระดับชาติ
- Do not exceed the maximum load rating of 30A or 5000W to prevent damage to the device and connected equipment.
- อุปกรณ์นี้ออกแบบมาสำหรับใช้ภายในอาคารในสภาพแวดล้อมที่แห้ง หลีกเลี่ยงการสัมผัสกับความชื้นหรืออุณหภูมิที่สูงหรือต่ำเกินไป
3. สินค้าหมดview
คุณสมบัติหลัก:
- 24 Hours/7 Days Programmable: Offers flexible scheduling options for daily and weekly cycles.
- 16 ON/OFF Settings: Allows for up to 16 distinct ON and OFF events per day.
- LCD Display with LED Indicators: Provides clear visibility of time, program status, and operational mode.
- ฟังก์ชั่นนับถอยหลัง: Enables timed operations for specific durations.
- 35mm DIN Rail Mounted: Designed for easy integration into standard electrical panels.
- Battery Back-Up Memory: Retains programmed settings during power outagใช่
ส่วนประกอบ:

รูปที่ 1 : ด้านหน้า View of the Timer Switch. This image displays the front panel of the Walfront TM919BK timer switch, showing the LCD screen, programming buttons (P, D+, H+, M+, Reset, Manual), and terminal connections for power input and load output.

รูปที่ 2: มุม View with Protective Cover Open. This image shows the timer switch from an angled perspective with its transparent protective cover lifted, providing access to the programming buttons and illustrating the compact design.
4. ข้อมูลจำเพาะ
| พารามิเตอร์ | ค่า |
|---|---|
| ประเภทสินค้า | สวิตช์จับเวลา |
| วัสดุ | พลาสติก |
| ฟังก์ชั่น | Clock display (12hr/24hr format), Timer, Countdown |
| แหล่งจ่ายไฟ | ไฟฟ้ากระแสสลับ 85-265 โวลต์ |
| ความจุ | 30A 5000 วัตต์ |
| ช่วงเวลา | 1 นาทีถึง 168 ชั่วโมง |
| โปรแกรม | เปิด/ปิด 16 ครั้งต่อวัน |
| การใช้พลังงาน | <5วีเอ |
| ข้อผิดพลาดเฉลี่ย | <2 วินาที/วัน |
| ช่วงอุณหภูมิ | -10℃ ถึง 50℃ |
| ความชื้น | <95% |
| รายการแพ็กเกจ | 1 x Timer Switch, 1 x User Manual |

รูปที่ 3: ขนาดผลิตภัณฑ์ This diagram illustrates the physical dimensions of the Walfront TM919BK timer switch, including height, width, and depth, crucial for installation planning.
5. การติดตั้ง
The Walfront TM919BK timer switch is designed for 35mm DIN rail mounting. Follow these steps for physical installation:
- Ensure the main power supply is disconnected before mounting the device.
- Locate an appropriate 35mm DIN rail within your electrical panel.
- Align the timer switch's DIN rail clip with the rail and press firmly until it clicks into place.
- Verify that the device is securely fastened to the DIN rail.

รูปที่ 4: ด้านข้าง View with DIN Rail Clip. ภาพนี้เน้นไปที่โปรด้านข้างfile of the timer switch, showing the integrated clip mechanism for secure attachment to a 35mm DIN rail.
6. แผนภาพการเดินสายไฟ
Proper wiring is critical for safe and correct operation. Refer to the diagrams below for connection instructions. Always ensure power is off before wiring.
General Wiring Diagram:
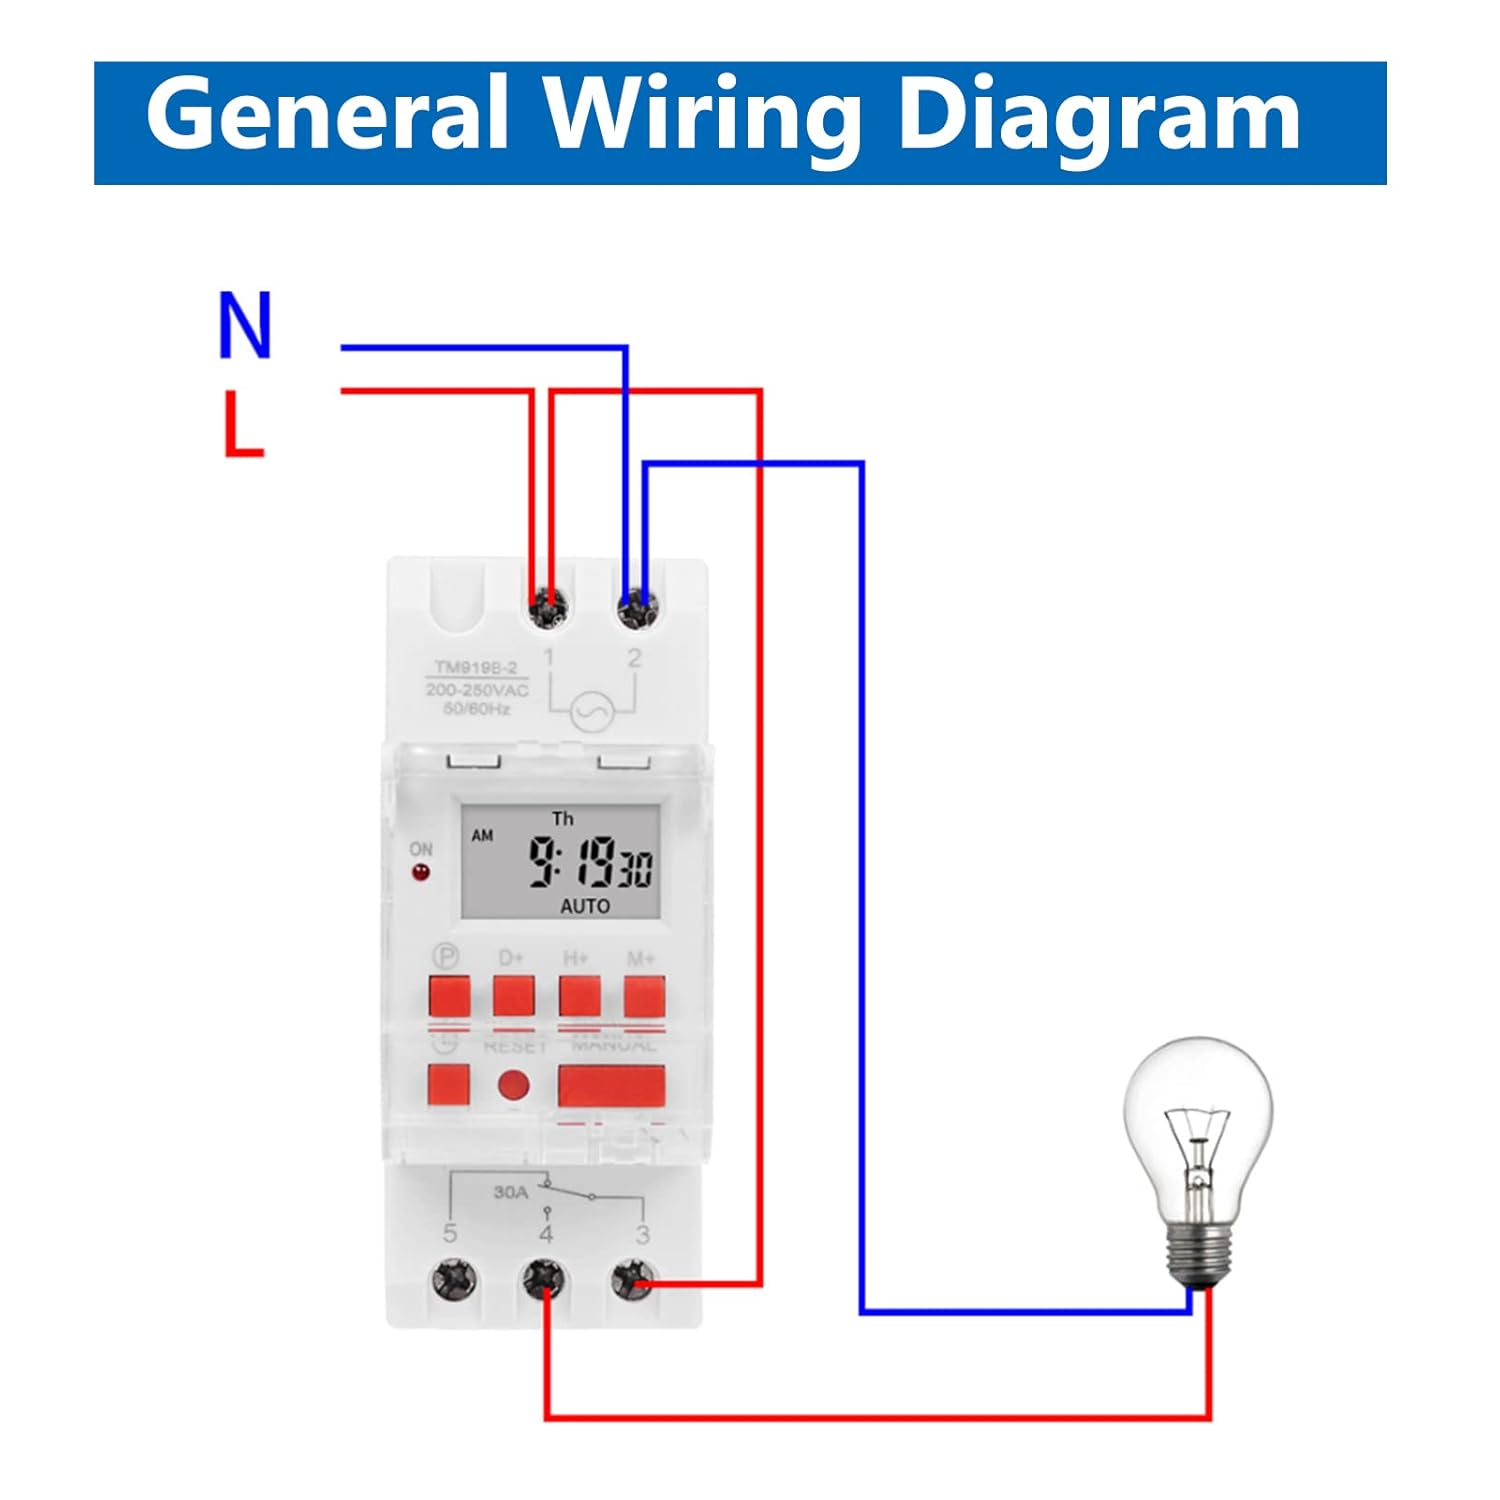
Figure 5: General Wiring Diagram. This diagram illustrates the basic electrical connections for the timer switch, showing how to connect the neutral (N) and live (L) input, and the switched output to a load (e.g., a light bulb).
Wiring with an AC Contactor (for high current loads):
For loads exceeding the timer's direct switching capacity (30A), an external AC contactor must be used. The timer switch will then control the coil of the contactor, which in turn switches the high-current load.
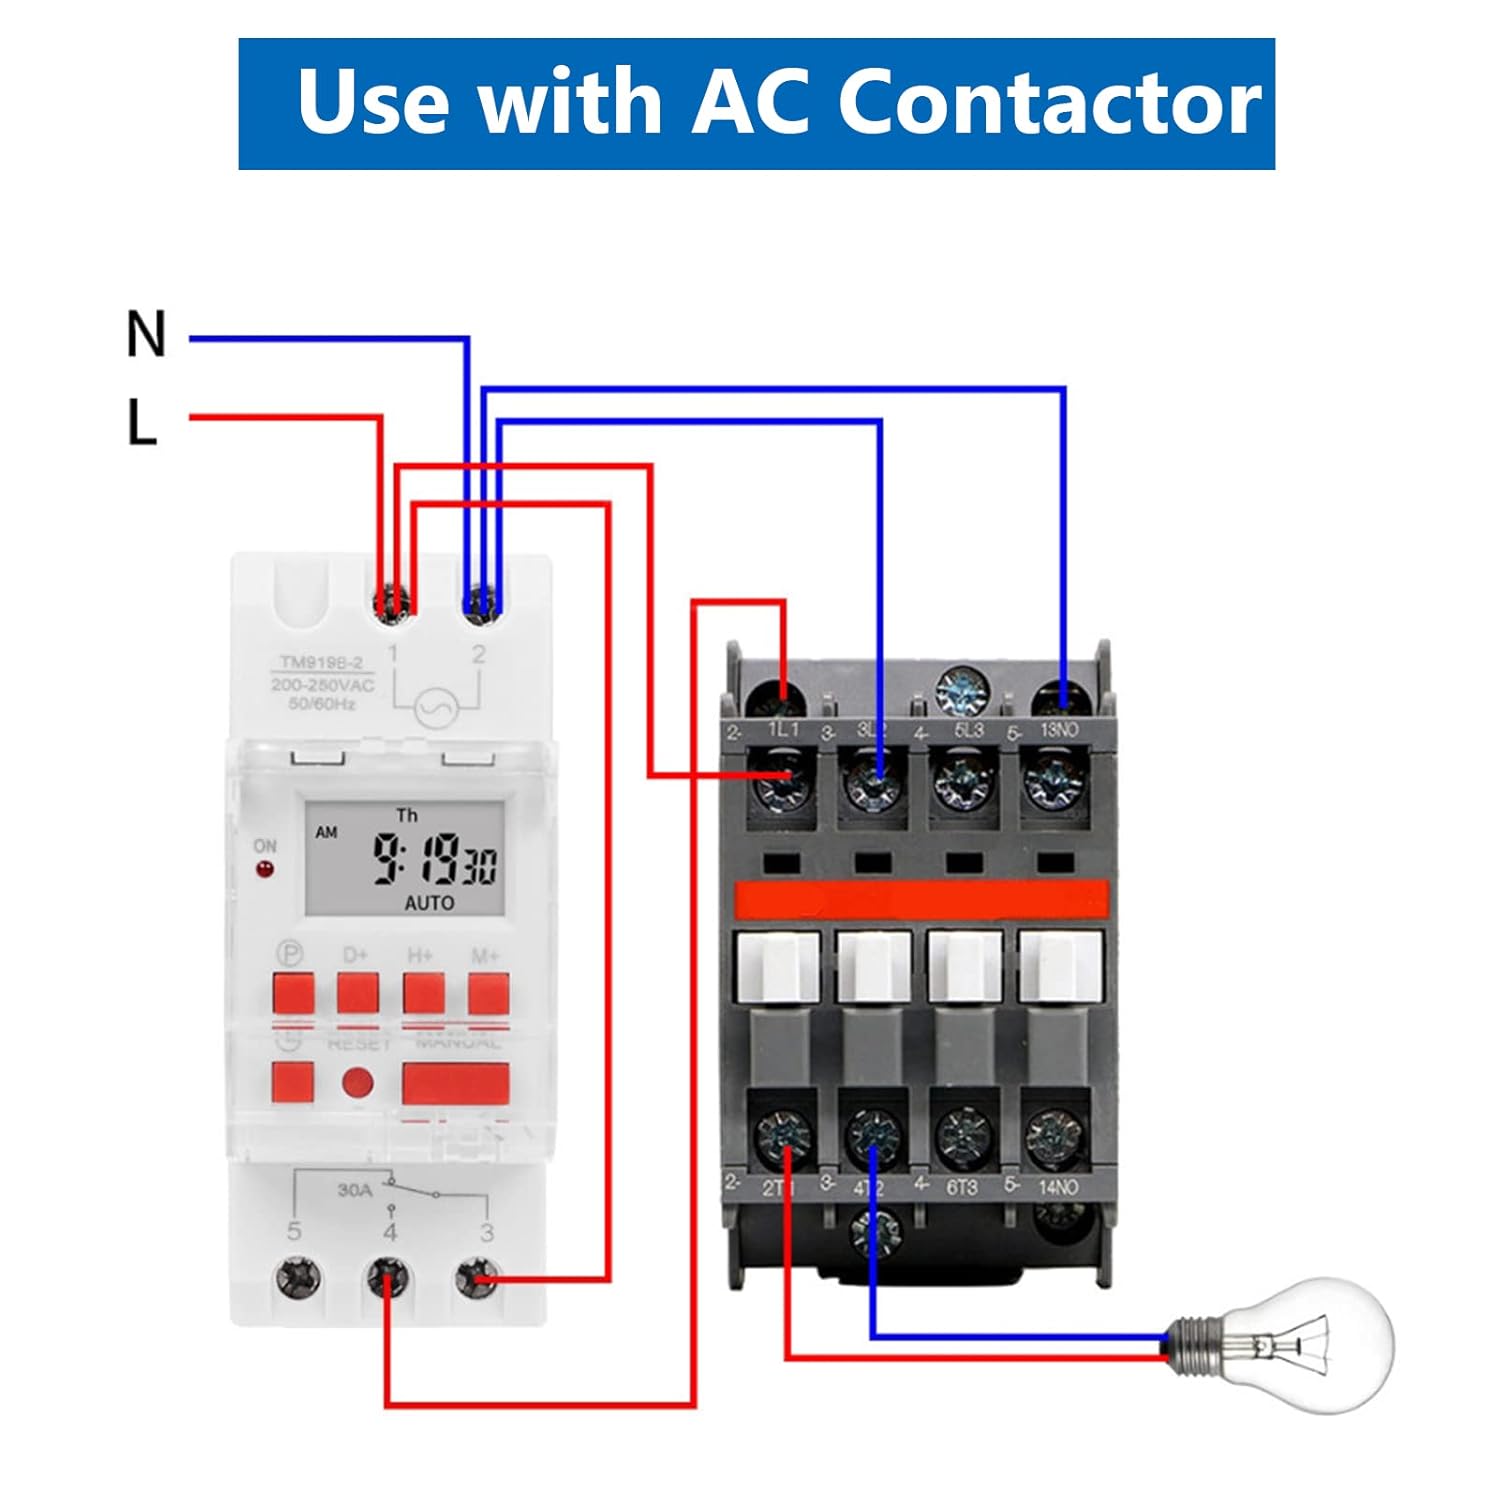
Figure 6: Wiring with AC Contactor. This diagram shows the connection scheme when using the timer switch to control an AC contactor, which is necessary for managing higher current loads safely.
7. การตั้งค่าเริ่มต้น
เมื่อใช้งานครั้งแรกหรือหลังจากไฟดับเป็นเวลานานtage, the timer may require initial setup. The internal battery backup helps retain settings, but the clock may need adjustment.
- เปิดเครื่อง: Connect the timer to power. The LCD will illuminate.
- รีเซ็ต: กดปุ่ม รีเซ็ต button (often recessed, may require a pointed object like a pen tip) to clear all previous settings and reset the clock.
- ตั้งเวลาปัจจุบัน:
- กดปุ่ม P button once. The display will show the current day.
- กด D+ to select the correct day of the week.
- กด H+ เพื่อตั้งชั่วโมงปัจจุบัน
- กด M+ เพื่อตั้งนาทีปัจจุบัน
- กดปุ่ม P button again to exit time setting mode.
- รูปแบบ 12/24 ชั่วโมง: หากต้องการสลับระหว่างรูปแบบเวลา 12 ชั่วโมงและ 24 ชั่วโมง ให้กดปุ่มค้างไว้ H+ กดปุ่มนี้ประมาณ 5 วินาที
8. Programming Operations
The TM919BK allows for up to 16 ON/OFF programs. Each program can be set for specific days of the week or combinations of days.
การตั้งค่าโปรแกรมเปิด/ปิด:
- กดปุ่ม P button repeatedly until '1 ON' appears on the display. This is your first ON program.
- กด D+ เพื่อเลือกวันที่ต้องการเข้าร่วมโปรแกรมนี้ ตัวเลือกได้แก่ วันใดวันหนึ่ง วันธรรมดา วันหยุดสุดสัปดาห์ หรือทั้ง 7 วัน
- กด H+ to set the hour for '1 ON'.
- กด M+ to set the minute for '1 ON'.
- กด P again. '1 OFF' will appear. Repeat steps 2-4 to set the OFF time for the first program.
- กดต่อไป P เพื่อวนรอบระหว่าง 'เปิด 2 ครั้ง', 'ปิด 2 ครั้ง' ไปจนถึง 'เปิด 16 ครั้ง', 'ปิด 16 ครั้ง' โดยตั้งค่าแต่ละโปรแกรมตามต้องการ
- หลังจากตั้งค่าโปรแกรมที่ต้องการทั้งหมดแล้ว ให้กดปุ่ม P button until the current time is displayed. The timer is now in operating mode.
ฟังก์ชั่นนับถอยหลัง:
The countdown function allows for a single timed event up to 24 hours.
- จากหน้าจอแสดงเวลาหลัก ให้กดปุ่มค้างไว้ M+ button for approximately 5 seconds. 'COUNTDOWN' will appear.
- ใช้ H+ และ M+ to set the desired countdown duration (hours and minutes).
- กด P to start the countdown. The output will switch ON (or OFF, depending on the current state) for the set duration.
- To cancel the countdown, press P อีกครั้ง.
9. คู่มือการแทนที่
การ คู่มือ button allows you to temporarily override the programmed settings without deleting them. This button cycles through three modes:
- บน: เอาต์พุตจะเปิดอยู่ตลอดเวลา โดยไม่สนใจโปรแกรมใดๆ
- อัตโนมัติ: The timer operates according to the programmed ON/OFF settings. This is the standard operating mode.
- ปิด: เอาต์พุตจะปิดอยู่ตลอดเวลา โดยไม่สนใจโปรแกรมใดๆ
To return to programmed operation, ensure the display shows 'AUTO'. If the timer is not in 'AUTO' mode, it will not execute your programmed schedules.
10. การบำรุงรักษา
แบตเตอรี่สำรอง:
The TM919BK includes a built-in battery to maintain time and program settings during power interruptions. The battery is designed for long-term use and typically does not require user replacement. If the display becomes dim or settings are frequently lost during power outages, the internal battery may be depleted. Contact customer support for assistance.
การทำความสะอาด:
To clean the timer switch, gently wipe the exterior with a soft, dry cloth. Do not use abrasive cleaners, solvents, or allow liquids to enter the device.
11 การแก้ไขปัญหา
- ตัวตั้งเวลาไม่เปิด/ปิดตามที่ตั้งโปรแกรมไว้:
- Check if the timer is in 'AUTO' mode. If it displays 'ON' or 'OFF', press the คู่มือ button until 'AUTO' appears.
- ตรวจสอบว่าเวลาและวันปัจจุบันตั้งค่าถูกต้องแล้ว
- Review your programmed ON/OFF settings for accuracy, ensuring no conflicts or overlaps.
- Ensure the load is properly connected and within the device's capacity.
- จอแสดงผลว่างเปล่าหรือมืดลง:
- ตรวจสอบแหล่งจ่ายไฟหลักของตัวตั้งเวลา
- If power is present, the internal battery may be low or depleted.
- การตั้งค่าจะหายไปหลังจากไฟดับtage:
- The internal battery backup may be depleted. This is usually a sign of the battery reaching its end of life.
- Difficulty programming:
- Perform a full reset using the รีเซ็ต button and re-enter all settings carefully.
- Refer to the 'Programming Operations' section and follow each step precisely.
12. การรับประกันและการสนับสนุน
Walfront products are manufactured to high-quality standards. For specific warranty details, please refer to the warranty card included with your purchase or contact your retailer. If you encounter any issues or require technical assistance, please contact Walfront customer support through the vendor's website or your purchase platform. Please have your product model number (TM919BK) and purchase information ready when contacting support.