1. บทนำและข้อมูลด้านความปลอดภัย
Thank you for choosing the ANENG V8 Digital Multimeter. This device is designed for safe and accurate measurement of AC/DC voltage, AC/DC current, resistance, capacitance, frequency, temperature, diode, continuity, and battery testing. Please read this manual thoroughly before use to ensure proper operation and to prevent potential hazards.
1.1 ข้อควรระวังเพื่อความปลอดภัย
- ตรวจสอบให้แน่ใจเสมอว่ามัลติมิเตอร์อยู่ในสภาพใช้งานได้ดีก่อนใช้งาน ตรวจสอบสายวัดว่ามีรอยชำรุดหรือไม่
- ไม่ต้องสมัครวอลุ่มtagหรือกระแสไฟฟ้าที่เกินค่าสูงสุดที่กำหนดไว้สำหรับมัลติมิเตอร์
- ใช้ความระมัดระวังอย่างยิ่งเมื่อทำงานกับ voltages above 36V DC or 25V AC RMS, as these can pose a shock hazard.
- ควรตัดกระแสไฟออกจากวงจรและปล่อยประจุไฟฟ้าแรงดันสูงทั้งหมดtagตัวเก็บประจุก่อนการวัดความต้านทาน ความต่อเนื่อง ไดโอด หรือความจุ
- ตรวจสอบให้แน่ใจว่าสวิตช์แบบหมุนอยู่ในตำแหน่งที่ถูกต้องสำหรับการวัดที่ต้องการ ก่อนที่จะเชื่อมต่อสายวัดเข้ากับวงจร
- ห้ามใช้งานมัลติมิเตอร์ในบริเวณที่มีก๊าซไวไฟ ไอระเหย หรือฝุ่นละออง
- เปลี่ยนแบตเตอรี่ทันทีเมื่อไฟแสดงสถานะแบตเตอรี่อ่อนปรากฏขึ้นเพื่อให้แน่ใจว่าการอ่านค่าแม่นยำ
2. สินค้าหมดview
2.1 เนื้อหาบรรจุภัณฑ์
The ANENG V8 Digital Multimeter package typically includes the following items:
- ANENG V8 Digital Multimeter
- สายทดสอบ (สีแดงและสีดำ)
- หัววัดอุณหภูมิ
- กระเป๋าใส่อุปกรณ์
- คู่มือการใช้งาน

Image: ANENG V8 Digital Multimeter with its standard accessories, including test leads, a temperature probe, and a protective carrying case.
2.2 การควบคุมและการแสดงผล
The multimeter features an 8000-count LCD backlight display for clear readings in various lighting conditions. Key controls include a rotary switch for function selection and buttons for range, data hold, and other features.

ภาพ: รายละเอียด view of the multimeter's front panel, highlighting the LCD screen, the central rotary selector, and various control buttons.
3. การตั้งค่า
3.1 การติดตั้งแบตเตอรี่
The ANENG V8 Digital Multimeter is powered by batteries. To install or replace batteries:
- ตรวจสอบให้แน่ใจว่ามัลติมิเตอร์ปิดอยู่ และถอดสายวัดทั้งหมดออก
- ค้นหาฝาครอบช่องใส่แบตเตอรี่ที่ด้านหลังของอุปกรณ์
- ใช้ไขควงคลายสกรูที่ยึดฝาครอบแบตเตอรี่ออก
- ถอดฝาครอบออก
- Insert new batteries, observing the correct polarity (+ and -) as indicated inside the compartment. The device typically uses AA batteries.
- ปิดฝาครอบแบตเตอรี่และขันสกรูให้แน่น
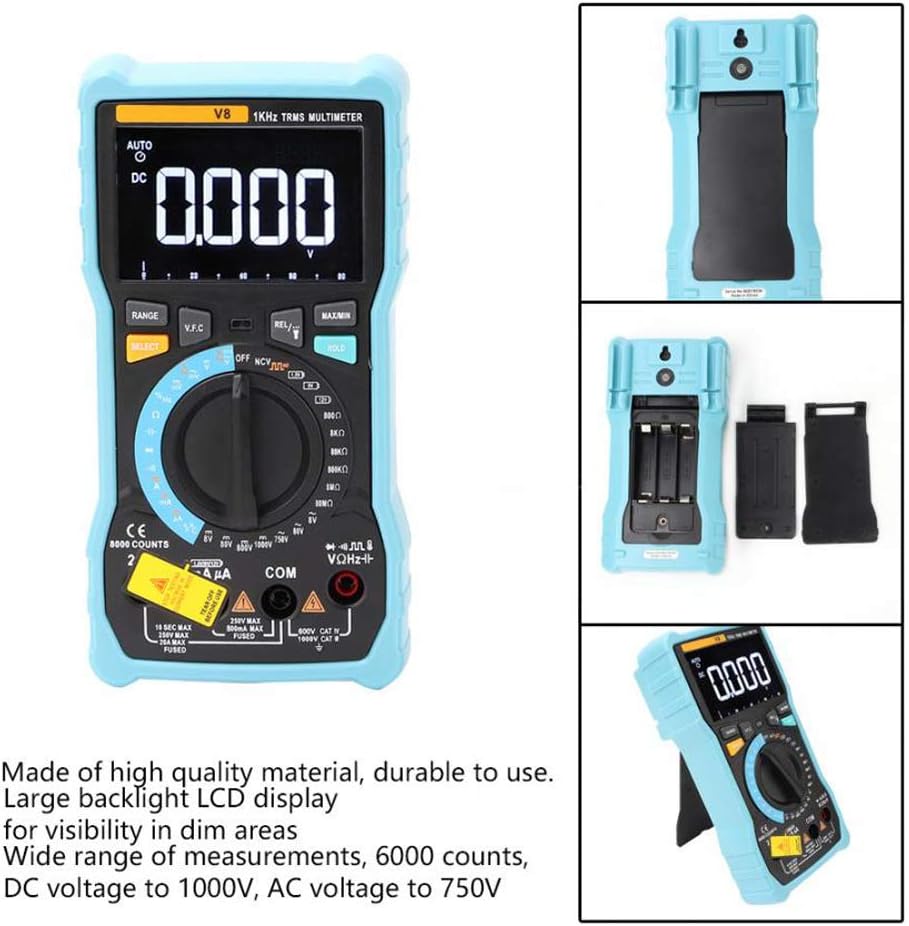
ภาพ: ด้านหลัง view of the multimeter with the battery compartment open, illustrating the correct placement for three AA batteries.
4. คู่มือการใช้งาน
Before any measurement, ensure the test leads are correctly inserted into the input jacks and the rotary switch is set to the appropriate function.
4.1 Measuring DC/AC Voltage
- Set the rotary switch to the 'V–' (DC Voltage) or 'V~' (AC Voltagจ) ตำแหน่ง
- เชื่อมต่อสายทดสอบสีแดงเข้ากับแจ็ค 'VΩmA' และสายทดสอบสีดำเข้ากับแจ็ค 'COM'
- ต่อสายวัดทดสอบแบบขนานเข้ากับวงจรหรือชิ้นส่วนที่คุณต้องการวัด
- อ่านเล่มที่tagค่า e บนจอแสดงผล
4.2 Measuring DC/AC Current
- Set the rotary switch to the 'A–' (DC Current) or 'A~' (AC Current) position. For milliampเอ่อ (มิลลิแอมป์) หรือ ไมโครampere (µA) measurements, select the corresponding range.
- For current up to 800mA, connect the red test lead to the 'VΩmA' jack. For current up to 20A, connect the red test lead to the '20A' jack. Connect the black test lead to the 'COM' jack.
- Disconnect power to the circuit. Open the circuit where you want to measure current. Connect the multimeter in series with the circuit.
- จ่ายไฟให้กับวงจรและอ่านค่ากระแสไฟฟ้าบนหน้าจอแสดงผล
4.3 การวัดความต้านทาน
- ตั้งสวิตช์แบบหมุนไปที่ตำแหน่ง 'Ω' (ความต้านทาน)
- เชื่อมต่อสายทดสอบสีแดงเข้ากับแจ็ค 'VΩmA' และสายทดสอบสีดำเข้ากับแจ็ค 'COM'
- Ensure the circuit is de-energized and all capacitors are discharged. Connect the test leads across the component to be measured.
- อ่านค่าความต้านทานบนจอแสดงผล
4.4 NCV (เครื่องวัดปริมาณสารแบบไม่สัมผัส)tagจ) การตรวจจับ
- ตั้งสวิตช์แบบหมุนไปที่ตำแหน่ง 'NCV'
- Move the top end of the multimeter near the conductor or outlet.
- มัลติมิเตอร์จะส่งเสียงบี๊บและไฟแสดงสถานะ NCV จะกะพริบหากแรงดันไฟฟ้า AC ผิดปกติtage is detected, indicating the presence of live voltagโดยไม่ต้องสัมผัสทางกายภาพ
4.5 การวัดอุณหภูมิ
- ตั้งสวิตช์หมุนไปที่ตำแหน่ง '°C/°F' (อุณหภูมิ)
- Connect the temperature probe to the 'VΩmA' and 'COM' jacks, observing polarity if applicable.
- วางปลายของหัววัดอุณหภูมิไว้บนหรือใกล้กับวัตถุที่คุณต้องการวัดอุณหภูมิ
- อ่านค่าอุณหภูมิบนจอแสดงผล
4.6 ฟังก์ชั่นอื่น ๆ
- ความจุ: Set the rotary switch to the 'F' position. Connect leads across the discharged capacitor.
- ความถี่/รอบการทำงาน: Set the rotary switch to the 'Hz/%' position. Connect leads to the signal source.
- การทดสอบไดโอด: Set the rotary switch to the 'Diode' position. Connect leads across the diode.
- การทดสอบความต่อเนื่อง: Set the rotary switch to the 'Continuity' position. Connect leads across the circuit. An audible beep indicates continuity.
- การทดสอบแบตเตอรี่: Set the rotary switch to the 'Battery' position. Connect leads to the battery terminals (1.5V, 9V, or 12V).
- การเก็บข้อมูล: กดปุ่ม 'HOLD' เพื่อหยุดการแสดงค่าปัจจุบันบนหน้าจอ กดอีกครั้งเพื่อปล่อย
- ไฟแบ็คไลท์/ไฟฉาย: Press the backlight button to turn on/off the display backlight or flashlight.
- ปิดเครื่องอัตโนมัติ: มัลติมิเตอร์จะปิดเครื่องโดยอัตโนมัติหลังจากไม่มีการใช้งานเป็นระยะเวลาหนึ่ง เพื่อประหยัดพลังงานแบตเตอรี่
5. การบำรุงรักษา
5.1 การทำความสะอาด
เช็ดเคสด้วยโฆษณาamp ผ้าและผงซักฟอกอ่อนๆ ห้ามใช้สารกัดกร่อนหรือตัวทำละลาย ควรทำความสะอาดขั้วอินพุตให้ปราศจากสิ่งสกปรกและความชื้น
5.2 การเปลี่ยนฟิวส์
หากฟังก์ชันการวัดกระแสไฟฟ้าล้มเหลว อาจจำเป็นต้องเปลี่ยนฟิวส์ โปรดดูข้อมูลจำเพาะสำหรับประเภทและพิกัดฟิวส์ที่ถูกต้อง การเปลี่ยนฟิวส์ควรดำเนินการโดยบุคลากรที่มีคุณสมบัติเหมาะสมเท่านั้น
5.3 พื้นที่จัดเก็บ
When not in use for extended periods, remove the batteries to prevent leakage and store the multimeter in a dry, cool place.
6 การแก้ไขปัญหา
- ไม่มีจอแสดงผล: ตรวจสอบการติดตั้งแบตเตอรี่และการชาร์จ เปลี่ยนแบตเตอรี่หากจำเป็น
- การอ่านไม่ถูกต้อง: Ensure the rotary switch is set to the correct function and range. Check test lead connections. Verify battery charge.
- การวัดปัจจุบันไม่ทำงาน: Check the fuse. Replace if blown (refer to fuse replacement section).
- NCV ตรวจไม่พบ: Ensure the NCV function is selected and the multimeter is close enough to the AC voltagแหล่งที่มา
7. ข้อมูลจำเพาะ
| พารามิเตอร์ | ค่า |
|---|---|
| แสดง | จอ LCD 8000 หลัก พร้อมไฟแบ็คไลท์ |
| DC ฉบับที่tagอี (วี) | 8.000V / 80.00V / 800.0V / 1000V |
| DC ฉบับที่tagอี (เอ็มวี) | 800mV |
| ฉบับ ACtagอี (วี) | 8.000 โวลต์ / 80.00 โวลต์ / 750 โวลต์ |
| ฉบับ ACtagอี (เอ็มวี) | 800mV |
| กระแสไฟฟ้าตรง (A) | 8.000ก/20.00ก |
| กระแสไฟตรง (mA) | 8.000mA / 80.00mA / 800.0mA |
| กระแสไฟฟ้าตรง (µA) | 800µA / 8000µA |
| กระแสไฟ AC (A) | 8.000ก/20.00ก |
| กระแสไฟ AC (mA) | 8.000mA / 80.00mA / 800.0mA |
| กระแสไฟฟ้าสลับ (µA) | 800µA / 8000µA |
| ความต้านทาน | 800.0Ω / 8.000kΩ / 80.00kΩ / 800.0kΩ / 8.000MΩ / 80.00MΩ |
| ความจุ | 9.999nF / 99.99nF / 999.9nF / 9.999µF / 99.99µF / 999.9µF / 9.999mF / 99.99mF |
| ความถี่ | 9.999เฮิร์ต / 99.99เฮิร์ต / 999.9เฮิร์ต / 9.999กิโลเฮิร์ตซ์ / 99.99กิโลเฮิร์ตซ์ / 999.9กิโลเฮิร์ตซ์ / 9.999เมกะเฮิร์ตซ์ |
| รอบการทำงาน | 1% ~ 99% |
| ช่วงอุณหภูมิ | -20°C ~ 1000°C (-4°F ~ 1832°F) |
| การทดสอบแบตเตอรี่ | 1.5 โวลต์ / 9 โวลต์ / 12 โวลต์ |
| การกำหนดช่วง | อัตโนมัติ / แมนนวล |
| อัตราการอัพเดท | 3 ครั้ง / วินาที |
| ค่า RMS ที่แท้จริง | ใช่ |
| การเก็บข้อมูล | ใช่ |
| แบ็คไลท์/ไฟฉาย | ใช่ |
| การแจ้งเตือนแบตเตอรี่ต่ำ | ใช่ |
| ปิดเครื่องอัตโนมัติ | ใช่ |
| วัสดุ | ABS / PVC |
| แหล่งพลังงาน | ใช้พลังงานจากแบตเตอรี่ |
8. การรับประกันและการสนับสนุน
This product is covered by a standard manufacturer's warranty against defects in materials and workmanship. Please refer to the warranty card included with your purchase for specific terms and conditions. For technical support or service inquiries, please contact your retailer or the manufacturer's customer service department.
9. วิดีโอผลิตภัณฑ์อย่างเป็นทางการ
ไม่มีวิดีโอผลิตภัณฑ์อย่างเป็นทางการจากผู้ขายที่สามารถฝังได้ในขณะนี้