1. บทนำ
This manual provides detailed instructions for the installation, operation, and maintenance of your Anlapus 1080p HD-TVI Surveillance Camera. Please read this manual thoroughly before using the product to ensure proper function and safety.
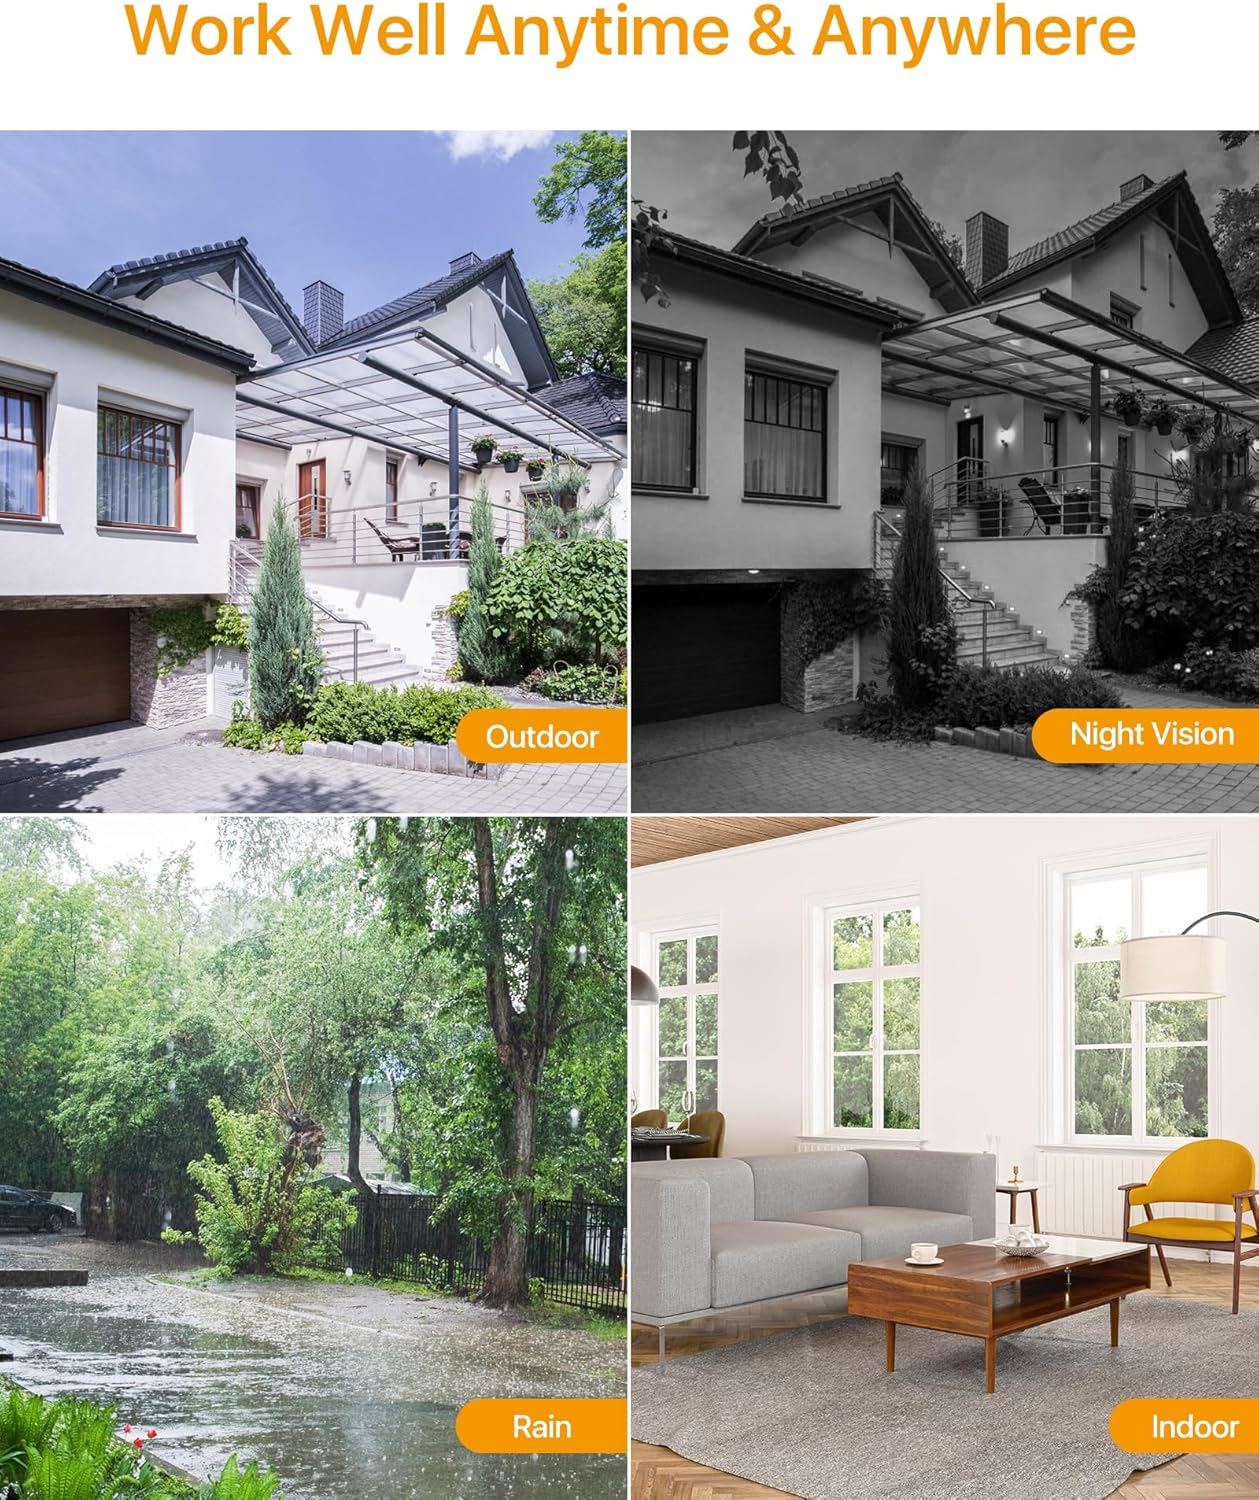
The Anlapus HD-TVI camera is designed for both indoor and outdoor surveillance, offering high-definition video quality and robust performance in various environmental conditions.
2. เนื้อหาบรรจุภัณฑ์
ตรวจสอบว่าสินค้าทั้งหมดที่ระบุไว้ด้านล่างนี้รวมอยู่ในแพ็คเกจของคุณแล้ว หากมีสินค้าใดสูญหายหรือเสียหาย โปรดติดต่อฝ่ายสนับสนุนลูกค้า
- 4 x Anlapus 1080p HD-TVI Cameras
- 4 x BNC Video Cables
- แหล่งจ่ายไฟ 1x
- 1 x 1-to-4 Power Splitter Cable
- สติกเกอร์เตือนภัย 4 ชิ้น
- 4 x Mounting Screw Bags (including screws and wall plugs)
- แม่แบบรูยึด 4 ชิ้น
- คู่มือเริ่มต้นอย่างรวดเร็ว 1 ชุด
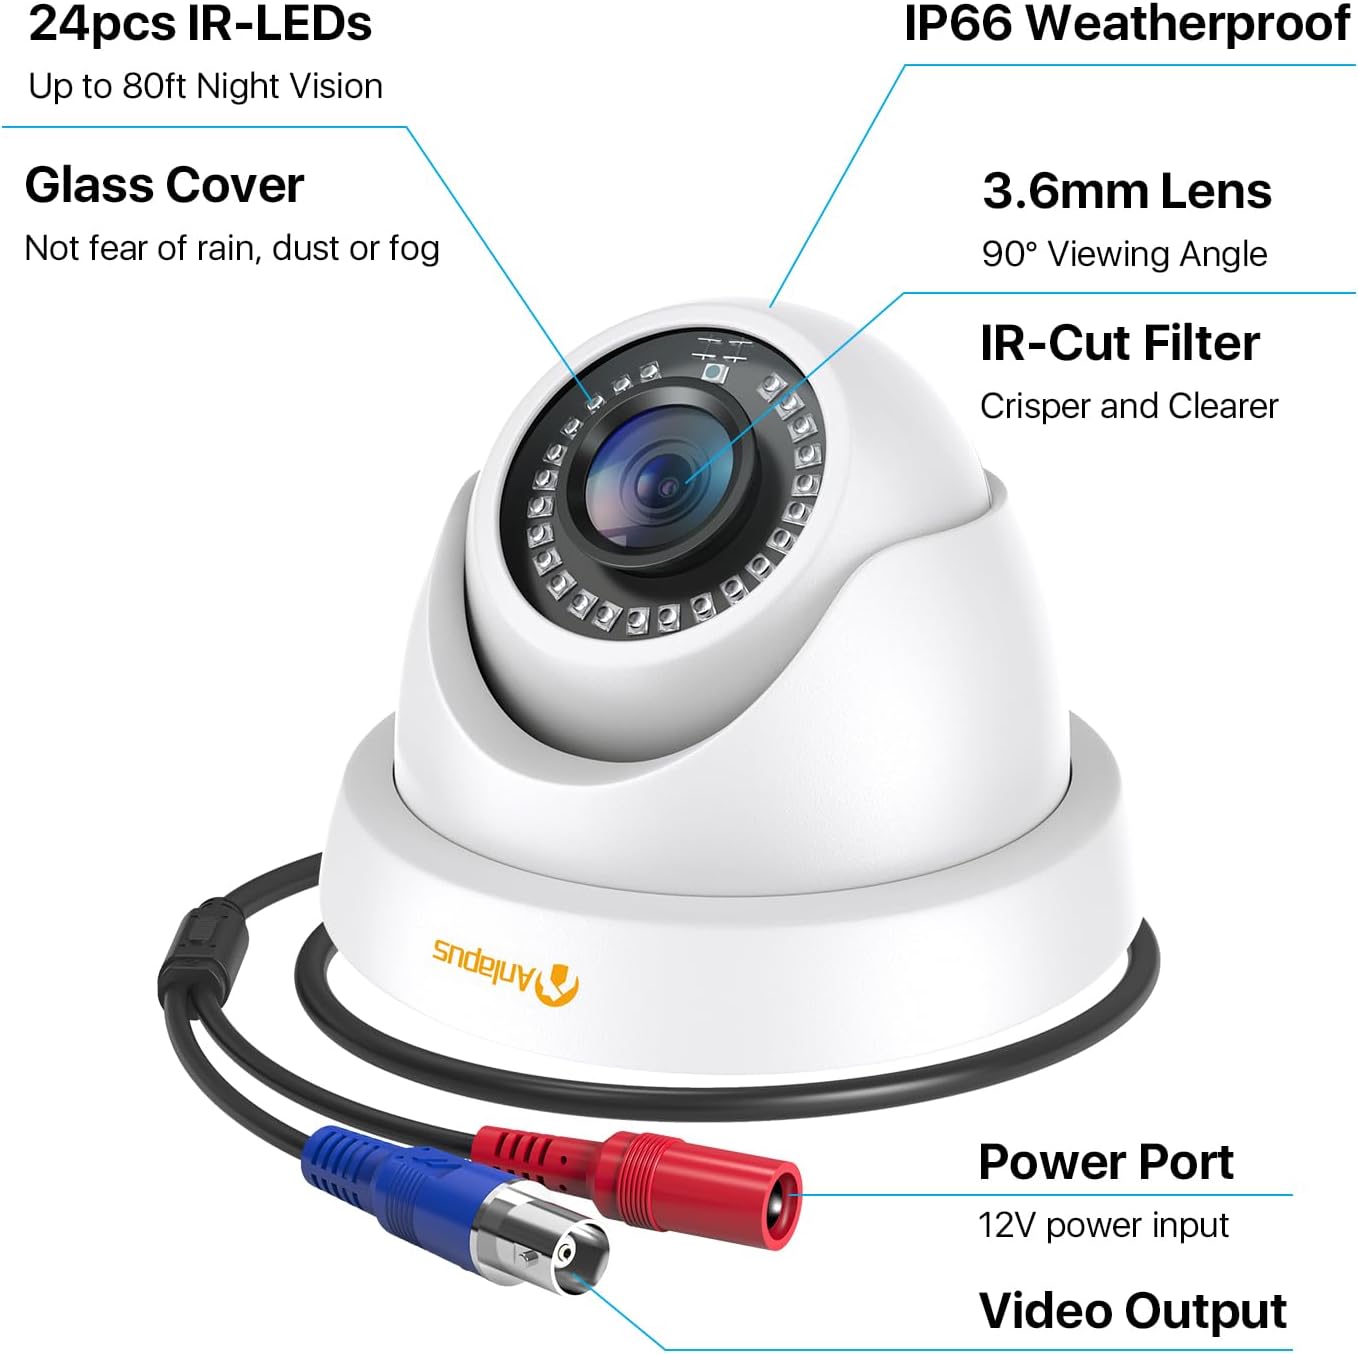
3. คุณสมบัติของผลิตภัณฑ์
- ความละเอียด HD 1080p: ให้ภาพวิดีโอที่ชัดเจนและมีรายละเอียดtage (1920x1080 pixels).
- กว้าง Viewอิงมุม: Equipped with a 3.6mm lens, offering a 90-degree field of view.
- HD-TVI Compatibility: Designed to work with HD-TVI DVRs. Ensure your DVR supports HD-TVI technology.
- การมองเห็นกลางคืนขั้นสูง: Features 24 IR-Cut LEDs for up to 24 meters (80 feet) of clear black and white night vision.
- ระดับการกันน้ำ IP66: Robust metal housing ensures protection against dust and water, suitable for both indoor and outdoor use in various weather conditions.
- การติดตั้งที่ยืดหยุ่น: Features a 3-axis adjustable bracket for ceiling or wall mounting, allowing 360-degree horizontal and 180-degree vertical adjustment.


4. การตั้งค่าและการติดตั้ง
4.1 รายการตรวจสอบก่อนการติดตั้ง
- Ensure your DVR is compatible with HD-TVI cameras.
- Plan the camera placement to cover desired surveillance areas.
- Ensure power outlets are accessible for the camera power supply.
- Gather necessary tools: drill, screwdriver, ladder (if mounting high).
4.2 การติดตั้งกล้อง
- Select a suitable mounting location (wall or ceiling) that provides the desired viewing angle and is within reach of the BNC cable and power supply.
- Use the provided mounting hole template to mark the drill points on the surface.
- เจาะรูนำตามตำแหน่งที่ทำเครื่องหมายไว้
- Insert the wall plugs into the drilled holes (if mounting on masonry or drywall).
- ยึดฐานกล้องเข้ากับพื้นผิวโดยใช้สกรูที่ให้มา
- Adjust the camera angle using the 3-axis bracket. The bracket allows for 360-degree horizontal rotation and 180-degree vertical tilt. Tighten the adjustment screws once the desired angle is achieved.
4.3 การเชื่อมต่อกล้อง
Refer to the connection diagram below for proper wiring.
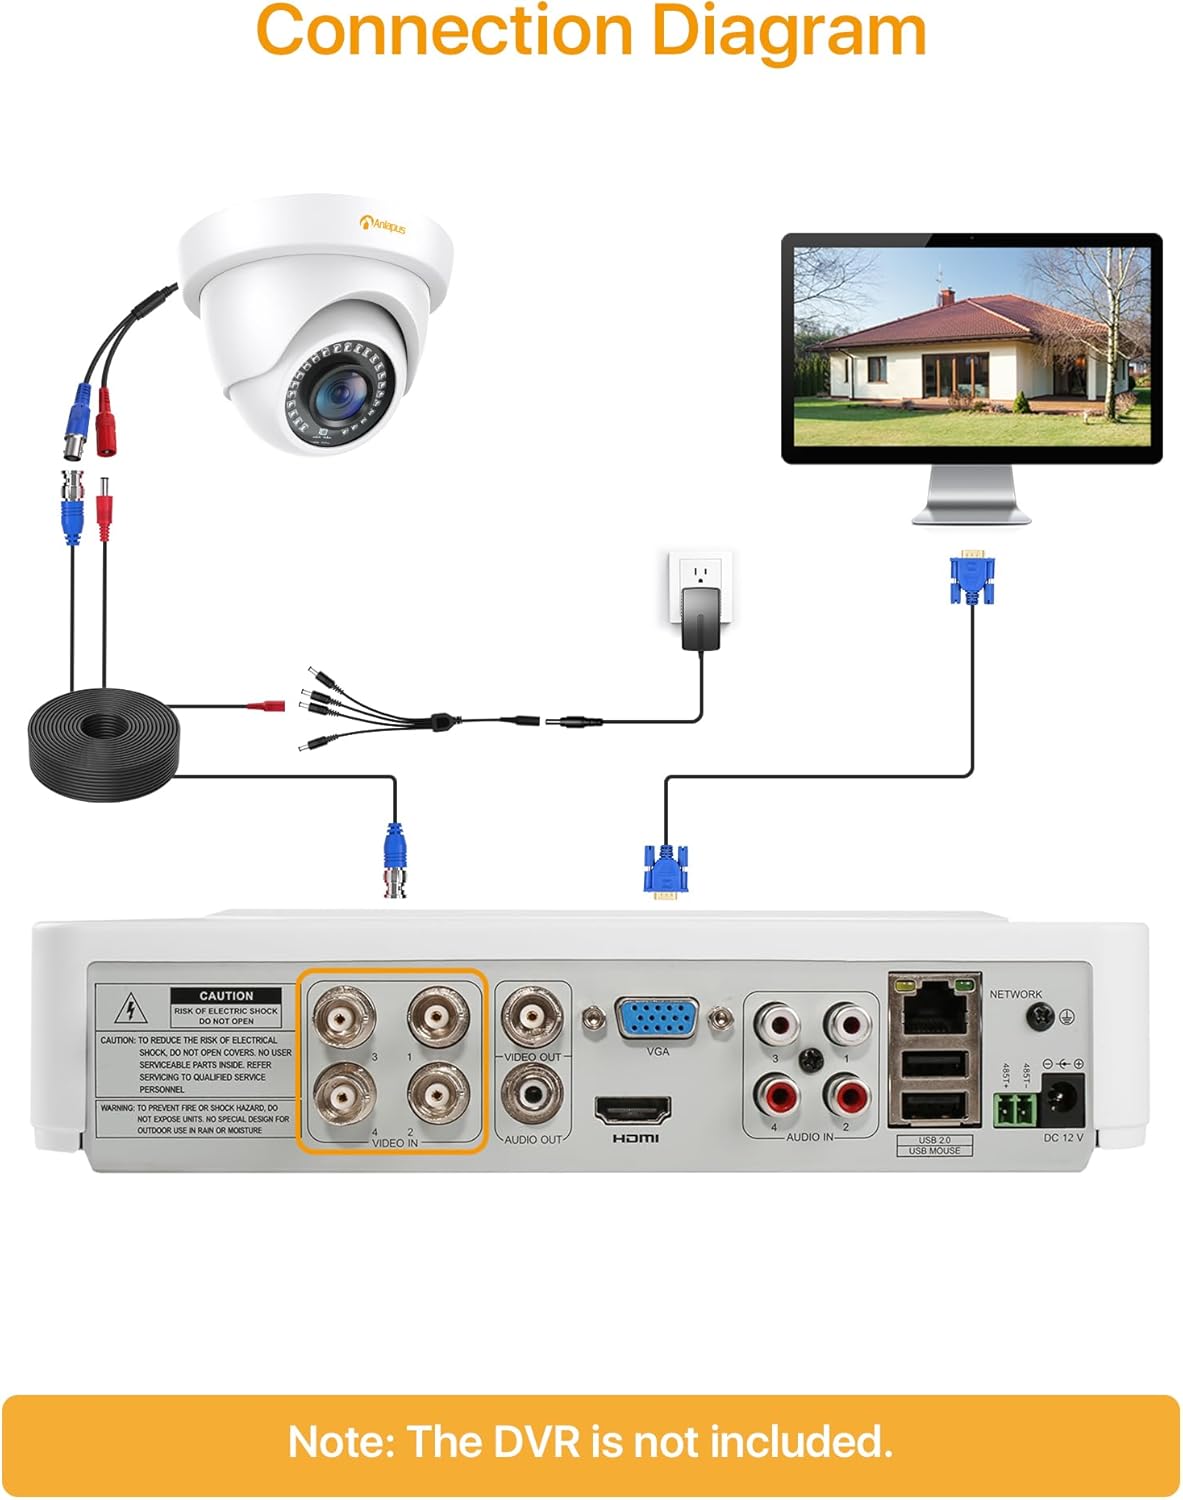
- Connect one end of the BNC video cable to the video output port of the camera.
- Connect the other end of the BNC video cable to a "VIDEO IN" port on your HD-TVI DVR.
- Connect the camera's power input to one of the outputs on the 1-to-4 power splitter cable.
- Connect the power supply to the 1-to-4 power splitter cable.
- เสียบปลั๊กแหล่งจ่ายไฟเข้ากับเต้ารับไฟฟ้ามาตรฐาน
- Repeat these steps for all cameras.
สำคัญ: ตรวจสอบให้แน่ใจว่าการเชื่อมต่อทั้งหมดปลอดภัยก่อนเปิดระบบ
5. คู่มือการใช้งาน
Once the cameras are properly installed and connected to your HD-TVI DVR, refer to your DVR's instruction manual for specific operating procedures, including:
- Viewอิงไลฟ์ฟูtage จากกล้อง
- Recording and playback of video.
- Configuring motion detection and alerts.
- Accessing the system remotely via mobile app or web อินเทอร์เฟซ
- Adjusting camera settings (if supported by your DVR).
The Anlapus camera provides a continuous video feed to the DVR. Its night vision capabilities activate automatically in low-light conditions.
6. การบำรุงรักษา
- การทำความสะอาด: ทำความสะอาดเลนส์และตัวเรือนกล้องเป็นระยะด้วยผ้านุ่มๆamp ผ้า หลีกเลี่ยงน้ำยาทำความสะอาดหรือตัวทำละลายที่มีฤทธิ์กัดกร่อน
- การตรวจสอบสายเคเบิล: Regularly check all cables for signs of wear, damage, or loose connections.
- อัพเดตเฟิร์มแวร์: While the camera itself does not typically require firmware updates, ensure your DVR's firmware is up-to-date for optimal performance and compatibility.
- การปกป้องสิ่งแวดล้อม: Although the camera is IP66 weatherproof, extreme weather conditions (e.g., heavy snow, ice) may temporarily affect performance. Ensure the camera is securely mounted to withstand strong winds.
7 การแก้ไขปัญหา
| ปัญหา | สาเหตุที่เป็นไปได้ | สารละลาย |
|---|---|---|
| No image on DVR screen |
|
|
| คุณภาพภาพไม่ดี / วิดีโอเบลอ |
|
|
| การมองเห็นตอนกลางคืนไม่ทำงาน |
|
|
If you encounter issues not covered here, please contact Anlapus customer support.
8. ข้อมูลจำเพาะ
| หมายเลขรุ่น | AJ-A4K-202T4-WPES |
| ความละเอียดวิดีโอ | 1080p (1920 x 1080 Pixels) |
| เลนส์ | 3.6มม. |
| Viewอิงแองเกิล | 90 องศา |
| ช่วงการมองเห็นตอนกลางคืน | สูงสุด 24 เมตร (80 ฟุต) |
| ไฟ LED IR | 24 pcs IR-Cut LEDs |
| คะแนนสภาพอากาศ | IP66 |
| วัสดุ | โลหะ |
| เทคโนโลยีการเชื่อมต่อ | แบบมีสาย (BNC) |
| กำลังไฟเข้า | 12 โวลต์ |
| การใช้พลังงาน | 12 วัตต์ |
| ขนาด (กว้าง x ยาว x สูง) | 42.9 x 27 x 8.71 ซม. |
| น้ำหนัก | 2.61 kilograms (for the package) |
| ข้อแนะนำการใช้ | การเฝ้าระวัง |
| อุปกรณ์ที่รองรับ | เครื่องบันทึกวีดีโอดิจิตอล (DVR) |
9. การรับประกันและการสนับสนุน
Anlapus products are designed for reliability and performance. For warranty information and technical support, please refer to the warranty card included in your package or visit the official Anlapus webเว็บไซต์.
If you require assistance with installation, troubleshooting, or have any questions regarding your Anlapus surveillance camera, please contact our customer support team. Contact details can typically be found on the Anlapus brand store page or in the quick start guide.