1. บทนำ
The EPEVER Tracer 3215BN is a 30A Maximum Power Point Tracking (MPPT) solar charge controller designed for 12V/24V battery systems. It efficiently converts solar energy to charge various battery types, including Sealed, Gel, and Flooded lead-acid batteries. This controller features an integrated LCD display for system monitoring and configuration, along with advanced protection functions to ensure system reliability.
2. คุณสมบัติของผลิตภัณฑ์
- เทคโนโลยี MPPT ขั้นสูง: Ensures maximum power point tracking with an efficiency of no less than 99.5%, optimizing solar energy harvesting.
- ประสิทธิภาพการแปลงสูง: Achieves a maximum conversion efficiency of 98%.
- ความเร็วในการติดตามที่รวดเร็ว: Ultra-fast tracking and accurate recognition of multiple power points.
- การออกแบบที่แข็งแกร่ง: Features a common negative design and die-cast aluminum construction for effective heat dissipation.
- การป้องกันที่ครอบคลุม: Includes all-round electronic fault self-test and enhanced electronic protection functions to prevent system damage.
- อินเทอร์เฟซการสื่อสาร: Equipped with an RS-485 communication bus interface and Modbus communication protocol for expanded applications and monitoring via PC or external display units like MT52.
- การสนับสนุนการอัปเกรดซอฟต์แวร์: Allows for future software enhancements.
- ตัวบ่งชี้ที่เป็นมิตรต่อผู้ใช้: LED indicators provide clear system status.
- Flexible Load Control: Offers multiple load control modes including manual control, light ON/OFF, light On+Timer, and time control.
- ความเข้ากันได้ของแบตเตอรี่: Supports Sealed, Gel, Flooded, and User-defined battery types.
- การชดเชยอุณหภูมิ: Includes a battery temperature compensation function.
- สถิติเกี่ยวกับพลังงาน: Provides real-time energy statistics.
3. การตั้งค่าและการติดตั้ง
Proper installation is crucial for the safe and efficient operation of your EPEVER Tracer 3215BN controller. Follow these steps carefully.
3.1 การระบุส่วนประกอบ

This image illustrates the various components and ports of the Tracer 3215BN controller, including the Heat Sink, RTS Port, Charging LED indicator, Solar Terminal, Battery LED indicator, Button, RS-485 Port, Battery Terminal, and Load Terminal.
3.2 แผนผังการเดินสายไฟ
Connect the components in the specified order to prevent damage to the controller and other system components.

This diagram shows the connection sequence: Solar Panel (PV) to the controller, controller to Battery, and controller to Load (e.g., lights, fan, TV, computer via inverter). Ensure correct polarity for all connections.
- เชื่อมต่อแบตเตอรี่: First, connect the battery to the controller's battery terminals. Ensure correct polarity (+ to + and - to -). The controller requires battery power to operate.
- เชื่อมต่อแผงโซลาร์เซลล์: Next, connect the solar panels to the controller's PV terminals. Verify correct polarity.
- เชื่อมต่อโหลด: Finally, connect your DC loads to the controller's load terminals. If using AC loads, connect them through an inverter, which is then connected to the battery.
หมายเหตุด้านความปลอดภัยที่สำคัญ: Always disconnect power from solar panels and battery before making or breaking any connections to the controller. Ensure all connections are tight to prevent loose contacts and overheating.
3.3 พอร์ตสื่อสาร

This image highlights the RTS (Remote Temperature Sensor) Port and the RS-485 Port, used for external temperature sensing and communication respectively.
- พอร์ตเกม RTS: Connect the optional Remote Temperature Sensor (RTS) here for accurate battery temperature compensation.
- พอร์ต RS-485: Use this port for connecting to a PC, MT52 remote meter, or other monitoring devices via Modbus protocol.
4. คู่มือการใช้งาน
Once installed, the controller will automatically begin charging the battery from the solar panels. The LCD display provides real-time information about the system status.
จอแสดงผล LCD 4.1 และปุ่มต่างๆ
The integrated LCD display shows various parameters such as battery voltage, charging current, load status, and error codes. Use the buttons adjacent to the display to navigate through menus and adjust settings.
4.2 โหมดควบคุมโหลด
The controller offers several load control modes:
- ควบคุมด้วยมือ: Turn the load ON or OFF manually.
- เปิด/ปิดไฟ: Load turns ON at dusk and OFF at dawn.
- Light On+Timer: Load turns ON at dusk and stays ON for a set duration.
- การควบคุมเวลา: Load operates during specific programmed times.
4.3 Remote Monitoring and Settings
The Tracer 3215BN supports remote monitoring and parameter adjustment through various accessories.
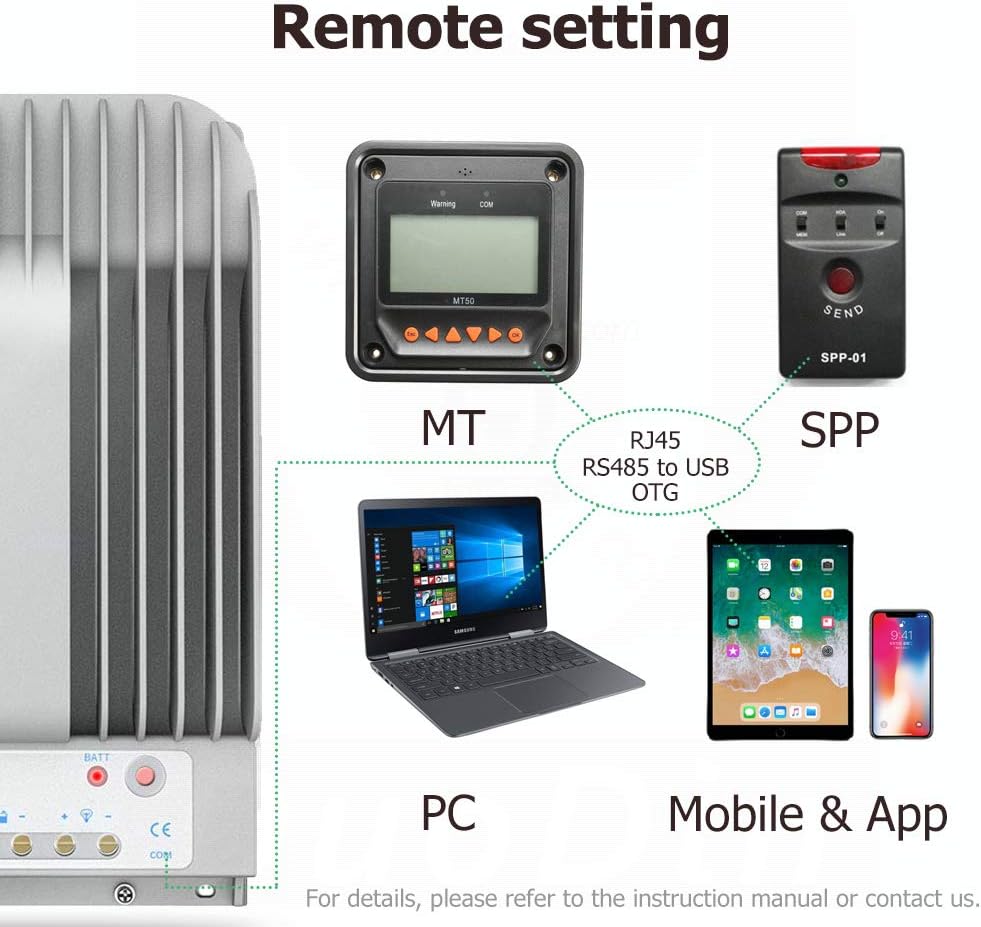
This image illustrates how the controller can be connected to an MT (remote meter), SPP (wireless module), PC, or mobile application for remote monitoring and configuration.
- MT Remote Meter: Connect an EPEVER MT series remote meter (e.g., MT52) to view real-time data and modify parameters from a distance.
- ซอฟต์แวร์พีซี: Use EPEVER PC software by connecting the controller via an RS-485 to USB adapter for detailed monitoring, data logging, and advanced settings.
- แอปมือถือ: Connect a compatible wireless module (e.g., Bluetooth or WiFi) to use the EPEVER mobile application for convenient monitoring and control via smartphone or tablet.
5. การบำรุงรักษา
การบำรุงรักษาอย่างสม่ำเสมอจะช่วยให้ตัวควบคุมการชาร์จพลังงานแสงอาทิตย์ของคุณมีอายุการใช้งานยาวนานและทำงานได้อย่างมีประสิทธิภาพสูงสุด
- ตรวจสอบการเชื่อมต่อ: Periodically check all wiring connections for tightness and corrosion. Loose connections can cause voltagการลดลงของอุณหภูมิและความร้อนสูงเกินไป
- ทำความสะอาดตัวควบคุม: รักษาตัวควบคุมให้สะอาด ปราศจากฝุ่นและสิ่งสกปรก ตรวจสอบให้แน่ใจว่าครีบระบายความร้อนไม่ถูกปิดกั้น เพื่อให้ความร้อนกระจายได้อย่างเหมาะสม
- ตรวจสอบสถานะแบตเตอรี่: ตรวจสอบปริมาณแบตเตอรี่tage and health regularly. Ensure the battery type setting in the controller matches your installed battery.
- สภาพแวดล้อม : Ensure the controller is installed in a dry, well-ventilated area, away from direct sunlight and extreme temperatures.
6 การแก้ไขปัญหา
This section addresses common issues you might encounter with your Tracer 3215BN controller.
6.1 ตัวควบคุมไม่เปิดใช้งาน
- ตรวจสอบการเชื่อมต่อแบตเตอรี่: The controller requires a minimum battery voltage to power on. Ensure the battery is properly connected and has sufficient charge. If the battery is completely discharged, the controller may not power on until an external 12V source or sufficient solar input is provided to raise the battery voltage.
- ตรวจสอบขั้ว: Confirm that the battery connections are made with correct polarity.
- Inspect Fuses/Breakers: Check any inline fuses or circuit breakers between the battery and the controller.
6.2 No Charging Indication
- Check Solar Panel Connection: Ensure solar panels are correctly connected to the PV terminals with proper polarity.
- Verify Solar Input Voltage: วัดปริมาตรวงจรเปิดtage of your solar panels to ensure it is within the controller's acceptable range (Max 150V).
- Sunlight Conditions: Ensure there is adequate sunlight reaching the solar panels.
6.3 Load Not Working
- Check Load Connection: Verify that the load is correctly connected to the load terminals.
- โหมดควบคุมโหลด: Ensure the load control mode is set appropriately (e.g., manual ON, or correct timer settings).
- ปริมาณแบตเตอรี่tage: หากแบตเตอรี่มีปริมาณtage is too low, the controller may disconnect the load to protect the battery.
- ระบบป้องกันการโอเวอร์โหลด: Check if the load current exceeds the controller's rated load current, triggering overload protection.
7. ข้อมูลจำเพาะ
Key technical specifications for the EPEVER Tracer 3215BN MPPT Solar Charge Controller:
| พารามิเตอร์ | ค่า |
|---|---|
| แบบอย่าง | เทรเซอร์3215BN |
| ปริมาตรที่กำหนดของระบบtage | 12V / 24V Auto Work |
| กระแสไฟชาร์จที่กำหนด | 30เอ |
| จัดอันดับโหลดปัจจุบัน | 30เอ |
| แม็กซ์ PV Open Circuit Voltage | 150V (ที่อุณหภูมิสภาพแวดล้อมการทำงานขั้นต่ำ) 138V (ที่อุณหภูมิแวดล้อม 25°C) |
| กำลังไฟฟ้าเข้า PV สูงสุด | 390 วัตต์ (12 โวลต์) / 780 วัตต์ (24 โวลต์) |
| MPP ฉบับที่tagอี เรนจ์ | ปริมาณแบตเตอรี่tage +2V ~ 108V |
| ประเภทแบตเตอรี่ | ปิดผนึก, เจล, น้ำท่วม, ผู้ใช้ |
| ประสิทธิภาพการแปลง | ≤98% |
| ประสิทธิภาพการติดตาม | ≥99.5% |
| การสื่อสาร | RS-485 (RJ45 interface) |
| ช่วงอุณหภูมิในการทำงาน | -35°C ถึง +55°C |
| ช่วงอุณหภูมิในการจัดเก็บ | -35°C ถึง +80°C |
| ขนาด (กว้าง x ยาว x สูง) | 281มม. x 160มม. x 60มม. |

This table provides a comparison of key specifications between the Tracer-AN and Tracer-BN series, highlighting the superior heat dissipation and voltage ranges of the BN series.

This image details the physical dimensions of the Tracer 3215BN controller.
8. ข้อมูลการรับประกัน
Warranty terms and conditions for EPEVER products can vary. It is recommended to confirm the specific warranty period and coverage directly with your seller (SolaMr) or the manufacturer (EPEVER) at the time of purchase. Keep your proof of purchase for any warranty claims.
9. การสนับสนุน
For technical assistance, troubleshooting beyond this manual, or inquiries regarding product functionality, please contact the following:
- การสนับสนุนผู้ขาย: Contact SolaMr for assistance related to your purchase.
- การสนับสนุนผู้ผลิต: Visit the official EPEVER website for product documentation, FAQs, and contact information for direct manufacturer support.