
การแนะนำ
This manual provides detailed instructions for the assembly, operation, maintenance, and troubleshooting of your Creality Ender 5 Plus 3D Printer. Please read this manual thoroughly before operating the printer to ensure safe and efficient use.
The Ender 5 Plus is designed for large-scale 3D printing with a build volume of 350x350x400mm, featuring an auto bed leveling sensor, dual Z-axis lead screws, and a touch screen for user-friendly operation.
ข้อควรระวังเพื่อความปลอดภัย
- ควรใช้งานเครื่องพิมพ์ในบริเวณที่มีอากาศถ่ายเทได้ดีเสมอ
- ให้มืออยู่ห่างจากชิ้นส่วนที่กำลังเคลื่อนไหวในระหว่างการทำงาน
- Do not touch the hotend or heated bed during or immediately after printing.
- Ensure the power supply is disconnected before performing any maintenance or assembly.
- Use only recommended filament types and settings.
การตั้งค่า
The Ender 5 Plus comes partially assembled. Follow these steps for initial setup:
1. การแกะกล่องและการระบุส่วนประกอบ
นำชิ้นส่วนทั้งหมดออกจากบรรจุภัณฑ์อย่างระมัดระวัง ตรวจสอบว่าชิ้นส่วนทั้งหมดครบถ้วนตามรายการที่ระบุไว้บนบรรจุภัณฑ์
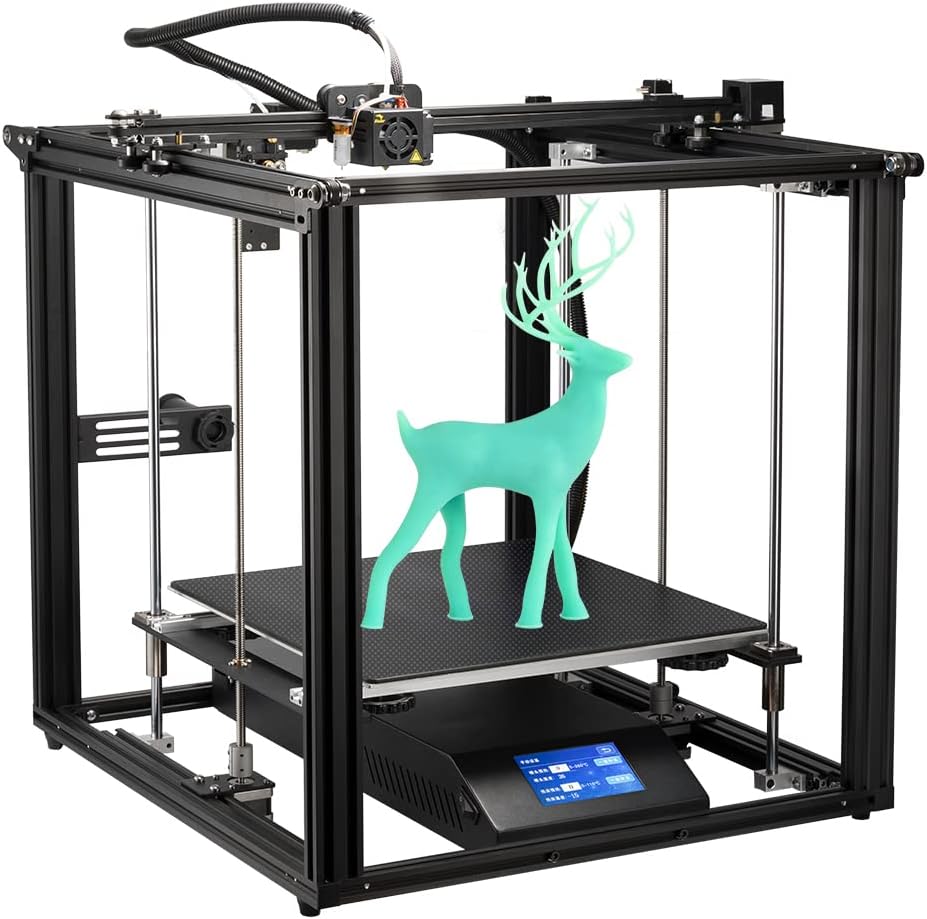
Figure 1: Fully assembled Creality Ender 5 Plus 3D Printer with a printed deer model.
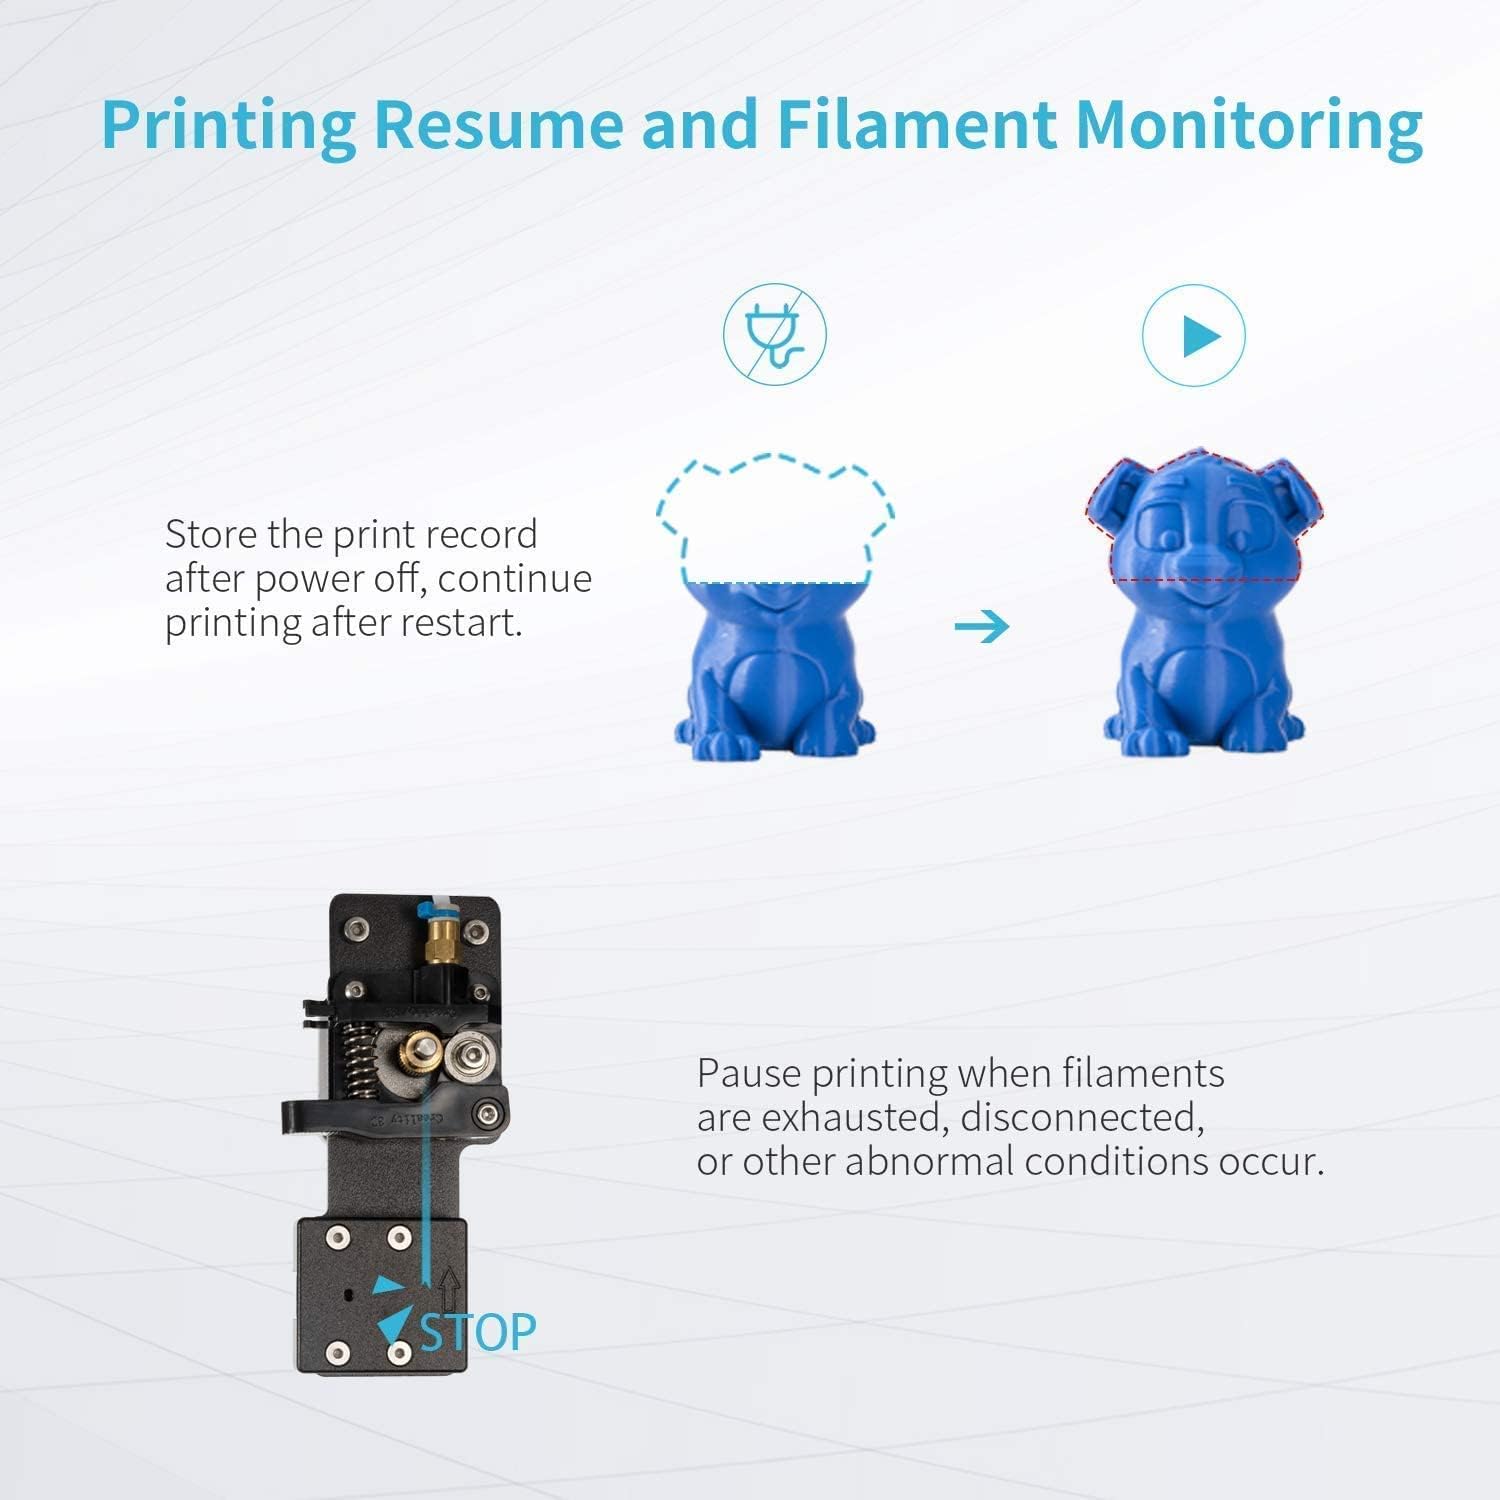
Figure 2: Components included for easy assembly, showing the bottom frame, top frame, Z-axis frame, aluminum profiles, hot bed with tempered glass, filament holder, 200g filament, and a tool list.
2. การประกอบเฟรม
Assemble the bottom frame, top frame, and Z-axis frame using the provided screws and tools. Ensure all connections are secure.
3. Hot Bed and Z-Axis Installation
Install the hot bed onto the Z-axis frame. The Ender 5 Plus features dual Z-axis lead screws for stable movement. Ensure the glass bed is properly secured on the heated bed.

Figure 3: Illustration of the dual Z-axis lead screws ensuring stable movement of the hot bed, preventing wobbling and dropping.
4. การเชื่อมต่อสายไฟ
Connect all motor, sensor, and power cables according to the wiring diagram in the quick start guide. Double-check all connections before powering on.
5. Auto Bed Leveling Sensor Kit
The printer is equipped with either a BL Touch or CR Touch auto-leveling kit. This sensor precisely measures the tilt of the hot bed surface for Z-axis leveling compensation. Refer to the specific instructions for your sensor type for calibration.
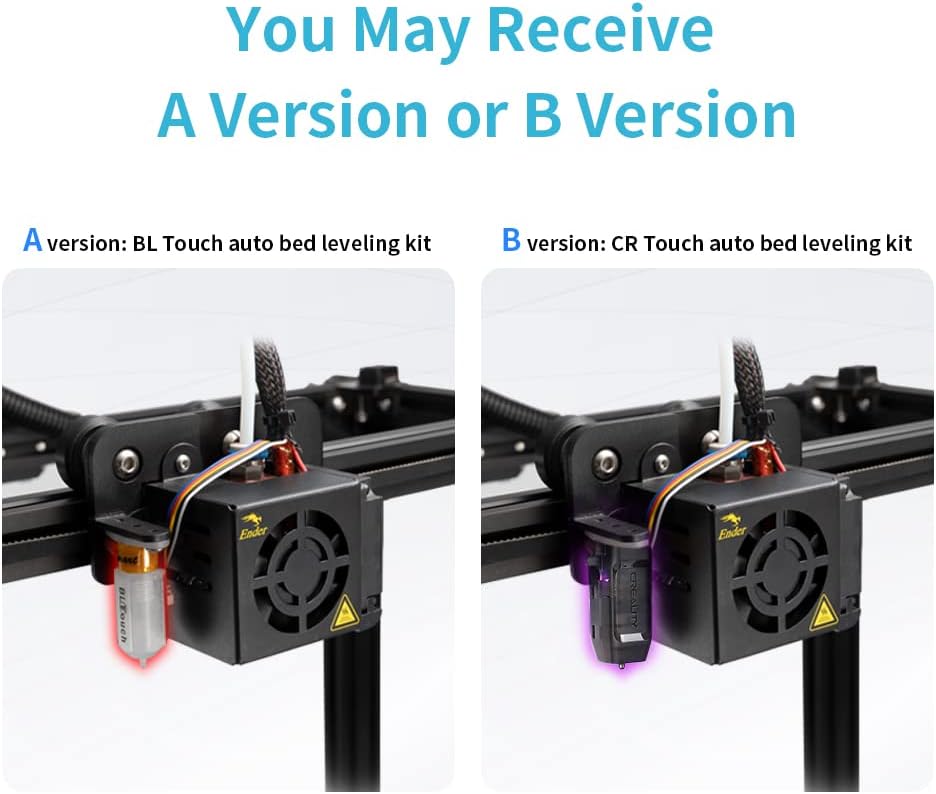
Figure 4: Comparison of BL Touch (A version) and CR Touch (B version) auto bed leveling kits, showing their installation on the print head.
คำแนะนำการใช้งาน
1. การเปิดเครื่องและการนำทางภายในโปรแกรม
Power on the printer using the switch on the side. The Ender 5 Plus features a 4.3-inch touch color screen for easy navigation. Use the intuitive interface to access print, temperature, and settings menus.

Figure 5: Close-up of the 4.3-inch touch color screen, providing easy and quick operation for the Ender 5 Plus.
2. กำลังโหลดเส้นใย
Place the filament spool on the holder. Feed the filament through the filament sensor and into the extruder. Use the 'Feed' function on the touch screen to load the filament until it extrudes from the nozzle.
Video 1: Official Comgrow video demonstrating the Ender 5 Plus in operation, highlighting its features and print capabilities. This video shows the printer's overall structure and movement during printing.
3. การเตรียมเอกสารสำหรับการพิมพ์
Prepare your 3D model using slicing software (e.g., Creality Slicer, Cura). Save the G-code file to the provided MicroSD card. Insert the MicroSD card into the printer's slot.
4. การเริ่มพิมพ์
From the touch screen, select 'Print' and choose your G-code file. The printer will automatically heat up the nozzle and bed, perform auto-leveling, and begin printing.
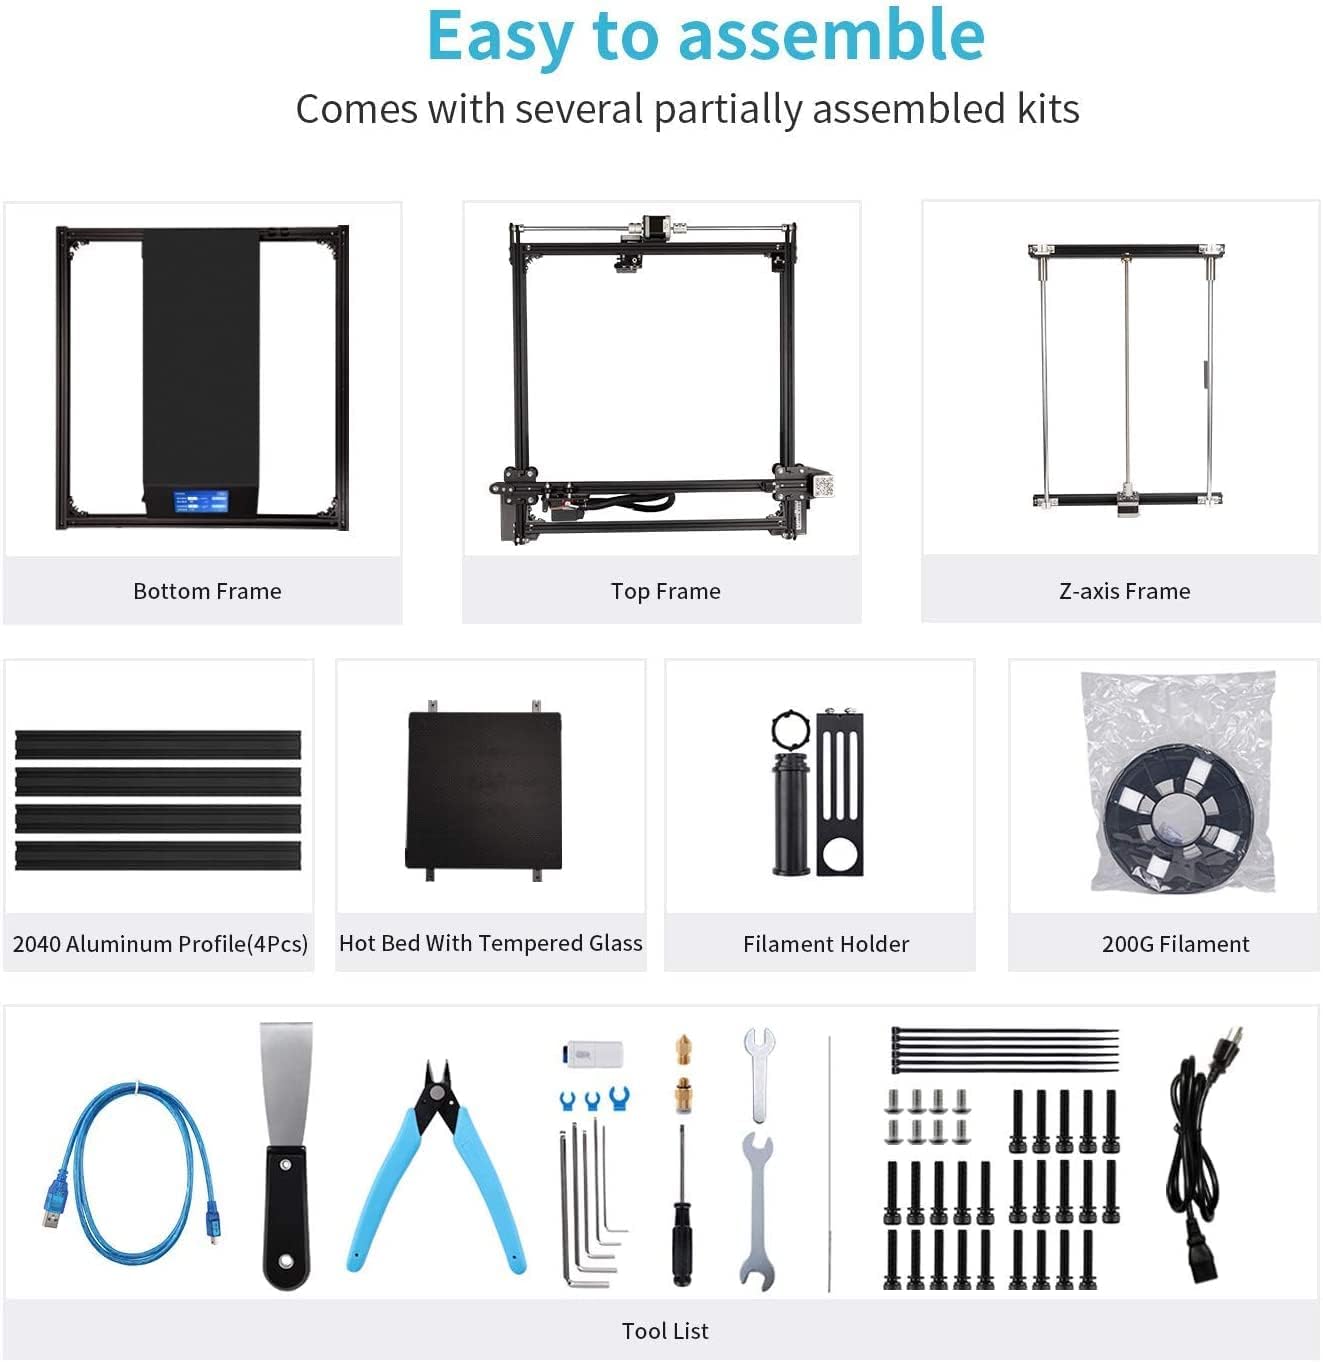
Figure 6: Diagram illustrating the printing resume function after power off and the filament monitoring system that pauses printing when filament is exhausted or disconnected.
The printer supports print resume function after power loss and filament monitoring to pause printing when filament runs out.
การซ่อมบำรุง
1. การทำความสะอาดฐานพิมพ์
After each print, allow the bed to cool and carefully remove the printed model. Clean the glass bed with isopropyl alcohol to ensure good adhesion for subsequent prints.
2.การบำรุงรักษาหัวฉีด
Regularly check the nozzle for clogs or wear. Replace the nozzle if necessary. Always ensure the hotend is heated to the appropriate temperature before attempting to remove or replace the nozzle.
3. การหล่อลื่น
Apply a small amount of lithium grease to the Z-axis lead screws periodically to ensure smooth movement.
4. ความตึงของสายพาน
Check the tension of the X and Y-axis belts. They should be taut but not overly tight. Adjust if necessary to prevent layer shifting or print quality issues.
การแก้ไขปัญหา
| ปัญหา | สาเหตุที่เป็นไปได้ | สารละลาย |
|---|---|---|
| เส้นใยไม่ไหลออกมา | Clogged nozzle, tangled filament, extruder issue, filament sensor issue. | Clear nozzle, untangle filament, check extruder gear, inspect filament sensor. |
| การยึดเกาะเตียงไม่ดี | Unleveled bed, dirty bed, incorrect bed temperature. | Re-level bed, clean bed with isopropyl alcohol, adjust bed temperature. |
| การเลื่อนชั้น | Loose belts, print speed too high, motor issues. | Tighten belts, reduce print speed, check motor connections. |
| Printer making loud noises | Loose components, worn bearings, fan noise. | Check and tighten all screws, lubricate moving parts, inspect fans. |
| Filament sensor not working | Sensor malfunction, wiring issue. | Inspect sensor for damage, check wiring connections. |
| Build plate hardware issues | Loose or stripped screws, weak mounting points. | Inspect all build plate mounting screws and hardware. Replace if damaged. |
ข้อมูลจำเพาะ
- ขนาดสินค้า : 28.74 x 12.2 x 29.13 นิ้ว (73 x 31 x 74 ซม.)
- น้ำหนักสินค้า: 48.6 ปอนด์ (22 กก.)
- ยี่ห้อ: Comgrow (Creality 3D)
- วัสดุ: อลูมิเนียม
- สี: สีดำ
- ขนาดการพิมพ์: 350x350x400มม.
- Auto Bed Leveling: BL Touch or CR Touch (randomly supplied)
- แกน Z: Dual Lead Screws
- แกน Y: มอเตอร์คู่
- แสดง: Touch Color Screen (4.3-inch)
- การใช้พลังงาน (โหมดเปิด): 550 วัตต์

Figure 7: Visual representation of the large build volume of the Ender 5 Plus, measuring 350x350x400mm, highlighting its solid cube frame design.
การรับประกันและการสนับสนุน
For warranty information and technical support, please refer to the official Comgrow website or contact their customer service directly. Comgrow is the first authorized seller of Creality 3D products on Amazon and provides professional technical support.
คุณสามารถเยี่ยมชม Comgrow Store on Amazon สำหรับข้อมูลเพิ่มเติมและทรัพยากรสนับสนุน

Figure 8: Comgrow company logo, indicating their role as an authorized distributor of Creality 3D products.