
1. สินค้าหมดview
The GalaxyElec STC-100A is a microcomputer temperature controller designed for precise temperature management. It supports both heating and refrigerating modes, allowing for accurate control based on user-defined temperature settings and differential values. The device includes delay protection for compressor startup and heating elements, a feature to limit the temperature setting range, and an alarm function for sensor errors.
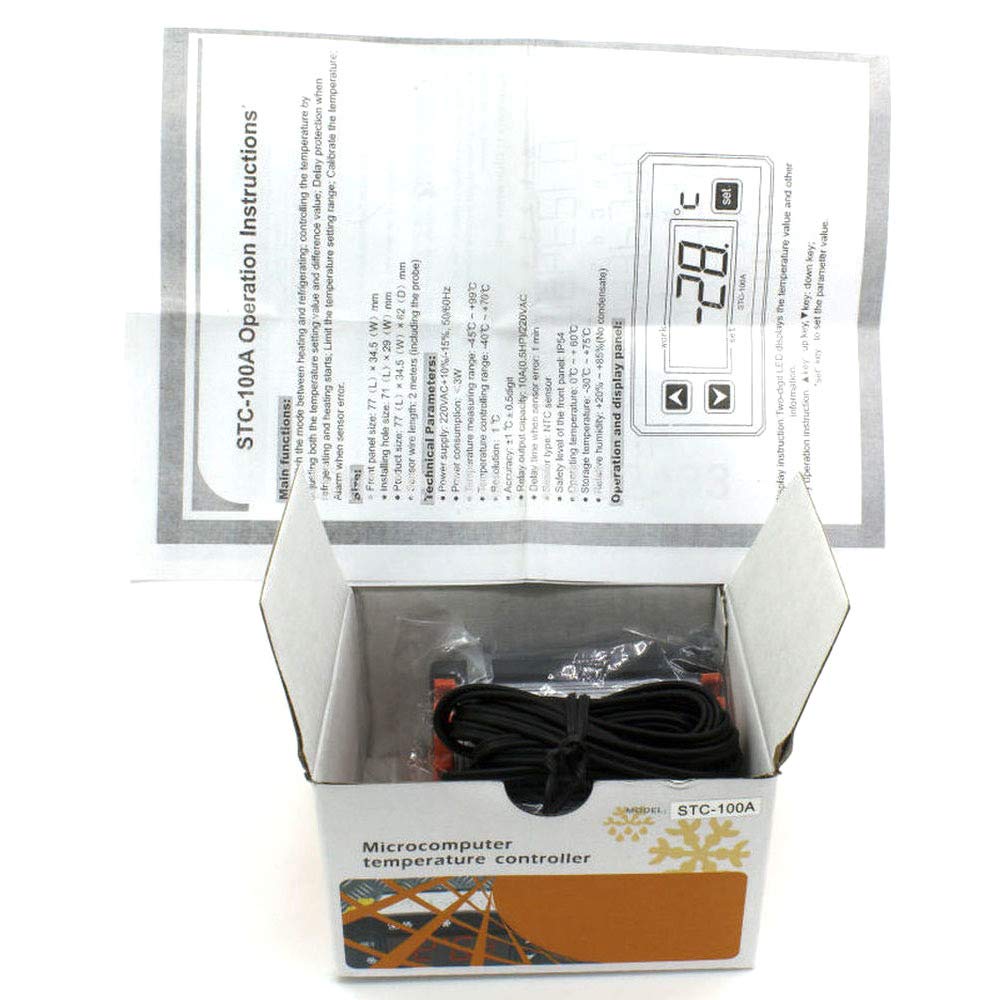
ภาพที่ 1.1: The STC-100A Temperature Controller shown in its retail packaging, with the instruction manual partially visible. The device itself is a compact unit with a digital display and control buttons.
2. ข้อมูลจำเพาะทางเทคนิค
| พารามิเตอร์ | ค่า |
|---|---|
| ขนาดแผงด้านหน้า | 77 (ย.) x 34.5 (ก.) มม. |
| Installing Hole Size | 71 (ย.) x 29 (ก.) มม. |
| ขนาดสินค้า | 77 (ย.) x 34.5 (ก.) x 62 (ล.) มม. |
| ความยาวสายเซนเซอร์ | 2 meters (including the probe) |
| แหล่งจ่ายไฟ | 220VAC +10% -15%, 50/60Hz |
| การใช้พลังงาน | <3วัตต์ |
| ช่วงวัดอุณหภูมิ | -45°C ถึง +99°C |
| ช่วงการควบคุมอุณหภูมิ | -40°C ถึง +70°C |
| ปณิธาน | 1 องศาเซลเซียส |
| ความแม่นยำ | ±1°C ±0.5 หลัก |
| ความจุเอาต์พุตรีเลย์ | 10A (0.5HP) / 220VAC |
| Delay Time When Sensor Error | 1 นาที |
| ประเภทเซนเซอร์ | เซ็นเซอร์กทช |
| Safety Level of Front Panel | IP54 |
| อุณหภูมิในการทำงาน | 0°C ถึง +60°C |
| อุณหภูมิในการจัดเก็บ | -30°C ถึง +75°C |
| ความชื้นสัมพัทธ์ | +20% to +85% (No condensate) |
3. แนวทางการติดตั้ง
Proper installation is crucial for the safe and effective operation of the STC-100A temperature controller. Ensure all electrical connections are made by a qualified professional if you are unsure.
3.1 การติดตั้งทางกายภาพ
- Prepare an opening in your control panel or enclosure with dimensions matching the 'Installing Hole Size' (71mm L x 29mm W).
- Insert the STC-100A controller into the prepared opening.
- Secure the controller using the provided mounting clips or screws to ensure it is firmly in place.
- Connect the NTC temperature sensor probe to the designated terminals on the controller. Ensure the sensor is placed in the area where temperature measurement is required. The sensor wire length is 2 meters.
3.2 เดินสายไฟฟ้า
คำเตือน: Disconnect power before performing any wiring to prevent electric shock. All wiring should comply with local electrical codes.
- Connect the power supply (220VAC, 50/60Hz) to the designated power input terminals on the controller.
- Connect your heating or refrigerating load (e.g., compressor, heater) to the relay output terminals. The relay output capacity is 10A (0.5HP) at 220VAC.
- Double-check all connections for tightness and correct polarity before applying power.
4. แผงควบคุมการทำงานและจอแสดงผล
The STC-100A features a two-digit LED display that shows the current temperature value and other operational information. Control is managed via three buttons located below the display.
ภาพที่ 4.1: The operational display panel of the STC-100A. It features a digital LED display for temperature readings and three tactile buttons for navigation and setting parameters: an 'up' arrow, a 'down' arrow, and a 'set' button.
4.1 ฟังก์ชันปุ่ม
- Up Key (▲): ใช้เพื่อเพิ่มค่าหรือเลื่อนขึ้นในเมนู
- Down Key (▼): ใช้สำหรับลดค่าหรือเลื่อนลงในเมนู
- Set Key (SET): Used to enter parameter setting mode, confirm selections, or save changes.
5. คู่มือการใช้งาน
5.1 เปิด/ปิดเครื่อง
The controller powers on automatically when connected to a suitable power supply. There is no dedicated power button.
5.2 Setting the Temperature Value
- กดปุ่ม ชุด key once. The display will flash, indicating that the temperature setting value can be adjusted.
- ใช้ ขึ้น (▲) or ลง (▼) keys to adjust the desired temperature set point.
- กดปุ่ม ชุด key again to confirm and save the new setting. The display will stop flashing and return to showing the current temperature.
5.3 Adjusting Advanced Parameters
To access and modify advanced parameters (e.g., difference value, delay protection, temperature calibration), refer to the detailed parameter list in the full manual. Typically, this involves pressing and holding the ชุด key for several seconds to enter the parameter menu, then using the ขึ้น (▲) และ ลง (▼) keys to navigate and adjust values, and ชุด เพื่อยืนยัน.
6. การบำรุงรักษา
การบำรุงรักษาอย่างสม่ำเสมอจะช่วยให้ตัวควบคุมอุณหภูมิของคุณมีอายุการใช้งานยาวนานและมีความแม่นยำ
- การทำความสะอาด: ควรเช็ดทำความสะอาดหน้าจอเป็นระยะ และ...asing with a soft, dry cloth. Do not use abrasive cleaners or solvents. Ensure no liquids enter the device.
- การดูแลเซ็นเซอร์: Ensure the temperature sensor probe is clean and free from debris. Avoid bending or damaging the sensor wire. If the sensor appears damaged or provides inconsistent readings, it may need replacement.
- สภาพแวดล้อม : Operate the controller within the specified operating temperature (0°C to +60°C) and relative humidity (+20% to +85%, non-condensing) to prevent damage.
7 การแก้ไขปัญหา
This section addresses common issues you might encounter with the STC-100A controller.
7.1 Sensor Error Alarm
- อาการ: The display shows an error code (e.g., 'E1' or similar, as indicated by 'Alarm when sensor error' in main functions).
- สาเหตุที่เป็นไปได้: The NTC sensor is disconnected, damaged, or faulty.
- สารละลาย: Check the sensor's connection to the controller. Ensure the wire is not cut or shorted. If the connection is secure and the error persists, replace the sensor. The delay time when sensor error is 1 minute before an alarm is triggered.
7.2 การอ่านค่าอุณหภูมิที่ไม่ถูกต้อง
- สาเหตุที่เป็นไปได้: Sensor misplacement, environmental interference, or calibration offset.
- สารละลาย: Ensure the sensor is correctly positioned to measure the desired temperature. Check for drafts or heat sources directly affecting the sensor. If necessary, use the temperature calibration function (refer to advanced parameters) to adjust the reading.
7.3 ตัวควบคุมไม่เปิดใช้งาน
- สาเหตุที่เป็นไปได้: ไม่มีแหล่งจ่ายไฟ, ปริมาตรไม่ถูกต้องtage. หรือสายไฟชำรุด
- สารละลาย: Verify that the 220VAC power supply is connected and active. Check all wiring connections for security and correctness. Ensure the voltage is within the specified range (220VAC +10% -15%).
8. ข้อมูลด้านความปลอดภัย
- Always disconnect power before installing, wiring, or performing maintenance on the controller.
- Ensure all wiring is done by a qualified person and complies with local electrical codes and regulations.
- Do not operate the device in environments exceeding its specified operating temperature or humidity ranges.
- The front panel has a safety level of IP54, providing protection against dust and splashing water, but it is not waterproof. Avoid direct exposure to water.
- อย่าพยายามซ่อมแซมอุปกรณ์ด้วยตนเอง โปรดติดต่อช่างผู้ชำนาญการ
9. การรับประกันและการสนับสนุน
For warranty information, please refer to the documentation provided at the time of purchase or contact your retailer. For technical support or further assistance with your GalaxyElec STC-100A Temperature Controller, please contact the manufacturer, GalaxyElec, or your authorized distributor.