
1. บทนำ
This manual provides comprehensive instructions for the setup, operation, maintenance, and troubleshooting of your Creality Ender 3 V3 KE 3D Printer. Please read this manual thoroughly before operating the printer to ensure safe and efficient use.

Figure 1: Creality Ender 3 V3 KE 3D Printer Overview.
2. คุณสมบัติหลัก
The Creality Ender 3 V3 KE 3D Printer is designed for high-speed, high-quality 3D printing with user-friendly features. Key features include:
- Faster Intuitive Printing Experience: Achieves print speeds up to 500mm/s with 8000mm/s² acceleration, significantly reducing print times. Features a responsive touch UI screen with real-time model preview and vivid motion graphics.
- "Sprite" Direct Extruder: Equipped with a 60W ceramic heater, bi-metal heatbreak, and copper nozzle, enabling printing temperatures up to 300°C. Supports a wide range of filaments including PLA, PETG, ABS, TPU, and ASA.
- Ultra-Smooth Motion and Stable Structure: Features a stiff steel linear rail on the X-axis with ball bearings for smooth, accurate, and steady movement. Rigid dual Z-axis lead screws reduce Z-wobbling, and the Y-axis uses two 8mm linear shafts for wear resistance.
- Upgraded Design with Smart Algorithms: Incorporates smart algorithms to mitigate printer vibrations, reducing ringing or ghosting. Optimizes feeding flow to minimize blobs and oozes. Dual cooling fans on the print head ensure rapid and even model cooling.
- Convenient Printing Methods: Supports CR Touch auto-leveling for precise first layer adhesion. Offers multiple printing methods including phone control, WiFi, and USB drive.

รูปที่ 2: การแสดงภาพคุณลักษณะสำคัญ

Figure 3: Core components and their functions.
วิดีโอ 1: จบview of main features and advantages of the Ender 3 V3 KE 3D printer.
3. คู่มือการติดตั้ง
The Creality Ender 3 V3 KE is designed for quick assembly, making it user-friendly even for beginners.
3.1 การแกะกล่องและการประกอบเบื้องต้น
Carefully remove all components from the packaging. Follow the included quick assembly guide for step-by-step instructions. Ensure all screws are tightened securely.
3.2 การเชื่อมต่อสายไฟ
ต่อสายไฟเข้ากับเครื่องพิมพ์และเต้ารับไฟฟ้าที่เหมาะสม ตรวจสอบให้แน่ใจว่าระดับเสียงtage switch (if present) is set correctly for your region (100-120V or 200-240V).
3.3 Auto-Leveling with CR Touch
The printer features CR Touch for automatic bed leveling. Power on the printer and navigate to the auto-leveling function on the touch screen UI. The printer will perform multi-point detection to accurately map the print surface, ensuring a perfect first layer without manual adjustments.
3.4 กำลังโหลดเส้นใย
The Ender 3 V3 KE supports automatic filament loading. Insert the filament into the extruder's input port. Follow the on-screen prompts or refer to the quick start guide for specific instructions on initiating the auto-loading process.

Figure 4: Getting started with quick assembly and auto-features.
4. คู่มือการใช้งาน
Operating your Ender 3 V3 KE is streamlined through its intuitive interface and multiple connectivity options.
4.1 การนำทางส่วนติดต่อผู้ใช้ (UI)
The printer features a 4.3-inch color touch screen UI. Navigate through menus using the intuitive tab bar. The UI provides real-time model preview and vivid motion graphics of printing parameters.

Figure 5: Smart UI for easy control.
4.2 Printing Methods
You can initiate prints using three primary methods:
- Phone Control: Utilize the Creality Cloud app on your smartphone for remote control and monitoring.
- WiFi (LAN Printing): Connect the printer to your local network for data-secure LAN printing.
- ยูเอสบีไดรฟ์: ถ่ายโอน G-code files to a USB drive and insert it into the printer's USB port for direct printing.

Figure 6: Multiple ways to initiate printing.
ซอฟต์แวร์แบ่ง 4.3 รายการ
Prepare your 3D models for printing using compatible slicing software such as Creality Print, Cura, or Simplify3D. These programs convert your 3D models (STL, OBJ, AMF) into G-code, which the printer understands.
4.4 การพิมพ์ความเร็วสูง
The Ender 3 V3 KE is capable of extraordinary printing speeds up to 500mm/s. For optimal results at high speeds, especially with Hyper PLA, ensure your filament is properly dried and the printer's settings are configured for speed.

Figure 7: Speed comparison of the Ender 3 V3 KE.
5. การบำรุงรักษา
การบำรุงรักษาตามปกติจะช่วยให้เครื่องพิมพ์ 3 มิติของคุณมีอายุการใช้งานยาวนานและมีประสิทธิภาพเหมาะสมที่สุด
5.1 การทำความสะอาดแผ่นสร้าง
The PEI flexible build plate is easy to adhere to and remove prints from. After each print, allow the plate to cool and gently flex it to pop off the print. Clean the surface with isopropyl alcohol to remove any residue and ensure good adhesion for subsequent prints.
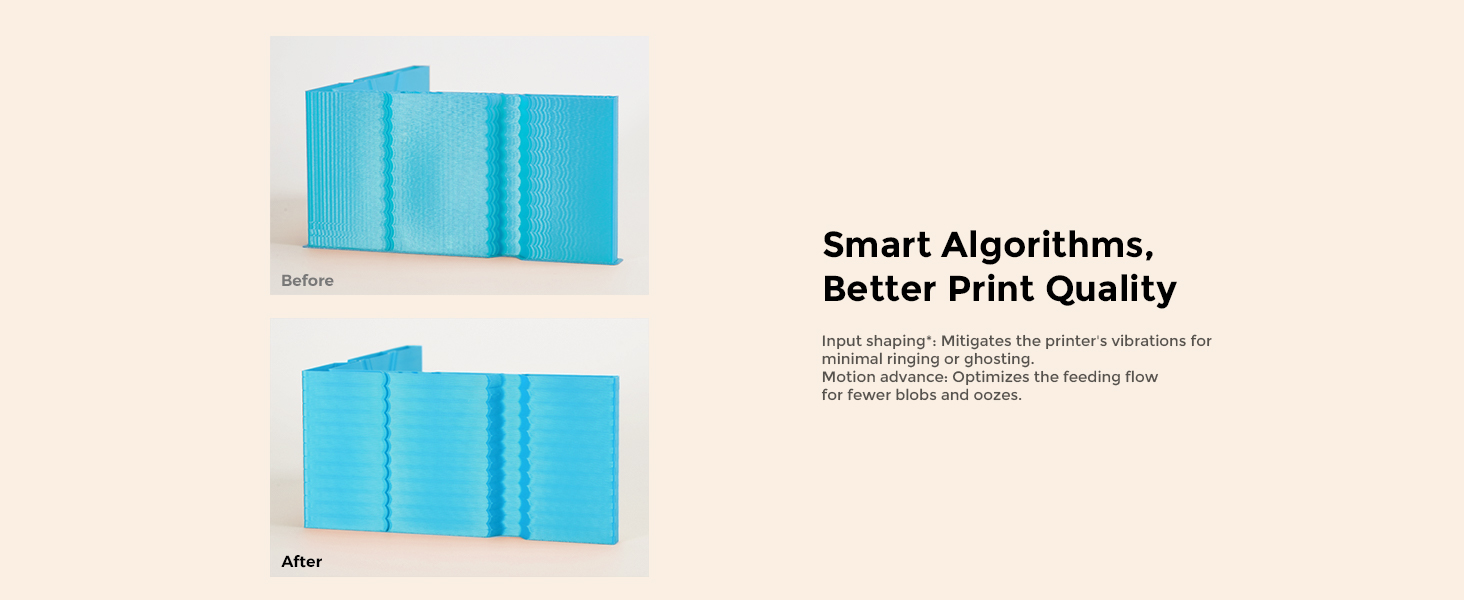
Figure 8: PEI Flexible Plate for easy print removal.
5.2 การดูแลรักษาเครื่องอัดรีดและหัวฉีด
The "Sprite" Direct Extruder is robust, but regular inspection of the nozzle for wear or clogs is recommended. The 60W ceramic heater and bi-metal heatbreak are designed for high temperatures, but ensure proper cooling after prints. The dual cooling fans on the print head help cool models rapidly and evenly; keep these fans free from dust and debris.

Figure 9: Dual fans for rapid model cooling.
5.3 Linear Rail and Lead Screw Lubrication
The X-axis linear rail and dual Z-axis lead screws are critical for smooth motion. Periodically inspect them for dust or filament debris. Apply a small amount of appropriate lubricant (e.g., lithium grease for lead screws, light machine oil for linear rails) as needed to maintain smooth operation and prevent wear.

Figure 10: X-axis linear rail for ultra-smooth motion.
6 การแก้ไขปัญหา
หัวข้อนี้จะกล่าวถึงปัญหาทั่วไปที่คุณอาจพบเจอและแนวทางแก้ไขที่อาจเกิดขึ้น
6.1 Print Quality Issues (Ringing, Ghosting, Blobs, Oozes)
The Ender 3 V3 KE features smart algorithms to improve print quality. If you observe issues like ringing (vibrations appearing as ripples), ghosting (faint duplicates of features), blobs (excess material), or oozes (unwanted filament leakage), ensure the printer's firmware is up to date. Verify that the "Input Shaping" and "Motion Advance" functions are enabled in the settings, as these are designed to mitigate such artifacts.

Figure 11: Improved print quality with smart algorithms.
6.2 Poor First Layer Adhesion
If prints are not sticking to the build plate:
- Re-run Auto-Leveling: Even with CR Touch, it's good practice to re-run the auto-leveling process if adhesion issues persist.
- ทำความสะอาดฐานพิมพ์: Ensure the PEI flexible plate is clean and free of grease or dust. Use isopropyl alcohol.
- Z-Offset Adjustment: Fine-tune the Z-offset if the nozzle is too far or too close to the bed. A slight adjustment can significantly improve adhesion.
- อุณหภูมิที่นอน: Verify the bed temperature is appropriate for the filament type being used.
6.3 Filament Not Extruding / Clogging
If filament is not coming out of the nozzle or is extruding inconsistently:
- Check for Clog: Heat the hotend to printing temperature and try to manually push filament through. If resistance is high, the nozzle might be clogged. Use a needle or cold pull method to clear it.
- Verify Extruder Gear: Ensure the extruder gear is clean and gripping the filament properly.
- เส้นทางของเส้นใย: Check for any kinks or obstructions in the filament path from the spool to the extruder.
- การตั้งค่าอุณหภูมิ: Confirm the hotend temperature is sufficient for the filament type.
7. ข้อมูลจำเพาะ
Detailed technical specifications for the Creality Ender 3 V3 KE 3D Printer:
| คุณสมบัติ | ข้อมูลจำเพาะ |
|---|---|
| ชื่อรุ่น | เอนเดอร์ 3 วี3 เคอี |
| สร้างปริมาณ | 220x220x240 มม. (8.66 x 8.66 x 9.44 นิ้ว) |
| ขนาดสินค้า | 17.32"D x 17.32"W x 18.31"H (433*366*490mm) |
| น้ำหนักสินค้า | 17.2 pounds (7.8kg Net Weight) |
| เครื่องอัดรีด | Upgraded 'Sprite' direct drive extrusion |
| โหมดปรับระดับ | Hands-free auto leveling (CR Touch) |
| หน้าจอแสดงผล | 4.3" color touch screen |
| เมนบอร์ด | 32-bit silent mainboard (Creality OS based on Klipper) |
| ความเร็วในการพิมพ์ทั่วไป | 300มม./วินาที |
| สูงสุด ความเร็วในการพิมพ์ | 500mm/s (with Hyper PLA) |
| อัตราเร่งสูงสุด | 8000มม./วินาที² |
| ความแม่นยำในการพิมพ์ | ±0.1มม. |
| ความสูงของชั้น | 0.1-0.35มม. |
| เส้นผ่านศูนย์กลางเส้นใย | 1.75มม. |
| เส้นผ่านศูนย์กลางหัวฉีด | 0.4mm (default) |
| อุณหภูมิหัวฉีด | ≤300° C |
| อุณหภูมิเตียงอุ่น | ≤100° C |
| พื้นผิวการสร้าง | PEI flexible build plate |
| เส้นใยที่รองรับ | PLA, PETG, ABS, TPU(95A), ASA |
| File โอนย้าย | USB Drive, LAN, Creality Cloud APP |
| ซอฟต์แวร์สไลซ์ | Creality Print, Cura, Simplify3D |
| พิมพ์ได้ File รูปแบบ | รหัส G |
| การกู้คืนการสูญเสียพลังงาน | ใช่ |
| เซ็นเซอร์ตรวจจับการหมดของเส้นใย | ใช่ |
| Vibration Compensation Sensor | ไม่จำเป็น |
| ภาษา UI | English, Español, Deutsche, Français, Русский, Português, Italiano, Türk, 日本語, 中文 |
| จัดอันดับVoltage | 100-120V~, 200-240V~ 50/60Hz |
| กำลังไฟที่กำหนด | 350W (On-mode power consumption: 60.0 watts) |

รูปที่ 12: ตารางข้อมูลจำเพาะโดยละเอียด
8. การรับประกันและการสนับสนุน
Comgrow, as the first seller of Creality 3D on Amazon, is committed to providing high-quality products and excellent after-sales service. For any technical assistance, warranty claims, or support inquiries, please contact Comgrow's technical staff. They have over 20 technical staff dedicated to providing professional support to all customers.
For further information and resources, please visit the official Comgrow store: Comgrow Store on Amazon.