
1. บทนำ
The MASTECH MS8260E is a versatile 2000-count digital multimeter designed for a wide range of electrical and electronic measurements. It features a large LCD display, non-contact voltagการตรวจจับ e (NCV) และความสามารถในการวัดปริมาตร AC/DCtage, AC/DC current, resistance, capacitance, and inductance. This manual provides essential information for the safe and effective operation, maintenance, and troubleshooting of your device.
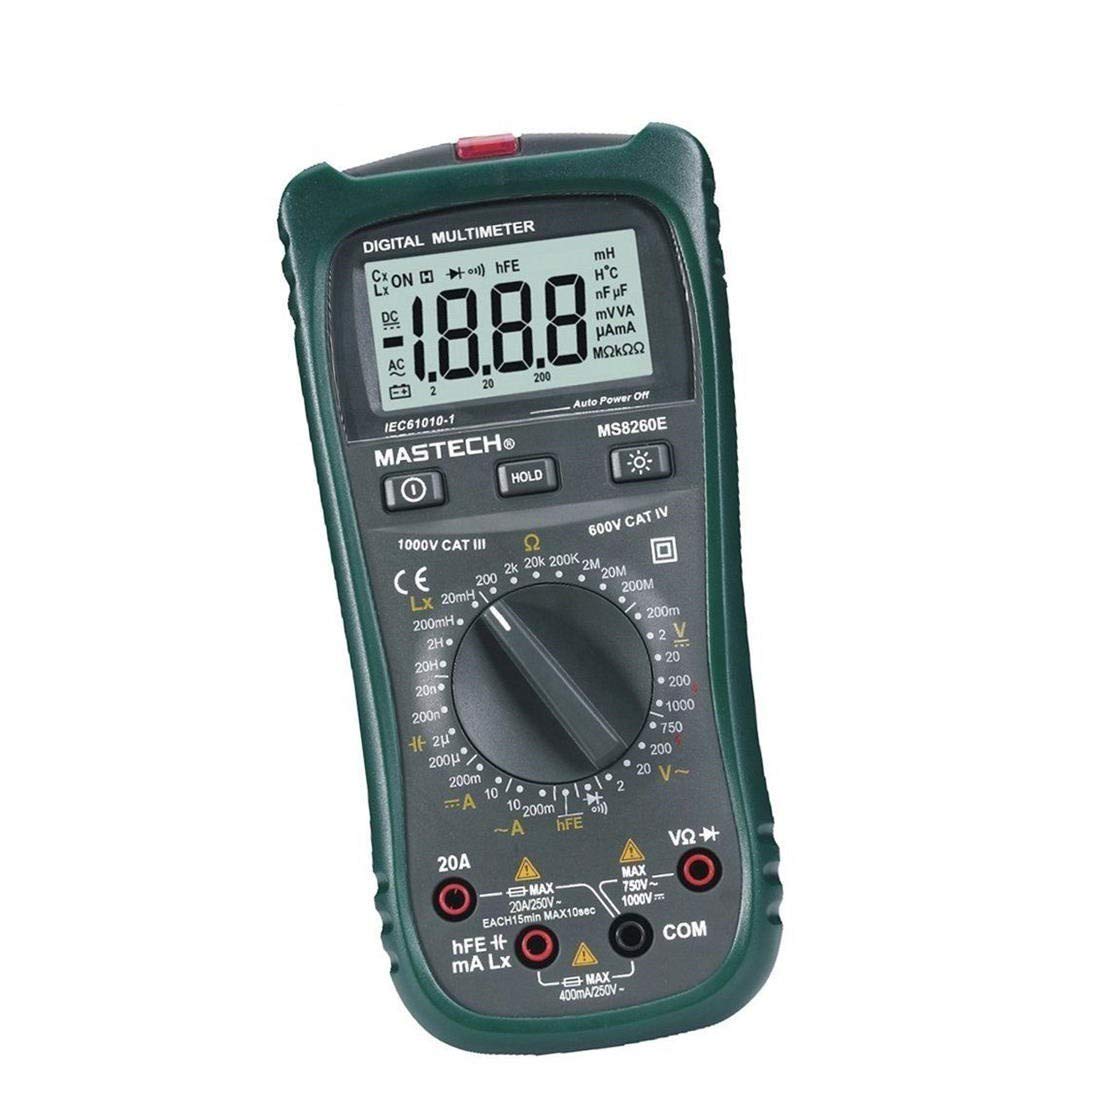
รูปที่ 1 : ด้านหน้า view of the MASTECH MS8260E Digital Multimeter, showing the LCD display, function rotary switch, and input jacks.
2. ข้อมูลด้านความปลอดภัย
To ensure safe operation and service of the meter, follow these safety guidelines:
- Read and understand all instructions in this manual before using the meter.
- ปฏิบัติตามรหัสความปลอดภัยระดับท้องถิ่นและระดับประเทศเสมอ
- ห้ามใช้มิเตอร์หากพบว่าชำรุดเสียหาย หรือฉนวนหุ้มสายวัดมีสภาพไม่ดี
- Observe the input limits for each measurement range to prevent electrical shock or damage to the meter. This meter is rated for CAT.IV 600V.
- ใช้ความระมัดระวังเมื่อทำงานกับ voltages สูงกว่า 30V AC RMS, 42V peak หรือ 60V DC ปริมาตรเหล่านี้tagอาจทำให้เกิดอันตรายจากการช็อตได้
- ควรตัดกระแสไฟออกจากวงจรและปล่อยประจุไฟฟ้าแรงดันสูงทั้งหมดtagตรวจสอบตัวเก็บประจุอย่างละเอียดก่อนทำการวัดความต้านทาน ความต่อเนื่อง ไดโอด หรือความจุ
- ควรเปลี่ยนแบตเตอรี่ทันทีเมื่อไฟแสดงสถานะแบตเตอรี่ต่ำปรากฏขึ้น เพื่อให้ได้ค่าการวัดที่แม่นยำ
- ห้ามใช้งานมิเตอร์ในบริเวณที่มีก๊าซ ไอระเหย หรือฝุ่นละอองที่อาจก่อให้เกิดการระเบิดได้
3. สินค้าหมดview
The MS8260E multimeter is equipped with several features to facilitate accurate and convenient measurements:
- Large 2000 Counts LCD Display: Provides clear digital readings.
- โวลุ่มแบบไม่สัมผัสในตัวtagเครื่องตรวจจับ e (NCV): ตรวจจับปริมาณ ACtage greater than 110V without physical contact, indicated by a flash warning.
- ฟังก์ชั่นการเก็บข้อมูล: หยุดภาพหน้าจอขณะอ่านค่า เพื่อให้บันทึกได้ง่าย
- จอแสดงผลแบ็คไลท์: Improves visibility in dimly lit conditions.
- ปิดเครื่องอัตโนมัติ: ช่วยประหยัดแบตเตอรี่โดยการปิดมิเตอร์โดยอัตโนมัติหลังจากไม่มีการใช้งานเป็นระยะเวลาหนึ่ง
- สัญญาณเตือนแบตเตอรี่ต่ำ: Alerts the user when the battery needs replacement.
- บ่งชี้ขั้ว: Automatically displays negative polarity.
- 30-Range Rotary Switch: Selects various measurement functions including AC/DC voltage, AC/DC current, resistance, capacitance, inductance, diode check, continuity test, and transistor (hFE) check.
4. การตั้งค่า
4.1 การติดตั้งแบตเตอรี่
The MS8260E requires one 9V battery (NEDA 1604/6F22). To install or replace the battery:
- Ensure the meter is turned off and disconnect all test leads from the input terminals.
- ค้นหาฝาครอบช่องใส่แบตเตอรี่ที่ด้านหลังของมิเตอร์
- คลายสกรูยึดออก แล้วถอดฝาครอบออก
- Insert the 9V battery, observing the correct polarity.
- ปิดฝาช่องใส่แบตเตอรี่และขันสกรูให้แน่น
4.2 การเชื่อมต่อสายทดสอบ
Always connect the black test lead to the "COM" (common) input jack. Connect the red test lead to the appropriate input jack based on the desired measurement:
- สำหรับฉบับที่tage, Resistance, Capacitance, Inductance, Diode, Continuity, and hFE measurements: Connect the red lead to the "VΩCAPHz" jack.
- For Current measurements up to 200mA: Connect the red lead to the "mA" jack.
- For Current measurements up to 10A: Connect the red lead to the "10A" jack.
Ensure test leads are fully inserted into the jacks before taking measurements.
5. คู่มือการใช้งาน
Turn the rotary switch to the desired function. The meter will display "OL" (Overload) if no input is present or if the input exceeds the range.
5.1 DC ฉบับที่tagอี การวัด (DCV)
- Set the rotary switch to the desired DCV range (200mV, 2V, 20V, 200V, 1000V).
- Connect the black test lead to the "COM" jack and the red test lead to the "VΩCAPHz" jack.
- ต่อสายวัดทดสอบเข้ากับชิ้นส่วนหรือวงจรที่ต้องการวัด โดยสังเกตขั้วให้ถูกต้อง
- อ่านเล่มที่tagค่า e บนจอ LCD
5.2 AC โวลtagการวัดแบบ ACV
- Set the rotary switch to the desired ACV range (2V, 20V, 200V, 750V).
- Connect the black test lead to the "COM" jack and the red test lead to the "VΩCAPHz" jack.
- เชื่อมต่อสายทดสอบเข้ากับขั้วไฟ ACtagแหล่งที่มา
- อ่านเล่มที่tagค่า e บนจอ LCD
5.3 การวัดกระแสไฟฟ้ากระแสตรง (DCA)
- Set the rotary switch to the desired DCA range (200mA, 10A).
- For measurements up to 200mA, connect the red lead to the "mA" jack. For measurements up to 10A, connect the red lead to the "10A" jack. The black lead connects to "COM".
- เปิดวงจรที่ต้องการวัดกระแสไฟฟ้า และต่อมิเตอร์อนุกรมกับโหลด
- อ่านค่าปัจจุบันบนจอ LCD
5.4 การวัดกระแสไฟฟ้าสลับ (ACA)
- Set the rotary switch to the desired ACA range (200mA, 10A).
- For measurements up to 200mA, connect the red lead to the "mA" jack. For measurements up to 10A, connect the red lead to the "10A" jack. The black lead connects to "COM".
- เปิดวงจรที่ต้องการวัดกระแสไฟฟ้า และต่อมิเตอร์อนุกรมกับโหลด
- อ่านค่าปัจจุบันบนจอ LCD
5.5 การวัดค่าความต้านทาน (โอห์ม)
- Set the rotary switch to the desired Ω range (200Ω, 2kΩ, 20kΩ, 200kΩ, 2MΩ, 20MΩ, 200MΩ).
- Connect the black test lead to "COM" and the red test lead to "VΩCAPHz".
- ตรวจสอบให้แน่ใจว่าวงจรไม่มีพลังงานและตัวเก็บประจุทั้งหมดถูกปล่อยประจุแล้ว
- ต่อสายวัดทดสอบเข้ากับตัวต้านทานหรือชิ้นส่วนอิเล็กทรอนิกส์
- อ่านค่าความต้านทานบนจอ LCD
5.6 Capacitance Measurement (CAP)
- Set the rotary switch to the desired CAP range (20nF, 200nF, 2uF, 200uF).
- Connect the black test lead to "COM" and the red test lead to "VΩCAPHz".
- ตรวจสอบให้แน่ใจว่าตัวเก็บประจุถูกปล่อยประจุจนหมดก่อนที่จะเชื่อมต่อสายทดสอบ
- เชื่อมต่อสายทดสอบข้ามตัวเก็บประจุ
- อ่านค่าความจุบนจอ LCD
5.7 Inductance Measurement (L)
- Set the rotary switch to the desired Inductance range (20mH, 200mH, 2H, 20H).
- Connect the black test lead to "COM" and the red test lead to "VΩCAPHz".
- Connect the test leads across the inductor.
- Read the inductance value on the LCD display.
5.8 การทดสอบไดโอด
- ตั้งสวิตช์หมุนไปที่สัญลักษณ์ไดโอด
- Connect the black test lead to "COM" and the red test lead to "VΩCAPHz".
- ต่อสายสีแดงเข้ากับขั้วบวกและสายสีดำเข้ากับขั้วลบของไดโอด แรงดันไฟฟ้าไปข้างหน้าtagค่าแรงดันตกคร่อม (โดยทั่วไปอยู่ที่ 0.5V ถึง 0.8V สำหรับไดโอดซิลิคอน) จะถูกแสดงขึ้น
- Reverse the leads. The display should show "OL" for a good diode.
5.9 การทดสอบความต่อเนื่อง
- ตั้งสวิตช์หมุนไปที่สัญลักษณ์ความต่อเนื่อง
- Connect the black test lead to "COM" and the red test lead to "VΩCAPHz".
- เชื่อมต่อสายทดสอบข้ามวงจรหรือส่วนประกอบ
- ถ้าค่าความต้านทานต่ำกว่าประมาณ 30 โอห์ม เสียงกริ่งจะดังขึ้น ซึ่งแสดงว่ามีการเชื่อมต่อกัน
5.10 การทดสอบทรานซิสเตอร์ (hFE)
- ตั้งสวิตช์หมุนไปที่ตำแหน่ง hFE
- Identify the type (NPN or PNP) and pinout (Emitter, Base, Collector) of the transistor.
- Insert the transistor leads into the corresponding sockets in the hFE test socket on the meter.
- อ่านค่า hFE (อัตราขยายกระแสตรง) บนหน้าจอ LCD
5.11 ไม่สัมผัส Voltagการตรวจจับ e (NCV)
- ตั้งสวิตช์แบบหมุนไปที่ตำแหน่ง NCV
- Hold the top front part of the meter near the AC voltagแหล่งจ่ายไฟ (เช่น ปลั๊กไฟหรือสายไฟหุ้มฉนวน)
- ถ้า AC voltage greater than 110V is detected, the NCV indicator light will flash, and the buzzer may sound.
6. การบำรุงรักษา
6.1 การทำความสะอาด
เช็ดมิเตอร์ด้วยโฆษณาamp cloth and a mild detergent. Do not use abrasives or solvents. Ensure the meter is dry before use.
6.2 การเปลี่ยนแบตเตอรี่
When the "BAT" symbol appears on the display, the battery needs to be replaced. Refer to Section 4.1 for battery installation instructions.
6.3 การเปลี่ยนฟิวส์
If the current measurement function fails, the fuse may need replacement. This operation should only be performed by qualified personnel. Refer to the service manual or contact customer support for fuse specifications and replacement procedures.
6.4 พื้นที่จัดเก็บ
If the meter is not to be used for an extended period, remove the battery to prevent leakage and damage to the meter. Store the meter in a cool, dry place away from direct sunlight.
7 การแก้ไขปัญหา
| ปัญหา | สาเหตุที่เป็นไปได้ | สารละลาย |
|---|---|---|
| ไม่มีการแสดงผลหรือแสดงผลจางมาก | Low battery; Meter off | Replace battery; Turn on meter |
| แสดง "OL" | Input exceeds range; Open circuit (for resistance/continuity) | Select higher range; Check circuit connection |
| การอ่านไม่ถูกต้อง | Low battery; Incorrect range selected; Poor test lead contact | Replace battery; Select appropriate range; Ensure good contact |
| การวัดกระแสไฟฟ้าไม่ทำงาน | ฟิวส์ขาด | Replace fuse (by qualified personnel) |
8. ข้อมูลจำเพาะ
| ฟังก์ชันการวัด | พิสัย | ความแม่นยำ |
|---|---|---|
| DC ฉบับที่tagอี (DCV) | 200mV, 2V, 20V, 200V, 1000V | ±0.5% (200mV-200V), ±0.8% (1000V) |
| ฉบับ ACtagอี (ACV) | 2 โวลต์ 20 โวลต์ 200 โวลต์ 750 โวลต์ | ±0.8% (2V-200V), ±1.2% (750V) |
| กระแสไฟฟ้ากระแสตรง (DCA) | 200mA, 10A | ±1.5% (200mA), ±2.0% (10A) |
| กระแสไฟฟ้ากระแสสลับ (ACA) | 200mA, 10A | ±1.8% (200mA), ±3.0% (10A) |
| ความต้านทาน (Ω) | 200Ω, 2kΩ, 20kΩ, 200kΩ, 2MΩ, 20MΩ, 200MΩ | ±0.8% (200Ω-2MΩ), ±1.0% (20MΩ), ±5.0% (200MΩ) |
| ความจุ (CAP) | 20nF, 200nF, 2uF, 200uF | ±4.0% (20nF-2uF), ±5.0% (200uF) |
| ความเหนี่ยวนำ (L) | 20mH, 200mH, 2H, 20H | ±3.0% |
| ความต่อเนื่องของเสียง | Buzzer sounds at <30Ω | ไม่มีข้อมูล |
| การทดสอบ Diode | 1mA, 2.8V | ไม่มีข้อมูล |
| ทรานซิสเตอร์ (hFE) | 0 - 1,000 | ไม่มีข้อมูล |
ข้อมูลจำเพาะทั่วไป:
- แสดง: 2000 นับ LCD
- ระดับความปลอดภัย: CAT.IV 600V
- พลัง: 9V battery (NEDA 1604/6F22)
- น้ำหนัก: Approximately 1 kg (including battery)
9. การรับประกันและการสนับสนุน
For warranty information, technical support, or service inquiries, please refer to the warranty card included with your product or visit the official Mastech website. Do not attempt to repair the meter yourself, as this may void the warranty and pose safety risks.