การแนะนำ
This manual provides essential information for the safe and efficient operation, maintenance, and troubleshooting of your Sealey SAC5020A 50L Direct Drive Air Compressor. The compressor features an aluminium cylinder head with a cast iron cylinder for enhanced wear resistance, making it suitable for general-purpose workshop applications. Its pump head is directly coupled to a heavy-duty induction motor, ensuring reliable and quiet operation. The precision-welded receiver tank complies with the Pressure Vessel Directive. It is equipped with a fully automatic pressure cut-out switch and twin gauges to display both tank and working pressures. The unit is supplied with a 3-pin plug.
ข้อมูลด้านความปลอดภัย
โปรดปฏิบัติตามข้อควรระวังด้านความปลอดภัยต่อไปนี้เสมอ เพื่อป้องกันการบาดเจ็บส่วนบุคคลหรือความเสียหายต่ออุปกรณ์:
- อ่านและทำความเข้าใจคำแนะนำทั้งหมดก่อนใช้งานคอมเพรสเซอร์
- Ensure the compressor is placed on a level, stable surface in a well-ventilated area.
- สวมใส่อุปกรณ์ป้องกันส่วนบุคคล (PPE) ที่เหมาะสม รวมถึงอุปกรณ์ป้องกันดวงตาและอุปกรณ์ป้องกันการได้ยิน
- ห้ามใช้งานคอมเพรสเซอร์ในที่มืดamp หรือในสภาพเปียกชื้น หรือในบริเวณที่มีของเหลวหรือก๊าซไวไฟ
- Always disconnect the compressor from the power supply before performing any maintenance or adjustments.
- ห้ามเป่าลมแรงดันสูงใส่คนหรือสัตว์เด็ดขาด
- Regularly inspect the air tank for signs of corrosion or damage. Do not use a damaged tank.
- ตรวจสอบให้แน่ใจว่าการเชื่อมต่อทั้งหมดแน่นหนาและไม่มีการรั่วซึมก่อนเริ่มใช้งาน
- Do not modify the compressor or its safety devices.
การแกะกล่องและการตั้งค่า
Carefully remove the compressor from its packaging. Inspect the unit for any signs of shipping damage. If damage is found, contact your supplier immediately.
Component Identification and Dimensions

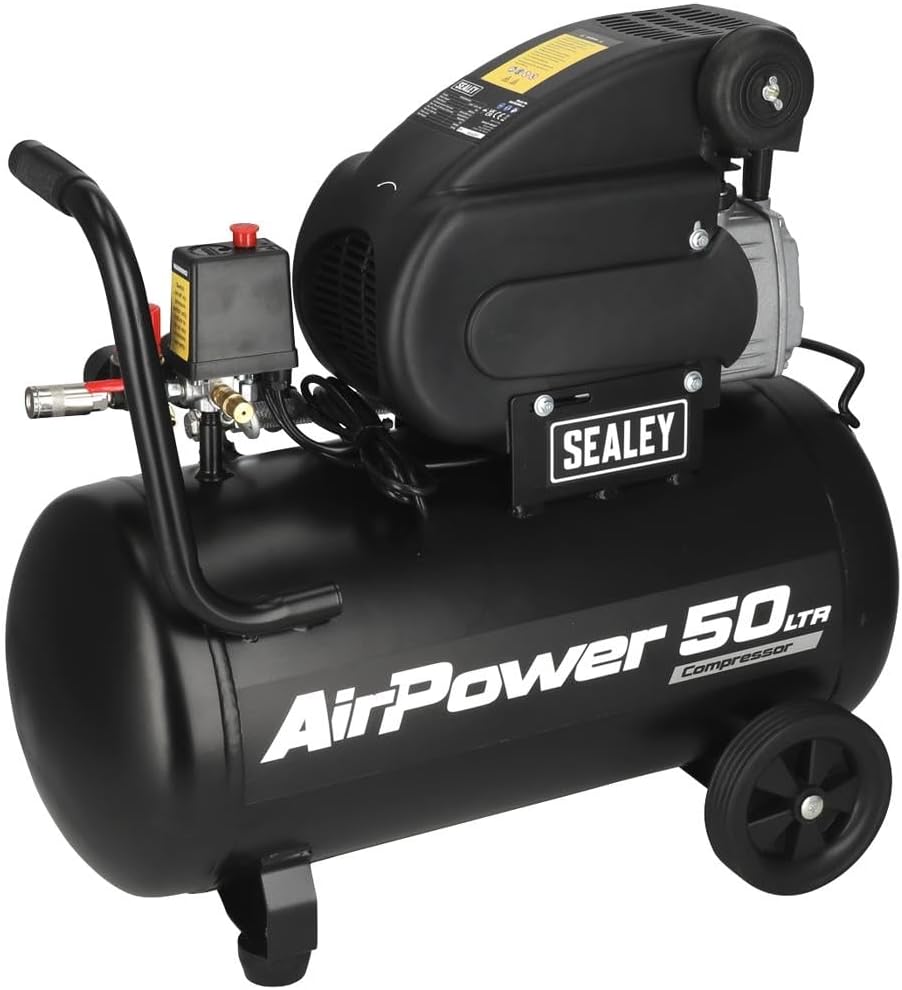
รูปที่ 1: Overall dimensions of the Sealey SAC5020A 50L Direct Drive Air Compressor. The image shows the compressor with its tank, motor, handle, wheels, and control panel, indicating a width of 705mm, a height of 600mm, and a depth of 300mm.
Familiarize yourself with the main components of your compressor. Refer to Figure 1 for an overview of the unit's dimensions and general layout.
การประกอบ
- ติดล้อ: Securely attach the wheels to the compressor base using the provided hardware.
- แนบที่จับ: Mount the transport handle to the designated points on the compressor body.
- การวางตำแหน่ง: Place the compressor on a firm, level surface. Ensure there is adequate space around the unit for ventilation.
การเชื่อมต่อไฟฟ้า
Connect the compressor to a suitable grounded power outlet. Ensure the power supply matches the voltage and frequency specifications of the compressor (typically 230V, 50Hz for this model). The unit is fitted with a 3-pin plug.
Initial Run-in Procedure
Before first use, or after extended storage, perform a brief run-in:
- Open the air outlet valve completely to allow air to escape freely.
- Switch on the compressor and let it run for approximately 15-20 minutes without building pressure. This helps to lubricate internal components.
- Switch off the compressor and close the air outlet valve.
คำแนะนำการใช้งาน
Controls and Gauges

รูปที่ 2: ภาพระยะใกล้ view of the twin pressure gauges. One gauge displays the tank pressure, and the other displays the regulated working pressure.
รูปที่ 3: The pressure cut-out switch (black box with yellow warning label) and the red pressure regulator knob, along with the quick-connect air outlet.
- สวิตซ์แรงดัน: The black box (Figure 3) automatically turns the compressor on and off to maintain tank pressure.
- เกจวัดแรงดันถัง: Displays the current pressure inside the air tank (Figure 2).
- Working Pressure Gauge: Displays the pressure of the air being supplied to your tools, adjustable via the regulator (Figure 2).
- เครื่องควบคุมความดัน: The red knob (Figure 3) allows you to adjust the working pressure. Turn clockwise to increase pressure, counter-clockwise to decrease.
- Quick-Connect Air Outlet: For attaching air hoses and tools (Figure 3).
การสตาร์ทคอมเพรสเซอร์
- ตรวจสอบให้แน่ใจว่าวาล์วระบายน้ำที่ด้านล่างของถังปิดสนิทแล้ว
- Plug the compressor into a suitable power outlet.
- Turn the main power switch to the "ON" position. The compressor will start to build pressure.
- Once the tank reaches its maximum pressure, the compressor will automatically shut off.
Connecting and Using Air Tools
- Connect your air hose to the quick-connect air outlet.
- Attach your air tool to the other end of the hose.
- Adjust the working pressure using the red regulator knob to suit the requirements of your air tool. Monitor the working pressure gauge.
- Begin using your air tool. The compressor will cycle on and off automatically to maintain pressure as needed.
การปิดระบบ
- หมุนสวิตช์ไฟหลักไปที่ตำแหน่ง "ปิด"
- ถอดสายลมและอุปกรณ์ออก
- ค่อยๆ เปิดวาล์วระบายน้ำที่ด้านล่างของถังเพื่อระบายความชื้นและแรงดันอากาศที่เหลืออยู่ ปิดวาล์วเมื่อถังว่างเปล่าแล้ว
การซ่อมบำรุง
การบำรุงรักษาอย่างสม่ำเสมอจะช่วยให้เครื่องอัดอากาศของคุณมีอายุการใช้งานยาวนานและทำงานได้อย่างปลอดภัย
ทุกวัน/หลังการใช้แต่ละครั้ง
- ระบายน้ำควบแน่น: After each use, or daily if used frequently, open the drain valve at the bottom of the air tank to release accumulated moisture. This prevents rust and corrosion inside the tank.
Weekly/Monthly
- ตรวจสอบตัวกรองอากาศ: Check the air filter for dirt and debris. Clean or replace if necessary to ensure proper airflow to the pump.
- ตรวจสอบการรั่วไหล: Listen for any air leaks around fittings, hoses, and valves. Tighten connections as needed. A soapy water solution can help identify small leaks.
- ตรวจสอบท่อและข้อต่อ: Examine air hoses for cracks, cuts, or wear. Replace damaged hoses immediately. Ensure all quick-connect fittings are functioning correctly.
- ตรวจสอบสายไฟ: Check the power cord for any damage, fraying, or exposed wires.
เป็นประจำทุกปี
- การตรวจสอบถัง: Visually inspect the air tank for any signs of external corrosion, dents, or damage. If any damage is found, do not use the compressor and seek professional inspection.
- การตรวจสอบวาล์วนิรภัย: Briefly pull the ring on the safety relief valve to ensure it operates freely and reseats properly.
For any maintenance beyond these basic steps, it is recommended to consult a qualified service technician.
การแก้ไขปัญหา
หัวข้อนี้จะให้แนวทางแก้ไขปัญหาทั่วไปที่คุณอาจพบกับเครื่องอัดอากาศของคุณ
| ปัญหา | สาเหตุที่เป็นไปได้ | สารละลาย |
|---|---|---|
| คอมเพรสเซอร์ไม่เริ่มทำงาน |
|
|
| คอมเพรสเซอร์ทำงานอย่างต่อเนื่องหรือเป็นรอบบ่อยเกินไป |
|
|
| แรงดันอากาศที่ช่องระบายอากาศต่ำ |
|
|
| เสียงรบกวนหรือการสั่นสะเทือนมากเกินไป |
|
|
ข้อมูลจำเพาะ
| คุณสมบัติ | รายละเอียด |
|---|---|
| ยี่ห้อ | ซีลีย์ |
| หมายเลขรุ่น | SAC5020A |
| แหล่งพลังงาน | AC |
| พลังสูงสุด | 2 แรงม้า |
| แรงม้ามอเตอร์ | 2 แรงม้า |
| ปริมาตรถัง | 50 ลิตร |
| ความจุการไหลของอากาศ | 6.8 ลูกบาศก์ฟุตต่อนาที (CFM) |
| น้ำหนักสินค้า | 32980 Grams (approx. 33 kg) |
| คุณสมบัติพิเศษ | การทำงานแบบเงียบ |
| ส่วนประกอบที่รวมอยู่ | 50ltr Direct Drive Compressor 2hp |
| การใช้ที่แนะนำ | Bolting, Drilling, Spraying, Sanding, Grinding, Tire Inflation |
ข้อมูลการรับประกัน
This Sealey product is covered by a manufacturer's warranty against defects in materials and workmanship. The specific terms and duration of the warranty may vary by region and purchase date. Please retain your proof of purchase for warranty claims.
For detailed warranty information, please refer to the warranty card included with your product or visit the official Sealey webเว็บไซต์.
การสนับสนุนและการติดต่อ
Should you require technical assistance, spare parts, or have any questions regarding your Sealey SAC5020A air compressor, please contact Sealey customer support or your authorized dealer.
ซีลีย์ อย่างเป็นทางการ Webเว็บไซต์: www.sealey.co.uk
Please have your model number (SAC5020A) and serial number (if applicable) ready when contacting support.