1. บทนำ
The PROEL MQ6 is a compact 6-channel mixer designed for various sound reinforcement applications. It offers a high input density, essential features, and superior audio quality in a durable, ultra-rugged case. This manual provides detailed instructions for the proper setup, operation, and maintenance of your MQ6 mixer.
2. ข้อมูลด้านความปลอดภัย
- แหล่งจ่ายไฟ: ใช้เฉพาะอะแดปเตอร์ไฟฟ้าที่ระบุเท่านั้น ตรวจสอบให้แน่ใจว่าระดับเสียงtage ตรงกับแหล่งจ่ายไฟในพื้นที่ของคุณ
- ความชื้น: Do not expose the unit to rain or moisture. Avoid placing liquids near the mixer.
- การระบายอากาศ : ตรวจสอบให้แน่ใจว่ามีการระบายอากาศที่เพียงพอ อย่าปิดกั้นช่องระบายอากาศ
- ความร้อน: เก็บเครื่องให้ห่างจากแหล่งความร้อน เช่น หม้อน้ำ เครื่องทำความร้อน เตา หรืออุปกรณ์อื่นๆ ที่ผลิตความร้อน
- การบริการ: อย่าพยายามให้บริการผลิตภัณฑ์นี้ด้วยตนเอง ส่งต่อการบริการทั้งหมดไปยังช่างบริการที่ผ่านการรับรอง
- สาย: ปกป้องสายไฟไม่ให้ถูกเหยียบหรือถูกหนีบ โดยเฉพาะที่ปลั๊ก เต้ารับไฟฟ้า และจุดที่สายไฟออกจากเครื่อง
- การทำความสะอาด: ทำความสะอาดด้วยผ้าแห้งเท่านั้น
3. สินค้าหมดview
The PROEL MQ6 is a 6-channel compact mixer featuring 2 mono MIC/LINE inputs, 2 stereo LINE inputs, 3-band EQ on mono channels, 2-band EQ on stereo channels, and electronically balanced main outputs.

รูปที่ 3.1: ด้านบน view of the PROEL MQ6 Compact 6-Channel Mixer, showing all controls and inputs.

รูปที่ 3.2: มุม view of the PROEL MQ6 mixer, highlighting the compact design and control layout.
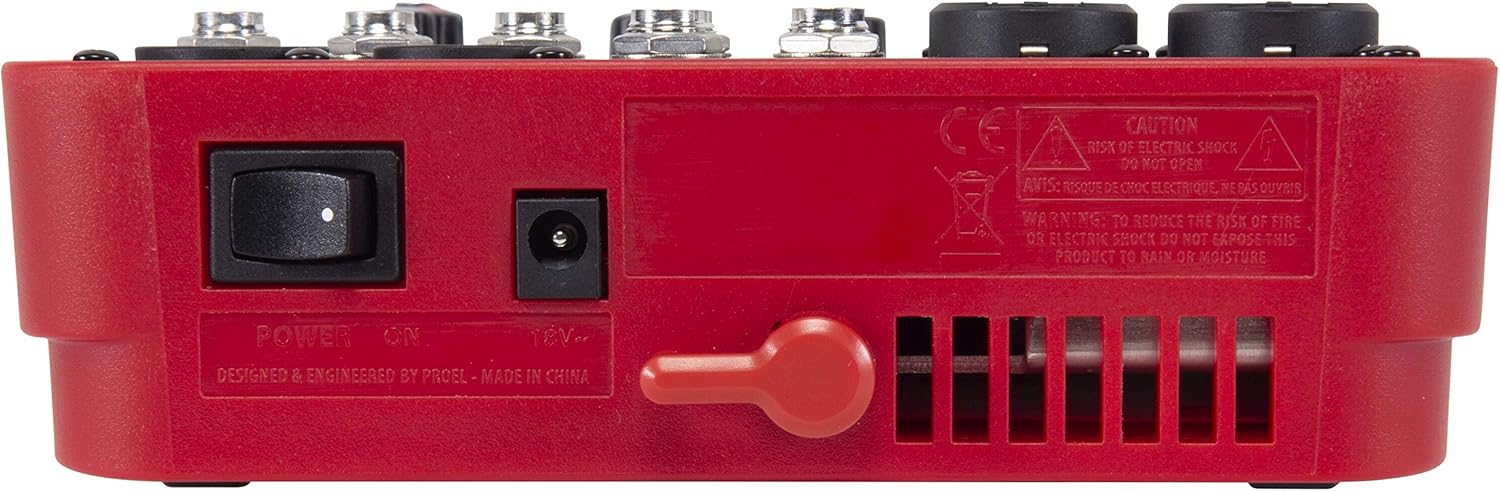
รูปที่ 3.3: ด้านหลัง view of the PROEL MQ6 mixer, showing the power switch and DC input.
คุณสมบัติผลิตภัณฑ์:
- 2 Mono MIC/LINE inputs with XLR/TRS combo jacks.
- 2 Stereo LINE inputs (3/4, 5/6) with TRS jacks.
- 3-Band EQ on mono channels for precise tone shaping.
- 2-Band EQ on stereo channels.
- Low-noise, high-headroom microphone preamps.
- Electronically balanced XLR MAIN MIX outputs.
- Phantom Power (+48V) for condenser microphones.
- Headphone output with dedicated level control.
PROEL MQ Series Overview วีดีโอ
วิดีโอนี้มีเนื้อหาเกี่ยวกับview of the PROEL MQ Series compact mixers. Please note that some features shown, such as digital effects, compressors, and USB connectivity, are available on other models within the MQ series (e.g., MQ6FX, MQ12USB, MQ16USB) and not on the MQ6 model specifically.
4. การตั้งค่า
4.1 การแกะบรรจุภัณฑ์และการตรวจสอบ
Carefully unpack the mixer and check for any signs of damage. Ensure all components listed in the packaging are present. If any items are missing or damaged, contact your dealer immediately.
4.2 การเชื่อมต่อสายไฟ
- ตรวจสอบให้แน่ใจว่าสวิตช์เปิดปิดของเครื่องผสมอาหารอยู่ในตำแหน่งปิด
- Connect the provided power adapter to the DC input jack on the rear of the mixer.
- เสียบอะแดปเตอร์ไฟฟ้าเข้ากับเต้ารับไฟฟ้า AC ที่เหมาะสม
4.3 การเชื่อมต่ออินพุต
The MQ6 features two types of input channels:
- Mono MIC/LINE Inputs (Channels 1-2): Use XLR cables for microphones or 1/4" TRS cables for line-level instruments (e.g., keyboards, guitars with preampส).
- Stereo LINE Inputs (Channels 3/4, 5/6): Use 1/4" TRS cables for stereo line-level sources. If connecting a mono source, use the L/MONO input.
4.4 การเชื่อมต่อเอาท์พุต
- MAIN MIX Outputs: เชื่อมต่อลำโพงหลักหรือแหล่งจ่ายไฟของคุณ amplifier to the XLR MAIN MIX L and R outputs. These outputs are electronically balanced.
- เอาต์พุตโทรศัพท์: Connect your headphones to the 1/4" PHONES jack for monitoring.
5. คู่มือการใช้งาน
5.1 การเปิด/ปิดเครื่อง
- Before powering on, ensure all channel GAIN and MIX level knobs are set to their minimum position.
- Turn on the mixer using the power switch on the rear panel.
- When powering off, first turn down all output levels, then switch off the mixer.
5.2 Channel Controls (Mono Channels 1-2)
- อินพุต MIC/LINE: Combo jack for XLR microphones or 1/4" TRS line-level sources.
- LO CUT (75 Hz): Engages a high-pass filter at 75 Hz to remove unwanted low-frequency rumble.
- ได้รับ: Adjusts the input sensitivity for the connected microphone or line source. Set this to achieve a strong signal without clipping (indicated by the PEAK LED).
- HI (12 kHz): Adjusts the high-frequency (treble) content of the channel.
- LOW (80 Hz): Adjusts the low-frequency (bass) content of the channel.
- ไฟ LED สูงสุด: ไฟ LED จะสว่างขึ้นเมื่อสัญญาณอินพุตสูงเกินไป ซึ่งบ่งชี้ว่าอาจเกิดการตัดสัญญาณ (clipping) หากไฟ LED นี้สว่างขึ้นบ่อยครั้ง ให้ลดค่า GAIN ลง
- ลูกบิดระดับ: Controls the channel's contribution to the main mix.
5.3 Channel Controls (Stereo Channels 3/4, 5/6)
- L/MONO, R LINE Inputs: 1/4" TRS jacks for stereo line-level sources. Use L/MONO for mono sources.
- HI (12 kHz): Adjusts the high-frequency (treble) content of the channel.
- LOW (80 Hz): Adjusts the low-frequency (bass) content of the channel.
- ลูกบิดระดับ: Controls the channel's contribution to the main mix.
5.4 Main Mix Section
- PHANTOM POWER ON/OFF: Activates +48V phantom power for condenser microphones connected to the XLR inputs. Ensure condenser microphones are connected before activating phantom power.
- เครื่องวัดระดับ: Displays the output level of the main mix. Aim for levels around 0 dB to avoid clipping.
- MIX Level Knob: ควบคุมระดับเสียงโดยรวมของมิกซ์หลัก
- ปุ่มปรับระดับเสียง PHONES: ปรับระดับเสียงเอาต์พุตหูฟัง
6. การบำรุงรักษา
- การทำความสะอาด: Use a soft, dry cloth to clean the mixer's surface. Do not use abrasive cleaners, solvents, or waxes.
- พื้นที่จัดเก็บ: เมื่อไม่ได้ใช้งานเป็นเวลานาน ควรเก็บเครื่องผสมอาหารไว้ในที่แห้งและปราศจากฝุ่น
- การดูแลสายเคเบิล: Regularly inspect all cables for damage. Replace frayed or damaged cables to prevent electrical hazards and ensure optimal performance.
- การระบายอากาศ : ตรวจสอบให้แน่ใจว่าช่องระบายอากาศปราศจากฝุ่นและสิ่งสกปรก เพื่อป้องกันความร้อนสูงเกินไป
7 การแก้ไขปัญหา
| ปัญหา | สาเหตุที่เป็นไปได้ | สารละลาย |
|---|---|---|
| ไม่มีเสียงออก |
|
|
| เสียงเพี้ยน |
|
|
| ไม่มีสัญญาณไมโครโฟน |
|
|
| ฮัมหรือเสียงรบกวน |
|
|
8. ข้อมูลจำเพาะ
| คุณสมบัติ | รายละเอียด |
|---|---|
| ยี่ห้อ | PROEL |
| แบบอย่าง | MQ6 |
| จำนวนช่องสัญญาณ | 6 |
| อินพุตเสียง | 2 x MIC/LINE (XLR/TRS Combo), 2 x Stereo LINE (TRS) |
| เทคโนโลยีการเชื่อมต่อ | เอ็กซ์แอลอาร์, ทีอาร์เอส |
| EQ (Mono Channels) | 3-Band (HI, LOW, LO CUT) |
| EQ (Stereo Channels) | 2-Band (HI, LOW) |
| พลังผี | +48โวลต์ |
| เอาท์พุทหลัก | XLR (Electronically Balanced) |
| เอาท์พุตหูฟัง | 1/4" TRS |
9. การรับประกัน
PROEL offers its customers a minimum of 24 (twenty-four) months warranty from the date of purchase for sound systems products. Please retain your proof of purchase for warranty claims. For detailed warranty terms and conditions, please refer to the official PROEL webไซต์หรือติดต่อฝ่ายสนับสนุนลูกค้าของพวกเขา
10. การสนับสนุน
For technical assistance, product inquiries, or service requests, please visit the official PROEL website or contact your authorized PROEL dealer. You may also find additional resources and FAQs on their support pages.