การแนะนำ
This manual provides comprehensive instructions for the installation, operation, and maintenance of your Aerocool LUX RGB 650M semi-modular power supply. The LUX RGB 650M is designed to deliver stable power to your PC components while offering customizable RGB lighting effects. Please read this manual thoroughly before installation and use to ensure proper functionality and safety.

ภาพ: มุมเอียง view of the Aerocool LUX RGB 650M Power Supply, showcasing its black finish and RGB lighting panel.
ข้อมูลด้านความปลอดภัย
- ตรวจสอบให้แน่ใจว่าได้ตัดการเชื่อมต่อแหล่งจ่ายไฟจากเต้ารับไฟฟ้า AC ก่อนการติดตั้งหรือการบำรุงรักษา
- ห้ามเปิดแหล่งจ่ายไฟ แรงดันไฟฟ้าสูงtagมีอนุภาคอยู่ภายใน ซึ่งอาจก่อให้เกิดไฟฟ้าช็อตได้
- Install the power supply in a well-ventilated area. Do not block the ventilation openings.
- ผลิตภัณฑ์นี้ออกแบบมาเพื่อใช้กับคอมพิวเตอร์ส่วนบุคคลเท่านั้น ห้ามใช้เพื่อวัตถุประสงค์อื่นใด
- เก็บแหล่งจ่ายไฟให้ห่างจากน้ำ ความชื้น และอุณหภูมิที่สูงหรือต่ำมาก
- ใช้เฉพาะสายไฟที่ให้มาพร้อมกับแหล่งจ่ายไฟเท่านั้น การใช้สายไฟจากผู้ผลิตอื่นอาจทำให้เกิดความเสียหายได้
เนื้อหาแพ็คเกจ
ตรวจสอบว่ามีรายการทั้งหมดอยู่ในแพ็คเกจ:
- Aerocool LUX RGB 650M Power Supply Unit
- Modular Cable Set (PCIe, SATA, Peripheral)
- Main ATX 20+4 Pin Cable (fixed)
- CPU 4+4 Pin Cable (fixed)
- สายไฟ AC
- สกรูยึด
- คู่มือการใช้งาน
การติดตั้งและการตั้งค่า
Follow these steps to install your Aerocool LUX RGB 650M power supply:
- เตรียมเคสพีซีของคุณ: ตรวจสอบให้แน่ใจว่าคอมพิวเตอร์ของคุณปิดอยู่และถอดปลั๊กออกจากเต้ารับแล้ว เปิดเคสคอมพิวเตอร์เพื่อเข้าถึงบริเวณติดตั้งแหล่งจ่ายไฟ
- ติดตั้งแหล่งจ่ายไฟ: Carefully slide the LUX RGB 650M into the designated power supply bay in your PC case. Secure it with the provided mounting screws.
- Connect Fixed Cables:
- เชื่อมต่อ 20+4 Pin ATX cable to your motherboard's main power connector.
- เชื่อมต่อ 4+4 Pin CPU cable to your motherboard's CPU power connector.
- เชื่อมต่อสายเคเบิลโมดูลาร์: Identify the necessary modular cables for your components (graphics card, SSDs/HDDs, optical drives).
- เชื่อมต่อสิ่งที่จำเป็น สายเคเบิล PCIe to your graphics card(s).
- เชื่อมต่อ สายไฟซาต้า to your storage drives (SSDs, HDDs).
- เชื่อมต่อ Peripheral (Molex) cables for any other components requiring them.

ภาพ: มุมเอียง view of the Aerocool LUX RGB 650M Power Supply, illustrating the semi-modular design with fixed and detachable cables.
- การจัดการสายเคเบิล: Utilize the semi-modular design to manage cables efficiently, improving airflow and aesthetics within your PC case.
- เชื่อมต่อ RGB:
- For motherboard synchronization, connect the power supply's Addressable RGB cable to a +5V Addressable RGB header on your compatible motherboard.
- If your motherboard does not have an Addressable RGB header, you can control the lighting effects directly via the LED control button on the power supply.
- การเชื่อมต่อไฟฟ้า: Connect the AC power cord to the power supply's input socket and then to a wall outlet. Ensure the power switch on the PSU is in the OFF (0) position before plugging it in.
- System Configuration Note: For optimal performance and stability, ensure your system's power requirements do not exceed the PSU's capacity. A recommended maximum configuration for this 650W model is an Intel i5 processor, an RTX 3060 graphics card, and 16GB DDR4 RAM. For precise power calculations, consult online PSU calculators.
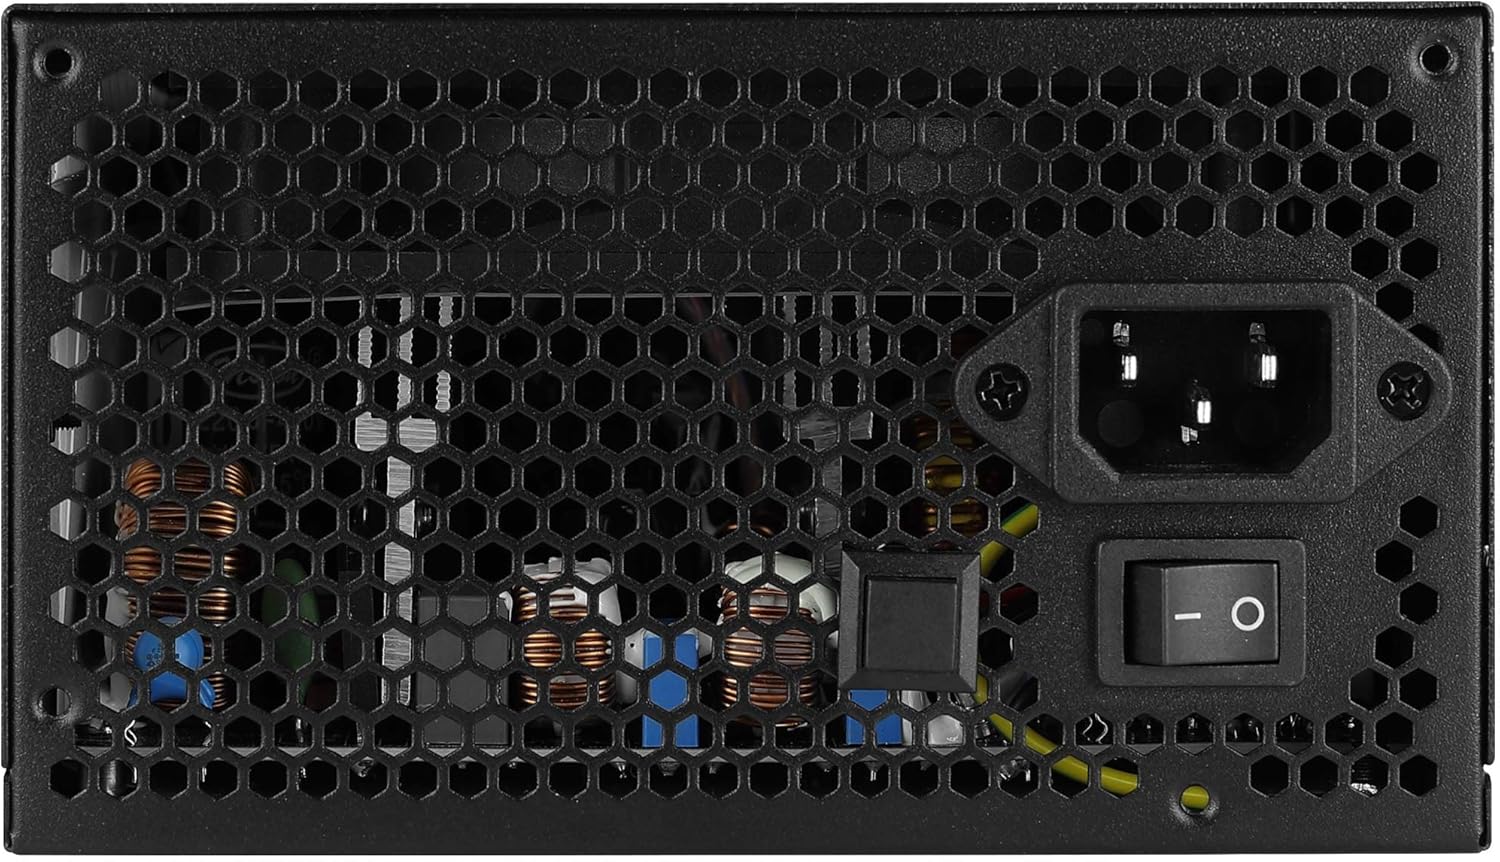
ภาพ: ด้านหลัง view of the Aerocool LUX RGB 650M Power Supply, showing the AC power input, power switch, and ventilation grille.
คำแนะนำการใช้งาน
After successful installation, follow these steps to operate your power supply:
- เปิดเครื่อง: Flip the power switch on the rear of the power supply to the ON (I) position. Then, power on your computer using the case's power button.
- การควบคุมแสง RGB:
- Via LED Control Button: If not connected to a motherboard ARGB header, press the dedicated LED control button on the power supply to cycle through 13 predefined lighting effects.
- ผ่านซอฟต์แวร์เมนบอร์ด: If connected to a +5V Addressable RGB header on your motherboard, you can control and synchronize the power supply's lighting effects using your motherboard's RGB software (e.g., ASUS Aura Sync, MSI Mystic Light Sync, Gigabyte RGB Fusion, ASRock Polychrome Sync).

ภาพ: ด้านบน view of the Aerocool LUX RGB 650M Power Supply, highlighting the integrated RGB lighting panel with the "LUX" and "AeroCool" logos.
การซ่อมบำรุง
การบำรุงรักษาอย่างถูกต้องจะช่วยให้แหล่งจ่ายไฟของคุณมีอายุการใช้งานยาวนานและมีประสิทธิภาพเหมาะสมที่สุด:
- การทำความสะอาดฝุ่น: Periodically clean the power supply's fan and ventilation grilles to prevent dust buildup, which can impede airflow and cooling. Use compressed air for best results. Ensure the power supply is off and unplugged before cleaning.
- การไหลเวียนของอากาศ: The LUX RGB 650M features a 30% increased ventilation area for enhanced airflow. Ensure your PC case has adequate ventilation to support efficient heat dissipation from the power supply.
- การทำงานของพัดลม: The 12cm silent black fan operates with optimized thermal fan speed control, adjusting its speed based on temperature to maintain quiet operation and effective cooling.

ภาพ: ด้านข้าง view of the Aerocool LUX RGB 650M Power Supply, highlighting the extensive honeycomb ventilation pattern for improved airflow.
การแก้ไขปัญหา
หากคุณพบปัญหาเกี่ยวกับแหล่งจ่ายไฟ โปรดดูปัญหาทั่วไปและวิธีแก้ไขต่อไปนี้:
- ไม่มีไฟเข้าระบบ:
- ตรวจสอบว่าสายไฟ AC เชื่อมต่อกับแหล่งจ่ายไฟและเต้ารับที่ผนังอย่างแน่นหนาหรือไม่
- Ensure the power switch on the rear of the PSU is in the ON (I) position.
- Verify that all power cables (20+4 Pin ATX, 4+4 Pin CPU, PCIe, SATA) are correctly and firmly connected to their respective components.
- ทดสอบเต้ารับไฟที่ผนังด้วยอุปกรณ์อื่นเพื่อยืนยันว่ามีไฟอยู่
- ความไม่เสถียรของระบบ/การขัดข้อง:
- Ensure your system's power draw does not exceed the 650W capacity of the PSU. Overloading can cause instability.
- ตรวจสอบการเชื่อมต่อสายเคเบิลหลวม
- Ensure adequate ventilation within the PC case to prevent overheating.
- ไฟ RGB ไม่ทำงาน:
- If using the LED control button, ensure it is being pressed correctly to cycle effects.
- If connected to a motherboard ARGB header, verify the connection is secure and that your motherboard's RGB software is installed and configured correctly. Ensure it's a +5V ARGB header, not a +12V RGB header.
ข้อมูลจำเพาะ

Image: Electrical specifications label for the Aerocool LUX RGB 650M Power Supply, detailing voltage และเอาต์พุตปัจจุบัน
| คุณสมบัติ | รายละเอียด |
|---|---|
| หมายเลขรุ่น | LUXRGB650M |
| ยี่ห้อ | แอร์โรคูล |
| กำลังขับ | 650 วัตต์ |
| การรับรองประสิทธิภาพ | 80Plus 230V EU Bronze (up to 88%+ efficiency) |
| ฟอร์มแฟกเตอร์ | เอทีเอ็กซ์ |
| Cabling Design | กึ่งโมดูลาร์ |
| วิธีการทำความเย็น | Air (12cm silent black fan with optimized thermal speed control) |
| ไฟ RGB | Prism RGB (13 predefined effects via button, compatible with +5V Addressable RGB motherboards) |
| อินพุต Voltage | 115-230 โวลต์ |
| ขนาด (กว้าง x ยาว x สูง) | 16 x 15 x 8.6 ซม. |
| น้ำหนัก | 1.5 กิโลกรัม |
| อุปกรณ์ที่รองรับ | เครื่องคอมพิวเตอร์ส่วนบุคคล |
การรับประกัน
The Aerocool LUX RGB 650M Power Supply comes with a รับประกัน 2 ปี on spare parts. Please retain your proof of purchase for warranty claims. The warranty covers defects in materials and workmanship under normal use. It does not cover damage caused by misuse, accident, modification, or unauthorized repair.
สนับสนุน
For technical assistance, troubleshooting beyond this manual, or warranty inquiries, please contact AeroCool customer support. Visit the official AeroCool webไซต์สำหรับข้อมูลติดต่อและแหล่งข้อมูลเพิ่มเติม
แหล่งข้อมูลออนไลน์: www.aerocool.io