
PIX-LINK LV-WR07
คู่มือการใช้งานเราเตอร์ไร้สาย PIX-LINK LV-WR07
Model: LV-WR07
1. บทนำ
Thank you for choosing the PIX-LINK LV-WR07 Wireless Router. This device is designed to provide a high-speed wireless network connection for your home or small office. With 300Mbps wireless speed and two external antennas, it ensures stable and wide-ranging Wi-Fi coverage. This manual will guide you through the setup, operation, and maintenance of your new router.

Image 1.1: The PIX-LINK LV-WR07 Wireless Router, showcasinด้วยการออกแบบที่กะทัดรัดและเสาอากาศภายนอกสองเสา
2. คุณสมบัติของผลิตภัณฑ์
- ระบบไร้สายความเร็วสูง: Up to 300Mbps data transmission rate, ideal for smooth HD streaming, online gaming, and fast web เรียกดู
- ความคุ้มครองที่เพิ่มขึ้น: Equipped with two external antennas to ensure a strong and stable Wi-Fi signal across your space.
- หลายพอร์ต: Features 5 LAN ports for reliable wired connections to devices like desktop computers, smart TVs, and gaming consoles.
- ฟังก์ชั่น WPS: Supports Wi-Fi Protected Setup (WPS) for easy and secure wireless connection setup.
- ความเข้ากันได้ในวงกว้าง: Connects seamlessly with various devices including gaming consoles, tablets, and smart televisions.

Image 2.1: Illustration of the router's network coverage and compatibility with various devices, including laptops, smartphones, and PCs.
3. เนื้อหาบรรจุภัณฑ์
โปรดตรวจสอบว่าสินค้าทั้งหมดมีอยู่ในแพ็คเกจของคุณ:
- PIX-LINK LV-WR07 Wireless Router
- อะแดปเตอร์แปลงไฟ
- สายเคเบิลอีเทอร์เน็ต
- คู่มือการติดตั้งด่วน (คู่มือนี้)
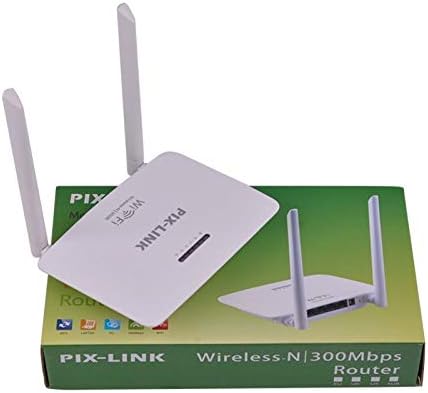
Image 3.1: The PIX-LINK LV-WR07 Wireless Router shown with its retail packaging, indicating the product as it appears in the box.

Image 3.2: The essential accessories included with the router: the power adapter for electrical connection and an Ethernet cable for wired network setup.
4. คู่มือการติดตั้ง
4.1 การเชื่อมต่อฮาร์ดแวร์
- เปิดเครื่อง: Connect the power adapter to the router's power port and then plug the adapter into a standard electrical outlet. The power indicator light on the router should illuminate.
- เชื่อมต่อแหล่งที่มาทางอินเทอร์เน็ต: Connect one end of the provided Ethernet cable to your modem's LAN port or your internet service provider's (ISP) Ethernet wall jack. Connect the other end of the Ethernet cable to the WAN port (usually labeled differently or colored) on your PIX-LINK LV-WR07 router.
- เชื่อมต่ออุปกรณ์ของคุณ:
- การเชื่อมต่อแบบมีสาย: For initial setup or stable connection, connect your computer to one of the router's LAN ports (usually yellow) using another Ethernet cable.
- การเชื่อมต่อแบบไร้สาย: Locate the default Wi-Fi network name (SSID) and password printed on a label on the bottom or back of your router. Connect your wireless device (laptop, smartphone, tablet) to this network.
4.2 การกำหนดค่าเริ่มต้น (Web อินเตอร์เฟซ)
After connecting the hardware, you can configure your router via a web เบราว์เซอร์
- การเข้าถึงการตั้งค่าเราเตอร์: เปิด web browser (e.g., Chrome, Firefox, Edge) on a device connected to the router. In the address bar, type the default IP address (e.g.,
192.168.1.1or192.168.0.1) and press Enter. This IP address is usually found on the router's label. - เข้าสู่ระบบ: A login window will appear. Enter the default username and password (commonly
adminสำหรับทั้งสองแบบ หรือตามที่ระบุไว้บนฉลากของเราเตอร์) - เรียกใช้ตัวช่วยการตั้งค่า: Most routers have a Quick Setup Wizard. Follow the on-screen instructions to configure your internet connection type (e.g., DHCP, Static IP, PPPoE) and set up your new Wi-Fi network name (SSID) and a strong password.
- บันทึกการตั้งค่า: หลังจากตั้งค่าเสร็จแล้ว ให้บันทึกการตั้งค่าและรีสตาร์ทเราเตอร์หากมีข้อความแจ้งเตือน
5. การใช้งานเราเตอร์ของคุณ
5.1 การเชื่อมต่ออุปกรณ์กับ Wi-Fi
วิธีเชื่อมต่ออุปกรณ์กับเครือข่าย Wi-Fi ของคุณ:
- บนอุปกรณ์ของคุณ ให้ไปที่การตั้งค่า Wi-Fi
- เลือกชื่อเครือข่าย Wi-Fi (SSID) ของคุณจากรายการ
- Enter the Wi-Fi password you set during configuration.
- ตอนนี้อุปกรณ์ของคุณควรเชื่อมต่อกับอินเทอร์เน็ตแล้ว
5.2 การใช้งาน WPS (Wi-Fi Protected Setup)
WPS allows you to connect devices to your Wi-Fi network without entering the password manually.
- Press the WPS button on your router (usually located on the back or side, labeled 'WPS'). The WPS LED indicator will start blinking.
- Within two minutes, activate WPS on your client device (e.g., a wireless adapter, smartphone, or printer). Refer to your device's manual for specific instructions on activating WPS.
- The device will automatically connect to your Wi-Fi network.
5.3 Wired Connections (LAN Ports)
The router provides multiple LAN ports for wired connections, offering stable and fast connectivity for devices like desktop computers, gaming consoles, and smart TVs.
- Simply connect an Ethernet cable from the device's Ethernet port to any available LAN port on the router.
- The corresponding LAN indicator light on the router should illuminate, indicating a successful connection.
6. การบำรุงรักษา
- ตำแหน่งที่เหมาะสมที่สุด: วางเราเตอร์ในตำแหน่งศูนย์กลาง ห่างจากสิ่งกีดขวาง (ผนังหนา วัตถุที่เป็นโลหะ) และแหล่งรบกวน (ไมโครเวฟ โทรศัพท์ไร้สาย) เพื่อให้ครอบคลุมสัญญาณ Wi-Fi สูงสุด
- รักษาความสะอาด: Regularly clean the router's exterior with a soft, dry cloth. Ensure ventilation holes are not blocked to prevent overheating.
- อัพเดตเฟิร์มแวร์: Periodically check the PIX-LINK official website for firmware updates. Updating firmware can improve performance, add new features, and fix bugs. Follow the instructions provided on the webเว็บไซต์อย่างระมัดระวัง
- เริ่มใหม่เป็นระยะ: การรีสตาร์ทเราเตอร์ทุกๆ สองสามสัปดาห์จะช่วยล้างหน่วยความจำและแก้ไขปัญหาเครือข่ายเล็กน้อย ซึ่งจะช่วยปรับปรุงประสิทธิภาพโดยรวม
7 การแก้ไขปัญหา
7.1 ไม่มีการเชื่อมต่ออินเทอร์เน็ต
- Check if the power adapter is securely connected and the router is powered on.
- Ensure the Ethernet cable from your modem/ISP is securely connected to the router's WAN port.
- Restart your modem and then your router. Wait a few minutes for them to fully boot up.
- ตรวจสอบการตั้งค่าประเภทการเชื่อมต่ออินเทอร์เน็ตในเราเตอร์ของคุณ web interface (e.g., DHCP, Static IP, PPPoE).
- ติดต่อผู้ให้บริการอินเทอร์เน็ต (ISP) ของคุณเพื่อยืนยันว่าไม่มีบริการใด ๆtagอยู่ในพื้นที่ของคุณ
7.2 Slow Wi-Fi Speed or Intermittent Connection
- Relocate the router to a more central position, away from obstacles and interference.
- ตรวจสอบให้แน่ใจว่าเฟิร์มแวร์ของเราเตอร์ของคุณเป็นเวอร์ชันล่าสุด
- Reduce the number of devices connected to the network, especially those performing high-bandwidth activities.
- ลองเปลี่ยนช่องสัญญาณ Wi-Fi ในการตั้งค่าเราเตอร์เพื่อหลีกเลี่ยงการรบกวนจากเครือข่ายใกล้เคียง
7.3 ไม่สามารถเข้าถึงเราเตอร์ได้ Web อินเทอร์เฟซ
- Ensure your device is connected to the router (either via Ethernet cable or Wi-Fi).
- Verify that you are typing the correct IP address (e.g.,
192.168.1.1) in the browser's address bar. - ล้างแคชและคุกกี้ของเบราว์เซอร์ของคุณหรือลองใช้วิธีอื่น web เบราว์เซอร์
- If you forgot the login credentials, you may need to perform a factory reset (see section 7.4).
7.4 How to Perform a Factory Reset
A factory reset will restore the router to its default settings, including the default Wi-Fi name and password, and login credentials.
- With the router powered on, locate the Reset button (often a small pinhole) on the back or bottom of the router.
- Use a paperclip or a thin object to press and hold the Reset button for about 5-10 seconds until the router's lights flash or change behavior.
- Release the button and wait for the router to restart. You will then need to reconfigure it using the initial setup steps.
8. ข้อมูลจำเพาะทางเทคนิค
| คุณสมบัติ | คำอธิบาย |
|---|---|
| ยี่ห้อ | พิกซ์-ลิงค์ |
| แบบอย่าง | LV-WR07 |
| ความเร็วไร้สาย | 300 เมกะบิตต่อวินาที (Mbps) |
| เสาอากาศ | เสาอากาศภายนอก 2 เสา |
| จำนวนพอร์ต | 5 (1 WAN, 4 LAN) |
| เทคโนโลยีการเชื่อมต่อ | ไวไฟ,แลน |
| คุณสมบัติพิเศษ | WPS (การตั้งค่าการป้องกัน Wi-Fi) |
| อุปกรณ์ที่รองรับ | Gaming Consoles, Tablets, Smart Televisions |
9. ข้อมูลการรับประกัน
PIX-LINK products are designed for reliability and performance. For specific warranty terms and conditions, please refer to the warranty card included with your product or visit the official PIX-LINK webไซต์ โปรดเก็บใบเสร็จรับเงินไว้เป็นหลักฐานการซื้อสำหรับการเรียกร้องการรับประกัน
10. การสนับสนุนลูกค้า
If you encounter any issues that are not covered in this manual or require further assistance, please contact PIX-LINK customer support. You can usually find contact information (phone number, email, or support portal) on the official PIX-LINK webไซต์หรือบนบรรจุภัณฑ์ผลิตภัณฑ์
Before contacting support, please have the following information ready:
- Product Model: LV-WR07
- Serial Number (found on the product label)
- คำอธิบายโดยละเอียดของปัญหาที่คุณกำลังประสบ
- Steps you have already taken to troubleshoot
Ask a question about this manual
Ask about setup, troubleshooting, compatibility, parts, safety, or missing instructions. Manuals+ will review the question and use this page’s manual context to help answer it.