
1. บทนำ
This manual provides detailed instructions for setting up and operating your NETVIP 300Mbps WiFi Extender. This device is designed to extend the coverage of your existing wireless network, eliminating Wi-Fi dead zones and improving signal strength in areas with weak reception. It supports both Repeater and Access Point (AP) modes, offering flexible solutions for your networking needs.
2. สินค้าหมดview
Familiarize yourself with the components of your NETVIP WiFi Extender:
- ไฟ LED แสดงสถานะ: Display the device's status, including power, Wi-Fi signal, and WPS activity.
- ปุ่ม WPS: For quick and secure connection to your router using Wi-Fi Protected Setup.
- พอร์ต LAN: Used for connecting wired devices or for setting up the device in Access Point mode.
- ปลั๊กไฟ: สำหรับเชื่อมต่ออุปกรณ์เข้ากับเต้ารับไฟฟ้า
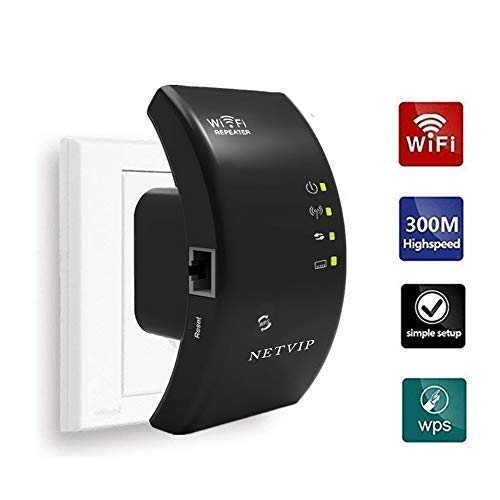
ภาพที่ 2.1: ด้านหน้า view of the NETVIP 300Mbps WiFi Extender, showing its compact design and key indicators.
3. คำแนะนำในการตั้งค่า
The NETVIP WiFi Extender can be configured in two main modes: Repeater Mode and Access Point (AP) Mode.
3.1. Repeater Mode (Extending Existing Wi-Fi)
Repeater mode extends the coverage of your existing wireless network.
- เปิดเครื่อง: Plug the extender into an electrical outlet near your main router. Wait for the Power LED to light up.
- เชื่อมต่อกับ Extender: On your computer or mobile device, connect to the Wi-Fi network named "Wireless-N" (or similar, check the label on your device). No password is required initially.
- เข้าสู่หน้าการตั้งค่า: เปิด web เบราว์เซอร์และป้อนที่อยู่ IP เริ่มต้น (เช่น 192.168.10.1) หรือชื่อโดเมน (เช่น รีพีทเตอร์.เน็ต(ตามที่ระบุไว้ในคู่มือเริ่มต้นใช้งานฉบับย่อ)
- เข้าสู่ระบบ: Enter the default username and password (usually "admin" for both, check device label).
- เลือกโหมด Repeater: ในหน้าการตั้งค่า ให้เลือก "โหมดตัวขยายสัญญาณ"
- สแกนหาเครือข่าย: ตัวขยายสัญญาณจะสแกนหาเครือข่าย Wi-Fi ที่ใช้งานได้ เลือกเครือข่าย Wi-Fi ที่บ้านของคุณจากรายการ
- กรอกรหัสผ่าน: Enter the Wi-Fi password for your home network. You can also set a new SSID (network name) for the extended network or keep it the same.
- ใช้การตั้งค่า: Click "Apply" or "Save". The extender will restart.
- ย้ายตำแหน่งส่วนขยาย: Once restarted, unplug the extender and move it to a location halfway between your router and the Wi-Fi dead zone. Ensure the signal strength LED indicates a good connection to your main router.
- เชื่อมต่ออุปกรณ์: เชื่อมต่ออุปกรณ์ของคุณเข้ากับเครือข่าย Wi-Fi ที่ขยายขอบเขตใหม่แล้ว
WPS Setup (Alternative for Repeater Mode)
- เปิดเครื่อง: เสียบตัวขยายสัญญาณเข้ากับเต้ารับไฟฟ้าใกล้กับเราเตอร์หลักของคุณ
- กด WPS บนเราเตอร์: กดปุ่ม WPS บนเราเตอร์หลักของคุณ
- กด WPS บน Extender: Within two minutes, press the WPS button on the NETVIP WiFi Extender.
- รอการเชื่อมต่อ: The WPS LED on both devices should blink and then become solid, indicating a successful connection.
- ย้ายตำแหน่งส่วนขยาย: Move the extender to an optimal location.
3.2. Access Point (AP) Mode (Creating a New Wi-Fi Network)
AP mode converts a wired internet connection into a wireless network.
- เปิดเครื่อง: เสียบปลั๊กต่อเข้ากับเต้ารับไฟฟ้า
- เชื่อมต่อผ่านอีเธอร์เน็ต: Connect an Ethernet cable from your main router's LAN port to the LAN port on the NETVIP WiFi Extender.
- เชื่อมต่อกับ Extender: On your computer or mobile device, connect to the Wi-Fi network named "Wireless-N" (or similar).
- เข้าสู่หน้าการตั้งค่า: เปิด web browser and enter the default IP address or domain name.
- เข้าสู่ระบบ: กรอกชื่อผู้ใช้และรหัสผ่านเริ่มต้น
- เลือกโหมด AP: On the setup page, choose "AP Mode".
- กำหนดการตั้งค่า Wi-Fi: Set a new SSID (network name) and a strong Wi-Fi password for your new wireless network.
- ใช้การตั้งค่า: Click "Apply" or "Save". The extender will restart.
- เชื่อมต่ออุปกรณ์: Connect your devices to the newly created Wi-Fi network.
4. คู่มือการใช้งาน
Once configured, the NETVIP WiFi Extender operates automatically. Ensure it is plugged into a power outlet and the LED indicators show normal operation.
- ตำแหน่งที่เหมาะสมที่สุด: For best performance in Repeater Mode, place the extender where it receives a strong signal from your main router (indicated by the signal LED) and can still provide coverage to the desired area. Avoid placing it near large metal objects, microwaves, or other sources of interference.
- สถานะ LED:
- กำลังไฟ LED: Solid indicates power on.
- LED Wi-Fi: Solid indicates Wi-Fi is active. Blinking indicates data transfer.
- ไฟ LED WPS: Solid indicates a successful WPS connection. Blinking indicates WPS pairing in progress.
- การเชื่อมต่อแบบมีสาย: In either mode, the LAN port can be used to connect a single wired device (e.g., a desktop computer, gaming console, or smart TV) to the network, providing a stable wired connection.
5. การบำรุงรักษา
Regular maintenance helps ensure optimal performance and longevity of your device.
- การทำความสะอาด: เช็ดอุปกรณ์เบาๆ ด้วยผ้านุ่มและแห้ง ห้ามใช้น้ำยาทำความสะอาดหรือสเปรย์
- อัพเดตเฟิร์มแวร์: ตรวจสอบเว็บไซต์ทางการของ NETVIP เป็นระยะ website for any available firmware updates. Updating firmware can improve performance, add new features, or fix bugs. Follow the instructions provided with the firmware update carefully.
- การรีเซ็ตอุปกรณ์: If you encounter persistent issues or wish to reconfigure the device from scratch, you can perform a factory reset. Locate the reset button (usually a small pinhole) on the device, press and hold it for 5-10 seconds with a paperclip until the LEDs flash. This will restore the device to its factory default settings.
6 การแก้ไขปัญหา
If you experience issues with your NETVIP WiFi Extender, refer to the following common problems and solutions:
- Cannot access the setup page (192.168.10.1 or repeater.net):
- Ensure your device is connected to the extender's default Wi-Fi network (e.g., "Wireless-N").
- ลองแบบอื่น web เบราว์เซอร์
- ล้างแคชและคุกกี้ของเบราว์เซอร์ของคุณ
- Restart the extender and your computer/mobile device.
- Perform a factory reset on the extender.
- ไม่มีการเข้าถึงอินเทอร์เน็ตหลังการตั้งค่า:
- In Repeater Mode, ensure the extender is receiving a strong signal from your main router. Relocate it closer if necessary.
- ตรวจสอบให้แน่ใจว่ารหัสผ่าน Wi-Fi ที่ป้อนระหว่างการตั้งค่าเราเตอร์หลักของคุณถูกต้อง
- In AP Mode, ensure the Ethernet cable is securely connected between the extender and your main router, and that your main router has internet access.
- รีสตาร์ททั้งเราเตอร์หลักและตัวขยายสัญญาณ
- ความเร็วอินเตอร์เน็ตช้า:
- Optimal placement is crucial. The extender should be positioned where it can receive a good signal from the router and transmit effectively to your devices.
- Avoid interference from other electronic devices (microwaves, cordless phones).
- ตรวจสอบให้แน่ใจว่าเราเตอร์หลักของคุณมีความเร็วเพียงพอ
- ตรวจสอบการอัปเดตเฟิร์มแวร์สำหรับตัวขยายสัญญาณ
- การเชื่อมต่อหลุดบ่อยครั้ง:
- Check for signal interference or obstacles.
- ตรวจสอบให้แน่ใจว่าตัวขยายสัญญาณไม่ร้อนเกินไป
- Try changing the Wi-Fi channel on your main router to avoid congestion.
- ทำการรีเซ็ตเป็นค่าเริ่มต้นจากโรงงานและกำหนดค่าตัวขยายสัญญาณใหม่
7. ข้อมูลจำเพาะ
| ยี่ห้อ | เน็ตวีพี |
| มาตรฐานการสื่อสารไร้สาย | 802.11b, 802.11g, 802.11n |
| อัตราการถ่ายโอนข้อมูล | สูงสุดถึง 300Mbps |
| โหมดการทำงาน | Repeater, Access Point (AP) |
| อุปกรณ์ที่รองรับ | Router, Alexa Devices |
| คุณสมบัติพิเศษ | WPS Function, LAN Port |
| ขนาดสินค้า | 4.33 x 2.36 x 2.76 นิ้ว |
| น้ำหนักสินค้า | 5.6 ออนซ์ |
8. การรับประกันและการสนับสนุน
NETVIP products are designed for reliability and performance. For specific warranty information, please refer to the warranty card included with your product or visit the official NETVIP webเว็บไซต์.
If you require technical assistance or have questions not covered in this manual, please contact NETVIP customer support through their official webโปรดกรอกข้อมูลในเว็บไซต์หรือข้อมูลติดต่อที่ให้ไว้พร้อมกับการสั่งซื้อของคุณ โปรดเตรียมรุ่นสินค้าและรายละเอียดการสั่งซื้อให้พร้อมเมื่อติดต่อฝ่ายสนับสนุน