การแนะนำ
This manual provides essential information for the setup, operation, and maintenance of your Rega Planar 1 Plus Turntable. The Planar 1 Plus is designed for ease of use, featuring a pre-mounted Carbon MM cartridge and an integrated high-quality moving magnet phono stage, allowing direct connection to any line-level input on an ampลิไฟเออร์หรือระบบเครื่องเสียง
คุณสมบัติที่สำคัญ ได้แก่:
- Integrated MM phono stage for direct connection.
- RB110 tonearm with ultra-low friction bearings.
- Factory-fitted Rega Carbon Moving Magnet Phono Cartridge.
- EBLT advanced drive belt for improved speed accuracy.
- Phenolic resin flywheel effect platter.
- 24 V low noise synchronous motor.
การตั้งค่า
Follow these steps to set up your Rega Planar 1 Plus turntable.
1. การแกะกล่องและการจัดวาง
- นำส่วนประกอบทั้งหมดออกจากบรรจุภัณฑ์อย่างระมัดระวัง เก็บบรรจุภัณฑ์ไว้เพื่อการขนส่งหรือจัดเก็บในอนาคต
- วางเครื่องเล่นแผ่นเสียงบนพื้นผิวที่มั่นคงและเรียบเสมอกัน ห่างจากแสงแดดโดยตรง แหล่งความร้อน และการสั่นสะเทือนรุนแรง
- ให้แน่ใจว่ามีการระบายอากาศเพียงพอรอบๆ เครื่อง

ภาพ: ด้านข้าง view of the Rega Planar 1 Plus turntable with the dust cover closed, showing its compact design.
2. การติดตั้งจานรองและแผ่นรอง
- Place the phenolic resin platter onto the sub-platter spindle.
- วางแผ่นรองสักหลาดไว้บนจานเสิร์ฟ

ภาพ: จากบนลงล่าง view of the Rega Planar 1 Plus turntable with the black felt mat on the platter.
3. Tonearm and Cartridge
The Rega Planar 1 Plus comes with the RB110 tonearm and Rega Carbon MM cartridge factory-fitted and pre-set. No adjustments for tracking force or anti-skate are required for initial setup.
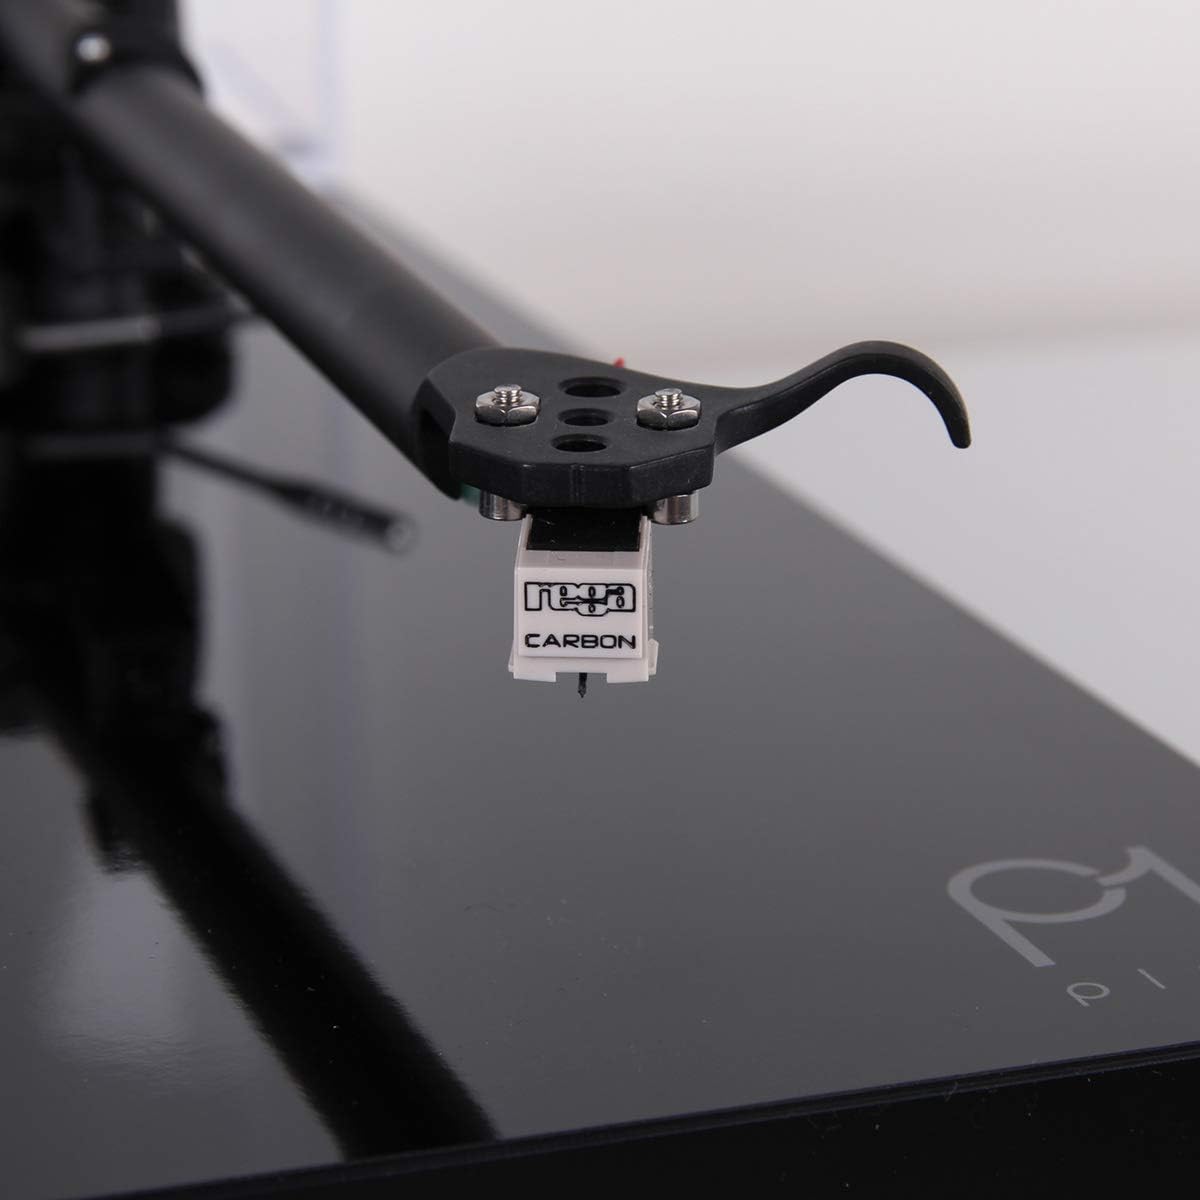
ภาพ: ระยะใกล้ view of the Rega Carbon Moving Magnet cartridge attached to the tonearm.
4. การเชื่อมต่อกับ Ampชีวิต
Due to the integrated phono stage, connect the turntable directly to any line-level input on your amplifier or audio system (e.g., AUX, CD, Tuner input).
- Connect the supplied twin phono-to-phono lead from the turntable's output to a suitable line-level input on your ampชีวิต.
- Connect the power supply to the turntable and then plug it into a wall outlet.
สำคัญ: Do not connect the Planar 1 Plus to an amplifier's dedicated "Phono" input if it already has a built-in phono preamplifier, as this will result in distorted sound. Use a line-level input.
คำแนะนำการใช้งาน
1. เล่นแผ่นเสียง
- ตรวจสอบให้แน่ใจว่าเครื่องเล่นแผ่นเสียงเปิดอยู่
- Place a record on the felt mat, ensuring it is centered on the spindle.
- ยกแขนโทนอาร์มขึ้นโดยใช้คันโยกสำหรับยกหัวอ่าน
- วางแขนโทนอาร์มให้ตรงกับร่องเริ่มต้นที่ต้องการของแผ่นเสียงอย่างระมัดระวัง
- ค่อยๆ ลดแขนโทนอาร์มลงโดยใช้คันโยก หัวเข็มจะสัมผัสกับแผ่นเสียง และการเล่นจะเริ่มต้นขึ้น
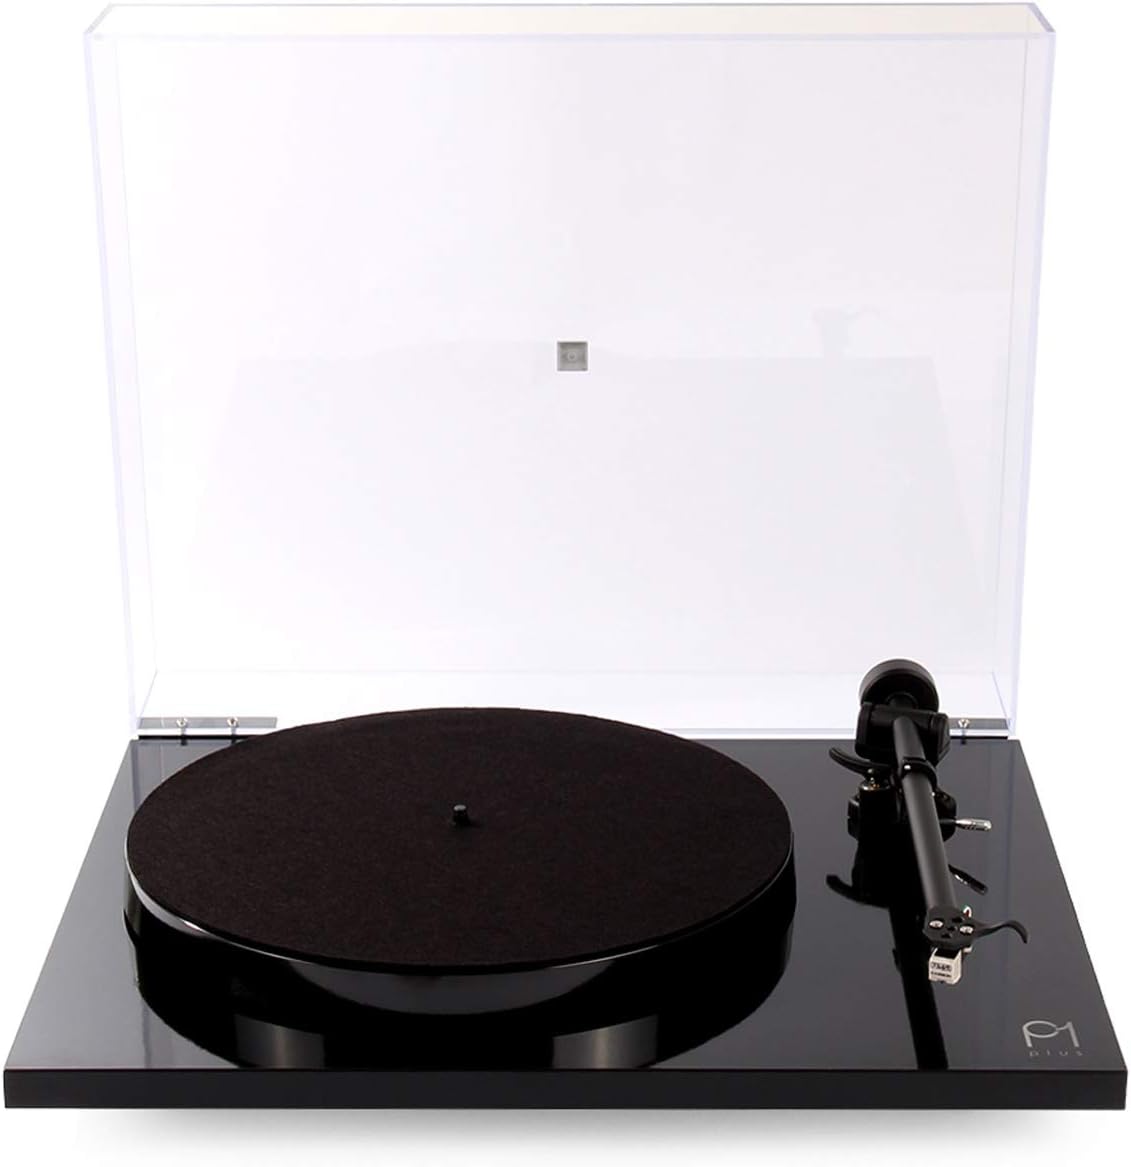
Image: The Rega Planar 1 Plus turntable with its clear dust cover open, ready for operation.
2. การหยุดเล่น
- ยกแขนโทนอาร์มขึ้นโดยใช้คันโยกสำหรับยกหัวอ่าน
- เลื่อนแขนโทนอาร์มกลับไปที่ตำแหน่งพัก และยึดให้แน่นด้วยคลิปหนีบแขนโทนอาร์ม
- Turn off the turntable power.
- Remove the record and store it properly.
3. Changing Playback Speed (33 1/3 RPM to 45 RPM)
The Rega Planar 1 Plus supports both 33 1/3 RPM and 45 RPM records. To change speed, you must manually move the drive belt on the motor pulley.
- Turn off the turntable power.
- Carefully remove the felt mat and the phenolic platter.
- Locate the drive belt around the sub-platter and the motor pulley.
- To change from 33 1/3 RPM to 45 RPM, move the drive belt from the smaller diameter of the motor pulley to the larger diameter.
- To change from 45 RPM to 33 1/3 RPM, move the drive belt from the larger diameter of the motor pulley to the smaller diameter.
- Replace the platter and felt mat.
- Turn on the turntable power.
การซ่อมบำรุง
1. การทำความสะอาดเครื่องเล่นแผ่นเสียง
- Always turn off and unplug the turntable before cleaning.
- Use a soft, lint-free cloth to gently wipe the plinth and dust cover. For stubborn marks, a slightly damp สามารถใช้ผ้าแล้วตามด้วยผ้าแห้ง
- หลีกเลี่ยงการใช้น้ำยาทำความสะอาดที่มีฤทธิ์กัดกร่อน ตัวทำละลาย หรือสเปรย์เคมี เนื่องจากอาจทำให้พื้นผิวเสียหายได้
2. การดูแลรักษาสไตลัส
- การทำความสะอาดหัวเข็มเป็นสิ่งสำคัญอย่างยิ่งต่อคุณภาพเสียงที่ดีที่สุดและอายุการใช้งานของแผ่นเสียงที่ยาวนานขึ้น
- Use a dedicated stylus cleaning brush or fluid. Always brush from back to front (from the pivot point towards the stylus tip).
- หลีกเลี่ยงการสัมผัสปากกาด้วยนิ้วมือ
- The Rega Carbon cartridge has a typical lifespan of approximately 1000 hours of playback. Consider replacing the stylus or cartridge after this period for best performance.
3. สายพาน
The EBLT drive belt is designed for durability. However, if you notice inconsistent speed or the belt appears stretched or cracked, it may need replacement. Contact your dealer for a genuine Rega replacement belt.
การแก้ไขปัญหา
If you encounter issues with your Rega Planar 1 Plus, refer to the following common problems and solutions.
ไม่มีเสียงหรือระดับเสียงต่ำ
- ตรวจสอบการเชื่อมต่อ: ตรวจสอบให้แน่ใจว่าสายเคเบิลทั้งหมด (สายไฟ, สายสัญญาณเสียง) เชื่อมต่อแน่นสนิทแล้ว
- การเลือกอินพุต: ตรวจสอบว่าของคุณ amplifier is set to the correct line-level input (e.g., AUX, CD).
- ระดับเสียง: ยืนยันการ amplifier's volume is turned up.
- ข้อมูลที่ป้อนไม่ถูกต้อง: ถ้าเชื่อมต่อกับ amplifier's dedicated "Phono" input, switch to a line-level input. The Planar 1 Plus has a built-in phono stage.
เสียงผิดเพี้ยน
- Stylus Cleanliness: Clean the stylus as described in the Maintenance section.
- Record Condition: Ensure the record is clean and free from dust or scratches.
- ข้อมูลที่ป้อนไม่ถูกต้อง: ถ้าเชื่อมต่อกับ amplifier's dedicated "Phono" input, switch to a line-level input. Connecting to a phono input with the built-in phono stage active will cause distortion.
เสียงฮัมเพลง
- การต่อลงดิน: Ensure the turntable is properly grounded. While the Planar 1 Plus typically handles grounding internally, external interference can occur.
- การเดินสายเคเบิล: Keep audio cables away from power cables and other electrical interference sources.
- Component Proximity: Move the turntable away from other electronic devices that might emit electromagnetic interference.
Inconsistent Speed or Wow/Flutter
- สายพานขับ: Check the drive belt for wear, stretching, or proper seating on the motor pulley and sub-platter. Replace if necessary.
- Platter Seating: Ensure the platter is correctly seated on the spindle.
- Record Weight: While the Planar 1 Plus is robust, extremely heavy records (e.g., some 180g or 200g pressings) can sometimes challenge the motor's stability, especially if the belt is worn. Ensure the belt is in good condition.
ข้อมูลจำเพาะ
| ยี่ห้อ | REGA |
| ชื่อรุ่น | เรก้า พลานาร์ 1 พลัส |
| หมายเลขรุ่น | TT-PL1-PLUS-BLK-USA |
| ความเร็วการหมุนสูงสุด | 45 RPM (manual belt change for 33 1/3 RPM) |
| ส่วนประกอบที่รวมอยู่ | Rega Carbon moving magnet cartridge, built-in phono preamplifier, RB110 tonearm, 24 V synchronous AC motor, felt mat, dust cover, power supply, twin phono-to-phono lead. |
| คุณสมบัติพิเศษ | Built-In Phono Stage |
| วัสดุ | Plastic (Plinth), Phenolic Resin (Platter) |
| น้ำหนักสินค้า | 9.59 ปอนด์ (ประมาณ 4.35 กก.) |
| สี | สีดำด้าน |
| เทคโนโลยีการเชื่อมต่อ | มีสาย |
| อัตราส่วนสัญญาณต่อเสียงรบกวน | 65 เดซิเบล |
| เล่มที่tage | 24 โวลต์ |
| แหล่งพลังงาน | AC |
ข้อมูลการรับประกัน
The Rega Planar 1 Plus Turntable is covered by a การรับประกันจากผู้ผลิต 3 ปีการรับประกันนี้ครอบคลุมข้อบกพร่องด้านวัสดุและฝีมือการผลิตภายใต้การใช้งานปกติ โปรดเก็บหลักฐานการซื้อไว้เพื่อขอรับสิทธิ์การรับประกัน
The warranty does not cover damage caused by misuse, accident, unauthorized modification, or normal wear and tear of consumable parts such as the stylus or drive belt.
สนับสนุน
For further assistance, technical support, or warranty inquiries, please contact your authorized Rega dealer or visit the official Rega webเว็บไซต์.
เรก้า Webเว็บไซต์: www.rega.co.uk
คุณยังสามารถดูได้ที่ Rega Store on Amazon สำหรับข้อมูลผลิตภัณฑ์เพิ่มเติม