
การแนะนำ
Welcome to the world of sewing with your new Janome IT 1028 Glamour mechanical sewing machine. This manual provides essential information for the safe and efficient operation, setup, maintenance, and troubleshooting of your machine. Please read it thoroughly before using the machine to ensure optimal performance and longevity.
The Janome IT 1028 Glamour is designed for ease of use, featuring 12 stitch types, a free arm for circular sewing, an oscillating hook, automatic buttonholes, and adjustable stitch length and width. It also includes a double presser foot lift, feed dog lowering, a thread cutter, a needle threader, and a soft cover for protection.
คำแนะนำเพื่อความปลอดภัย
เพื่อลดความเสี่ยงต่อการเกิดไฟฟ้าช็อต ไฟไหม้ หรือการบาดเจ็บของบุคคล:
- ควรถอดปลั๊กเครื่องออกจากเต้ารับไฟฟ้าทุกครั้งหลังใช้งาน และก่อนทำความสะอาด ถอดฝาครอบ หรือปรับแต่งบริการใดๆ ให้กับผู้ใช้
- Do not allow the machine to be used as a toy. Close attention is necessary when the machine is used by or near children.
- Use this machine only for its intended use as described in this manual. Use only attachments recommended by the manufacturer.
- ห้ามใช้งานเครื่องนี้หากสายไฟหรือปลั๊กชำรุด หรือไม่ทำงานอย่างถูกต้อง ทำตกหรือชำรุด หรือตกน้ำ
- ห้ามทำตกหรือเสียบวัตถุใดๆ ลงในช่องเปิดใดๆ
- ห้ามใช้กลางแจ้ง
- ห้ามดำเนินการในบริเวณที่มีการใช้ผลิตภัณฑ์สเปรย์ หรือในบริเวณที่มีการส่งออกซิเจน
- วางนิ้วให้ห่างจากชิ้นส่วนที่เคลื่อนไหวทั้งหมด ต้องใช้ความระมัดระวังเป็นพิเศษรอบ ๆ เข็มจักรเย็บผ้า
- ควรใช้แผ่นยึดเข็มให้เหมาะสมเสมอ หากใช้แผ่นยึดเข็มที่ไม่ถูกต้อง เข็มอาจหักได้
- ห้ามใช้เข็มที่งอ
- อย่าดึงหรือดันผ้าขณะเย็บ เพราะอาจทำให้เข็มหักได้
- ควรปิดจักรเย็บผ้าทุกครั้งเมื่อทำการปรับแต่งบริเวณเข็ม เช่น การร้อยด้ายเข้าเข็ม การเปลี่ยนเข็ม การร้อยด้ายเข้ากระสวย หรือการเปลี่ยนตีนผี
- Always unplug the machine when removing the light bulb.
- ห้ามถอดปลั๊กโดยดึงที่สายไฟ หากต้องการถอด ให้จับที่ปลั๊ก ไม่ใช่ที่สายไฟ
สินค้าเกินview
คุณสมบัติหลัก
- 12 Stitch Types: Versatile options for various sewing projects.
- แขนอิสระ: Facilitates sewing cuffs, sleeves, and other small, circular items.
- Oscillating Hook: Ensures smooth and consistent stitch formation.
- สามารถปรับความยาวและความกว้างของตะเข็บได้: Provides control over stitch appearance.
- Automatic Four-Step Buttonhole: Simplifies the creation of professional-looking buttonholes.
- การยกตีนผีคู่: Allows for sewing thicker fabrics.
- Feed Dog Lowering: Useful for darning and free-motion quilting.
- เครื่องตัดเกลียว: Conveniently trims threads.
- ตัวร้อยเข็ม: Assists in quickly threading the needle.
- ปกอ่อน: Protects the machine from dust and damage.
ส่วนประกอบของเครื่องจักร
Familiarize yourself with the main parts of your Janome IT 1028 Glamour sewing machine.

รูปที่ 1 : ด้านหน้า view of the Janome IT 1028 Glamour sewing machine with the soft cover in place. This image shows the overall design and the stitch selection and length dials.

รูปที่ 2: ระยะใกล้ view of the stitch selector dial (left) and stitch length dial (right) on the Janome IT 1028 Glamour. The decorative illustration on the machine body is also visible.
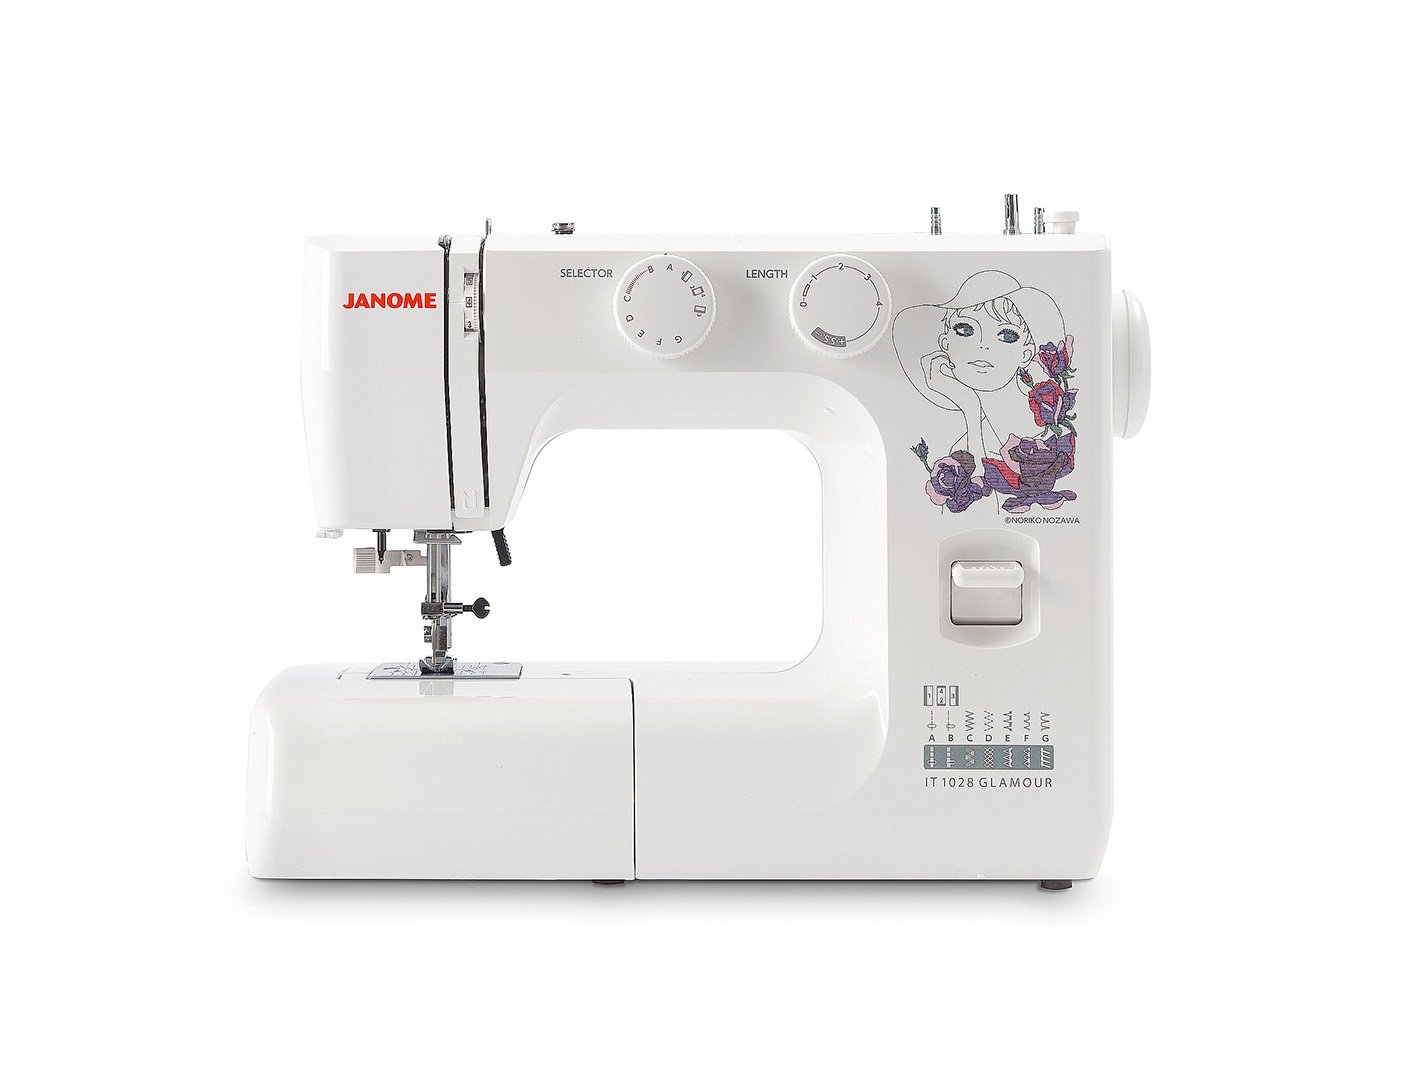
Figure 3: The Janome IT 1028 Glamour sewing machine with the accessory tray removed, revealing the free arm and the bobbin case area. This view is essential for bobbin insertion and cleaning.
การตั้งค่า
1. การแกะกล่องและการจัดวาง
- นำเครื่องออกจากบรรจุภัณฑ์อย่างระมัดระวัง
- วางเครื่องบนพื้นผิวเรียบและมั่นคง
- นำฟิล์มป้องกันหรือวัสดุบรรจุภัณฑ์ออกให้หมด
2. การเชื่อมต่อไฟฟ้า
- ตรวจสอบให้แน่ใจว่าสวิตช์เปิดปิดของเครื่องอยู่ในตำแหน่ง "ปิด"
- เสียบสายไฟเข้ากับช่องเสียบสายไฟของเครื่อง
- เสียบสายไฟเข้ากับเต้ารับไฟฟ้าที่เหมาะสม
3. การพันด้ายลงกระสวย
- วางหลอดด้ายไว้บนแกนยึดหลอดด้าย
- สอดด้ายผ่านตัวนำด้ายด้านบนและรอบจานปรับความตึงของแกนม้วนด้าย
- สอดด้ายผ่านรูในกระสวยจากด้านในออกไปด้านนอก
- Place the bobbin onto the bobbin winder spindle and push the spindle to the right.
- Start the machine. The bobbin will wind automatically. Stop when the bobbin is full.
- Cut the thread and push the bobbin winder spindle to the left. Remove the bobbin.
4. การใส่กระสวย
- ปิดเครื่อง
- Open the bobbin cover plate located on the free arm.
- Insert the bobbin into the bobbin case with the thread running in the direction indicated by the arrows.
- Pull the thread through the tension spring and into the guide slot.
- ปิดฝาครอบกระสวย
5. การร้อยด้ายบน
- ยกตีนผีขึ้น
- วางหลอดด้ายไว้บนแกนยึดหลอดด้าย
- สอดด้ายผ่านตัวนำด้ายด้านบน
- Bring the thread down the right channel, up the left channel, and through the take-up lever from right to left.
- ดำเนินการนำด้ายลงมาจนถึงตัวนำด้ายของแกนเข็ม
- Use the built-in needle threader or manually thread the needle from front to back.
- ดึงด้ายผ่านรูเข็มประมาณ 6 นิ้ว
6. การดึงด้ายกระสวยขึ้นมา
- ใช้มือซ้ายจับเส้นด้ายด้านบนเบาๆ
- Turn the handwheel towards you to lower the needle into the needle plate and then raise it.
- The upper thread will catch the bobbin thread, forming a loop.
- Pull the loop to bring the bobbin thread up through the needle plate hole.
- ดึงด้ายทั้งสองเส้น (ด้ายบนและด้ายล่าง) ลอดใต้ตีนผีและไปทางด้านหลังของเครื่อง
คำแนะนำการใช้งาน
1. การเลือกเย็บ
หมุน ปุ่มเลือกตะเข็บ Select (refer to Figure 2) to choose your desired stitch pattern. The available stitches are indicated by letters or symbols on the dial.
2. การปรับความยาวและความกว้างของตะเข็บ
- ความยาวตะเข็บ: ใช้ หน้าปัดความยาวตะเข็บ (refer to Figure 2) to adjust the length of your stitches. Higher numbers indicate longer stitches.
- ความกว้างของตะเข็บ: For stitches that allow width adjustment, use the corresponding dial or setting. (Note: The Janome IT 1028 Glamour has adjustable stitch width, typically integrated with the stitch selector or a separate dial. Consult the machine's markings for specific controls.)
3. การเย็บปักถักร้อยขั้นพื้นฐาน
- วางผ้าไว้ใต้ตีนผีเย็บผ้า
- ลดตีนผียกตีนผี
- เปิดเครื่อง
- Gently press the foot controller to start sewing. The harder you press, the faster the machine will sew.
- Guide the fabric gently with your hands, but do not pull or push forcefully.
- To secure the beginning and end of a seam, use the reverse lever to sew a few stitches backward.
- When finished, raise the needle to its highest position, lift the presser foot, and pull the fabric away from the machine.
- Use the built-in thread cutter or scissors to trim the threads.
4. Using the Free Arm
To use the free arm, simply slide off the accessory tray (refer to Figure 3). This exposes the narrow free arm, ideal for sewing small, tubular items like sleeves, pant hems, and cuffs.
5. Automatic Four-Step Buttonholes
The Janome IT 1028 Glamour features an automatic four-step buttonhole function. Refer to the stitch selector dial for the buttonhole settings (usually marked with a buttonhole symbol and steps 1-4).
- ติดตีนผีรังดุม
- ทำเครื่องหมายตำแหน่งรังดุมบนผ้าของคุณ
- ตั้งค่าตัวเลือกการเย็บไปที่ขั้นตอนการเย็บรังดุมขั้นแรก
- เย็บด้านแรกของรังดุม
- Change the stitch selector to the next step and sew the bar tack.
- Continue through all four steps, following the machine's markings for each segment of the buttonhole.
- Carefully cut open the buttonhole using a seam ripper, ensuring not to cut the stitches.
การซ่อมบำรุง
1. การทำความสะอาดเครื่อง
การทำความสะอาดอย่างสม่ำเสมอจะช่วยรักษาประสิทธิภาพการทำงานของเครื่อง ควรดึงปลั๊กเครื่องออกก่อนทำความสะอาดทุกครั้ง
- บริเวณแกนม้วนด้าย: Remove the needle plate and bobbin case. Use a small brush to remove lint and dust from the bobbin area and feed dogs.
- ภายนอก: เช็ดพื้นผิวภายนอกด้วยผ้าแห้งนุ่มๆ ห้ามใช้สารเคมีรุนแรงหรือน้ำยาทำความสะอาดที่มีฤทธิ์กัดกร่อน
2. การเปลี่ยนเข็ม
Replace the needle regularly (after 8-10 hours of sewing) or if it becomes bent, dull, or damaged. A damaged needle can cause skipped stitches or fabric damage.
- ปิดเครื่องและถอดปลั๊กออก
- คลายเข็ม clamp สกรู
- ถอดเข็มเก่าออก
- ใส่เข็มใหม่โดยให้ด้านแบนหันเข้าด้านหลังของเครื่อง แล้วดันขึ้นให้สุด
- ขันเข็มให้แน่นamp ขันสกรูให้แน่น
การแก้ไขปัญหา
ส่วนนี้จะกล่าวถึงปัญหาทั่วไปที่คุณอาจพบ สำหรับปัญหาที่ไม่ได้ระบุไว้ในที่นี้ โปรดติดต่อฝ่ายสนับสนุนลูกค้า
| ปัญหา | สาเหตุที่เป็นไปได้ | สารละลาย |
|---|---|---|
| ข้ามตะเข็บ | เข็มไม่ถูกต้อง เข็มงอ การร้อยด้ายไม่ถูกวิธี ขนาดเข็มไม่เหมาะสมกับเนื้อผ้า | Replace needle, re-thread machine, ensure correct needle type/size. |
| ด้ายขาด (ด้านบน) | Improper threading, tension too tight, poor quality thread, bent needle, burr on needle plate. | Re-thread machine, adjust upper tension, use quality thread, replace needle, check needle plate for damage. |
| ด้ายขาด (กระสวย) | กระสวยพันด้ายไม่ถูกต้อง, ใส่กระสวยไม่ถูกวิธี, มีเศษด้ายในกล่องกระสวย, แรงดึงด้ายแน่นเกินไป | Re-wind bobbin, re-insert bobbin correctly, clean bobbin case, adjust bobbin tension (if adjustable). |
| เย็บไม่เท่ากัน | Incorrect tension settings, pulling/pushing fabric, wrong presser foot. | Adjust tension, guide fabric gently, use appropriate presser foot. |
| เครื่องไม่สตาร์ท | ไม่ได้เสียบปลั๊ก ปิดสวิตช์ไฟ และไม่ได้เชื่อมต่อแป้นเหยียบควบคุม | ตรวจสอบการเชื่อมต่อสายไฟ ตรวจสอบให้แน่ใจว่าสวิตช์เปิดอยู่ และเชื่อมต่อตัวควบคุมเท้า |
ข้อมูลจำเพาะ
- หมายเลขรุ่น: 8100000017663 (IT 1028 Glamour)
- ยี่ห้อ: เจโนเม
- วัสดุ: พลาสติก
- น้ำหนัก: 8 กิโลกรัม
- Dimensions (P x L x H): 10 cm x 35 cm x 25 cm (Depth x Width x Height)
- แหล่งพลังงาน: สายไฟฟ้า
- ประเภทของตะเข็บ: 12
- ประเภทตะขอ: ที่สั่น
- Buttonhole Type: Automatic Four-Step
การรับประกันและการสนับสนุน
For warranty information, service, or technical support, please refer to the warranty card included with your product or contact your authorized Janome dealer or customer service center. Keep your purchase receipt as proof of purchase.