
1. บทนำ
Thank you for choosing the Technoline WT 538 Wireless Projection Alarm Clock. This modern device features a touch sensor for projection and illumination, designed to integrate seamlessly into your digital lifestyle. It offers a radio-controlled clock with manual setting options, date and weekday display in 7 languages, 12/24 hour format, time zone adjustment, and indoor temperature display in Celsius or Fahrenheit. The alarm includes a customizable snooze function, and the time can be projected onto a wall or ceiling. This manual provides detailed instructions for setup, operation, and maintenance to ensure optimal performance of your alarm clock.

ภาพที่ 1.1: ด้านหน้า view of the Technoline WT 538 Wireless Projection Alarm Clock in use, showing its display and projection feature.
2. ข้อมูลด้านความปลอดภัย
- อ่านคำแนะนำทั้งหมดอย่างละเอียดก่อนใช้อุปกรณ์
- เก็บอุปกรณ์ให้ห่างจากน้ำ ความชื้น และอุณหภูมิที่สูงเกินไป
- Use only the specified power adapter (4.5V) and battery type (2 x 1.5V AAA).
- อย่าพยายามถอดประกอบหรือซ่อมแซมอุปกรณ์ด้วยตนเอง แนะนำให้ส่งช่างผู้ชำนาญการไปรับบริการทั้งหมด
- ทิ้งแบตเตอรี่ที่ใช้แล้วอย่างรับผิดชอบตามข้อบังคับท้องถิ่น
3. เนื้อหาบรรจุภัณฑ์
โปรดตรวจสอบว่าสินค้าทั้งหมดมีอยู่และอยู่ในสภาพดี:
- Technoline WT 538 Wireless Projection Alarm Clock
- อะแดปเตอร์ 4.5V
- แบตเตอรี่ AAA 2 ก้อน 1.5V
- คู่มือการใช้งาน (เอกสารนี้)
4. สินค้าหมดview
Familiarize yourself with the main components and controls of your WT 538 alarm clock.
4.1 Front Display and Projection
The front of the device features a clear digital display showing time, date, weekday, and indoor temperature. The projection lens is located on the side, allowing time to be projected onto a surface.

ภาพที่ 4.1: รายละเอียด view of the alarm clock's digital display.
4.2 Rear Controls and Connections
The back of the alarm clock houses the control buttons, battery compartment, and power adapter input.

ภาพที่ 4.2: ด้านหลัง view showing buttons (SET, ALARM, +, -, WAVE), projection ON/OFF switch, alarm ON/OFF switch, battery compartment, and DC 4.5V power input.
5. การตั้งค่า
5.1 การติดตั้งแบตเตอรี่
- เปิดฝาปิดช่องใส่แบตเตอรี่ที่ด้านหลังของอุปกรณ์
- Insert 2 x 1.5V AAA batteries, ensuring correct polarity (+ and -).
- ปิดฝาช่องใส่แบตเตอรี่ให้แน่น
5.2 Power Adapter Connection
For continuous operation and permanent projection, connect the included 4.5V power adapter.
- Plug the small end of the power adapter into the DC 4.5V input jack on the back of the alarm clock.
- เสียบปลายอีกด้านของอะแดปเตอร์แปลงไฟเข้ากับเต้ารับไฟฟ้ามาตรฐาน
5.3 การตั้งค่าเริ่มต้น
Upon first power-on (either with batteries or power adapter), the clock will attempt to synchronize with the radio-controlled time signal. This process may take a few minutes. If the signal is not received, you can set the time manually.
6. คู่มือการใช้งาน
6.1 Time Setting (Radio-Controlled and Manual)
- Radio-Controlled Time: The clock automatically attempts to receive the DCF-77 radio signal for accurate time. A signal icon on the display indicates reception status.
- การตั้งเวลาด้วยตนเอง: If radio reception is poor, press and hold the 'SET' button to enter manual time setting mode. Use the '+' and '-' buttons to adjust hours, minutes, and other settings. Press 'SET' again to confirm each step.
- รูปแบบ 12/24 ชั่วโมง: During manual time setting, you can switch between 12-hour (with AM/PM indicator) and 24-hour formats.
- การตั้งค่าโซนเวลา: Adjust the time zone offset if needed, typically during manual setup.
6.2 การแสดงวันที่และวันในสัปดาห์
The display shows the current date and weekday. The weekday can be displayed in 7 different languages. Refer to the manual setting section to cycle through language options.
6.3 Indoor Temperature Display
The alarm clock continuously displays the indoor temperature. Press the '°C/°F' button to switch between Celsius and Fahrenheit units.
6.4 ฟังก์ชั่นปลุก
- Press the 'ALARM' button once to view เวลาปลุกปัจจุบัน
- Press and hold the 'ALARM' button to enter alarm setting mode. Use '+' and '-' to adjust the alarm hour and minute. Press 'ALARM' to confirm.
- Use the 'ALARM ON/OFF' switch on the back to activate or deactivate the alarm. An alarm icon will appear on the display when active.
6.5 ฟังก์ชั่นเลื่อนซ้ำ
When the alarm sounds, gently touch the top of the alarm clock (touch sensor area) to activate the snooze function. The alarm will pause for a preset duration (adjustable during alarm setup) and sound again later.
6.6 การเปิดใช้งานไฟแบ็คไลท์
The display backlight can be activated by gently touching the top of the alarm clock (touch sensor area). This provides temporary illumination for easy viewในสภาพแสงน้อย
6.7 ฟังก์ชันการฉายภาพ
The WT 538 can project the time onto a wall or ceiling.
- Temporary Projection: Gently touch the top of the alarm clock (touch sensor area) to activate the projection temporarily.
- Permanent Projection: Permanent projection is only possible when the alarm clock is powered by the included 4.5V power adapter. Use the 'Projection ON/OFF' switch on the back of the device to enable continuous projection.
- Adjust the angle of the projection lens to achieve the desired position and focus.
7. การบำรุงรักษา
7.1 การทำความสะอาด
Wipe the device with a soft, dry cloth. Do not use abrasive cleaners or solvents, as these may damage the surface.
7.2 การเปลี่ยนแบตเตอรี่
When the display dims or the device functions become unreliable, it is time to replace the batteries. Follow the battery installation steps in Section 5.1.
8 การแก้ไขปัญหา
- ไม่มีภาพแสดง/อุปกรณ์ไม่เปิดใช้งาน: Check battery polarity, ensure batteries are fresh, or verify the power adapter is correctly connected and plugged into a working outlet.
- Poor Radio Signal Reception: Move the alarm clock to a location away from electronic devices that may cause interference. Try different orientations.
- Projection Unclear/Out of Focus: Adjust the projection lens to focus the image. Ensure the projection surface is within the optimal range.
- Projection Not Permanent: Ensure the alarm clock is connected to the power adapter and the 'Projection ON' switch is activated. Permanent projection is not available when running on batteries alone.
- สัญญาณเตือนไม่ส่งเสียง: Check if the alarm is set correctly and the 'ALARM ON' switch is activated.
9. ข้อมูลจำเพาะ
| คุณสมบัติ | ข้อมูลจำเพาะ |
|---|---|
| ยี่ห้อ | เทคโนไลน์ |
| แบบอย่าง | WT 538 |
| ประเภทจอภาพ | ดิจิตอล |
| คุณสมบัติพิเศษ | Alarm, Calendar Display, Multiple Time Zones, Snooze, Silent Clock, Illuminated, Projection |
| ขนาดของผลิตภัณฑ์ (กว้าง x สูง x ลึก) | 15 cm x 9 cm x 1.5 cm (with battery compartment: 4 cm) |
| น้ำหนัก (รวมแบตเตอรี่) | 0.202 กก. |
| แหล่งพลังงาน | 4.5V Power Adapter (included) or 2 x 1.5V AAA Batteries (included) |
| ประเภทการติดตั้ง | โต๊ะวางของ |
| วัสดุกรอบ | อะคริโลไนไตรล์บิวทาไดอีนสไตรีน |
| ช่วงการวัดอุณหภูมิ | -9.9°C ถึง 50°C |
| ความละเอียดของอุณหภูมิ | 0.1 องศาฟาเรนไฮต์ |
| ความแม่นยำของอุณหภูมิ | 0 °C to 40 °C: ± 1 °C; -9.9 °C to -0.1 °C: ± 2 °C; 40 °C to 50 °C: ± 2 °C |
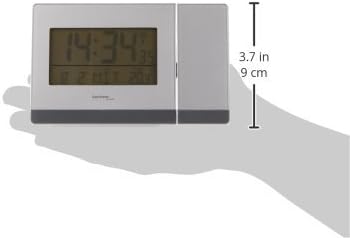
ภาพที่ 9.1: ด้านข้าง view illustrating the dimensions of the alarm clock.
10. การรับประกันและการสนับสนุน
For warranty information or technical support, please refer to the documentation provided with your purchase or contact your retailer. Keep your proof of purchase for any warranty claims.