
1. บทนำ
This manual provides detailed instructions for the operation and maintenance of your FEELWORLD T7PLUS 7-inch DSLR Camera Monitor. Please read this manual thoroughly before using the product to ensure proper function and to prevent damage. Keep this manual for future reference.
2. สินค้าหมดview
The FEELWORLD T7PLUS is a high-resolution 7-inch camera monitor designed for professional photography and video production. It features a 1920x1200 display, 4K HDMI input/output, and advanced monitoring tools.
2.1 คุณสมบัติหลัก
- จอแสดงผลความละเอียดสูง: 7-inch screen with 1920 x 1200 resolution, 1200:1 contrast ratio, and Rec.709 color standard for vivid and accurate image reproduction.
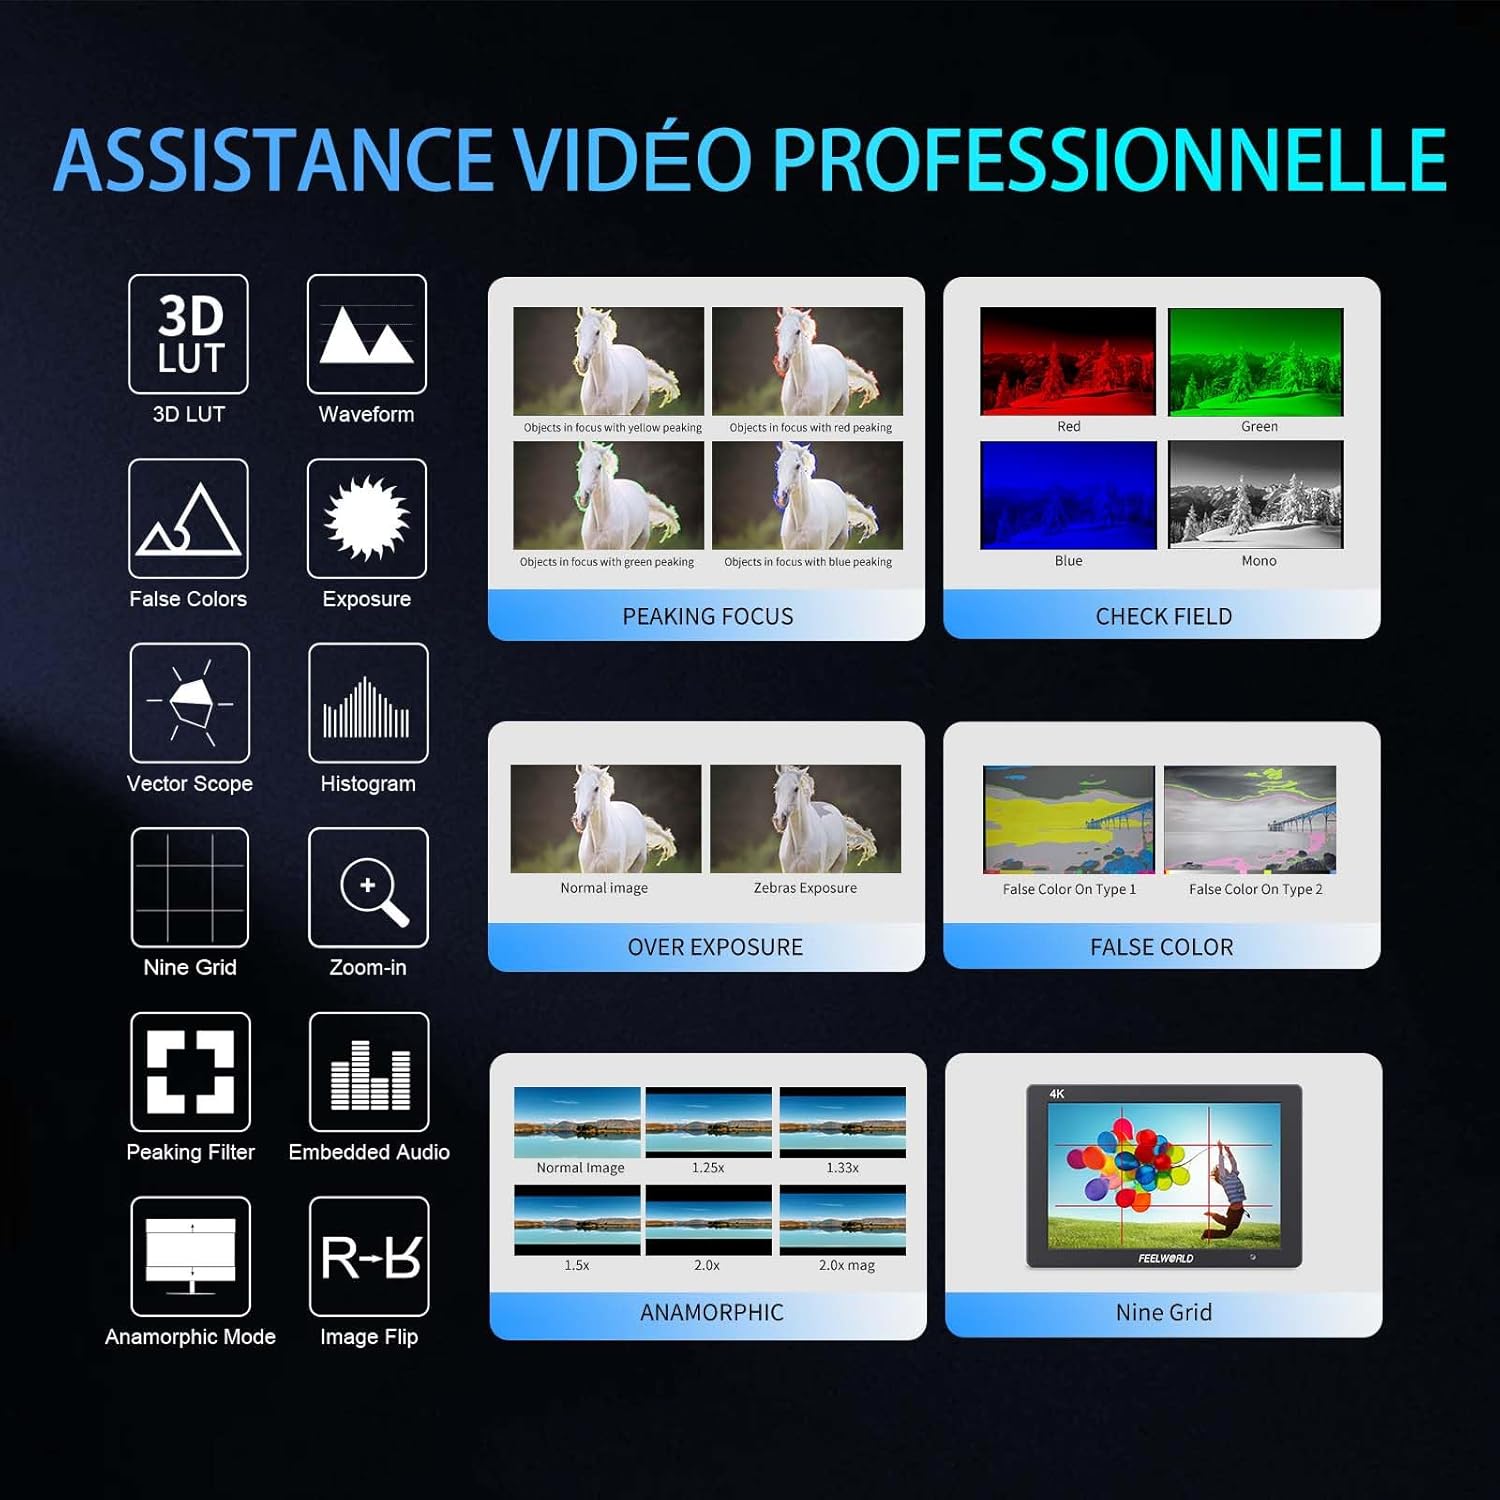
- Advanced Customization Functions: Supports 32 custom 3D LUTs and professional tools including waveform, vector scope, RGB histogram, peaking focus, false color, and more for precise control during shooting.
- การเชื่อมต่อที่หลากหลาย: Equipped with 4K HDMI input and output, allowing simultaneous display and transmission of live signals to other monitors without compromising video quality.
- ดีไซน์น้ำหนักเบาและทนทาน: Slim 18mm aluminum casing, weighing only 320g.
- ตัวเลือกพลังงานที่ยืดหยุ่น: Compatible with F550/F970 series batteries and DC 12V power input.
2.2 ส่วนประกอบ
แพ็คเกจประกอบด้วยรายการต่อไปนี้:
- 1 x FEELWORLD T7PLUS Monitor
- สายมินิ HDMI 1 เส้น
- 1 x ม่านบังแดด
- 1 x Warming Boot Holder
- 1 x F970 Battery Plate
- 1 x F550 Battery
- 1 x คู่มือผู้ใช้
- สายอะแดปเตอร์ USB 1 เส้น
- 1 x กระเป๋า

ภาพ: ด้านหน้า view of the FEELWORLD T7PLUS monitor, showcasinด้วยหน้าจอขนาด 7 นิ้ว

Image: A visual representation of all items included in the FEELWORLD T7PLUS package, including the monitor, cables, battery, and accessories.
3. การตั้งค่า
3.1 การติดตั้งจอภาพ
The T7PLUS monitor can be mounted using the included warming boot holder or other compatible mounting solutions. Ensure the monitor is securely attached to your camera rig or stand.

Image: The FEELWORLD T7PLUS monitor shown mounted on top of a DSLR camera, ready for use.
3.2 การเชื่อมต่อสายไฟ
The monitor supports two power input methods:
- พลังงานแบตเตอรี่: Attach a compatible F550 or F970 series battery to the F970 battery plate on the back of the monitor.
- แหล่งจ่ายไฟ DC 12V: Connect a 12V/1.5A DC power adapter to the DC 12V input port on the side of the monitor.

ภาพ: ระยะใกล้ view of the rear of the FEELWORLD T7PLUS monitor, highlighting the battery plate and DC 12V power input port.
3.3 การเชื่อมต่อ HDMI
Connect your camera or video source to the HDMI-IN port using the provided Mini HDMI cable. If you need to output the signal to another monitor, use the HDMI-OUT port.
ภาพ: ด้านข้าง view of the FEELWORLD T7PLUS monitor, showing the HDMI-IN and HDMI-OUT ports, along with the DC 12V input and headphone jack.
4. คู่มือการใช้งาน
4.1 การควบคุมขั้นพื้นฐาน
The monitor features several buttons for navigation and function control:
- ปุ่มเปิด/ปิด: Press and hold to turn the monitor on/off.
- ปุ่มเมนู: เข้าสู่เมนูหลัก
- ปุ่มลูกศร (ขึ้น/ลง/ซ้าย/ขวา): เลือกดูตัวเลือกในเมนูและปรับการตั้งค่า
- F1-F4 Function Buttons: Customizable shortcut buttons for quick access to frequently used features.

Image: Close-up of the control buttons on the top edge of the FEELWORLD T7PLUS monitor, including power, menu, navigation, and customizable function buttons (F1-F4).
4.2 การนำทางเมนู
Press the MENU button to open the main menu. Use the arrow buttons to navigate through categories and options. Press the MENU button again or the right arrow to confirm selections. To exit the menu, press the left arrow button repeatedly until the menu closes.
5. คุณสมบัติขั้นสูง
5.1 3D LUT (Look Up Table)
The T7PLUS supports loading up to 32 custom 3D LUTs via a USB drive. This allows you to preview ฟู่ของคุณtage with specific color grades in real-time.
- บันทึก LUT .cube ของคุณ files to the root directory of a USB drive.
- Connect the USB drive to the monitor's USB port.
- Navigate to the "LUT" menu option.
- Select "Load LUT" and choose your desired LUT file.
- You can switch between loaded LUTs for quick comparison.

Image: The FEELWORLD T7PLUS monitor displaying the 3D LUT menu, showing options for loading and managing custom LUT fileจากไดรฟ์ USB
5.2 Waveform, Vector Scope, and Histogram
These tools provide detailed analysis of your video signal, helping you achieve accurate exposure and color balance.
- รูปแบบของคลื่น: แสดงระดับความสว่างและค่าความอิ่มตัวของสีของสัญญาณวิดีโอของคุณ
- ขอบเขตเวกเตอร์: Shows the color hue and saturation.
- RGB ฮิสโตแกรม: Illustrates the distribution of red, green, and blue color channels.
These functions can be activated individually or simultaneously via the menu or assigned to a function button.
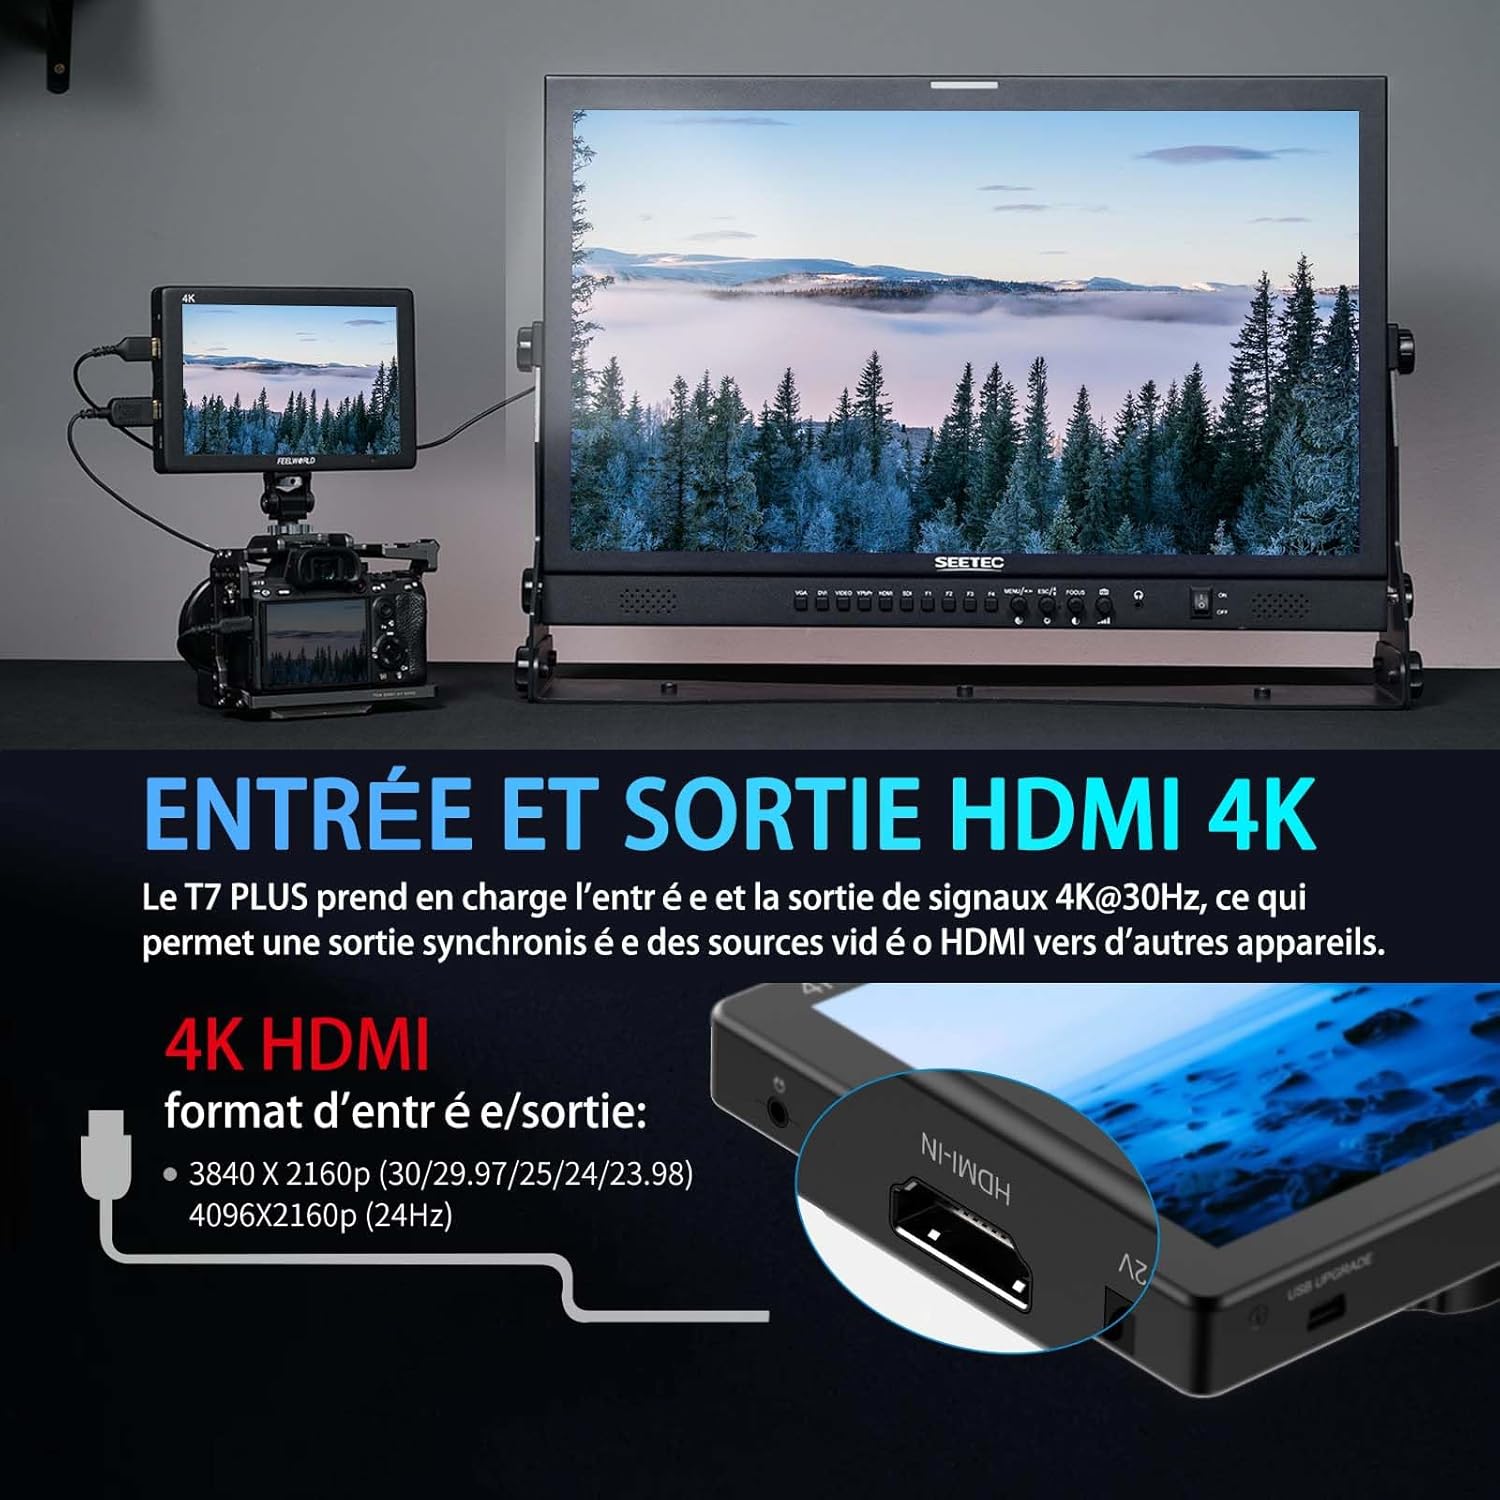
Image: The FEELWORLD T7PLUS monitor displaying a waveform monitor, showing the luminance and chrominance levels of the video input.
5.3 Other Monitoring Tools
- ระบบช่วยเพิ่มสมาธิสูงสุด: Highlights sharp edges to aid in achieving precise focus.
- สีเท็จ: แสดงระดับการรับแสงโดยใช้สเปktrumสี
- Exposure (Zebras): Indicates overexposed areas with zebra patterns.
- ขยายเข้า: ขยายส่วนใดส่วนหนึ่งของภาพเพื่อให้สามารถโฟกัสได้อย่างแม่นยำ
- ตารางเก้าช่อง: Overlays a grid for composition assistance.
- โหมดอนามอร์ฟิก: De-squeezes anamorphic footage.
- พลิกภาพ: พลิกภาพในแนวนอนหรือแนวตั้ง
- เสียงในตัว: Displays audio levels from the HDMI input.
6. ข้อมูลจำเพาะ
| คุณสมบัติ | ข้อมูลจำเพาะ |
|---|---|
| ยี่ห้อ | FEELWORLD |
| หมายเลขรุ่น | T7 PLUS |
| ขนาดหน้าจอ | 7 นิ้ว |
| ปณิธาน | 1920 x 1200 (UXGA Wide) |
| อัตราส่วนภาพ | 16:10 น. |
| อัตราส่วนคอนทราสต์ | 1200:1 น. |
| ความสว่าง | 450 นิต |
| อัตราการรีเฟรช | 60 เฮิรตซ์ |
| Viewอิงแองเกิล | 178 องศา |
| เทคโนโลยีการเชื่อมต่อ | HDMI |
| พอร์ต HDMI | 1x HDMI-IN, 1x HDMI-OUT (Supports 4K@30Hz) |
| คุณสมบัติพิเศษ | Advanced Customization with 3D LUT |
| อุปกรณ์ที่รองรับ | DSLR Camera, Camcorder, Handheld Stabilizer |
| น้ำหนัก | 1 Kilogram (approx. 320g for monitor only) |
| กำลังไฟเข้า | แผ่นแบตเตอรี่ DC 12V, NP-F |
7 การแก้ไขปัญหา
- ไม่มีไฟฟ้า:
- Ensure the battery is fully charged and correctly inserted, or the DC adapter is securely connected to a power source.
- ตรวจสอบปุ่มเปิด/ปิดเพื่อให้ใช้งานได้อย่างถูกต้อง
- ไม่มีสัญญาณ:
- Verify that the HDMI cable is securely connected to both the camera/source and the monitor's HDMI-IN port.
- Confirm the camera's HDMI output settings are correct and active.
- ลองใช้สาย HDMI เส้นอื่น
- ภาพบิดเบี้ยว/สีผิดเพี้ยน:
- Check the monitor's color settings and ensure no LUTs are incorrectly applied.
- Verify the camera's video output format is compatible with the monitor.
- ปุ่มไม่ตอบสนอง:
- Restart the monitor by turning it off and on again.
- ตรวจสอบให้แน่ใจว่าไม่มีเศษสิ่งสกปรกกีดขวางปุ่มกด
8. การบำรุงรักษา
- การทำความสะอาด: Use a soft, dry cloth to clean the monitor's body. For the screen, use a specialized screen cleaning solution and a microfiber cloth. Avoid harsh chemicals or abrasive materials.
- พื้นที่จัดเก็บ: When not in use, store the monitor in a cool, dry place, away from direct sunlight and extreme temperatures. Use the provided bag for protection during transport.
- การดูแลแบตเตอรี่ If using batteries, ensure they are charged periodically even when not in use to maintain battery health.
9. การรับประกันและการสนับสนุน
The FEELWORLD T7PLUS monitor comes with a รับประกัน 1 ปี from the FEELWORLD Official Store. For technical support, service, or warranty claims, please contact FEELWORLD customer service through their official channels or the retailer where the product was purchased.
หากต้องการข้อมูลเพิ่มเติม โปรดเยี่ยมชม FEELWORLD Brand Store.
10. วิดีโอผลิตภัณฑ์
Video: A short product showcase of the FEELWORLD T7PLUS monitor, demonstrating its physical design, various ports (HDMI-IN, HDMI-OUT, DC 12V), and control buttons. This video provides a visual overview of the monitor's external features and connectivity options.