
1. สินค้าหมดview
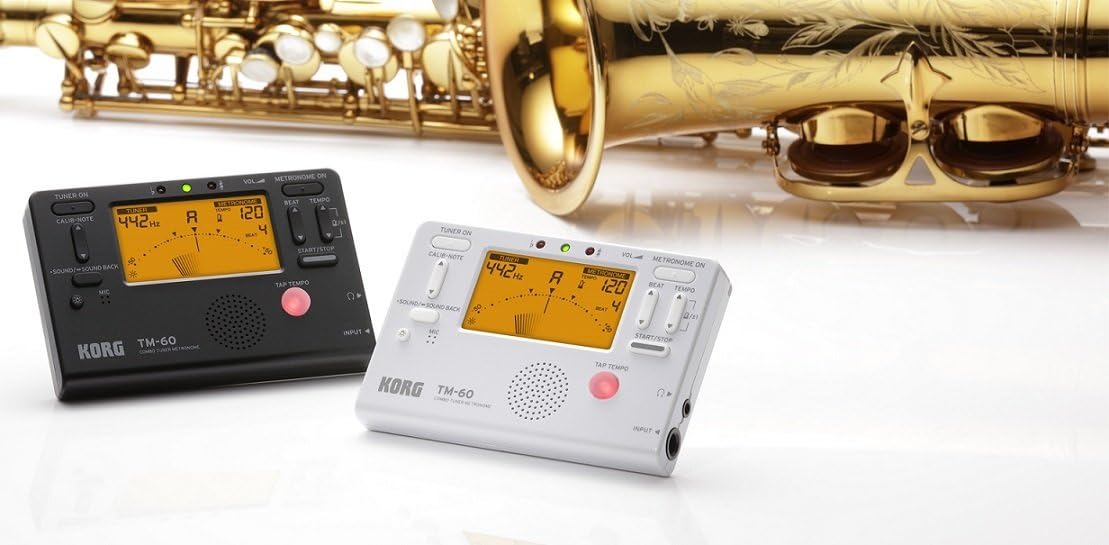
The KORG TM60CBK is a versatile combo tuner and metronome designed for musicians. It features a high-precision tuner function and a metronome function that can be used simultaneously. This model includes a CM-200 Contact Clip-on Microphone for enhanced tuning accuracy, especially in noisy environments. The large screen displays both tuner and metronome functions clearly, making it an essential tool for practicing.
- ฟังก์ชั่นคู่: High-precision tuner and metronome functions can be used concurrently.
- รวมไมโครโฟน: Comes with a CM-200 Contact Clip-on Microphone for direct instrument tuning.
- จอแสดงผลที่ชัดเจน: Features a new, larger screen for simultaneous display of tuner and metronome.
- สี: สีดำ.
2. การตั้งค่า
2.1 การติดตั้งแบตเตอรี่
The KORG TM60CBK operates on AAA batteries. To install or replace batteries:
- เปิดฝาปิดช่องใส่แบตเตอรี่ที่อยู่ด้านหลังของตัวเครื่อง
- Insert the AAA batteries, ensuring correct polarity (+/-).
- ปิดฝาช่องใส่แบตเตอรี่ให้แน่น
2.2 Connecting the CM-200 Contact Clip-on Microphone
For precise tuning, especially with acoustic instruments or in loud settings, connect the included clip-on microphone:
- Plug the microphone's 1/4-inch (6.35mm) jack into the INPUT jack on the side of the TM60CBK unit.
- Attach the clip to the headstock or bell of your instrument. Ensure the clip is securely fastened and the microphone is positioned to pick up vibrations effectively.
3. คู่มือการใช้งาน
โหมดจูนเนอร์ 3.1
To use the tuner function:
- Press the 'TUNER ON' button to activate the tuner.
- Select the desired instrument mode (Chromatic, Guitar, Bass, Violin, Ukulele) using the 'ITEM' button.
- Adjust the A4 calibration pitch (default 440Hz) using the 'CALIB./NOTE' buttons if needed.
- Play a single note on your instrument. The display will show the detected note and indicate if it is sharp, flat, or in tune using the needle-style meter and LED indicators.
3.2 โหมดเมโทรโนม
To use the metronome function:
- Press the 'METRONOME ON' button to activate the metronome.
- Set the desired tempo (BPM) using the 'TEMPO' buttons.
- Adjust the beat (time signature) using the 'BEAT' buttons.
- Select different rhythm patterns using the 'RHYTHM' button.
- Press 'START/STOP' to begin or pause the metronome.
- Adjust the volume using the 'VOL' slider on the side of the unit.
- For private practice, plug headphones into the 3.5mm headphone jack.
- Use the 'TAP TEMPO' button to set the tempo by tapping along to a desired rhythm.
3.3 เครื่องกำเนิดเสียง
The TM60CBK can also generate reference tones:
- In Tuner Mode, press the 'SOUND/SOUND BACK' button to activate the tone generator.
- Use the 'CALIB./NOTE' buttons to select the desired reference note.
- Listen to the generated tone and tune your instrument by ear.
4. รูปภาพผลิตภัณฑ์



5. ข้อมูลจำเพาะ
| คุณสมบัติ | รายละเอียด |
|---|---|
| ชื่อรุ่น | ทีเอ็ม60 |
| หมายเลขรุ่น | TM60C-BK |
| สี | สีดำ |
| ขนาดรายการ (ยาว x กว้าง x สูง) | 4.37 x 2.91 x 0.71 นิ้ว |
| น้ำหนักสินค้า | 0.16 กรัม |
| ส่วนประกอบที่รวมอยู่ | ถุง |
| ประเภทขั้วต่อ | USB (for power, not data) |
6. การบำรุงรักษา
To ensure the longevity and optimal performance of your KORG TM60CBK:
- การทำความสะอาด: เช็ดทำความสะอาดตัวเครื่องด้วยผ้าแห้งเนื้อนุ่ม หลีกเลี่ยงการใช้สารทำความสะอาดที่มีฤทธิ์กัดกร่อนหรือตัวทำละลาย
- การดูแลแบตเตอรี่ ถอดแบตเตอรี่ออกหากจะไม่ได้ใช้งานเครื่องเป็นเวลานานเพื่อป้องกันการรั่วไหล
- พื้นที่จัดเก็บ: เก็บอุปกรณ์ไว้ในที่แห้งและเย็น หลีกเลี่ยงแสงแดดโดยตรงและอุณหภูมิที่สูงหรือต่ำเกินไป
7 การแก้ไขปัญหา
- เครื่องไม่เปิดเครื่อง: ตรวจสอบการติดตั้งแบตเตอรี่และให้แน่ใจว่าแบตเตอรี่ไม่หมด
- Tuner is inaccurate: Ensure the CM-200 microphone is securely attached to the instrument. Verify the correct instrument mode is selected. Check the A4 calibration pitch.
- ไม่มีเสียงจากเครื่องตีจังหวะ: Check the volume level. Ensure headphones are not plugged in if you intend to use the internal speaker.
8. การรับประกันและการสนับสนุน
For warranty information, technical support, or service inquiries, please refer to the official KORG website or contact KORG customer service directly. Keep your purchase receipt as proof of purchase for warranty claims.