
1. บทนำ
This manual provides detailed instructions for the installation, operation, maintenance, and troubleshooting of your FSP 400W Micro ATX Power Supply (Model FSP400-60GHS(85)-R1). This power supply unit is designed for compact small form factor PC systems, offering 400 watts of power output with 80 Plus Bronze certification for high efficiency. It is compatible with Intel and AMD CPU systems and standard PC configurations.
Please read this manual thoroughly before installation and operation to ensure proper usage and to prevent damage to the unit or other components.
2. ข้อมูลด้านความปลอดภัย
คำเตือน: แหล่งจ่ายไฟมีแรงดันไฟฟ้าสูงtagส่วนประกอบต่างๆ ห้ามเปิดแหล่งจ่ายไฟasinก. ไม่มีชิ้นส่วนใดที่ผู้ใช้สามารถซ่อมบำรุงได้ภายใน การเปิด casing will void the warranty and poses a risk of electric shock.
- ตรวจสอบให้แน่ใจว่าได้ตัดการเชื่อมต่อแหล่งจ่ายไฟจากเต้ารับไฟฟ้า AC ก่อนการติดตั้งหรือการบำรุงรักษา
- ติดตั้งแหล่งจ่ายไฟในบริเวณที่มีอากาศถ่ายเทได้ดี
- Do not operate the power supply in high humidity or extreme temperature environments.
- ใช้เฉพาะสายเคเบิลที่ให้มาพร้อมกับแหล่งจ่ายไฟเท่านั้น
- ตรวจสอบให้แน่ใจว่าเชื่อมต่อสายเคเบิลทั้งหมดอย่างแน่นหนา ก่อนที่จะเปิดระบบ
- ผลิตภัณฑ์นี้ออกแบบมาเพื่อใช้กับคอมพิวเตอร์ส่วนบุคคลเท่านั้น ห้ามใช้เพื่อวัตถุประสงค์อื่นใด
3. เนื้อหาบรรจุภัณฑ์
ตรวจสอบว่ามีสินค้าทั้งหมดที่ระบุไว้ด้านล่างอยู่ในแพ็คเกจของคุณ:
- FSP 400W Micro ATX Power Supply (FSP400-60GHS(85)-R1)
- สายไฟ AC
- SFX to PS2 Bracket
- คู่มือการใช้งาน
- Mounting Screws (typically included with PC cases, but sometimes with PSUs)

Figure 3.1: Package Contents. Shows the power supply unit, user manual, various power cables, an AC power cord, and an SFX to PS2 adapter bracket.
4. สินค้าหมดview
The FSP400-60GHS(85)-R1 is a compact power supply designed for small form factor systems. Key features include an 80mm cooling fan with thermal sensing technology and an energy-saving 1-watt standby mode.
4.1 การจัดวางทางกายภาพ

รูปที่ 4.1: มุม view of the FSP 400W Micro ATX Power Supply, highlighting the fan grille, power switch, and AC power input.

รูปที่ 4.2: ด้านหลัง view of the power supply, detailing the main power switch and the AC power input socket.

รูปที่ 4.3: ด้านบน view of the power supply, showing the protective grille over the 80mm cooling fan.
4.2 ขั้วต่อเอาต์พุต
The power supply includes various connectors to power your system components:
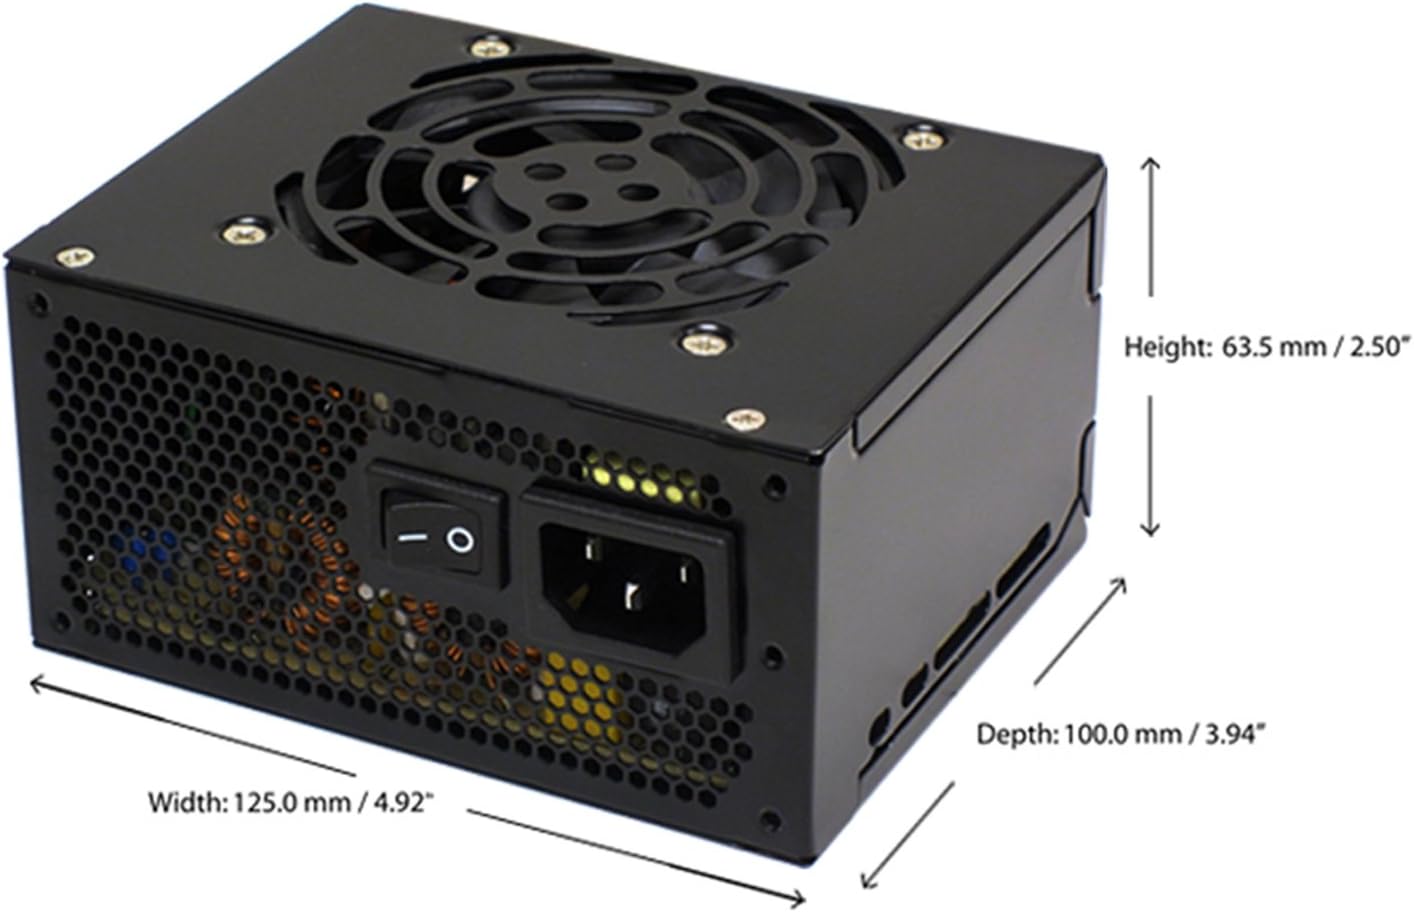
Figure 4.4: Diagram illustrating the types and quantities of output connectors available on the FSP400-60GHS(85)-R1 power supply.
- Main 24 Pin (1): For motherboard power.
- P4 | EPS 4+4 Pin (1): For CPU power.
- PCI-E 8 Pin (6+2) (1): สำหรับกราฟิกการ์ด
- Molex 4 Pin (3): For older peripherals and fans.
- Serial ATA 15 Pin (3): For SATA hard drives and SSDs.
- FDD 4 Pin (1): For floppy disk drives or other legacy devices.
5. การตั้งค่าและการติดตั้ง
Before beginning installation, ensure your computer system is powered off and disconnected from the AC power outlet. It is recommended to wear an anti-static wrist strap to prevent electrostatic discharge (ESD) damage to components.
5.1 การติดตั้งแหล่งจ่ายไฟ
- เตรียมคดี: Open your computer case. Identify the power supply mounting area.
- การติดตั้ง PSU:
- For SFX cases: Insert the FSP400-60GHS(85)-R1 directly into the SFX power supply bay and secure it with screws.
- For standard ATX cases: Attach the included SFX to PS2 bracket to the power supply. Then, mount the power supply with the bracket into the ATX power supply bay and secure it with screws.

Figure 5.1: The FSP 400W Micro ATX Power Supply shown with the SFX to PS2 adapter bracket installed, ready for mounting in a standard ATX case.

Figure 5.2: Illustration demonstrating how the SFX power supply fits into a PS2 (ATX) case using the provided adapter bracket.
5.2 สายเชื่อมต่อ
Connect the appropriate cables to your motherboard and components. Refer to your motherboard and component manuals for specific connection points.
- พลังงานเมนบอร์ด: Connect the 24-pin ATX connector to the corresponding socket on your motherboard.
- พลังซีพียู: Connect the 4+4-pin EPS/ATX 12V connector to the CPU power socket on your motherboard.
- พลังงานการ์ดจอ: If your graphics card requires external power, connect the 6+2-pin PCI-E connector(s) to the graphics card.
- อุปกรณ์จัดเก็บข้อมูล: Connect SATA power connectors to your SATA hard drives, SSDs, and optical drives.
- อุปกรณ์ต่อพ่วง: Use Molex 4-pin connectors for case fans or other legacy peripherals as needed.
- การจัดการสายเคเบิล: จัดเรียงสายเคเบิลให้เรียบร้อยเพื่อให้แน่ใจว่ามีการไหลเวียนของอากาศที่ดีภายในเคส
เมื่อเชื่อมต่อสายภายในทั้งหมดเรียบร้อยแล้ว ให้ปิดเคสคอมพิวเตอร์ของคุณ
5.3 การเชื่อมต่อภายนอก
- ต่อสายไฟ AC เข้ากับช่องเสียบ AC ของแหล่งจ่ายไฟ
- เสียบปลายอีกด้านของสายไฟ AC เข้ากับเต้ารับติดผนังที่มีสายดินหรืออุปกรณ์ป้องกันไฟกระชาก
- Ensure the power switch on the back of the power supply is in the "OFF" (O) position before plugging it in.
6. คู่มือการใช้งาน
6.1 การเปิดระบบของคุณ
- After all connections are secure, flip the power switch on the back of the power supply to the "ON" (I) position.
- กดปุ่มเปิด/ปิดบนเคสคอมพิวเตอร์ของคุณเพื่อเริ่มระบบ
6.2 Thermal Control System
The FSP400-60GHS(85)-R1 features an 80mm cooling fan with thermal sensing technology. This system automatically adjusts the fan speed based on the internal temperature of the power supply, optimizing cooling performance while minimizing noise.
6.3 Energy Saver Standby Mode
This power supply is designed with an energy-saving 1-watt standby mode, reducing power consumption when the system is in a low-power state or turned off but still connected to AC power.
7. การบำรุงรักษา
การบำรุงรักษาอย่างถูกต้องจะช่วยให้แหล่งจ่ายไฟของคุณมีอายุการใช้งานยาวนานและประสิทธิภาพการทำงานเหมาะสมที่สุด
- การทำความสะอาด: Periodically clean the exterior of the power supply and its fan grille to prevent dust buildup. Use a soft, dry cloth or compressed air. Ensure the power supply is disconnected from AC power before cleaning.
- การระบายอากาศ : Ensure that the power supply's fan and ventilation openings are not obstructed. Good airflow is crucial for cooling.
- ความสมบูรณ์ของสายเคเบิล: ตรวจสอบสายไฟทั้งหมดเป็นประจำเพื่อดูว่ามีร่องรอยการสึกหรอ ฉีกขาด หรือเสียหายหรือไม่ เปลี่ยนสายไฟที่ชำรุดทันที
Do not attempt to open the power supply unit for internal cleaning or repair. This will void the warranty and can be dangerous.
8 การแก้ไขปัญหา
หากคุณพบปัญหาเกี่ยวกับแหล่งจ่ายไฟ โปรดดูปัญหาทั่วไปและวิธีแก้ไขต่อไปนี้:
8.1 No Power to System
- ตรวจสอบไฟฟ้ากระแสสลับ: ตรวจสอบให้แน่ใจว่าสายไฟ AC เสียบเข้ากับแหล่งจ่ายไฟและเต้ารับที่ผนังอย่างแน่นหนาแล้ว
- สวิตช์ไฟ: Verify that the power switch on the back of the power supply is in the "ON" (I) position.
- การเชื่อมต่อภายใน: Confirm that the 24-pin ATX and 4+4-pin EPS/ATX 12V connectors are firmly seated in the motherboard.
- ไฟฟ้าลัดวงจร: Disconnect all peripheral power cables (SATA, Molex, PCI-E) and attempt to power on. If the system powers on, a short circuit may exist in one of the connected components or cables. Reconnect them one by one to identify the faulty component.
8.2 System Instability or Random Shutdowns
- โอเวอร์โหลด: ตรวจสอบให้แน่ใจว่าความต้องการพลังงานของระบบของคุณไม่เกินกำลังไฟ 400 วัตต์ของแหล่งจ่ายไฟ
- การระบายอากาศ : Check for proper airflow within the case and ensure the power supply's fan is not obstructed. Overheating can cause instability.
- การเชื่อมต่อสายเคเบิล: Re-check all power connections to ensure they are secure. Loose connections can lead to intermittent power delivery.
8.3 เสียงพัดลมดังเกินไป
- การสะสมของฝุ่น: Clean the fan grille and fan blades with compressed air.
- สิ่งกีดขวาง: Ensure no cables or foreign objects are interfering with the fan's rotation.
- สภาพแวดล้อมการทำงาน: High ambient temperatures can cause the thermal control system to increase fan speed. Ensure adequate room ventilation.
If troubleshooting steps do not resolve the issue, contact FSP customer support or your retailer for assistance.
9. ข้อมูลจำเพาะ
Detailed technical specifications for the FSP400-60GHS(85)-R1 power supply:
| ชื่อรุ่น | FSP 400W Micro ATX Power Supply |
| หมายเลขรุ่น | FSP400-60GHS(85)-R1 |
| ยี่ห้อ | FSP |
| เอาท์พุต วัดtage | 400 วัตต์ |
| ใบรับรอง 80 Plus | 80 พลัสบรอนซ์ |
| ฟอร์มแฟกเตอร์ | Micro ATX (SFX with PS2 bracket) |
| วิธีการทำความเย็น | Air (80mm fan with thermal control) |
| การออกแบบแหล่งจ่ายไฟ | ไม่ใช่โมดูลาร์ |
| อินพุต Voltage | 100 - 265 Volts (AC) |
| ขนาด (กว้าง x ยาว x สูง) | 4.9 x 3.9 x 2.5 นิ้ว (125.0 x 100.0 x 63.5 มม.) |
| น้ำหนักสินค้า | 2.31 ปอนด์ |
| อุปกรณ์ที่รองรับ | Personal Computer (AMD/Intel CPU systems) |
| ตัวเชื่อมต่อ | Main 24 Pin (1), P4 | EPS 4+4 Pin (1), PCI-E 8 Pin (6+2) (1), Molex 4 Pin (3), Serial ATA 15 Pin (3), FDD 4 Pin (1) |
| การปฏิบัติตามข้อกำหนดด้านสิ่งแวดล้อม | RoHS, Lead-Free, Green Product (G.P) |

Figure 9.1: Physical dimensions of the FSP 400W Micro ATX Power Supply.

Figure 9.2: Illustrative diagram showing typical cable lengths for the power supply connectors.
10. ข้อมูลการรับประกัน
The FSP 400W Micro ATX Power Supply (FSP400-60GHS(85)-R1) is covered by a การรับประกันจากผู้ผลิต 3 ปี. This warranty guarantees the quality and performance of the product for the specified period from the date of purchase.
The warranty covers defects in materials and workmanship under normal use. It does not cover damage resulting from improper installation, accidents, misuse, abuse, natural disasters, or unauthorized modifications or repairs. Opening the power supply casinจีจะทำให้การรับประกันเป็นโมฆะ
For warranty claims or service, please retain your proof of purchase and contact FSP customer support.
11. การสนับสนุนลูกค้า
If you require further assistance, have questions, or need to report an issue that cannot be resolved using the troubleshooting guide, please contact FSP customer support.
- FSP Webเว็บไซต์: Visit the official FSP webเว็บไซต์นี้เป็นแหล่งรวบรวมข้อมูลผลิตภัณฑ์ คำถามที่พบบ่อย และแหล่งข้อมูลสนับสนุน
- ข้อมูลติดต่อ: Refer to the FSP website or your product packaging for the most current customer service contact details (phone, email, or support portal).
When contacting support, please have your product model number (FSP400-60GHS(85)-R1) and proof of purchase readily available.