
1. บทนำ
This manual provides detailed instructions for the installation, operation, and maintenance of your GIGABYTE Z370XP SLI motherboard. Designed for 8th Generation Intel Core processors, this ATX motherboard offers robust performance and features for various computing needs. Please read this manual thoroughly before beginning installation.
2. คุณสมบัติหลัก
- Supports 8th Generation Intel Core Processors.
- Dual Channel DDR4 memory support with 4 DIMM slots.
- USB 3.1 Gen 2 with USB Type-C for high-speed connectivity.
- 2-Way Graphics Support (SLI/CrossFire) for enhanced visual performance.
- Intel Gigabit LAN for stable and fast network connections.
- GIGABYTE UEFI Dual BIOS for system protection and easy configuration.
- APP Center including Easy Tune and Cloud Station Utilities for system management.
- Realtek ALC1220 Codec for high-definition audio.
- ATX Form Factor (305mm x 225mm).
3. เนื้อหาบรรจุภัณฑ์
ตรวจสอบว่าสินค้าทั้งหมดอยู่ในบรรจุภัณฑ์ครบถ้วน หากมีสินค้าใดขาดหายหรือเสียหาย โปรดติดต่อผู้ค้าปลีก
- GIGABYTE Z370XP SLI Motherboard
- (Additional accessories such as SATA cables, I/O shield, and manual may be included depending on the region and retailer.)
4. การตั้งค่าและการติดตั้ง
Before installing the motherboard, ensure your system components are compatible and that you have a static-free environment.
4.1 เมนบอร์ดเกินview

ภาพที่ 1: จากบนลงล่าง view of the GIGABYTE Z370XP SLI Motherboard. This image displays the CPU socket, DIMM slots, PCIe slots, and various headers.

ภาพที่ 2: มุม view of the GIGABYTE Z370XP SLI Motherboard, highlighting the heatsinks and overall layout.
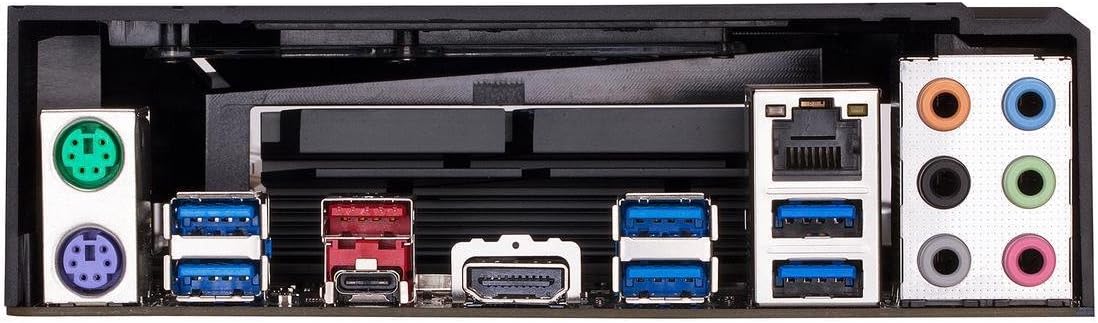
ภาพที่ 3: Rear I/O panel of the GIGABYTE Z370XP SLI Motherboard, showing the various ports including USB, HDMI, Ethernet, and audio jacks.
4.2 การติดตั้งซีพียู
- ค้นหาซ็อกเก็ต CPU LGA 1151 บนเมนบอร์ด
- เปิดคันโยกซ็อกเก็ต CPU และถอดฝาครอบป้องกันออก
- Carefully align the CPU with the socket, ensuring the gold triangle on the CPU matches the triangle on the socket.
- วาง CPU ลงในซ็อกเก็ตอย่างเบามือโดยไม่ต้องออกแรง
- ปิดก้านซ็อกเก็ตเพื่อยึดซีพียู
- ติดตั้งตัวระบายความร้อน CPU ตามคำแนะนำของผู้ผลิต
4.3 การติดตั้งหน่วยความจำ (RAM)
- คลายคลิปที่ปลายทั้งสองด้านของช่องเสียบ DIMM
- จัดตำแหน่งรอยบากบนโมดูลหน่วยความจำ DDR4 ให้ตรงกับรอยบากในช่อง DIMM
- ใส่โมดูลหน่วยความจำให้แน่นเข้าไปในช่องจนกระทั่งคลิปล็อคเข้าที่
- For dual-channel operation, refer to the motherboard manual for recommended slot configurations.
4.4 การติดตั้งอุปกรณ์จัดเก็บข้อมูล
- ไดรฟ์ SATA: Connect SATA data cables from your storage devices (HDDs/SSDs) to the SATA 3 ports on the motherboard. Connect SATA power cables from your power supply to the drives.
- ไดรฟ์ M.2: Locate the M.2 slots. Insert the M.2 drive at an angle and secure it with the provided screw.
4.5 การติดตั้งการ์ดจอและการ์ดขยาย
- Open the latch on the desired PCI Express x16 slot.
- Align your graphics card or expansion card with the slot and press down firmly until it is seated.
- ยึดการ์ดเข้ากับเคสคอมพิวเตอร์ด้วยสกรู
- เชื่อมต่อสายไฟ PCIe ที่จำเป็นจากแหล่งจ่ายไฟของคุณไปยังการ์ดกราฟิก
4.6 การต่อสายไฟ
- เชื่อมต่อขั้วต่อไฟหลัก ATX 24 พินจากแหล่งจ่ายไฟของคุณเข้ากับพอร์ตที่ตรงกันบนเมนบอร์ด
- เชื่อมต่อขั้วต่อไฟ CPU ATX 12V แบบ 8 พิน (หรือ 4+4 พิน) เข้ากับเมนบอร์ด
4.7 การเชื่อมต่อแผงด้านหน้า
Connect the front panel cables (power button, reset button, HDD LED, power LED, USB ports, audio jacks) to their respective headers on the motherboard. Refer to the motherboard's silkscreen labels for correct orientation.
5. คู่มือการใช้งาน
5.1 การบูตระบบครั้งแรก
- After all components are installed and connected, close your PC case.
- เชื่อมต่อจอภาพ คีย์บอร์ด และเมาส์ของคุณ
- ต่อสายไฟเข้ากับแหล่งจ่ายไฟและเปิดสวิตช์ไฟ
- กดปุ่มเปิด/ปิดบนเคสคอมพิวเตอร์ของคุณ
- The system should power on and display the GIGABYTE splash screen.
5.2 การตั้งค่า BIOS/UEFI
ในการเข้าสู่ยูทิลิตี้การตั้งค่า BIOS/UEFI ให้กดปุ่ม เดล key repeatedly during the initial boot process. The BIOS allows you to configure system settings such as boot order, CPU/memory frequencies, and peripheral settings. Save changes before exiting.
5.3 การติดตั้งไดรเวอร์
After installing your operating system, install the necessary drivers for the motherboard chipset, LAN, audio, and other integrated components. These drivers are typically provided on a support DVD or can be downloaded from the GIGABYTE official webเว็บไซต์.
6. การบำรุงรักษา
- การกำจัดฝุ่น: Regularly clean dust from inside your PC case, especially from fans and heatsinks, to prevent overheating. Use compressed air for best results.
- อัปเดต BIOS: ตรวจสอบ GIGABYTE เป็นระยะ webเว็บไซต์สำหรับอัปเดต BIOS การอัปเดต BIOS สามารถปรับปรุงเสถียรภาพ ความเข้ากันได้ และประสิทธิภาพของระบบได้ โปรดปฏิบัติตามคำแนะนำที่ GIGABYTE ให้ไว้อย่างระมัดระวังเมื่อทำการอัปเดต BIOS
- การอัปเดตไดรเวอร์: หมั่นอัปเดตไดรเวอร์ระบบของคุณอยู่เสมอ เพื่อให้มั่นใจได้ถึงประสิทธิภาพสูงสุดและความเข้ากันได้กับซอฟต์แวร์และฮาร์ดแวร์ใหม่ๆ
7 การแก้ไขปัญหา
หากคุณพบปัญหา โปรดดูขั้นตอนการแก้ไขปัญหาทั่วไปต่อไปนี้:
- ไม่มีพลังงาน/ไม่บูต:
- ตรวจสอบให้แน่ใจว่าสายไฟทั้งหมด (24-pin ATX, 8-pin CPU, GPU) เชื่อมต่อแน่นหนาดีแล้ว
- ตรวจสอบว่าได้เปิดสวิตช์ไฟแล้วหรือไม่
- ตรวจสอบการเชื่อมต่อปุ่มเปิดปิดแผงด้านหน้า
- ไม่มีจอแสดงผล:
- Ensure the monitor is connected to the graphics card (or motherboard if using integrated graphics) and powered on.
- ติดตั้งการ์ดจอและโมดูลหน่วยความจำใหม่
- ทดสอบด้วยแรมแท่งเดียวในช่องที่แตกต่างกัน
- ความไม่เสถียรของระบบ/การขัดข้อง:
- ตรวจสอบอุณหภูมิ CPU และ GPU
- ตรวจสอบให้แน่ใจว่าได้ติดตั้งไดรเวอร์ทั้งหมดอย่างถูกต้องและเป็นเวอร์ชันล่าสุดแล้ว
- เรียกใช้เครื่องมือวินิจฉัยหน่วยความจำเพื่อตรวจสอบข้อผิดพลาด RAM
- รีเซ็ตการตั้งค่า BIOS เป็นค่าเริ่มต้น
- On-board Readout/Debug LED: The motherboard may feature an on-board debug LED or POST code display. Consult the full GIGABYTE manual for specific code meanings to diagnose boot issues.
8. ข้อมูลจำเพาะ
| คุณสมบัติ | รายละเอียด |
|---|---|
| ยี่ห้อ | กิกะไบต์ |
| ชื่อรุ่น | Z370XP SLI |
| ซ็อคเก็ตซีพียู | แอลจีเอ 1151 |
| โปรเซสเซอร์ที่เข้ากันได้ | โปรเซสเซอร์ Intel Core รุ่นที่ 8 |
| ประเภทชิปเซ็ต | อินเทล Z370 |
| เทคโนโลยีหน่วยความจำ RAM | DDR4 |
| ความเร็วสัญญาณนาฬิกาหน่วยความจำ | 2666 MHz (รองรับความเร็วสูงกว่านี้ได้ผ่านการโอเวอร์คล็อก) |
| มีช่องหน่วยความจำให้เลือก | 4 |
| Ram Memory Maximum Size | 64GB |
| อินเทอร์เฟซการ์ดกราฟิก | พีซีไอ เอ็กซ์เพรส |
| Total PCIe Ports | 4 |
| พอร์ต SATA ทั้งหมด | 6 |
| สล็อต M.2 | 2 |
| พอร์ต USB รวม | 8 (พอร์ต I/O ด้านหลัง) + เฮดเดอร์ภายใน |
| USB 3.1 Gen2 ประเภท C | 1 (พอร์ต I/O ด้านหลัง) |
| จำนวนพอร์ตอีเธอร์เน็ต | 1 (Intel Gigabit LAN) |
| จำนวนพอร์ต HDMI ทั้งหมด | 1 |
| ประเภทขั้วต่อ S/PDIF | ออฟติคอล |
| ประเภทขั้วต่อสายไฟหลัก | 24-Pin ATX |
| ฟอร์มแฟกเตอร์ | ATX (305mm X 225mm) |
| น้ำหนักสินค้า | 16 ออนซ์ |
| ยูพีซี | 889523011324 |
9. ข้อมูลการรับประกัน
The GIGABYTE Z370XP SLI motherboard typically comes with a รับประกันจำกัด 3 ปี. Warranty terms and conditions may vary by region and retailer. Please retain your proof of purchase for warranty claims. For detailed warranty information, visit the official GIGABYTE webเว็บไซต์.
10. การสนับสนุนด้านเทคนิค
For further assistance, driver downloads, BIOS updates, or troubleshooting not covered in this manual, please visit the official GIGABYTE support webเว็บไซต์: www.gigabyte.com/support. You may also contact GIGABYTE customer service directly.