
Walfront KG316T / Walfrontygik4mhwoz-01
Walfront KG316T Microcomputer Control Power Timer Switch User Manual
Model: KG316T / Walfrontygik4mhwoz-01
1. บทนำ
The Walfront KG316T Microcomputer Control Power Timer Switch is a versatile digital programmable timer relay designed to automatically control various electrical equipment. It allows users to set specific ON/OFF times for appliances, street lamps, neon lamps, production equipment, radio and television systems, and other industrial or home devices. This manual provides detailed instructions for installation, operation, and maintenance of your timer switch.
2. ข้อมูลด้านความปลอดภัย
คำเตือน: เสี่ยงต่อการเกิดไฟฟ้าช็อต โปรดตัดกระแสไฟก่อนการติดตั้งหรือการซ่อมบำรุง
- Always ensure the power supply is disconnected before attempting any wiring or installation.
- Installation should be performed by a qualified electrician or knowledgeable individual to prevent electric shock or damage to the device.
- Do not operate the timer switch in wet or damp เงื่อนไข.
- ตรวจสอบให้แน่ใจว่าการเชื่อมต่อทั้งหมดมีความปลอดภัยและมีฉนวนป้องกันอย่างเหมาะสม
- Do not exceed the specified load capacity of the switch.
3. สินค้าหมดview
The KG316T timer switch features an LCD display for easy programming and monitoring, along with several control buttons and indicator lights.
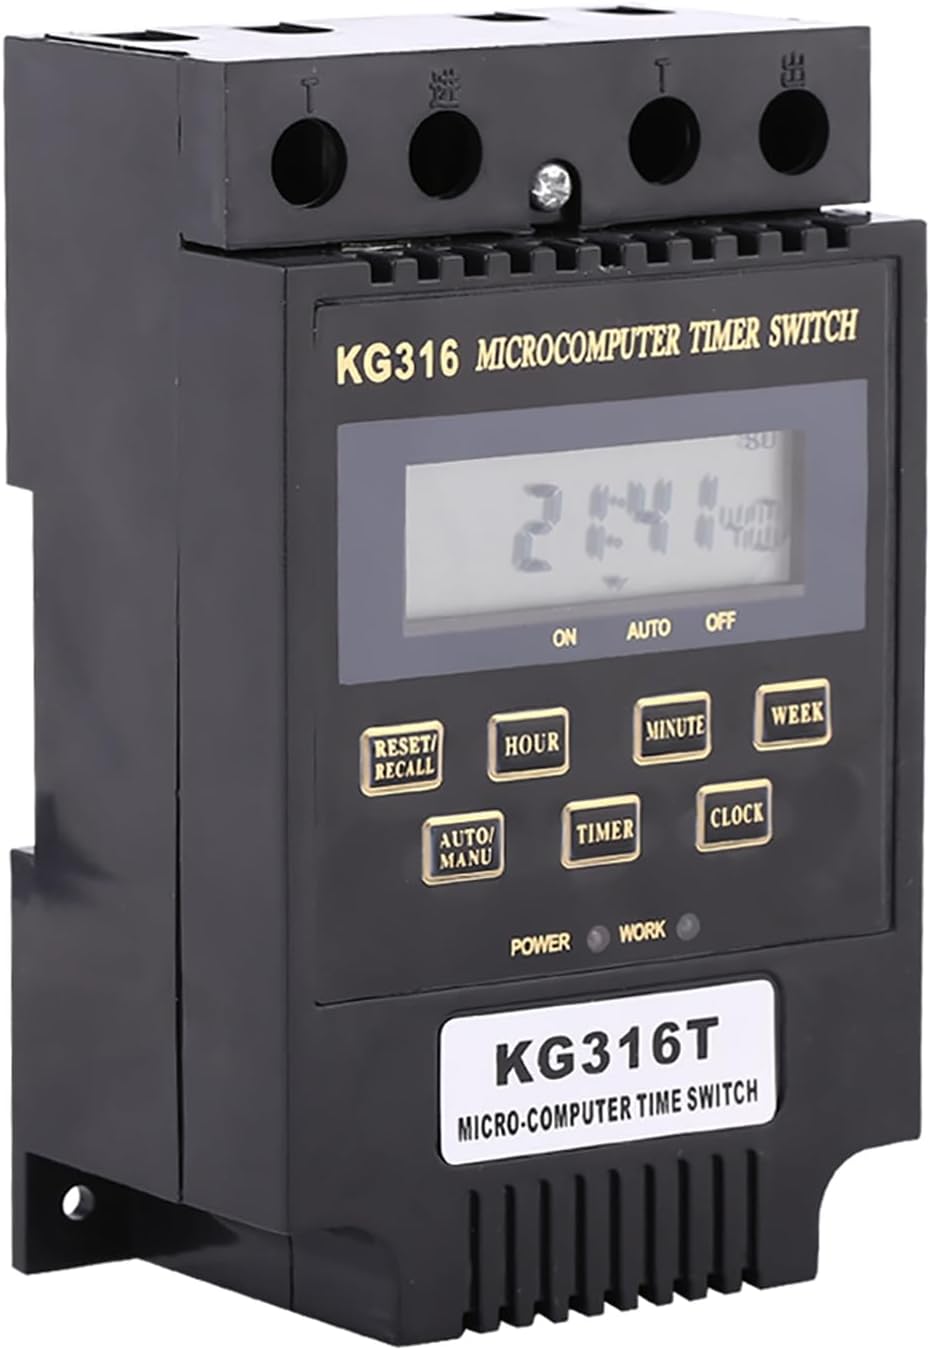
รูปที่ 3.1 : ด้านหน้า view of the KG316T Timer Switch, showing the LCD display and control buttons.

รูปที่ 3.2: มุม view of the KG316T Timer Switch, illustrating its physical dimensions (120mm length, 74mm width, 51mm height).
3.1 ส่วนประกอบและจอแสดงผล
- จอแสดงผล LCD: Shows current time, program status (ON/AUTO/OFF), and programming parameters.
- ปุ่ม:
- RESET/RECALL: Resets settings or recalls programs.
- ชั่วโมง: Adjusts hour during time setting or programming.
- นาที: Adjusts minute during time setting or programming.
- สัปดาห์: Selects day(s) of the week for programs.
- อัตโนมัติ/แมนนวล: Toggles between Automatic and Manual modes.
- ตัวจับเวลา: Enters programming mode for ON/OFF settings.
- นาฬิกา: ใช้สำหรับตั้งเวลาปัจจุบันและออกจากโหมดการตั้งโปรแกรม
- ไฟแสดงสถานะ:
- POWER (Red): Indicates that the circuit is powered.
- WORK (Green): Indicates that the switch is closed (output is active).

Figure 3.3: Comparison of the 'New Type' and 'Old Type' KG316T models. Functionality remains consistent.
4. ข้อมูลจำเพาะ
| คุณสมบัติ | ข้อมูลจำเพาะ |
|---|---|
| อินพุต Voltage | AC110V, AC220V (model dependent) |
| เล่มที่tage การจำแนกประเภท | 180V ถึง 240V |
| Switch Load Capacity | 10A (resistive), 10A (inductive) |
| การตั้งค่าที่ตั้งโปรแกรมได้ | 10 ON and 10 OFF (manual/automatic) |
| ช่วงเวลา | 1 นาทีถึง 168 ชั่วโมง |
| อุณหภูมิในการทำงาน | -25℃ ถึง 60℃ |
| ความชื้น | ความชื้นสัมพัทธ์ 45-85% |
| ข้อผิดพลาด | ≤ 1s/24h |
| ขนาด (กว้าง x ยาว x สูง) | ขนาด 4.72 นิ้ว (ลึก) x 2.91 นิ้ว (กว้าง) x 2 นิ้ว (สูง) (120 มม. x 74 มม. x 51 มม.) |
| วัสดุ | พลาสติก |
| น้ำหนักสินค้า | 3.98 ออนซ์ (ประมาณ 113 กรัม) |
5. การตั้งค่า
5.1 Battery Installation (for 220V models)
The 110V version of this timer switch has an inbuilt battery for data storage. For the 220V version, an external AA battery (not included) is required to retain settings during power outages. Locate the battery compartment, insert one AA battery, ensuring correct polarity.
5.2 การเพิ่มพลังเริ่มต้น
Once wired correctly and power is supplied, the LCD display will illuminate. If the display is blank, check the power connection and battery (if applicable).
6. คำแนะนำในการเดินสายไฟ
Proper wiring is crucial for the safe and correct operation of the timer switch. Refer to the diagrams and descriptions below. If you are unsure, consult a qualified electrician.

รูปที่ 6.1: View of the KG316T timer switch terminals for wiring connections.
6.1 Direct Control Wiring (Single-Phase, Low Power)
This wiring method is suitable for single-phase powered electrical appliances with lower power consumption that falls within the switch's direct load capacity (10A resistive/inductive).
6.2 Single-Phase Expansion Wiring
For single-phase powered electrical appliances with higher power consumption than the direct load capacity of this switch, you will need an external alternating current contactor. The timer switch will control the coil voltage of this external contactor, which in turn handles the higher load.
6.3 Three-Phase Wiring (AC220V Control Coil)
For three-phase electrical appliances, with an AC220V control coil voltage, you will need an external three-phase AC contactor. The timer switch will activate or deactivate the coil of this contactor to control the three-phase load.
6.4 Three-Phase Wiring (AC380V Control Coil)
Similarly, for three-phase electrical appliances with an AC380V control coil voltage, you will need an external three-phase AC contactor. The timer switch will manage the operation of this contactor to control the three-phase power.
7. คู่มือการใช้งาน
7.1 Setting Clock (Present Time)
- Press and hold the "CLOCK" button.
- While holding "CLOCK", press "WEEK" to set the current day of the week.
- While holding "CLOCK", press "HOUR" to set the current hour.
- While holding "CLOCK", press "MINUTE" to set the current minute.
7.2 Setting Programs (ON/OFF Times)
The timer supports up to 10 ON and 10 OFF settings.
- Set "1 on": Press the "TIMER" button. The LCD will display "1 on" at the bottom left. Then press "HOUR" and "MINUTE" buttons to set the desired ON time for the first program.
- Set "1 off": Continue to press the "TIMER" button. The LCD will display "1 off" at the bottom left. Then press "HOUR" and "MINUTE" buttons to set the desired OFF time for the first program.
- Set Additional Programs: Continue to press the "TIMER" button. The LCD will successively display "2 on", "2 off", "3 on", "3 off" ... up to "10 on", "10 off". Repeat the process of setting HOUR and MINUTE for each desired ON/OFF program.
- Clearing Unused Programs: If you only need a few programs (e.g., "1 on", "1 off") and wish to clear the remaining ones, press the "TIMER" button until the desired program number is displayed (e.g., "2 on"). Then press the "RESET/RECALL" button. This will set the time for that program to "--:--" instead of "00:00" (shown on the LCD), effectively disabling it.
- การบันทึกการตั้งค่า: After completing all program settings, press the "CLOCK" button. The LCD will display the present time. If no button is pressed for 30 seconds, it will automatically display the present time and save the settings.
7.3 ทำความเข้าใจเกี่ยวกับไฟแสดงสถานะ
- When connected to a circuit, the red light (POWER) indicates if the circuit is powered.
- การ green light (WORK) indicates if the switch is closed (i.e., the output is active and power is being supplied to the connected appliance).
7.4 Using the AUTO/MANU Button
Press the "AUTO/MANU" button to cycle through different operating modes:
- บน: The switch is manually forced ON, overriding programmed settings.
- อัตโนมัติ: The switch operates according to the programmed ON/OFF times.
- ปิด: The switch is manually forced OFF, overriding programmed settings.
To return to automatic operation, press the "AUTO/MANU" button until the LCD displays "AUTO".
7.5 Setting Days of the Week for Programs
After setting an ON/OFF program, you can specify which day or days of the week it should be active:
- Press the "TIMER" button to navigate to the desired program (e.g., "1 on").
- Then press the "WEEK" button repeatedly to cycle through various day combinations:
- Mon, Tue, Wed, Thu, Fri, Sat, Sun (All days)
- จันทร์
- อังคาร
- ... (Individual days)
- Mon, Tue, Wed, Thu, Fri (Weekdays)
- Sat, Sun (Weekends)
- Mon, Wed, Fri
- Tue, Thu, Sat
- Mon, Tue, Wed
- Thu, Fri, Sat
- And other combinations.
- Select the desired day combination for that specific program.
8. การบำรุงรักษา
- Keep the timer switch clean and free from dust. Use a soft, dry cloth for cleaning. Do not use abrasive cleaners or solvents.
- ตรวจสอบให้แน่ใจว่าสภาพแวดล้อมในการทำงานอยู่ในช่วงอุณหภูมิและความชื้นที่กำหนดไว้
- If the 220V model uses an external AA battery, replace it periodically (e.g., annually) to ensure data retention during power outagใช่
- Regularly check wiring connections for tightness and signs of wear or damage.
9 การแก้ไขปัญหา
| ปัญหา | สาเหตุที่เป็นไปได้ | สารละลาย |
|---|---|---|
| จอ LCD ว่างเปล่า | No power supply; Battery drained (220V model); Loose connection. | Check power input; Replace AA battery (220V model); Verify all wiring connections are secure. |
| Timer not switching ON/OFF at programmed times | Incorrect program settings; Timer is in MANU (manual) mode; Incorrect day of week setting. | Review and correct program times; Ensure timer is in "AUTO" mode using the AUTO/MANU button; Verify correct days are selected for programs. |
| Buttons are unresponsive or stuck | Physical defect; Debris under button. | Gently press the button multiple times; If persistent, contact customer support. |
| Red POWER light is off | ไม่มีกำลังไฟฟ้าเข้า | Check the main power supply to the timer switch. |
| Green WORK light is off when it should be on | Timer is in OFF or AUTO mode but not at an ON time; Overload protection activated. | Check program settings and current time; Ensure timer is in ON or AUTO mode at an active ON time; Verify load does not exceed 10A. |
10. การรับประกันและการสนับสนุน
Walfront products are manufactured to high quality standards. For specific warranty details, please refer to the warranty card included with your purchase or visit the official Walfront website. If you encounter any issues not covered in this manual or require further assistance, please contact Walfront customer support through their official channels.
Ask a question about this manual
Ask about setup, troubleshooting, compatibility, parts, safety, or missing instructions. Manuals+ will review the question and use this page’s manual context to help answer it.