
1. บทนำ
This manual provides essential information for the safe and efficient operation of your Xerox AltaLink C8030 Multifunction Printer. Please read these instructions carefully before using the device and retain them for future reference. This device integrates printing, scanning, copying, and faxing capabilities to support various office tasks.
2. ข้อมูลด้านความปลอดภัย
Always follow basic safety precautions to reduce the risk of fire, electric shock, and injury. Ensure the device is connected to a grounded power outlet. Do not block ventilation openings. Keep the device away from water and excessive humidity. Refer to the safety labels on the product for specific warnings.
3. สินค้าหมดview
The Xerox AltaLink C8030 is a color multifunction printer designed for high-volume office environments. It features a 10-inch touchscreen for intuitive navigation and control. Key capabilities include:
- Print Speed: Up to 30 pages per minute (ppm) for both color and monochrome.
- Copy Resolution: 600 x 600 DPI.
- Memory: 8 GB RAM, 1 GB RAM, 250 GB HDD.
- Connectivity: NFC, Wireless, USB.
- Paper Supply: Multiple trays including 2 x 520-sheet trays, a 2,000-sheet high-capacity tandem tray, and a 100-sheet bypass tray.
- Features: Single Pass DADF, Data Security, Job Accounting, PostScript Kit, Network Scanning, Server Fax, iFax, Standard Output Tray, Office Finisher LX.
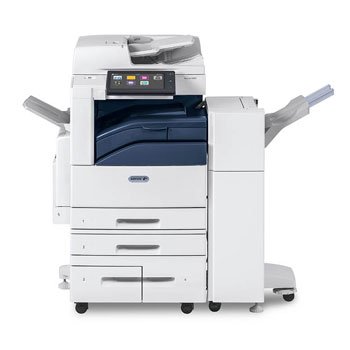
ภาพ: ด้านหน้า view of the Xerox AltaLink C8030 multifunction printer, showing its various paper trays and the integrated touchscreen control panel.
4. การตั้งค่า
4.1 การแกะและการจัดวาง
- นำเครื่องพิมพ์ออกจากบรรจุภัณฑ์อย่างระมัดระวัง
- วางเครื่องพิมพ์บนพื้นผิวที่มั่นคงและเรียบเสมอกัน โดยมีอากาศถ่ายเทสะดวก
- Ensure sufficient space around the printer for maintenance and paper loading.
4.2 การเชื่อมต่อสายไฟ
- เชื่อมต่อสายไฟเข้ากับเครื่องพิมพ์ แล้วจึงเสียบเข้ากับเต้ารับไฟฟ้าที่มีสายดิน
- กดปุ่มเปิด/ปิดเพื่อเปิดอุปกรณ์
4.3 การโหลดกระดาษ
- Open the desired paper tray (e.g., Tray 1, Tray 2, or Bypass Tray).
- ปรับตัวกั้นกระดาษให้พอดีกับขนาดกระดาษ
- ใส่กระดาษลงในช่องใส่กระดาษ โดยตรวจสอบให้แน่ใจว่าไม่เกินเส้นกำหนดปริมาณสูงสุด
- ปิดถาดกระดาษให้แน่น
4.4 การเชื่อมต่อเครือข่ายและ USB
- เครือข่าย: Connect an Ethernet cable to the printer's network port and to your network router/switch. Configure network settings via the touchscreen if necessary.
- ไร้สาย: Access the network settings on the touchscreen, select your Wi-Fi network, and enter the password.
- ยูเอสบี: Connect a USB cable from your computer to the printer's USB port for direct connection.
5. คู่มือการใช้งาน
5.1 การพิมพ์
- From your computer or mobile device, open the document you wish to print.
- เลือก 'พิมพ์' จากเมนูของแอปพลิเคชัน
- Choose the Xerox AltaLink C8030 as your printer.
- Adjust print settings (e.g., number of copies, color/monochrome, paper size) as needed.
- คลิก 'พิมพ์'
5.2 การสแกน
- วางเอกสารคว่ำหน้าลงบนกระจกสแกนเนอร์ หรือหงายหน้าขึ้นในช่องป้อนเอกสารอัตโนมัติ (ADF)
- On the printer's touchscreen, select the 'Scan' function.
- Choose your scan destination (e.g., email, network folder, USB drive).
- Configure scan settings (e.g., resolution, file format, color mode).
- กด 'เริ่ม' เพื่อเริ่มการสแกน
5.3 การคัดลอก
- วางเอกสารของคุณบนกระจกสแกนเนอร์หรือในช่องป้อนเอกสารอัตโนมัติ (ADF)
- On the touchscreen, select the 'Copy' function.
- Enter the desired number of copies.
- Adjust copy settings (e.g., enlargement/reduction, 2-sided, color/monochrome).
- กด 'เริ่ม' เพื่อเริ่มการคัดลอก
5.4 การส่งแฟกซ์
- วางเอกสารของคุณบนกระจกสแกนเนอร์หรือในช่องป้อนเอกสารอัตโนมัติ (ADF)
- บนหน้าจอสัมผัส ให้เลือกฟังก์ชัน 'แฟกซ์'
- ป้อนหมายเลขแฟกซ์ของผู้รับ
- Configure fax settings (e.g., resolution, delayed send).
- Press 'Start' to send the fax.
6. การบำรุงรักษา
6.1 การเปลี่ยนตลับหมึก
- เปิดฝาครอบด้านหน้าของเครื่องพิมพ์
- ตรวจสอบหาตลับหมึกที่หมดแล้ว
- Grasp the handle and pull the cartridge out.
- แกะตลับหมึกใหม่ออกจากบรรจุภัณฑ์แล้วเขย่าเบาๆ
- ใส่ตลับหมึกใหม่เข้าไปจนกระทั่งได้ยินเสียงคลิกเข้าที่
- ปิดฝาครอบด้านหน้า
6.2 การทำความสะอาดกระจกสแกนเนอร์
- ปิดเครื่องพิมพ์และถอดปลั๊กไฟ
- เปิดฝาครอบสแกนเนอร์
- Wipe the scanner glass with a soft, lint-free cloth dampened with a mild glass cleaner.
- Ensure the glass is dry before closing the cover and restoring power.
7 การแก้ไขปัญหา
7.1 กระดาษติด
- Follow the on-screen instructions to locate and clear the paper jam.
- Open all accessible covers and trays to check for jammed paper.
- Gently pull the paper in the direction of the paper path.
7.2 ปัญหาคุณภาพการพิมพ์
- ตรวจสอบระดับหมึกพิมพ์และเปลี่ยนตลับหมึกหากเหลือน้อย
- ทำการทำความสะอาดหรือปรับเทียบหัวพิมพ์จากเมนูการบำรุงรักษาของเครื่องพิมพ์
- Ensure you are using appropriate paper types for your print job.
7.3 ปัญหาการเชื่อมต่อ
- Verify all cables (Ethernet, USB) are securely connected.
- For wireless connections, check Wi-Fi signal strength and network settings.
- Restart the printer, router, and computer/device.
8. ข้อมูลจำเพาะ
| คุณสมบัติ | ข้อมูลจำเพาะ |
|---|---|
| ยี่ห้อ | เครื่องถ่ายเอกสาร |
| ชื่อรุ่น | AltaLink C8030 |
| เทคโนโลยีการพิมพ์ | เลเซอร์ |
| เอาท์พุตเครื่องพิมพ์ | สี |
| ความเร็วในการพิมพ์สูงสุด (ขาวดำ) | 30 หน้าต่อนาที |
| ความเร็วในการถ่ายเอกสารสูงสุด (ขาวดำ) | 30 หน้าต่อนาที |
| เทคโนโลยีการเชื่อมต่อ | NFC, Wireless |
| น้ำหนักสินค้า | 349 ปอนด์ |
| วิธีการควบคุม | รีโมท, สัมผัส |
| อุปกรณ์ที่รองรับ | PC |
| GTIN / UPC | 095205880151 |
9. การรับประกันและการสนับสนุน
For warranty information, please refer to the documentation included with your product or visit the official Xerox website. For technical support, driver downloads, or service requests, please contact Xerox customer support through their official channels. Keep your product's serial number and purchase date readily available when contacting support.
แหล่งข้อมูลออนไลน์: Xerox Official Webเว็บไซต์