1. บทนำ
This user manual provides detailed instructions for the installation, operation, and maintenance of the Cooler Master Elite RC-342 Mini-Tower Computer Case. This chassis is designed to support Micro-ATX motherboards and offers efficient cooling with its front mesh design. Please read this manual thoroughly before beginning installation to ensure proper setup and optimal performance.
2. คุณสมบัติของผลิตภัณฑ์
- Mini-Tower Design: Compact form factor supporting Micro-ATX motherboards.
- การระบายอากาศที่เหมาะสมที่สุด: Front mesh panel ensures superior airflow for component cooling.
- Easy Access I/O: Conveniently located front panel with USB ports and audio jacks.
- รวมพาวเวอร์ซัพพลาย: Comes with a 400W power supply unit.
- ความยืดหยุ่นของช่องจอดรถ: Features internal 3.5" drive bays, including a removable bay for easier installation.
3. การตั้งค่าและการติดตั้ง
Before starting, ensure you have a clean, static-free workspace. Refer to your motherboard and component manuals for specific installation details.
3.1. การเปิดคดี
To access the interior, remove the two thumbscrews located at the rear of the case on the left side panel. Slide the side panel backward and lift it off.

รูปที่ 3.1: Left side panel of the case. Remove thumbscrews to open.
3.2. การติดตั้งเมนบอร์ด
The Elite RC-342 supports Micro-ATX motherboards. Install the necessary standoffs into the motherboard tray according to your motherboard's mounting holes. Carefully place the motherboard onto the standoffs and secure it with screws.
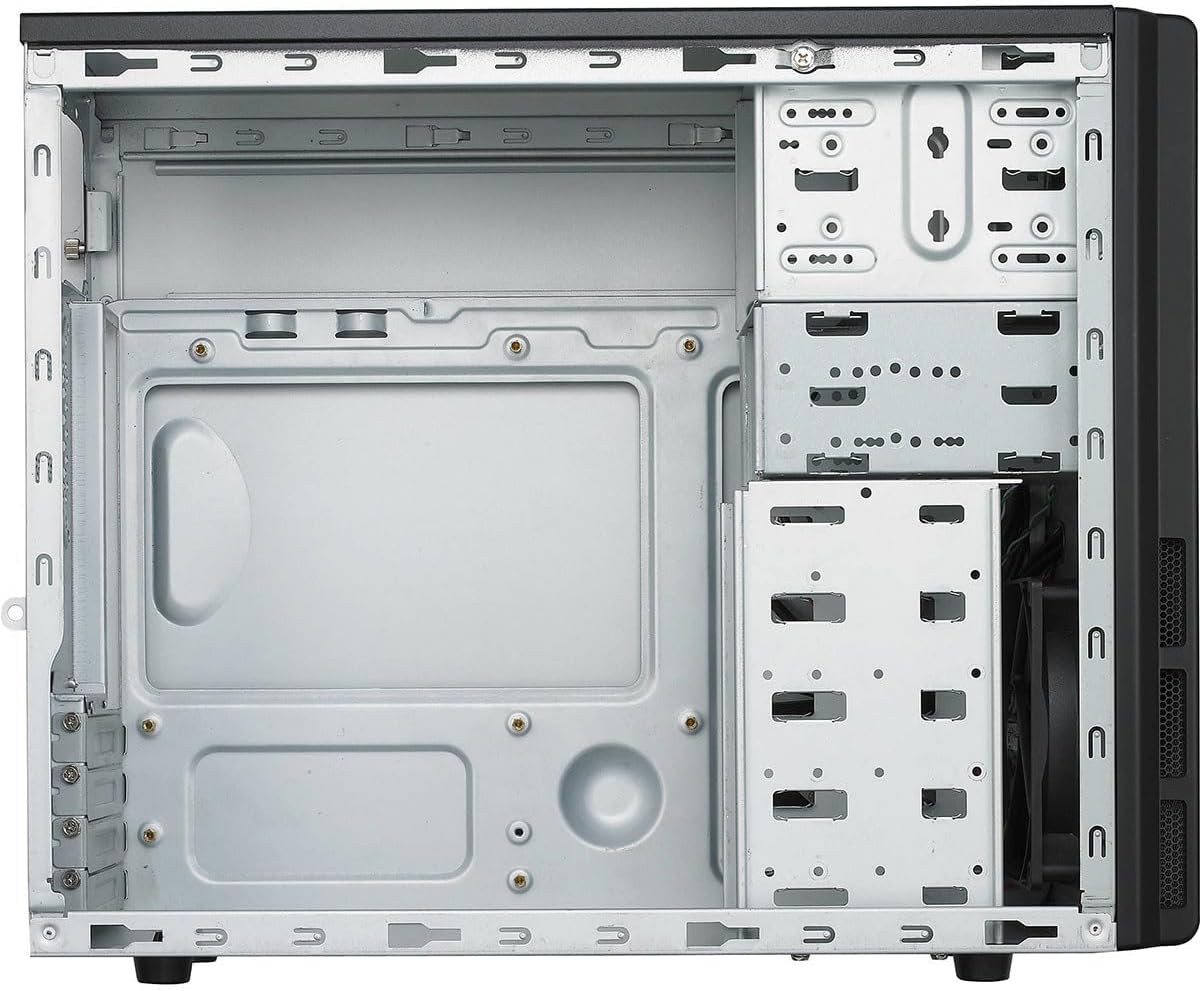
รูปที่ 3.2: ภายใน view of the case, illustrating the motherboard mounting area and drive bays.
3.3. Drive Installation (HDD/SSD)
The case features multiple 3.5-inch internal drive bays. One of these bays is removable to facilitate easier installation of hard drives. For 2.5-inch SSDs, use the provided 2.5-inch to 3.5-inch adapter if necessary. Secure drives with screws.

รูปที่ 3.3: Removable drive cage for hard drive installation.
3.4. การติดตั้งชุดจ่ายไฟ (PSU)
The Cooler Master Elite RC-342 includes a 400W power supply unit. Install the PSU into the designated bottom-mount area at the rear of the case. Secure it with screws from the exterior. Connect the necessary power cables to your motherboard and components.

รูปที่ 3.4: The included 400W power supply unit.
3.5. การเชื่อมต่อแผง I/O ด้านหน้า
Connect the front panel cables (USB 3.0, audio, power switch, reset switch, power LED, HDD LED) to the corresponding headers on your motherboard. Refer to your motherboard manual for header locations.

รูปที่ 3.5: Front panel with USB 3.0 ports, audio jacks, and power/reset buttons.

รูปที่ 3.6: หลัง view of the case, showing the I/O shield area and expansion slots.
4. ข้อควรพิจารณาในการดำเนินงาน
The Elite RC-342 is designed for optimal airflow through its front mesh panel. Ensure that the case is placed in an area with adequate ventilation to allow for proper air intake and exhaust. Avoid blocking the front, rear, or side vents.
The front I/O panel provides convenient access to two USB 3.0 ports and audio jacks for headphones and microphones.
5. การบำรุงรักษา
Regular maintenance helps maintain optimal cooling performance and extends the lifespan of your components.
- การทำความสะอาดฝุ่น: Periodically clean the front mesh panel and any fan filters to prevent dust buildup, which can restrict airflow. Use compressed air or a soft brush.
- การทำความสะอาดภายใน: With the system powered off and unplugged, carefully clean the interior of the case to remove accumulated dust from components and surfaces.
6 การแก้ไขปัญหา
หากคุณพบปัญหาในระหว่างหรือหลังการติดตั้ง โปรดพิจารณาสิ่งต่อไปนี้:
- ความพอดีของชิ้นส่วน: Ensure all components, especially the motherboard and expansion cards, are properly seated and secured.
- การจัดการสายเคเบิล: Verify that internal cables are routed efficiently and do not obstruct airflow or prevent side panel closure. Poor cable management can sometimes hinder component installation or cooling.
- ปัญหาเรื่องพลังงาน: Double-check all power connections from the PSU to the motherboard and other components. Ensure the PSU switch is in the 'ON' position.
- ฟังก์ชั่นแผงด้านหน้า: If front USB ports or audio jacks are not working, confirm that their respective cables are correctly connected to the motherboard headers.
7. ข้อมูลจำเพาะ
| คุณสมบัติ | รายละเอียด |
|---|---|
| ยี่ห้อ | คูลเลอร์มาสเตอร์ |
| ชื่อรุ่น | ผู้ลากมากดี |
| หมายเลขรุ่น | RC342KKR400U3 |
| ประเภทเคส | มินิทาวเวอร์ |
| ความเข้ากันได้ของเมนบอร์ด | ไมโครเอทีเอ็กซ์ |
| สี | สีดำ |
| วัสดุ | อะคริโลไนไตรล์ บิวทาไดอีน สไตรีน (ABS), เหล็กอัลลอย |
| ขนาดสินค้า (ลึก x กว้าง x สูง) | 17.3" x 7.1" x 13.9" (43.9 ซม. x 18.0 ซม. x 35.3 ซม.) |
| น้ำหนักสินค้า | 9 ปอนด์ (4.08 กก.) |
| ประเภทการติดตั้งแหล่งจ่ายไฟ | การติดตั้งด้านล่าง |
| รวมพาวเวอร์ซัพพลาย | 400 วัตต์ |
| วิธีการทำความเย็น | อากาศ |
| Total USB 3.0 Ports | 2 (Front Panel) |
| ช่องใส่ไดรฟ์ภายใน | 4 x 3.5 นิ้ว |
| ยูพีซี | 884102029349 |

รูปที่ 7.1: Product dimensions (Depth x Width x Height).
8. ข้อมูลการรับประกัน
The Cooler Master Elite RC-342 Computer Case comes with a รับประกัน 2 ปี นับจากวันที่ซื้อ การรับประกันนี้ครอบคลุมถึงความบกพร่องของวัสดุและฝีมือการผลิตภายใต้การใช้งานปกติ โปรดเก็บหลักฐานการซื้อไว้เพื่อขอรับสิทธิ์การรับประกัน
9. การสนับสนุน
For technical assistance, troubleshooting, or warranty inquiries, please visit the official Cooler Master support webเว็บไซต์หรือติดต่อฝ่ายบริการลูกค้าของพวกเขา
คูลเลอร์ มาสเตอร์ อย่างเป็นทางการ Webเว็บไซต์: www.coolermaster.com


