
Flysky FS-i6X
Flysky FS-i6X 10CH 2.4GHz AFHDS 2A RC Transmitter User Manual
Model: FS-i6X Transmitter & FS-iA10B Receiver
ยี่ห้อ: Flysky
1. บทนำ
This manual provides detailed instructions for the operation, setup, and maintenance of your Flysky FS-i6X 10-channel 2.4GHz AFHDS 2A RC Transmitter and FS-iA10B Receiver. This system is designed for use with fixed-wing aircraft, gliders, and helicopters, offering reliable and precise control.
The FS-i6X transmitter and FS-iA10B receiver are pre-bound at the factory. Therefore, re-binding is generally not required upon initial receipt. Please read this manual thoroughly before operating the device to ensure safe and correct usage.
2. เนื้อหาบรรจุภัณฑ์
ตรวจสอบว่ารายการทั้งหมดที่ระบุไว้ด้านล่างนี้รวมอยู่ในแพ็คเกจของคุณ:
- 1x Flysky FS-i6X Transmitter
- 1x FS-iA10B Receiver
- 1x ปลั๊กยึด
- 1x Upgrade Cable
หมายเหตุ: ไม่รวมแบตเตอรี่และต้องซื้อแยกต่างหาก
3. สินค้าหมดview
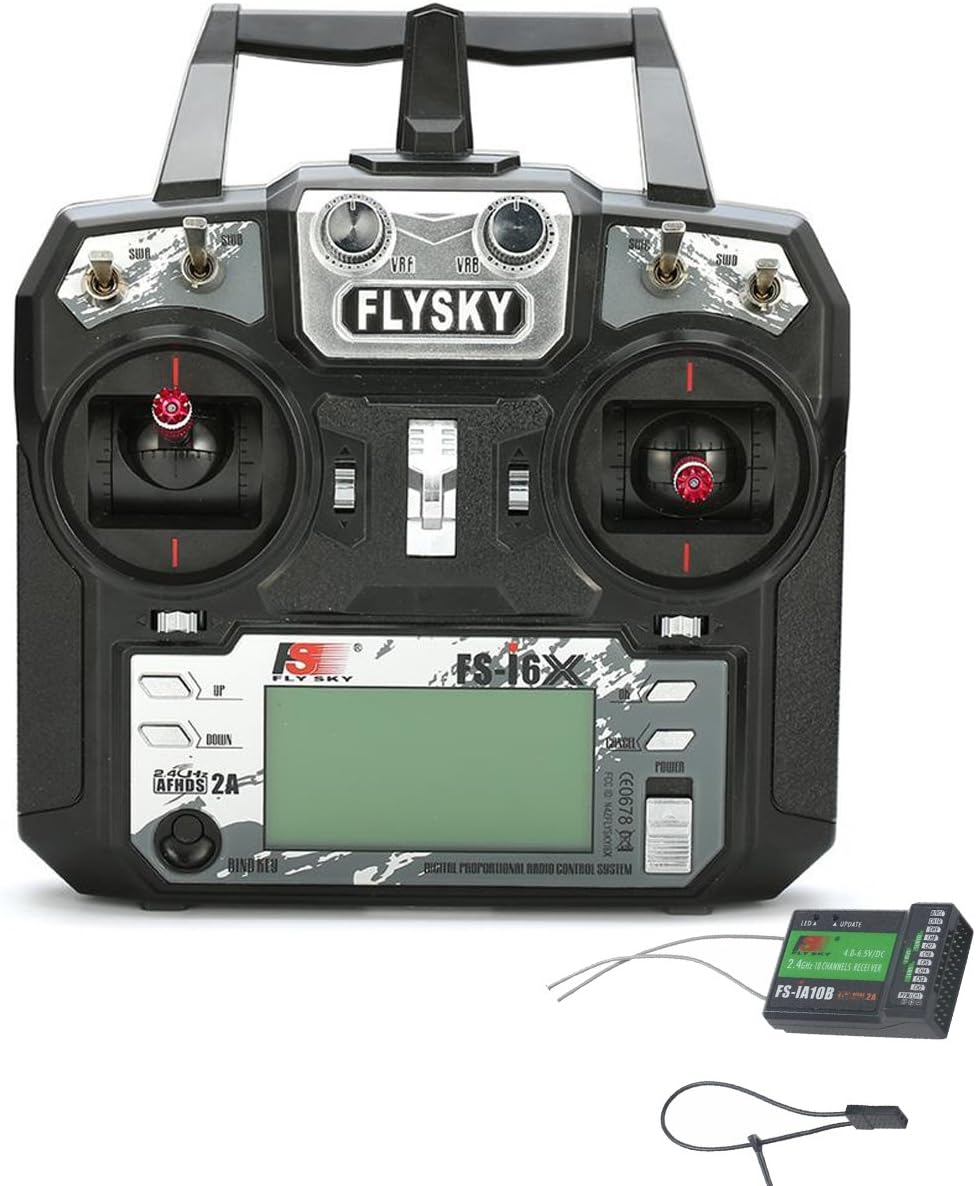
3.1 FS-i6X Transmitter Components
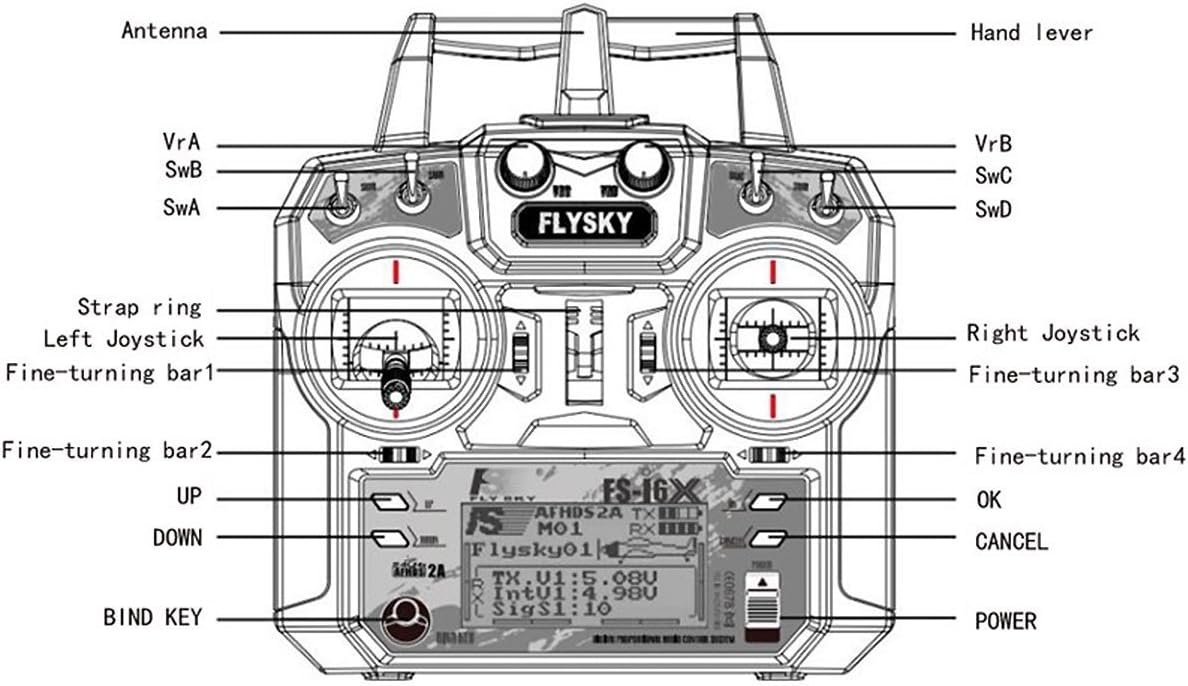
3.2 FS-iA10B Receiver Components

4. การตั้งค่า
4.1 การติดตั้งแบตเตอรี่ (เครื่องส่งสัญญาณ)
The FS-i6X Transmitter requires four (4) AA batteries (1.5V each) for a total of 6V DC power. Ensure correct polarity when inserting batteries.
- เปิดฝาช่องใส่แบตเตอรี่ด้านหลังของตัวส่งสัญญาณ
- Insert four AA batteries according to the polarity markings (+/-) inside the compartment.
- ปิดฝาช่องใส่แบตเตอรี่ให้แน่น

4.2 การเชื่อมต่อตัวรับ
Connect your servos and other control devices to the appropriate channels on the FS-iA10B receiver. Ensure that the power supply for the receiver is within the specified range of 4.0-6.5V DC.
4.3 ขั้นตอนการผูกมัด
The FS-i6X transmitter and FS-iA10B receiver are pre-bound from the factory. You do not need to bind them again upon receipt. However, if you need to re-bind or bind to a new receiver, follow these steps:
- ตรวจสอบให้แน่ใจว่าปิดเครื่องส่งสัญญาณแล้ว
- Insert the bind plug into the B/VCC port on the FS-iA10B receiver.
- Connect power to the receiver. The receiver's LED should flash rapidly, indicating it is in binding mode.
- While holding down the BIND KEY on the transmitter, turn on the transmitter.
- Release the BIND KEY once the transmitter display shows "RX Binding" or similar.
- ไฟ LED บนตัวรับสัญญาณควรติดสว่างคงที่ แสดงว่าการเชื่อมต่อสำเร็จแล้ว
- ปิดทั้งเครื่องส่งและเครื่องรับ
- ถอดปลั๊กผูกออกจากเครื่องรับ
- Turn on the transmitter first, then the receiver. The system should now be bound and operational.
5. คู่มือการใช้งาน
5.1 การเปิด/ปิดเครื่อง
- การเปิดเครื่อง: Press and hold the POWER button on the transmitter until the display illuminates.
- วิธีปิดเครื่อง: กดปุ่ม POWER ค้างไว้จนกว่าจอแสดงผลจะดับลง
5.2 Channel Setup (Enabling 10 Channels)
เครื่องส่งสัญญาณ FS-i6X จะตั้งค่าเริ่มต้นไว้ที่ 6 ช่องสัญญาณ หากต้องการเปิดใช้งานทั้ง 10 ช่องสัญญาณ ให้ทำตามขั้นตอนต่อไปนี้:
- กดค้างไว้ OK กดปุ่มค้างไว้ 2 วินาทีเพื่อเข้าสู่เมนูการตั้งค่าหลัก
- ไปที่และเลือก การตั้งค่าระบบ.
- เลื่อนลงไปจนถึงรายการสุดท้าย สวิตช์เสริม (auxiliary switch setting), and select it to enter.
- For switches SwA, SwB, SwC, SwD, set their selection to On เพื่อเปิดใช้งาน
- เปลี่ยนการกำหนดช่องสัญญาณจาก บทที่ 6 ถึง บทที่ 10.
- กดค้างไว้ ยกเลิก button to automatically save the settings and exit the menu.
5.3 ระดับเสียงต่ำtagอีคำเตือน
เครื่องส่งสัญญาณมีระดับเสียงต่ำtage warning system. If the battery voltage drops below 4.2V, an alert will be displayed on the LCD screen, indicating that the batteries need to be replaced or recharged (if using rechargeable batteries).
6. ข้อมูลจำเพาะ
6.1 FS-i6X RC Transmitter Specifications
| คุณสมบัติ | รายละเอียด |
|---|---|
| ช่อง | 6-10 (ค่าเริ่มต้น 6) |
| ประเภทโมเดล | ปีกคงที่/เครื่องร่อน/เฮลิคอปเตอร์ |
| ช่วง RF | 2.408-2.475กิกะเฮิร์ตซ์ |
| พลังงาน RF | <20เดซิเบลม |
| ช่อง RF | 135 |
| แบนด์วิธ | 500กิโลเฮิรตซ์ |
| ระบบ 2.4GHz | AFHDS 2A/AFDHS |
| ประเภทการมอดูเลชั่น | GFSK |
| ความละเอียดติด | 4096 |
| ปริมาณต่ำtagอีคำเตือน | <4.2โวลต์ |
| พอร์ต DSC | พอร์ต PS/2 PPM |
| มีค่าใช้จ่าย | เลขที่ |
| ความยาวเสาอากาศ | 26 มม. (เสาอากาศคู่) |
| น้ำหนัก | 392กรัม |
| พลัง | 6V DC 1.5AA*4 |
| แสดง | จอแสดงผลแบบทรานส์เฟล็กทีฟ STN, LCD ขนาด 128x64 พิกเซล, VA ขนาด 73x39 มม., LCD พร้อมไฟแบ็คไลท์สีขาว |
| ขนาด | 174x89x190มม. |
| อัปเดตออนไลน์ | ใช่ |
| สี | สีดำ |
| ใบรับรอง | CE0678, รหัส FCC: N4ZFLYSKYI6X |
| แบบอย่าง | Model 2 (left hand throttle) |
6.2 FS-iA10B Receiver Specifications
| คุณสมบัติ | รายละเอียด |
|---|---|
| ช่องทางการ | 10 |
| ประเภทโมเดล | ปีกคงที่/เครื่องร่อน/เฮลิคอปเตอร์ |
| ช่วง RF | 2.4055-2.475กิกะเฮิร์ตซ์ |
| ช่อง RF | 140 |
| ความไวของตัวรับสัญญาณ RF | -105เดซิเบลม |
| แบนด์วิธ | 500กิโลเฮิรตซ์ |
| ระบบ 2.4GHz | เอเอฟเอชดีเอส 2เอ |
| ประเภทการมอดูเลชั่น | GFSK |
| พลัง | 4.0-6.5V ซี |
| ความยาวเสาอากาศ | 26 มม. (เสาอากาศคู่) |
| น้ำหนัก | 17.6กรัม |
| ขนาด | 50.6*34.9*14.9มม. |
| ท่าเรือไอ-บัส | ใช่ |
| พอร์ตรับข้อมูล | ใช่ |
| สี | สีดำ |
| ใบรับรอง | CE0678, FCC |
7. การบำรุงรักษา
- รักษาเครื่องส่งและเครื่องรับให้สะอาด ปราศจากฝุ่นและความชื้น ใช้ผ้าแห้งนุ่มๆ ในการทำความสะอาด
- Avoid exposing the devices to extreme temperatures, direct sunlight, or corrosive materials.
- ถอดแบตเตอรี่ออกจากเครื่องส่งสัญญาณหากไม่ได้ใช้งานเป็นเวลานาน เพื่อป้องกันการรั่วไหล
- ตรวจสอบการเชื่อมต่อทั้งหมดอย่างสม่ำเสมอเพื่อให้แน่ใจว่าแน่นสนิท
8 การแก้ไขปัญหา
| ปัญหา | สารละลาย |
|---|---|
| เครื่องส่งสัญญาณไม่สามารถเปิดได้ | Check battery installation and ensure batteries are fresh or fully charged. Verify correct polarity. |
| Receiver LED flashes rapidly, not binding. | Ensure the bind plug is correctly inserted into the B/VCC port. Confirm the transmitter is in binding mode (holding BIND KEY while powering on). Ensure the receiver is powered. |
| No control response after binding. | Verify that the receiver is receiving power and its LED is solid. Check all servo connections to the receiver. Ensure the transmitter and receiver are within range and not experiencing interference. Re-bind the system if necessary. |
| Only 6 channels are active. | Follow the "Channel Setup (Enabling 10 Channels)" instructions in Section 5.2 to activate all 10 channels. |
| ปริมาณต่ำtage warning on display. | Replace the transmitter batteries immediately. |
9. Support and Online Resources
For further assistance, firmware updates, or additional product information, please visit the official Flysky website. Online communities and forums dedicated to RC hobbies can also provide valuable support and tips.
The FS-i6X supports online updates. Refer to the official Flysky website for instructions on how to perform firmware updates using the provided upgrade cable.
Ask a question about this manual
Ask about setup, troubleshooting, compatibility, parts, safety, or missing instructions. Manuals+ will review the question and use this page’s manual context to help answer it.