1. บทนำ
This manual provides essential information for the safe and effective operation of your Thsinde 18B+ Auto Ranging Digital Multimeter. Please read this manual thoroughly before use and retain it for future reference.
1.1 ข้อมูลด้านความปลอดภัย
คำเตือน:
- ปฏิบัติตามรหัสความปลอดภัยระดับท้องถิ่นและระดับประเทศเสมอ
- อย่าใช้มัลติมิเตอร์หากพบว่าชำรุดหรือสายวัดเสียหาย
- ตรวจสอบให้แน่ใจว่าได้เลือกฟังก์ชันและช่วงที่ถูกต้องก่อนทำการวัด
- ไม่เคยสมัครฉบับที่tage to the meter when the function switch is set to current, resistance, or diode/continuity.
- ใช้ความระมัดระวังเมื่อทำงานกับ voltages สูงกว่า 30V AC RMS, 42V peak หรือ 60V DC ปริมาตรเหล่านี้tagอาจทำให้เกิดอันตรายจากการช็อตได้
- เปลี่ยนแบตเตอรี่และฟิวส์ด้วยชนิดและพิกัดที่ระบุไว้เท่านั้น
- ให้วางนิ้วไว้ด้านหลังตัวกั้นหัววัดระหว่างการวัด
2. สินค้าหมดview
The Thsinde 18B+ is an auto-ranging digital multimeter designed for measuring AC/DC voltage, AC/DC current, resistance, continuity, diode, frequency, and non-contact voltage (NCV). It features a large backlit LCD display and True RMS measurement capability.

Figure 2.1: Thsinde 18B+ Digital Multimeter and Accessories
This image displays the Thsinde 18B+ digital multimeter, its orange protective rubber sleeve, a set of red and black test leads, a pair of red and black alligator clips, and a 9V battery. The multimeter's display shows "0.000" with "TRUE RMS" and "AUTOAPO" indicators. The function dial is set to AC/DC Voltage.
2.1 ส่วนประกอบและจอแสดงผล
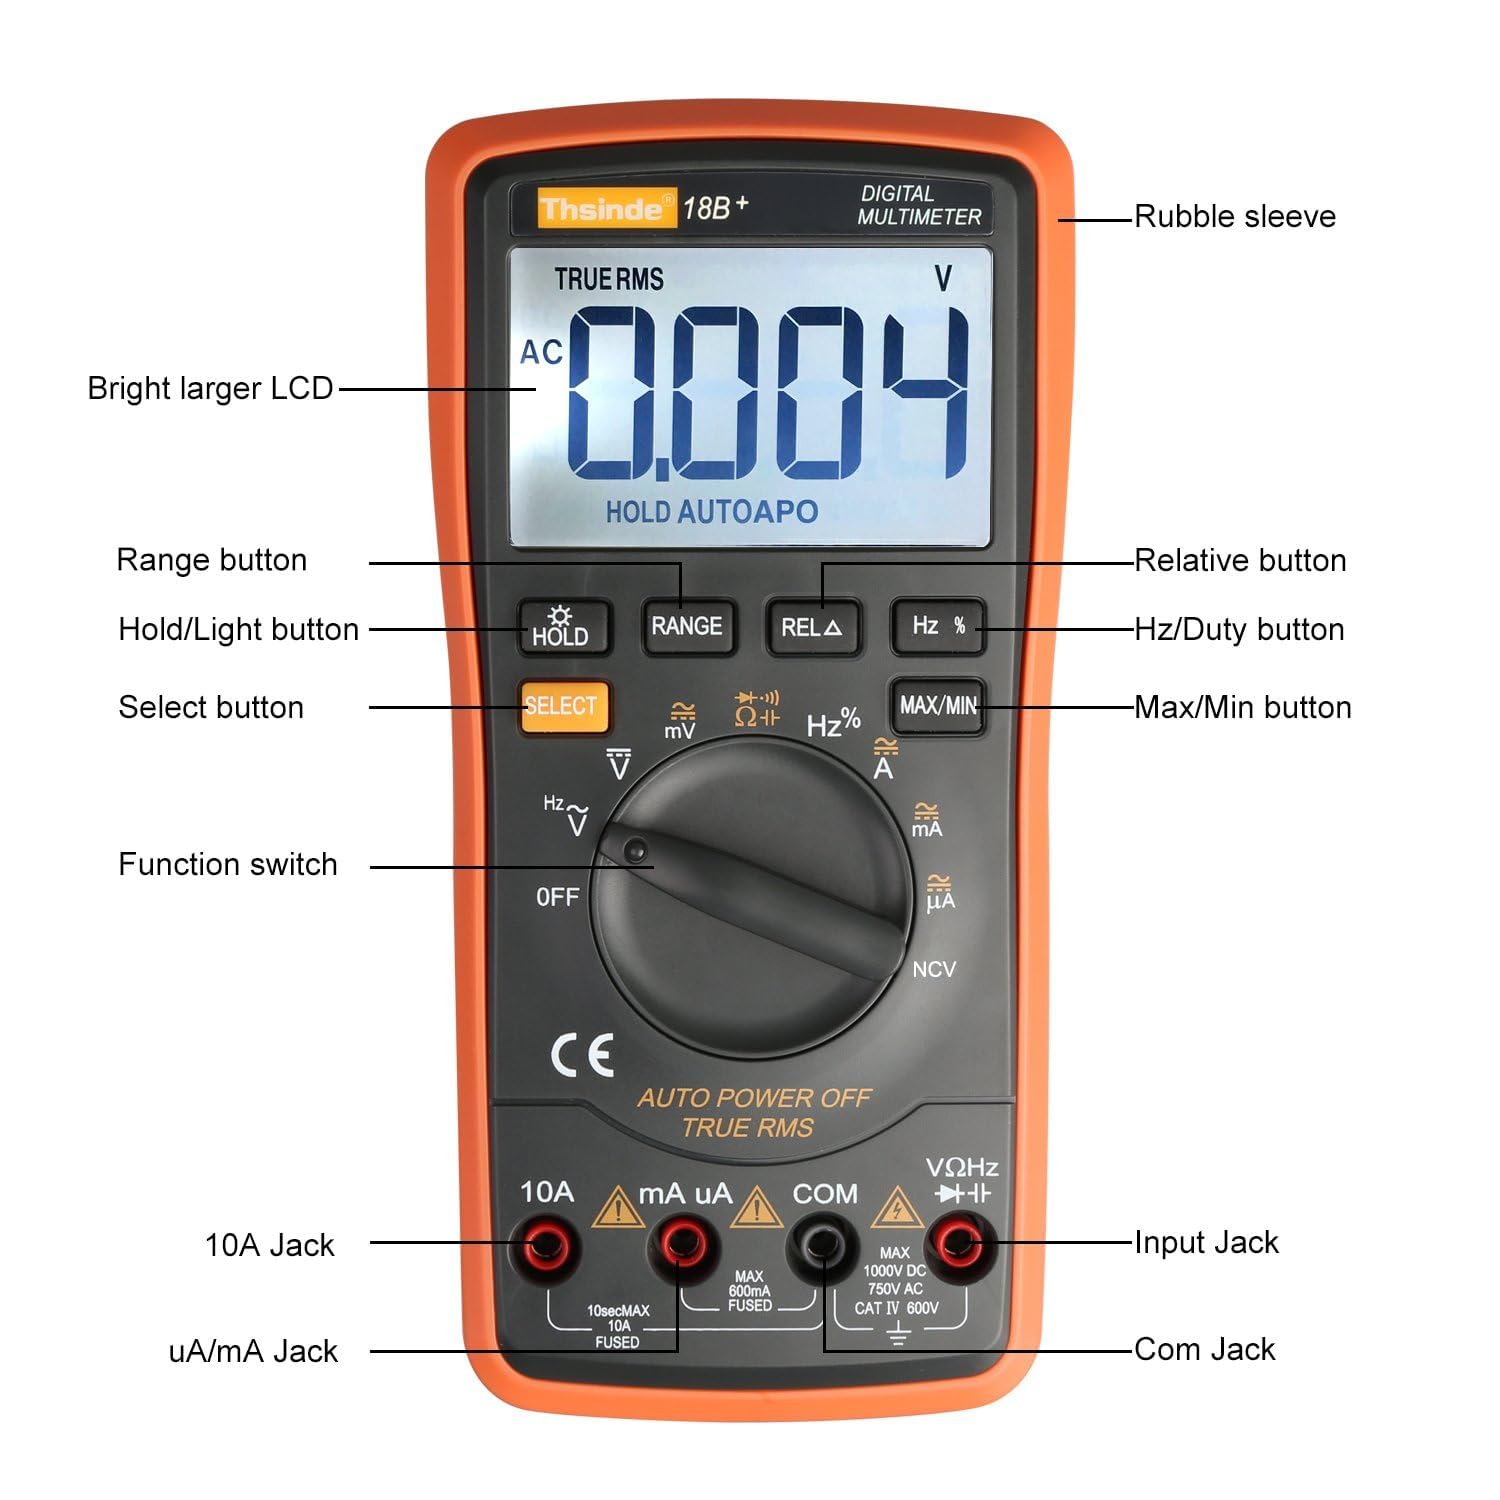
Figure 2.2: Multimeter Components Diagram
This diagram labels the key components of the Thsinde 18B+ multimeter. These include the Rubble sleeve, Bright larger LCD, Range button, Hold/Light button, Select button, Hz/Duty button, Relative button, Max/Min button, Function switch, 10A Jack, uA/mA Jack, Com Jack, and Input Jack.
- Rubble sleeve: ชั้นนอกป้องกันasing.
- Bright larger LCD: จอแสดงผลดิจิทัลสำหรับแสดงค่าต่างๆ
- ปุ่ม: HOLD/Light, RANGE, REL Δ, Hz %, MAX/MIN, SELECT.
- สวิตช์ฟังก์ชั่น: แป้นหมุนสำหรับเลือกโหมดการวัด
- แจ็คอินพุต:
- แจ็ค 10A: สำหรับการวัดกระแสไฟฟ้าสูง (สูงสุด 10A)
- uA/mA Jack: สำหรับไมโครampere และ milliampมีการวัดปัจจุบัน
- COM แจ็ค: อินพุตทั่วไป (เชิงลบ) สำหรับการวัดทั้งหมด
- VΩHz→→+ Jack: อินพุตเชิงบวกสำหรับเล่มtage, resistance, frequency, diode, and continuity measurements.

Figure 2.3: Display Feature Icons
This image highlights various functions and display indicators of the multimeter, including Diode test, Frequency, Capacitor, AC/DC voltage, AC/DC current, Beeper continuity, NCV (Non-Contact Voltage), Backlight, True RMS, Electric resistance, Max/Min value, Data hold, LCD display, Relative value, Auto Power Off (APO), and Beeper diode ON/OFF.
3. การตั้งค่า
3.1 การติดตั้งแบตเตอรี่
- ตรวจสอบให้แน่ใจว่ามัลติมิเตอร์ปิดอยู่
- ค้นหาช่องใส่แบตเตอรี่ที่ด้านหลังของเครื่อง
- คลายสกรูยึดออก แล้วถอดฝาครอบแบตเตอรี่ออก
- Connect a 9V battery (included) to the battery clips, observing correct polarity (+ and -). The positive terminal is typically on the left when viewจากด้านหลัง
- Place the battery into the compartment, ensuring it fits snugly.
- ปิดฝาครอบแบตเตอรี่และขันสกรูให้แน่น
3.2 การเชื่อมต่อสายทดสอบ
- เสียบสายทดสอบสีดำเข้าในแจ็คอินพุต "COM" (ทั่วไป)
- สำหรับการวัดส่วนใหญ่ (ปริมาตร)tage, resistance, frequency, diode, continuity), insert the red test lead into the "VΩHz→→+" input jack.
- For current measurements, insert the red test lead into the "uA/mA" jack for low currents or the "10A" jack for high currents.
4. คู่มือการใช้งาน
4.1. การดำเนินการทั่วไป
- เปิด/ปิดเครื่อง: Rotate the function switch from "OFF" to any desired measurement function to turn the meter ON. Rotate back to "OFF" to power OFF.
- การปรับระยะอัตโนมัติ: มัลติมิเตอร์จะเลือกช่วงการวัดที่เหมาะสมโดยอัตโนมัติ
- การเก็บข้อมูล (HOLD): กดปุ่ม "HOLD" เพื่อหยุดการอ่านค่าปัจจุบันบนหน้าจอ กดอีกครั้งเพื่อปล่อย
- แสงไฟด้านหลัง: Press and hold the "HOLD" button to activate the display backlight. Press and hold again to turn it off. The backlight may have an automatic timeout.
- Auto Shutoff (APO): The meter will automatically power off after approximately 15 minutes of inactivity to conserve battery. To disable APO, press and hold the "SELECT" button while turning the function switch from "OFF" to a measurement mode. "APO" will disappear from the display.

Figure 4.1: Backlit LCD Display in Low Light
This image demonstrates the multimeter's large, backlit LCD display, showing a DC voltage reading of "0.158" in a dimly lit area, highlighting its readability in various lighting conditions.
4.2 ฟังก์ชันการวัด
4.2.1 โวลต์ AC/DCtage Measurement (V~ / V↓)
- Set the function switch to V~ (AC Voltage) or V↓ (DC Voltagจ).
- Connect the red test lead to the VΩHz→→+ jack and the black test lead to the COM jack.
- แตะหัววัดทดสอบไปที่จุดวงจรที่มีแรงดันไฟฟ้าtage จะต้องถูกวัด
- หน้าจอจะแสดงปริมาณtagอีการอ่าน
4.2.2 AC/DC Current Measurement (A~ / A↓, mA~ / mA↓, µA~ / µA↓)
- Set the function switch to the appropriate current range (A, mA, or µA). Use the "SELECT" button to toggle between AC and DC current if necessary.
- Connect the red test lead to the 10A jack (for up to 10A) or the uA/mA jack (for up to 600mA). Connect the black test lead to the COM jack.
- Open the circuit where current is to be measured and connect the test probes in series with the circuit.
- จอแสดงผลจะแสดงค่าที่อ่านได้ในปัจจุบัน
- คำเตือน: ห้ามต่อมิเตอร์แบบขนานกับโวลต์มิเตอร์เด็ดขาดtage source when in current mode, as this can blow the fuse or damage the meter.
4.2.3 การวัดค่าความต้านทาน (โอห์ม)
- Set the function switch to Ω.
- Connect the red test lead to the VΩHz→→+ jack and the black test lead to the COM jack.
- ตรวจสอบให้แน่ใจว่าวงจรหรืออุปกรณ์ที่กำลังทดสอบนั้นไม่มีกระแสไฟฟ้าไหลผ่าน
- Touch the test probes across the component to measure its resistance.
- หน้าจอจะแสดงค่าความต้านทาน
4.2.4 Continuity Test (🔊)
- Set the function switch to Ω and press "SELECT" until the continuity symbol (🔊) appears.
- Connect the red test lead to the VΩHz→→+ jack and the black test lead to the COM jack.
- ตรวจสอบให้แน่ใจว่าวงจรหรืออุปกรณ์ที่กำลังทดสอบนั้นไม่มีกระแสไฟฟ้าไหลผ่าน
- แตะหัววัดทดสอบลงบนชิ้นส่วนหรือวงจร
- If resistance is below approximately 50Ω, the buzzer will sound, indicating continuity.
4.2.5 Diode Test (→→+)
- Set the function switch to Ω and press "SELECT" until the diode symbol (→→+) appears.
- Connect the red test lead to the VΩHz→→+ jack and the black test lead to the COM jack.
- ตรวจสอบให้แน่ใจว่าได้ถอดไดโอดออกจากวงจรแล้ว
- Touch the red probe to the anode and the black probe to the cathode of the diode. The display will show the forward voltagอีลดลง
- สลับขั้วโพรบ หน้าจอควรแสดง "OL" (Open Loop) สำหรับไดโอดที่ใช้งานได้ดี
4.2.6 Frequency/Duty Cycle Measurement (Hz %)
- Set the function switch to Hz %.
- Connect the red test lead to the VΩHz→→+ jack and the black test lead to the COM jack.
- Touch the test probes to the circuit where frequency or duty cycle is to be measured.
- The display will show the frequency in Hz. Press "SELECT" to toggle to duty cycle measurement (%).
4.2.7 Capacitance Measurement (⊕)
- Set the function switch to ⊕.
- Connect the red test lead to the VΩHz→→+ jack and the black test lead to the COM jack.
- ตรวจสอบให้แน่ใจว่าตัวเก็บประจุคายประจุจนหมดก่อนทำการทดสอบ
- นำหัววัดทดสอบแตะที่ขั้วของตัวเก็บประจุ
- The display will show the capacitance value in Farads (F), microfarads (µF), or nanofarads (nF).
4.2.8 ไม่สัมผัส Voltagการตรวจจับ e (NCV)
- Set the function switch to NCV.
- Move the top front part of the multimeter close to the conductor or outlet you want to test.
- ถ้า AC voltage is detected (typically above 700V RMS as per product description, but usually much lower for NCV detection in general use), the meter will beep and the NCV indicator light will illuminate.

รูปที่ 4.2: ปริมาตรแบบไม่สัมผัสtagการตรวจจับ e (NCV)
This image shows the Thsinde 18B+ multimeter being used to detect non-contact voltage near a power strip. The display shows "APO" and the NCV symbol, indicating the function is active. A wireless signal icon emanates from the meter towards the power strip, illustrating its ability to detect live AC voltagอีโดยไม่ต้องมีการสัมผัสโดยตรง
5. การบำรุงรักษา
5.1 การเปลี่ยนแบตเตอรี่
When the battery indicator appears on the display, replace the 9V battery as described in Section 3.1. Always use a fresh 9V battery.
5.2 การเปลี่ยนฟิวส์
If the current measurement functions stop working, the fuse(s) may need replacement. This meter uses HRC fuses. Refer to the specifications for correct fuse ratings.
- ตรวจสอบให้แน่ใจว่ามัลติมิเตอร์ปิดอยู่และถอดสายทดสอบออกแล้ว
- Unscrew the retaining screws on the back cover and carefully open the casing.
- Locate the blown fuse(s). There are typically two fuses: one for the mA/µA range and one for the 10A range.
- Carefully remove the old fuse(s) and replace with new fuse(s) of the identical type and rating.
- ปิด casing and secure with screws.
- คำเตือน: Never use a fuse with a different rating or bypass a fuse. This can lead to serious injury or damage to the meter.
5.3 การทำความสะอาด
เช็ดมิเตอร์ด้วยโฆษณาamp ผ้าและผงซักฟอกอ่อนๆ ห้ามใช้สารกัดกร่อนหรือตัวทำละลาย ตรวจสอบให้แน่ใจว่ามิเตอร์แห้งสนิทก่อนใช้งาน
6 การแก้ไขปัญหา
- มิเตอร์ไม่เปิด: ตรวจสอบการติดตั้งแบตเตอรี่และตรวจสอบให้แน่ใจว่าแบตเตอรี่ไม่หมด
- ไม่มีการแสดงค่าการอ่านหรือ "OL" (โอเวอร์โหลด)
- Ensure test leads are correctly inserted and making good contact.
- Verify the function switch is set to the correct measurement mode.
- The measured value may exceed the selected range (if not in auto-ranging) or the meter's maximum capability.
- สำหรับการตรวจสอบความต้านทาน/ความต่อเนื่อง ให้แน่ใจว่าวงจรไม่มีกระแสไฟฟ้าไหลผ่าน
- การวัดกระแสไฟฟ้าไม่ทำงาน: Check the appropriate fuse (mA/µA or 10A) as described in Section 5.2.
- การอ่านค่าที่ไม่ถูกต้อง:
- ตรวจสอบให้แน่ใจว่าแบตเตอรี่ไม่เหลือน้อย
- Check for proper test lead connection.
- ตรวจสอบให้แน่ใจว่าได้เลือกฟังก์ชันและช่วงที่ถูกต้องแล้ว
- Environmental factors (temperature, humidity) can affect accuracy.
- ไม่มีเสียงสัญญาณดังระหว่างการทดสอบความต่อเนื่อง: The resistance may be above the continuity threshold (typically 50Ω).
7. ข้อมูลจำเพาะ
| ฟังก์ชันการวัด | ช่วง / ความแม่นยำ |
|---|---|
| แสดง | 6000 เคานต์, True RMS |
| DC ฉบับที่tage | สูงถึง 1000V |
| ฉบับ ACtage | สูงถึง 750V |
| กระแสไฟฟ้าตรง | สูงสุด 10A |
| กระแสไฟ AC | สูงสุด 10A |
| ความต้านทาน | ใช่ |
| ความจุ | Up to 20000 µF |
| ความถี่ | ใช่ |
| การทดสอบ Diode | ใช่ |
| ความต่อเนื่อง | Yes (Buzzer) |
| NCV (Non-Contact Vol .)tage) | Yes (with alarm sound) |
| แหล่งพลังงาน | 1 x 9V แบตเตอรี่ |
| ปิดเครื่องอัตโนมัติ | Yes (approx. 15 mins, can be disabled) |
| ระดับความปลอดภัย | CAT III 1000V, CAT IV 600V (as marked on device) |
หมายเหตุ: ข้อมูลจำเพาะอาจเปลี่ยนแปลงได้โดยไม่ต้องแจ้งให้ทราบล่วงหน้า
8. การรับประกันและการสนับสนุน
The Thsinde 18B+ Digital Multimeter comes with a 1-year warranty from the date of purchase. This warranty covers manufacturing defects and material faults under normal use.
For warranty claims, technical support, or any questions regarding the product, please contact Thsinde customer service through the retailer where the product was purchased.