
1. บทนำ
This manual provides detailed instructions for the installation, operation, and maintenance of your Biostar TB85 motherboard. The Biostar TB85 is an ATX form factor motherboard designed for Intel Socket 1150 processors, supporting DDR3 memory. It features an Intel B85 chipset, offering a reliable foundation for personal computer systems.

รูปที่ 1: เกินview of the Biostar TB85 Motherboard. This image displays the full layout of the motherboard, including the CPU socket, RAM slots, PCIe slots, and various connectors.
2. การตั้งค่าและการติดตั้ง
ก่อนเริ่มการติดตั้ง โปรดตรวจสอบให้แน่ใจว่าระบบของคุณปิดอยู่และถอดปลั๊กออกจากแหล่งจ่ายไฟแล้ว จับที่ขอบของเมนบอร์ดเพื่อหลีกเลี่ยงการเกิดไฟฟ้าสถิต
2.1 การติดตั้งซีพียู
The Biostar TB85 motherboard uses an LGA 1150 socket.
- ค้นหาซ็อกเก็ต CPU บนเมนบอร์ด
- Gently push down the load lever and pull it sideways to open the socket retention frame.
- จัดตำแหน่งเครื่องหมายรูปสามเหลี่ยมบนซีพียูให้ตรงกับเครื่องหมายที่ตรงกันบนซ็อกเก็ต จากนั้นวางซีพียูลงในซ็อกเก็ตอย่างระมัดระวังโดยไม่ต้องออกแรงดัน
- ปิดกรอบยึดและล็อคให้แน่นด้วยคันโยกรับน้ำหนัก
- ทาซิลิโคนระบายความร้อนลงบนซีพียู และติดตั้งพัดลมระบายความร้อนซีพียูตามคำแนะนำของผู้ผลิต
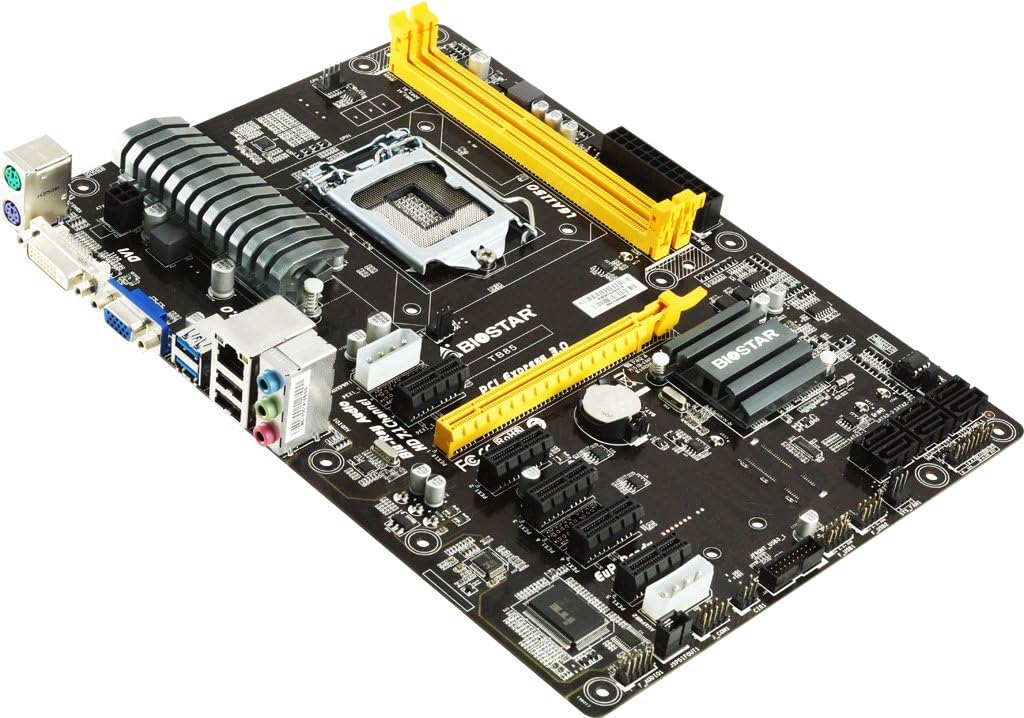
รูปที่ 2: รายละเอียด view of the LGA 1150 CPU socket and the two yellow DDR3 RAM slots on the Biostar TB85 motherboard.
2.2 การติดตั้ง RAM
The motherboard supports DDR3 RAM modules. It has two DIMM slots, supporting up to 16 GB total memory.
- เปิดคลิปที่ปลายทั้งสองด้านของช่อง DIMM
- จัดตำแหน่งรอยบากบนโมดูลหน่วยความจำ DDR3 ให้ตรงกับคีย์ในช่อง DIMM
- ใส่โมดูลหน่วยความจำให้แน่นเข้าไปในช่องจนกระทั่งคลิปล็อคเข้าที่
2.3 Storage Device Installation (SATA)
The Biostar TB85 includes SATA 3 ports for connecting storage devices such as HDDs and SSDs. While the specifications list 1 total SATA port, the motherboard visually features multiple SATA 3 ports for connectivity.
- เชื่อมต่อปลายด้านหนึ่งของสายเคเบิลข้อมูล SATA เข้ากับพอร์ต SATA บนเมนบอร์ด
- เชื่อมต่อปลายอีกด้านของสายเคเบิลข้อมูล SATA เข้ากับอุปกรณ์จัดเก็บข้อมูลของคุณ
- เชื่อมต่อสายไฟ SATA จากหน่วยจ่ายไฟ (PSU) เข้ากับอุปกรณ์จัดเก็บข้อมูล
2.4 การติดตั้งการ์ดขยาย (PCIe)
The motherboard features multiple PCIe slots for expansion cards like graphics cards, network cards, or sound cards. It has 4 total PCIe ports.
- เลือกช่อง PCIe ที่เหมาะสมสำหรับการ์ดขยายของคุณ
- ถอดฝาครอบตัวยึดโลหะที่ตรงกันออกจากเคสพีซีของคุณ
- Align the expansion card with the slot and press it down firmly until it is fully seated.
- ยึดการ์ดเข้ากับเคสคอมพิวเตอร์ด้วยสกรู
2.5 การต่อสายไฟ
Connect the main 24-pin ATX power connector and the 8-pin (or 4-pin) CPU power connector from your PSU to the corresponding sockets on the motherboard. Ensure all power cables are securely connected.
2.6 การเชื่อมต่อแผงด้านหน้าและด้านหลัง
Connect your PC case's front panel connectors (power button, reset button, USB ports, audio jacks, indicator LEDs) to the appropriate headers on the motherboard. Refer to the motherboard's silkscreen labels for correct pin assignments.
The rear I/O panel includes ports for peripherals:
- PS/2 ports for keyboard/mouse
- VGA and DVI display outputs
- USB 3.0 and USB 2.0 ports (The specifications list 2 total USB ports, but the rear I/O panel typically offers more)
- พอร์ต LAN
- Audio jacks (HD 7.1 Channel Blu-Ray Audio)
3. คู่มือการใช้งาน
3.1 การบูตเริ่มต้นและการตั้งค่า BIOS
After assembling your system, connect a monitor, keyboard, and mouse. Power on the system. During startup, press the designated key (usually เดล or F2) เพื่อเข้าสู่ยูทิลิตี้การตั้งค่า BIOS/UEFI
- ตรวจสอบข้อมูลระบบ: Verify that the CPU, RAM, and storage devices are correctly detected.
- ตั้งค่าลำดับการบูต: Configure the boot order to prioritize your operating system installation media (USB drive or optical drive).
- บันทึกและออก: บันทึกการเปลี่ยนแปลงและออกจาก BIOS ระบบจะรีสตาร์ท
3.2 การติดตั้งระบบปฏิบัติการและไดรเวอร์
Install your preferred operating system (e.g., Windows, Linux) by following its installation prompts. After the OS is installed, install the necessary drivers for the motherboard components.
- ไดรเวอร์ชิปเซ็ต: ติดตั้งไดรเวอร์ชิปเซ็ต Intel B85
- ไดร์เวอร์กราฟิก: Install drivers for integrated graphics (if used) or your dedicated graphics card.
- ไดรเวอร์เสียง: Install HD Audio drivers for 7.1 channel support.
- ไดรเวอร์ LAN: ติดตั้งไดรเวอร์เครือข่ายเพื่อเชื่อมต่ออินเทอร์เน็ต
- USB 3.0 Drivers: Ensure USB 3.0 functionality.
Drivers can typically be found on the Biostar official website or on the driver CD included with the motherboard (if applicable).
4. การบำรุงรักษา
การบำรุงรักษาตามปกติจะช่วยให้เมนบอร์ดและระบบของคุณมีอายุการใช้งานยาวนานและทำงานได้เสถียร
- การกำจัดฝุ่น: Periodically clean dust from the motherboard, CPU cooler, and case fans using compressed air. Ensure the system is powered off and unplugged.
- อัปเดต BIOS: ตรวจสอบไบโอสตาร์ website for BIOS updates. BIOS updates can improve compatibility, stability, and performance. Follow Biostar's specific instructions for BIOS flashing carefully to avoid system damage.
- การอัปเดตไดรเวอร์: อัปเดตไดรเวอร์ของคุณอยู่เสมอเพื่อให้มั่นใจถึงประสิทธิภาพที่เหมาะสมและความเข้ากันได้กับซอฟต์แวร์และฮาร์ดแวร์ใหม่
- การตรวจสอบส่วนประกอบ: ตรวจสอบให้แน่ใจว่าสายเคเบิลทั้งหมดเชื่อมต่อแน่นหนาและไม่มีชิ้นส่วนใดหลวม
5 การแก้ไขปัญหา
หากพบปัญหา โปรดดูขั้นตอนการแก้ไขปัญหาทั่วไปต่อไปนี้
- ไม่มีไฟฟ้า:
- Ensure the PSU is switched on and all power cables (24-pin ATX, 8-pin CPU) are firmly connected to the motherboard and PSU.
- ตรวจสอบการเชื่อมต่อของสวิตช์เปิดปิดแผงด้านหน้ากับเมนบอร์ด
- ไม่มีจอแสดงผล:
- Verify that the monitor is connected to the correct display output (VGA/DVI on motherboard or dedicated graphics card).
- ลองถอดและเสียบโมดูล RAM ใหม่ ลองบูตเครื่องโดยเสียบ RAM เพียงโมดูลเดียวดู
- ถอดและเสียบการ์ดจอใหม่ (ถ้ามี)
- ความไม่เสถียรของระบบ/การขัดข้อง:
- ตรวจสอบอุณหภูมิ CPU และ GPU ให้แน่ใจว่ามีการระบายความร้อนที่เพียงพอ
- เรียกใช้เครื่องมือวินิจฉัยหน่วยความจำเพื่อตรวจหา RAM ที่ผิดพลาด
- ตรวจสอบให้แน่ใจว่าได้ติดตั้งไดรเวอร์ทั้งหมดอย่างถูกต้องและเป็นเวอร์ชันล่าสุดแล้ว
- ไม่ตรวจพบอุปกรณ์ต่อพ่วง:
- ลองเสียบอุปกรณ์ต่อพ่วงเข้ากับพอร์ตอื่นดู
- ตรวจสอบให้แน่ใจว่าได้ติดตั้งไดรเวอร์ของอุปกรณ์ต่อพ่วงแล้ว
- ตรวจสอบการตั้งค่า BIOS เพื่อเปิดใช้งานพอร์ต
For more advanced troubleshooting or persistent issues, contact Biostar technical support.
6. ข้อมูลจำเพาะ
Below are the key technical specifications for the Biostar TB85 motherboard.
| คุณสมบัติ | ข้อมูลจำเพาะ |
|---|---|
| ยี่ห้อ | ไบโอสตาร์ |
| ชื่อรุ่น | ทีบี85 |
| ซ็อคเก็ตซีพียู | แอลจีเอ 1150 |
| โปรเซสเซอร์ที่เข้ากันได้ | Intel Core i3-4xxx, i5-4xxx, i7-4xxx, i3-5xxx, i5-5xxx, i7-5xxx |
| ประเภทชิปเซ็ต | อินเทล B85 |
| เทคโนโลยีหน่วยความจำ RAM | DDR3 |
| ความจุหน่วยความจำ (สูงสุด) | 16GB |
| ประเภทขั้วต่อสายไฟหลัก | 24 พิน |
| อินเทอร์เฟซการ์ดกราฟิก | Integrated (VGA, DVI outputs) |
| พอร์ต SATA ทั้งหมด | 1 (SATA 3 supported) |
| พอร์ต USB รวม | 2 (as per spec, typically more via headers) |
| Total PCIe Ports | 4 |
| เสียง | HD 7.1 Channel Blu-Ray Audio |
| ฟอร์มแฟกเตอร์ | เอทีเอ็กซ์ |
| น้ำหนักสินค้า | 2.05 ปอนด์ |
7. ข้อมูลการรับประกัน
Biostar motherboards typically come with a manufacturer's limited warranty. The duration and terms of the warranty may vary by region and retailer.
- ระยะเวลารับประกัน: Refer to your purchase documentation or the official Biostar website for specific warranty periods applicable to your region.
- หลักฐานการซื้อ: Always retain your proof of purchase (invoice or receipt) as it is required for warranty claims.
- ข้อยกเว้นการรับประกัน: The warranty generally does not cover damage caused by improper installation, misuse, unauthorized modifications, accidents, or natural disasters.
For detailed warranty terms and conditions, please visit the official Biostar support webเว็บไซต์.
8. การสนับสนุน
For technical assistance, driver downloads, BIOS updates, or further information regarding your Biostar TB85 motherboard, please utilize the following resources:
- Official Biostar Webเว็บไซต์: www.biostar.com.tw (Check for support section, drivers, and FAQs)
- หน้าการสนับสนุนผลิตภัณฑ์: Look for a dedicated support page for the TB85 model on the Biostar webเว็บไซต์.
- ติดต่อฝ่ายสนับสนุน: Information for contacting Biostar technical support via email or phone can usually be found on their webเว็บไซต์.
When contacting support, have your motherboard model (TB85) and a detailed description of your issue ready.


