1. บทนำ
This manual provides comprehensive instructions for the installation, operation, and maintenance of your ASUS Prime Z270M-PLUS motherboard. Please read this manual thoroughly before installing or using the product to ensure correct setup and optimal performance.
2. ข้อมูลด้านความปลอดภัย
โปรดปฏิบัติตามข้อควรระวังด้านความปลอดภัยต่อไปนี้เพื่อป้องกันความเสียหายต่อเมนบอร์ดและการบาดเจ็บต่อตัวคุณเอง:
- ควรถอดสายไฟออกจากเต้ารับที่ผนังทุกครั้งก่อนสัมผัสชิ้นส่วนใดๆ
- ควรสวมสายรัดข้อมือป้องกันไฟฟ้าสถิต หรือสัมผัสวัตถุที่มีการต่อลงดินบ่อยๆ เพื่อระบายไฟฟ้าสถิตก่อนจับต้องชิ้นส่วนต่างๆ
- จับส่วนประกอบต่างๆ โดยจับที่ขอบเพื่อหลีกเลี่ยงการสัมผัสส่วนที่บอบบาง
- ตรวจสอบให้แน่ใจว่ามีการระบายอากาศที่เหมาะสมภายในเคสพีซีของคุณเพื่อป้องกันความร้อนสูงเกินไป
- เก็บเมนบอร์ดให้ห่างจากความชื้นและอุณหภูมิที่สูงหรือต่ำเกินไป
3. เนื้อหาบรรจุภัณฑ์
ตรวจสอบว่ามีรายการทั้งหมดอยู่ในแพ็คเกจของคุณ:
- ASUS Prime Z270M-PLUS Motherboard
- สาย SATA
- คู่มือการใช้งาน
4. สินค้าหมดview
The ASUS Prime Z270M-PLUS is a micro-ATX motherboard designed for Intel LGA 1151 socket processors. It features robust hardware safeguards, advanced cooling controls, and high-speed connectivity options.
คุณสมบัติหลัก:
- 5X Protection III: Hardware-level safeguards to ensure component longevity and reliability against electrical overloads.
- การส่องสว่างด้วยไฟ LED: Customizable lighting control for PCIe slots.
- Fan Xpert 4 Core: Advanced fan controls for optimized cooling and reduced noise.
- Dual Native M.2 and NVMe PCIe RAID Support: Provides high-speed storage solutions.
- USB Type-C: Convenient and reversible connectivity.
- รองรับ DDR4: Supports memory speeds up to 3866 MHz.
- เสียง: Realtek ALC887 8-channel high-definition audio.
- รองรับ Multi-GPU: Features AMD CrossFireX Technology.

รูปที่ 4.1: จากบนลงล่าง view of the ASUS Prime Z270M-PLUS motherboard, highlighting the CPU socket, RAM slots, and PCIe slots.

รูปที่ 4.2: มุม view of the ASUS Prime Z270M-PLUS motherboard, showcasing its various components and heatsinks.
5. การตั้งค่า
5.1. การติดตั้งซีพียู
- ค้นหาซ็อกเก็ต LGA 1151 บนเมนบอร์ด
- เปิดคันโยกซ็อกเก็ต CPU และยกแผ่นโหลดขึ้น
- Carefully align the CPU with the socket, ensuring the gold triangle on the CPU matches the triangle on the socket.
- วาง CPU ลงในซ็อกเก็ตอย่างเบามือโดยไม่ต้องออกแรง
- ปิดแผ่นรับน้ำหนักและกดคันโยกลงจนล็อคเข้าที่
5.2. การติดตั้งหน่วยความจำ (RAM)
The motherboard supports DDR4 memory up to 64GB with speeds up to 3866 MHz.
- เปิดคลิปที่ปลายทั้งสองด้านของช่อง DIMM
- จัดตำแหน่งรอยบากบนโมดูลหน่วยความจำ DDR4 ให้ตรงกับคีย์ในช่อง DIMM
- ใส่โมดูลหน่วยความจำให้แน่นเข้าไปในช่องจนกระทั่งคลิปล็อคเข้าที่
5.3. การติดตั้งอุปกรณ์จัดเก็บข้อมูล
The motherboard supports SATA III devices and NVMe PCIe M.2 drives.
- อุปกรณ์ SATA: Connect SATA data cables from your storage drives (HDDs/SSDs) to the SATA III ports on the motherboard. Connect power cables from your power supply to the drives.
- อุปกรณ์ M.2: Locate the M.2 slot. Insert the M.2 drive at an angle and secure it with the provided screw.
5.4. การติดตั้งการ์ดขยาย
The motherboard features PCIe 3.0 slots for graphics cards and other expansion cards.
- Align the expansion card with the appropriate PCIe slot.
- กดลงไปให้แน่นจนกระทั่งการ์ดเข้าที่อย่างถูกต้องและคลิปล็อกล็อคสนิท
- ยึดการ์ดเข้ากับเคสคอมพิวเตอร์ด้วยสกรู
5.5. การต่อสายไฟ
เชื่อมต่อขั้วต่อไฟ ATX 24 พิน และขั้วต่อไฟ ATX 12V 8 พิน จากแหล่งจ่ายไฟของคุณเข้ากับพอร์ตที่ตรงกันบนเมนบอร์ด
5.6. การเชื่อมต่อแผงด้านหน้า
Connect the cables from your PC case's front panel (USB ports, audio jacks, power button, reset button, LED indicators) to the corresponding headers on the motherboard. Refer to the motherboard diagram in your physical manual for exact header locations.
5.7. แผง I/O ด้านหลัง
แผง I/O ด้านหลังมีพอร์ตต่างๆ สำหรับเชื่อมต่ออุปกรณ์ภายนอก
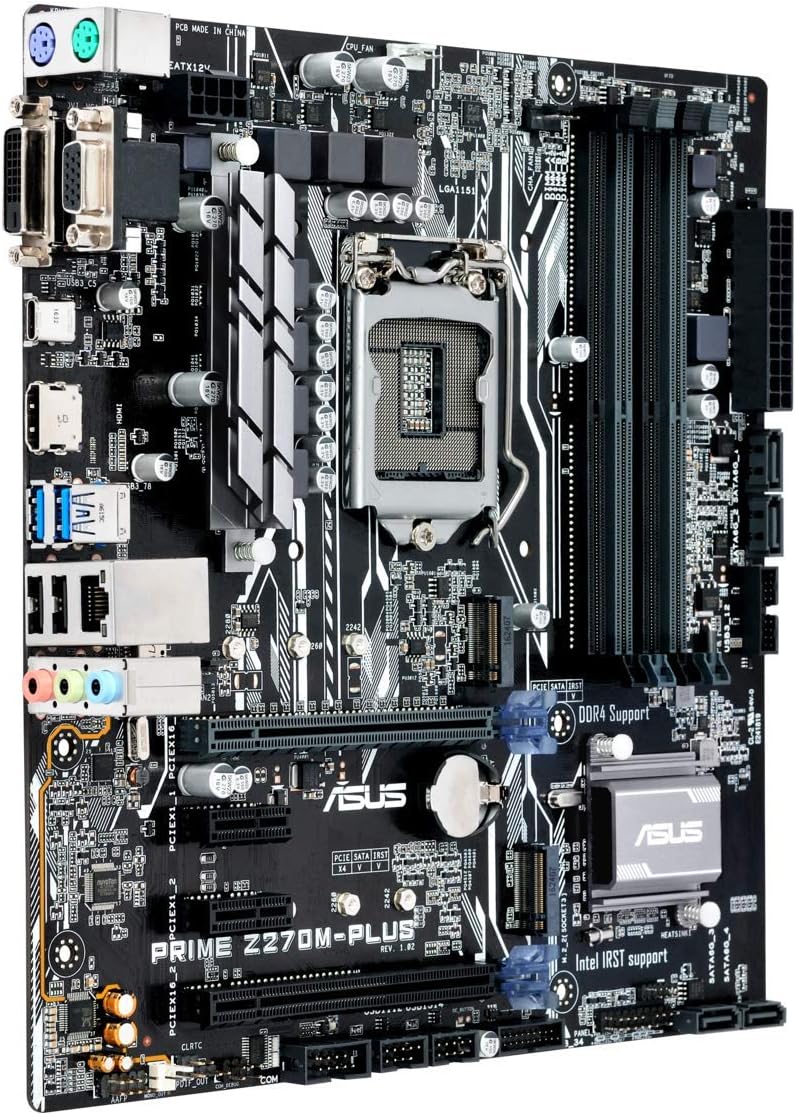
Figure 5.1: Rear I/O panel of the ASUS Prime Z270M-PLUS motherboard, showing various connectivity ports.
Common ports include:
- PS/2 Keyboard/Mouse Combo Port
- พอร์ต DVI-D
- พอร์ต VGA
- พอร์ต HDMI
- พอร์ต USB 3.0
- พอร์ต USB 2.0
- LAN (RJ-45) Port
- ช่องเสียบสัญญาณเสียง (Line In, Line Out, Microphone)
6. ปฏิบัติการ
6.1 การบูตเริ่มต้นและการตั้งค่า BIOS/UEFI
Upon the first power-on, the system will typically enter the BIOS/UEFI setup utility. Here you can configure system settings, boot order, and monitor hardware status. Press the เดล key during startup to enter the BIOS/UEFI.
6.2. การติดตั้งไดร์เวอร์
After installing your operating system, install the necessary drivers for the motherboard components (chipset, audio, LAN, graphics, etc.). These drivers are typically provided on a support DVD or can be downloaded from the ASUS official webเว็บไซต์.
6.3. System Boot
Once the operating system and drivers are installed, your system should boot normally. Ensure all peripherals are connected correctly.
7. การบำรุงรักษา
7.1. การทำความสะอาด
ทำความสะอาดเคสคอมพิวเตอร์และเมนบอร์ดเป็นประจำเพื่อป้องกันฝุ่นสะสม ซึ่งอาจทำให้เครื่องร้อนเกินไปและชิ้นส่วนเสียหายได้ ใช้ลมเป่าเพื่อกำจัดฝุ่นจากพัดลม ฮีทซิงค์ และชิ้นส่วนอื่นๆ ตรวจสอบให้แน่ใจว่าได้ปิดเครื่องและถอดปลั๊กออกก่อนทำความสะอาด
7.2. การอัปเดต BIOS
ตรวจสอบการสนับสนุน ASUS เป็นระยะ webเว็บไซต์สำหรับการอัปเดต BIOS การอัปเดต BIOS สามารถปรับปรุงเสถียรภาพของระบบ เพิ่มการรองรับฮาร์ดแวร์ใหม่ หรือแก้ไขข้อบกพร่อง โปรดปฏิบัติตามคำแนะนำของ ASUS อย่างระมัดระวังเมื่อดำเนินการอัปเดต BIOS เพื่อหลีกเลี่ยงความเสียหายของระบบ
8 การแก้ไขปัญหา
If you encounter issues with your motherboard, consider the following general troubleshooting steps:
- ไม่มีไฟฟ้า: Ensure all power cables (24-pin ATX, 8-pin CPU) are securely connected. Check your power supply unit (PSU) for functionality.
- ไม่มีจอแสดงผล: Verify that your graphics card is properly seated and connected to the monitor. If using integrated graphics, ensure your monitor is connected to the motherboard's video output. Try reseating RAM modules.
- ความไม่เสถียรของระบบ/การขัดข้อง: Check for overheating. Ensure all drivers are up to date. Test memory modules individually.
- ไม่พบส่วนประกอบ: ตรวจสอบให้แน่ใจว่าได้ติดตั้งส่วนประกอบ (เช่น ฮาร์ดไดรฟ์ การ์ดขยาย) อย่างถูกต้องและเชื่อมต่อสายเคเบิลที่จำเป็นทั้งหมดแล้ว ตรวจสอบการตั้งค่า BIOS เพื่อให้แน่ใจว่าส่วนประกอบนั้นเปิดใช้งานอยู่
- รีเซ็ต BIOS: If system settings become unmanageable, you can clear the CMOS by removing the CMOS battery for a few minutes or using the Clear CMOS jumper (refer to your physical manual for location).
9. ข้อมูลจำเพาะ
| คุณสมบัติ | ข้อมูลจำเพาะ |
|---|---|
| ชื่อรุ่น | Prime Z270M-PLUS |
| ซ็อคเก็ตซีพียู | แอลจีเอ 1151 |
| โปรเซสเซอร์ที่เข้ากันได้ | Celeron, Core i3, Core i5, Core i7, Pentium (14nm CPUs) |
| ชิปเซ็ต | อินเทล Z270 |
| เทคโนโลยีหน่วยความจำ | DDR4 |
| ความจุหน่วยความจำสูงสุด | 64GB |
| ความเร็วสัญญาณนาฬิกาหน่วยความจำ | สูงสุดถึง 3866 เมกะเฮิรตซ์ |
| อินเทอร์เฟซการจัดเก็บข้อมูล | SATA III, Dual Native M.2 (NVMe PCIe support) |
| ช่องเสียบขยาย | PCIe3.0 พีซีไอXNUMX |
| พอร์ต USB | USB 3.0, USB 2.0, USB Type-C |
| เอาท์พุตวิดีโอ | HDMI, DVI-D, VGA (via integrated graphics) |
| เสียง | Realtek ALC887 เสียงความละเอียดสูง 8 แชนเนล |
| แลน | 1x กิกะบิตอีเทอร์เน็ต |
| ฟอร์มแฟกเตอร์ | mATX (23 x 20 x 2 cm) |
| น้ำหนัก | 900 กรัม |
| หมายเลขรุ่นของผู้ผลิต | B990M80 |
10. ข้อมูลการรับประกัน
The product warranty for the ASUS Prime Z270M-PLUS motherboard is not applicable as per the provided product information. Please refer to your point of purchase or local ASUS support for specific warranty terms and conditions that may apply in your region.
11. การสนับสนุน
หากต้องการความช่วยเหลือเพิ่มเติม การสนับสนุนทางเทคนิค หรือการดาวน์โหลดไดรเวอร์ โปรดไปที่เว็บไซต์สนับสนุนอย่างเป็นทางการของ ASUS webไซต์ คุณยังสามารถค้นหาแหล่งข้อมูลเพิ่มเติมและคำถามที่พบบ่อยได้ที่นั่น
ASUS Official Webเว็บไซต์: เว็บไซต์ www.asus.com
ร้านค้าแบรนด์ ASUS: ASUS Spain Store on Amazon