
การแนะนำ
This manual provides detailed instructions for the installation, configuration, and maintenance of your Biostar TB85 Motherboard. The Biostar TB85 is designed to support Intel LGA 1150 processors and DDR3 memory, offering a stable and efficient platform for various computing needs. Please read this manual thoroughly before proceeding with installation to ensure proper setup and operation.
การตั้งค่า
Proper installation is crucial for the stable operation of your motherboard. Follow these steps carefully.
1. เค้าโครงเมนบอร์ด
ทำความคุ้นเคยกับส่วนประกอบและขั้วต่อต่างๆ บนเมนบอร์ด

Figure 1: Biostar TB85 Motherboard Overview. This image displays the top-down view of the motherboard, highlighting the LGA 1150 CPU socket, four DDR3 RAM slots, multiple PCI Express slots, SATA ports, and various headers for front panel connections and USB ports.
2. การติดตั้ง CPU (LGA 1150)
- ค้นหาซ็อกเก็ต CPU LGA 1150 บนเมนบอร์ด
- ค่อยๆ กดคันโยกโหลดลงแล้วดึงไปด้านข้างเพื่อเปิดฝาซ็อกเก็ต CPU
- วางซีพียูให้ตรงกับซ็อกเก็ตอย่างระมัดระวัง ตรวจสอบให้แน่ใจว่าสามเหลี่ยมสีทองบนซีพียูตรงกับสามเหลี่ยมบนซ็อกเก็ต อย่าฝืนดันซีพียูเข้าไปในซ็อกเก็ต
- วางซีพียูลงในซ็อกเก็ต
- ปิดฝาครอบซ็อกเก็ตและดันคันโยกโหลดกลับไปที่ตำแหน่งล็อค
- ทาซิลิโคนระบายความร้อนลงบนซีพียู และติดตั้งพัดลมระบายความร้อนซีพียูตามคำแนะนำของผู้ผลิต
3. การติดตั้ง RAM (DDR3)
- Locate the DDR3 memory slots. The Biostar TB85 has four DDR3 DIMM slots.
- เปิดคลิปที่ปลายทั้งสองด้านของช่องใส่หน่วยความจำ
- จัดตำแหน่งโมดูลหน่วยความจำให้ตรงกับช่อง โดยให้แน่ใจว่ารอยบากบนโมดูลตรงกับกุญแจในช่อง
- กดปลายทั้งสองข้างของโมดูลหน่วยความจำให้แน่นจนกระทั่งคลิปล็อคเข้าที่
4. การติดตั้งเมนบอร์ด
- Install standoffs in your PC case that align with the screw holes on the ATX motherboard.
- วางเมนบอร์ดลงในเคสอย่างระมัดระวัง โดยจัดตำแหน่งรูสกรูให้ตรงกับตัวรองรับ
- ยึดเมนบอร์ดด้วยสกรู อย่าขันแน่นเกินไป
5. การเชื่อมต่อแหล่งจ่ายไฟ
- เชื่อมต่อขั้วต่อไฟ ATX 24 พินจากแหล่งจ่ายไฟของคุณเข้ากับพอร์ตที่สอดคล้องกันบนเมนบอร์ด
- เชื่อมต่อขั้วต่อไฟเลี้ยง CPU ATX 12V แบบ 8 พิน (หรือ 4 พิน) เข้ากับพอร์ตที่อยู่ใกล้กับซ็อกเก็ต CPU
6. Storage and Peripherals
- Connect SATA data cables from your storage devices (HDDs, SSDs) to the SATA 3 ports on the motherboard.
- Connect the front panel connectors (power button, reset button, HDD LED, power LED) to the appropriate headers on the motherboard. Refer to the motherboard diagram for exact pinouts.
- Connect USB 2.0 and USB 3.0 front panel headers if your case supports them.
- Install any PCI Express expansion cards (e.g., graphics card) into the available slots and secure them.
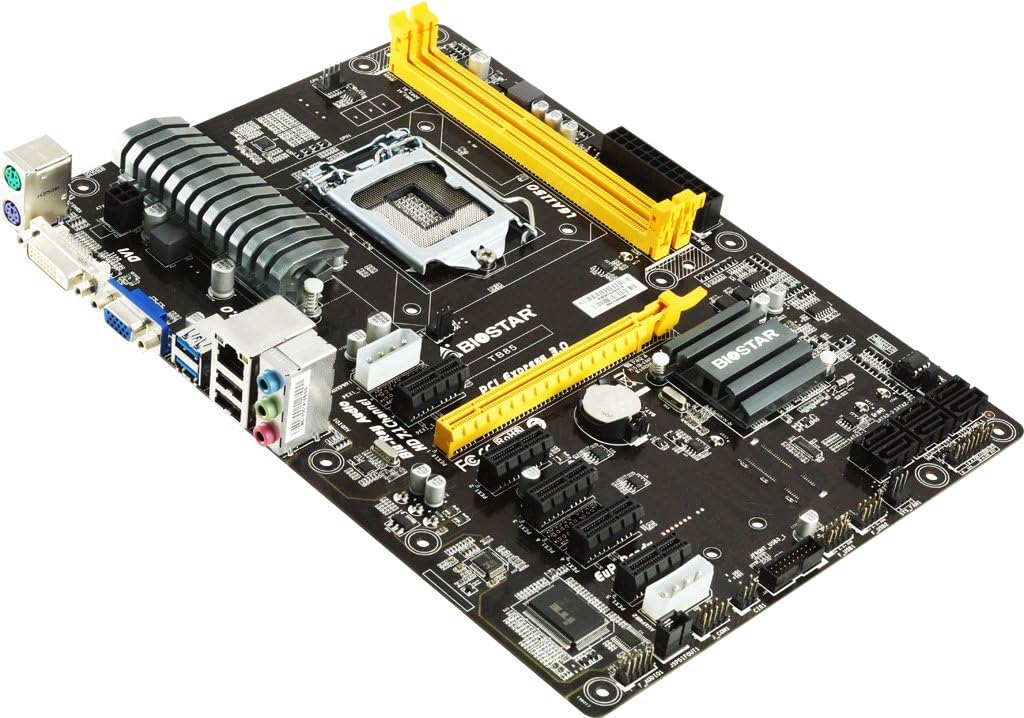
Figure 2: Biostar TB85 Motherboard Angled View. This image provides an angled perspective of the motherboard, showcasing the rear I/O panel with USB, audio, and video ports, as well as the CPU socket and the arrangement of PCI Express slots.
การดำเนินงาน
Once all components are installed, you can proceed with initial power-on and operating system setup.
1. การบูตครั้งแรก
- ตรวจสอบให้แน่ใจว่าการเชื่อมต่อทั้งหมดมีความปลอดภัย
- เชื่อมต่อจอภาพ คีย์บอร์ด และเมาส์ของคุณ
- เปิดระบบของคุณ ระบบควรทำการทดสอบตัวเองเมื่อเปิดเครื่อง (POST)
- If the system boots successfully, you will see the BIOS/UEFI splash screen or a prompt to enter setup.
2. การตั้งค่า BIOS/UEFI
ในการเข้าใช้งานยูทิลิตี้การตั้งค่า BIOS/UEFI ให้กดปุ่ม เดล key during the POST process. In the BIOS/UEFI, you can configure various system settings, including boot order, CPU settings, memory timings, and peripheral options.
3. การติดตั้งระบบปฏิบัติการ
Insert your operating system installation media (USB drive or DVD) and set the boot order in the BIOS/UEFI to prioritize the installation media. Follow the on-screen prompts to install your preferred operating system (e.g., Windows 7, Windows 8).
การซ่อมบำรุง
การบำรุงรักษาตามปกติจะช่วยให้เมนบอร์ดของคุณมีอายุการใช้งานยาวนานและมีประสิทธิภาพเหมาะสมที่สุด
1. การทำความสะอาด
- ทำความสะอาดฝุ่นออกจากเมนบอร์ดและส่วนประกอบต่างๆ เป็นระยะโดยใช้ลมอัด ตรวจสอบให้แน่ใจว่าได้ปิดเครื่องและถอดปลั๊กออกก่อนทำความสะอาด
- หลีกเลี่ยงการใช้น้ำยาทำความสะอาดโดยตรงกับส่วนประกอบต่างๆ
2. การอัปเดต BIOS
Check the Biostar official website for the latest BIOS updates. BIOS updates can improve system stability, add support for new hardware, or fix known issues. Follow the update instructions provided by Biostar carefully to avoid damaging the motherboard.
3 การตรวจสอบส่วนประกอบ
Occasionally inspect cables and connections to ensure they are secure. Check for any signs of physical damage or overheating on components.
การแก้ไขปัญหา
หัวข้อนี้ให้แนวทางแก้ไขปัญหาทั่วไปที่คุณอาจพบเจอ
1. ไม่มีพลังงาน / ไม่สามารถบูตได้
- Verify that the power supply is connected correctly to the motherboard (24-pin ATX and 8-pin/4-pin CPU power).
- Ensure the power button cable from the case is correctly connected to the motherboard's front panel header.
- ทดสอบแหล่งจ่ายไฟด้วยระบบอื่นหรือเครื่องทดสอบแหล่งจ่ายไฟ
2. ไม่มีการแสดงผล
- Ensure the monitor is connected to the correct video output (either integrated graphics or a dedicated graphics card).
- ติดตั้งการ์ดจอและโมดูลหน่วยความจำใหม่
- ลองบูตเครื่องโดยติดตั้งแรมเพียงแท่งเดียวดู
3. System Beep Codes
If your system emits a series of beeps during startup, these are POST (Power-On Self-Test) error codes. Consult the Biostar website or a general BIOS beep code reference for the specific meaning of the sequence. Common issues indicated by beep codes include memory errors, graphics card issues, or CPU problems.
4. การล้าง CMOS
If you encounter boot issues or incorrect BIOS settings, you can clear the CMOS (Complementary Metal-Oxide-Semiconductor) to reset BIOS settings to default. To do this:
- Power off the system and unplug the power cord.
- Locate the CLR_CMOS jumper on the motherboard (refer to the motherboard diagram).
- Move the jumper from pins 1-2 to 2-3 for 5-10 seconds, then move it back to 1-2.
- Alternatively, remove the CMOS battery for 1-2 minutes and then reinsert it.
- Reconnect the power cord and power on the system.
ข้อมูลจำเพาะ
Key technical specifications for the Biostar TB85 Motherboard:
| คุณสมบัติ | ข้อมูลจำเพาะ |
|---|---|
| ยี่ห้อ | ไบโอสตาร์ |
| หมายเลขรุ่น | ทีบี85 |
| ซ็อคเก็ตซีพียู | แอลจีเอ 1150 |
| โปรเซสเซอร์ที่เข้ากันได้ | Intel Core i7, i5, i3, Pentium (LGA 1150) |
| ประเภทชิปเซ็ต | อินเทล B85 |
| เทคโนโลยีหน่วยความจำ RAM | DDR3 |
| ความเร็วสัญญาณนาฬิกาหน่วยความจำ | 1600 เมกะเฮิรตซ์ / 1333 เมกะเฮิรตซ์ / 1066 เมกะเฮิรตซ์ |
| มีช่องหน่วยความจำให้เลือก | 4 |
| อินเทอร์เฟซการ์ดกราฟิก | พีซีไอ เอ็กซ์เพรส |
| รองรับมาตรฐานบัสระบบ | SATA3 ขึ้นไป |
| พอร์ต USB รวม | 6 (including USB 2.0) |
| แพลตฟอร์ม | 7 ของ Windows, Windows 8 |
การรับประกันและการสนับสนุน
For warranty information and technical support, please refer to the official Biostar website or contact your local dealer. Keep your proof of purchase for warranty claims. The Biostar website typically provides drivers, BIOS updates, and additional support resources.
Official Biostar Webเว็บไซต์: www.biostar.com.tw